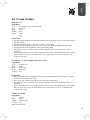
WMF Eismaschine 3in1 Owner's manual
- Category
- Blenders
- Type
- Owner's manual
This manual is also suitable for
Page is loading ...
Page is loading ...

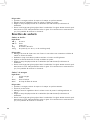
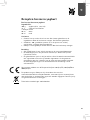
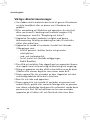
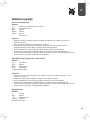
Aufbau Eismaschine
1 Gerätedeckel
2 Rührer
3 Gefrierbehälter
4 Halterung für Gefrierbehälter
5 Display mit Zeitanzeige
6 Ein/Ausschalter
7 Deckel für Gefrierbehälter
8 Eislöffel
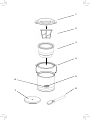
Components of ice machine
1 Device lid
2 Stirrer
3 Freezer container
4 Holder for freezer container
5 Display with timer
6 On/off switch
7 Lid for freezer container
8 Ice cream spoon
Montage sorbetière
1 Couvercle de l‘appareil
2 Agitateur
3 Conteneur de congélation
4 Support pour conteneur de congélation
5 Écran avec affichage du temps
6 Interrupteur marche/arrêt
7 Couvercle pour conteneur de congélation
8 Cuillère à glace
Componenti della gelatiera
1 Coperchio dell’apparecchio
2 Agitatore
3 Recipiente refrigerante
4 Supporto del recipiente refrigerante
5 Display con timer
6 Interruttore on/off
7 Coperchio del recipiente refrigerante
8 Cucchiaio per gelato
Componentes de la heladera
1 Tapa del aparato
2 Agitador
3 Envase de refrigeración
4 Soporte para el envase de refrigeración
5 Pantalla con indicación de tiempo
6 Tecla de encendido/ apagado
7 Tapa para envase de refrigeración
8 Cuchara para helado
Opbouw ijsmachine
1 Deksel van het apparaat
2 Roerder
3 Vriescontainer
4 Houder voor de vriescontainer
5 Display met tijdaanduiding
6 Aan-/uitschakelaar
7 Deksel voor vriescontainer
8 IJslepel
Produktoversigt over ismaskinen
1 Låg
2 Omrører
3 Frysebeholder
4 Holder til frysebeholder
5 Display med tidsvisning
6 Tænd-/slukknap
7 Låg til frysebeholder
8 Isske
Glassmaskinens delar
1 Lock
2 Omrörare
3 Frysbehållare
4 Hållare för frysbehållare
5 Display för tidvisning
6 Strömbrytare
7 Lock till frysbehållare
8 Glassked
Jääkoneen rakenne
1 Laitteen kansi
2 Sekoitin
3 Jäädytyssäiliö
4 Jäädytyssäiliön pidike
5 Kellonajan näyttö
6 Virtapainike
7 Jäädytysastian kansi
8 Jäätelölusikka
Ismaskinens komponenter
1 Lokk
2 Rører
3 Fryseelement
4 Holder til fryseelement
5 Display med tidsindikator
6 Av/på-bryter
7 Lokk til fryseelement
8 Isskje
Page is loading ...
Page is loading ...
Page is loading ...
Page is loading ...
Page is loading ...
Page is loading ...
Page is loading ...
Page is loading ...

12
Operating Manual
Important safety information
▪ If the supply cord is damaged, it must be replaced by the
manufacturer or its service agent or a similarly qualified person
in order to avoid hazards.
▪ After using the appliance and attachments, clean all surfaces/
parts that have come into contact with food. Follow the
instructions in the “Cleaning and care” section.
▪ Always use the appliance in accordance with these instructions.
Improper use can result in electric shocks and other hazards.
▪ This device is designed to be used in the household and for
similar applications, for example:
⋅ Staff kitchen areas in shops, offices and other working
environments;
⋅ Farm houses;
⋅ By guests at hotels, motels or other residential facilities;
⋅ Bed-and-breakfast establishments.
▪ Always disconnect the appliance from the mains supply if it
is left unattended and before assembling, disassembling or
cleaning.
▪ Switch off the appliance and disconnect from the mains supply
before changing accessories or approaching parts that move
during use.
▪ This appliance must not be used by children. Keep the
appliance and its cord out of the reach of children.
▪ Children must not play with the appliance.
▪ Appliances can be used by persons with reduced physical,
sensory or mental capabilities or lack of experience and/or
knowledge if they are supervised or have been instructed on
how to use the appliance in a safe way and understand the
hazards involved.

13
enen
Before use
The appliance may only be used for the intended purpose according to these instruc-
tions for use. Therefore, you are advised to read the instructions for use carefully before
operating the appliance. They contain instructions for using, cleaning and caring for the
appliance. We accept no liability for any damage caused if the instructions in this manual
are not followed.
Keep this instruction manual in a safe place and pass it on to any subsequent user together
with the appliance. Please also note the warranty information at the end.
Observe the safety information when using the appliance.
Technical data
Rated voltage: 220-240 V~ 50-60 Hz
Power consumption: 12 W
Protection class: II
Additional safety information
▪ Only connect the appliance to sockets that have been installed pursuant to regulations.
The supply cable and plug must be dry.
▪ Do not pull or clamp the connection cable over sharp edges. Do not leave it dangling.
Protect it from heat and oil.
▪ Only use an extension cable that is in perfect condition.
▪ Never pull the mains plug out of the socket by the cable or with wet hands.
▪ Do not carry the appliance by the cable.
▪ Do not place the appliance on hot surfaces such as hotplates or near open flames
because this could melt the casing.
▪ When the appliance is not being used, pull the mains plug out of the socket.
▪ Stop using the appliance and/or pull the mains plug out of the socket immediately if:
⋅ The appliance or power cord is damaged.
⋅ You suspect that there is a defect after the appliance has fallen or following a
similar incident.
In such cases, arrange for the appliance to be repaired.
▪ The appliance must be supervised when in use.
▪ Always operate the appliance with the lid closed.
▪ The device must not be operated in the fridge/freezer.
▪ Do not immerse the drive unit in water.
▪We accept no liability for damage caused as a result of misuse, incorrect operation,
improper repair or non-observance of the descaling instructions. Claims under warranty
are likewise excluded in such cases.
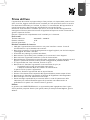
Use
The WMF KITCHENminis 3in1 ice machine is a space-saving kitchen appliance. The device
allows you to produce various kinds of frozen dessert, including frozen yoghurt, ice cream
and sorbets. If you want to make different types of ice cream at the same time or you need
a bigger portion, there is an extra freezer bowl with lid available as accessory.

14
Getting started and preparation
▪ Clean the device before use as described in the chapter on “Cleaning and Care”.
▪ Before using for the first time, clean the appliance as described in the “Cleaning and
care” section.
▪ Cool the empty and completely dry freezer container (3) in a freezer at a temperature
of -18°C for at least 12 hours. For future use, we recommend generally storing the
freezer container (3) in the freezer compartment or a freezer. Make sure that the freezer
container (3) is upright so that the cooling liquid is evenly distributed.
▪ Now prepare the relevant volume of ice cream mixture in a separate container (you can
find recipe ideas in the “Recipes” section). The maximum volume is 300ml.
Note: If the ice cream mixture warms up during preparation, you should leave it to cool
in the fridge before making the ice cream.
▪ Now start the ice machine by first placing the freezer container (3) into the appropriate
holder (4) in the ice machine. Make sure that the cut-out on the handle sits on the
appropriate groove.
▪ Attach the stirrer (2) to the lid (1) by clicking it into the special holder on the inside
of the lid. The stirrer (2) is then firmly attached, but flexible. Now place the lid (1) and
stirrer (2) onto the appliance. Make sure that the lid clicks into place. Plug the appliance
into a socket and turn it on using the On/Off switch.
▪ Select the desired preparation time (1-30 minutes) using the “+” and “-” buttons and
start the ice machine by pressing the On/Off switch again.
▪ Now add the ice-cream mixture (maximum 300 ml) to the ice machine through the
filler opening in the lid. The freezer container (3) must turn to prevent the liquid from
freezing solid at the edge.
▪ An audible signal sounds once the set preparation time has elapsed.
▪ Disconnect the mains plug from the socket, remove the lid (1) and take the freezer
container (3) out of the ice machine using the holder (4). For ease of use, the stirrer (2)
can be detached from the anchor in the lid and remains stuck in the frozen ice cream
mixture.
▪ The ice-cream can now be eaten or stored in the freezer container with the lid provided.
Cleaning and care
Device:
Unplug the mains plug and allow the appliance to cool down.
The appliance should not be placed in water, only wiped down on the outside with a damp
cloth
with a little washing-up liquid on it.
Do not use harsh or abrasive cleaning agents.
Accessories:
The lid of the freezer container, the stirrer and the holder of the freezer container can be
cleaned in the dishwasher.
Note: The freezer container must always be completely dry before it is used for cooling in
the freezer again.

15
en
Ice cream recipes
Pistachio ice
Ingredients:
75 g unsalted pistachio nuts (shelled)
50 g marzipan
60 g sugar
160 ml milk
140 ml cream
1 egg
Preparation:
▪ Mix the pistachios with the milk and mix to a fine purée.Then heat in a pan and bring to
the boil quickly.
▪ Allow the pistachio milk to cool for 12 hours in the fridge.
▪ Cut the marzipan dough into small pieces and mix in with the cooled pistachio milk,
along with the other ingredients, then purée finely again.
▪ Set the preparation time on the ice machine (approx. 20 minutes*) and start the ice
machine.
▪Pour the finished ice cream mixture into the ice machine. After 20 minutes, the machine
beeps and the ice cream can be removed. If the consistency is not yet as desired, the
timer can be reset.
Strawberry ice cream (vegan & lactose-free)
Ingredients:
75 g strawberries
30 g sugar
80 ml soya cream
65 ml soya milk
1 pinch salt
Preparation:
▪Wash and quarter the strawberries. Then mix the strawberries with the sugar in a bowl
and allow to stand for 1-2 hours.
▪ Then purée the strawberries and mix with the other ingredients.
▪ Set the preparation time on the ice machine (approx. 20 minutes*) and start the ice
machine.
▪Pour the finished ice cream mixture into the ice machine. After 20 minutes, the machine
beeps and the ice cream can be removed. If the consistency is not yet as desired, the
timer can be reset.
Mango ice cream
Ingredients:
1 mango
30 g sugar
1 tbsp. coconut milk
5 leaves mint
Juice from one lime

16
Preparation:
▪Peel the mango, remove the stone and cut into small pieces.
▪ Add all the ingredients to a mixer and purée.
▪ Set the preparation time on the ice machine (approx. 20 minutes*) and start the ice
machine.
▪Pour the finished ice cream mixture into the ice machine. After 20 minutes, the machine
beeps and the ice cream can be removed. If the consistency is not yet as desired, the
timer can be reset.
Sorbet recipes
Basil sorbet:
Ingredients:
100 g sugar
100 ml water
½ lime
10 g basil leaves
150 g yoghurt (1.8 or 3.5% fat)
Preparation:
▪ Mix the zest of the lime with the water and sugar in a bowl and boil down to half the
volume.
▪ Allow the resulting syrup to cool in the fridge for around 12 hours.
▪ Add the basil leaves to the syrup and purée.
▪ Set the preparation time on the ice machine (approx. 20 minutes*) and start the ice
machine.
▪Pour the finished ice cream mixture into the ice machine. After 20 minutes, the machine
beeps and the ice cream can be removed. If the consistency is not yet as desired, the
timer can be reset.
Mango sorbet
Ingredients:
1 small mango
1 lemon
50 ml mineral water
50 ml elderberry syrup
Preparation:
▪Peel the mango, remove the stone and cut into small pieces.
▪ Juice the lemon.
▪ Mix all the ingredients with a mixer and then press the resulting mixture through a
sieve.
▪ Set the preparation time on the ice machine (approx. 20 minutes*) and start the ice
machine.
▪Pour the finished ice cream mixture into the ice machine. After 20 minutes, the machine
beeps and the ice cream can be removed. If the consistency is not yet as desired, the
timer can be reset.

17
en
Frozen yoghurt recipes
Basic frozen yoghurt recipe
Ingredients:
100 g yoghurt (min. 1.8% fat)
16 g sugar or vanilla sugar
1 tbsp. quark
20 ml cream
20 ml milk
Variants:
▪ Lemon: use the zest and juice of an organic lemon and mix the ingredients with the
basic mixture. Use vanilla sugar.
▪ Strawberry: Purée 100 g of strawberries and use 1 tbsp honey instead of sugar or vanilla
sugar.
▪ Cookies: crush your favourite cookies and mix with the basic mixture.
Preparation:
▪ Mix all the ingredients together well in a bowl.
▪ Set the preparation time on the ice machine (approx. 20 minutes*) and start the ice
machine.
▪Pour the finished ice cream mixture into the ice machine. After 20 minutes, the machine
beeps and the ice cream can be removed. If the consistency is not yet as desired, the
timer can be reset.
*The preparation time depends on the quantity and the cooling of the freezer container.

18
For UK use only
▪ This product is supplied with a 13 A plug conforming to BS 1363 fitted to the mains
lead. If the plug is unsuitable for your socket outlets or needs to be replaced, please
note the following. If the plug is a non-rewireable one, cut it from the mains lead and
immediately dispose of it. Never insert it into a socket outlet as there is a very great risk
of an electric shock.
▪ The replacement of the plug at the mains lead has to be done according to the
following instructions:
Important: The wires in this mains lead are coloured in accordance with the following
code:
blue Neutral
brown Live
As the colours of the wires in the mains lead of this appliance may not correspond with the
coloured markings identifying the terminals in your plug, proceed as follows:
⋅ the wire which is coloured blue must be connected to the terminal which is marked
with the letter N or coloured black,
⋅ the wire which is coloured brown must be connected to the terminal which is
marked with the letter L or coloured red.
▪ If a 13 A (BS 1363) plug is used it must be fitted with a 3 A fuse conforming to BS
1362 and be ASTA approved. If any other type of plug is used, the appliance must be
protected by a 5 A fuse either in the plug or adapter or at the distribution board. If in
doubt - consult a qualified electrician.
▪ Never use the plug without closing the fuse cover.

19
en
The appliance complies with the European directives 2014/35/EC, 2014/30/EC
and 2009/125/EC.
At the end of its lifetime this product must not be disposed of through the
normal domestic waste, but it should be handed to an assembly point for
the recycling of electrical and electronical appliances. You can inquire about
details at the local administration.
Subject to technical changes.
Page is loading ...
Page is loading ...
Page is loading ...
Page is loading ...
Page is loading ...
Page is loading ...
Page is loading ...
Page is loading ...
Page is loading ...
Page is loading ...
Page is loading ...
Page is loading ...
Page is loading ...
Page is loading ...
Page is loading ...
Page is loading ...
Page is loading ...
Page is loading ...
Page is loading ...
Page is loading ...
Page is loading ...
Page is loading ...
Page is loading ...
Page is loading ...
Page is loading ...
Page is loading ...
Page is loading ...
Page is loading ...
Page is loading ...
Page is loading ...
Page is loading ...
Page is loading ...
Page is loading ...
Page is loading ...
Page is loading ...
Page is loading ...
Page is loading ...
Page is loading ...
Page is loading ...
Page is loading ...
Page is loading ...
Page is loading ...
Page is loading ...
Page is loading ...
Page is loading ...
Page is loading ...
Page is loading ...
Page is loading ...
Page is loading ...
-
 1
1
-
 2
2
-
 3
3
-
 4
4
-
 5
5
-
 6
6
-
 7
7
-
 8
8
-
 9
9
-
 10
10
-
 11
11
-
 12
12
-
 13
13
-
 14
14
-
 15
15
-
 16
16
-
 17
17
-
 18
18
-
 19
19
-
 20
20
-
 21
21
-
 22
22
-
 23
23
-
 24
24
-
 25
25
-
 26
26
-
 27
27
-
 28
28
-
 29
29
-
 30
30
-
 31
31
-
 32
32
-
 33
33
-
 34
34
-
 35
35
-
 36
36
-
 37
37
-
 38
38
-
 39
39
-
 40
40
-
 41
41
-
 42
42
-
 43
43
-
 44
44
-
 45
45
-
 46
46
-
 47
47
-
 48
48
-
 49
49
-
 50
50
-
 51
51
-
 52
52
-
 53
53
-
 54
54
-
 55
55
-
 56
56
-
 57
57
-
 58
58
-
 59
59
-
 60
60
-
 61
61
-
 62
62
-
 63
63
-
 64
64
-
 65
65
-
 66
66
-
 67
67
-
 68
68


WMF Eismaschine 3in1 Owner's manual
- Category
- Blenders
- Type
- Owner's manual
- This manual is also suitable for
Ask a question and I''ll find the answer in the document
Finding information in a document is now easier with AI
in other languages
- italiano: WMF Eismaschine 3in1 Manuale del proprietario
- français: WMF Eismaschine 3in1 Le manuel du propriétaire
- español: WMF Eismaschine 3in1 El manual del propietario
- Deutsch: WMF Eismaschine 3in1 Bedienungsanleitung
- Nederlands: WMF Eismaschine 3in1 de handleiding
- dansk: WMF Eismaschine 3in1 Brugervejledning
- svenska: WMF Eismaschine 3in1 Bruksanvisning
- suomi: WMF Eismaschine 3in1 Omistajan opas
Related papers
-
WMF LONO User manual
-
WMF 04 1608 0031 Datasheet
-
-
WMF 05 7001 4291 Operating instructions
-
WMF PERFECT Owner's manual
-
-
-
-
-
Other documents
-
Tefal IG500140 Owner's manual
-
Steba IC 30 User manual
-
Melissa 16310111 Datasheet
-
Steba IC 20 User manual
-
Hendi 274231 User manual
-
Rommelsbacher IM 12 WIENEU User manual
-
Unold 48825 Operating instructions
-
-
-
Unold 48865 Owner's manual