Panasonic ey 6220 d dr Owner's manual
- Category
- Cordless combi drills
- Type
- Owner's manual
This manual is also suitable for
Page is loading ...

2
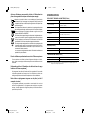
Index/Index/Index/Indice/Index/Indice/Indeks/Index/Indeks/Hakemisto
English: Page 5
Deutsch: Seite 12
Français: Page 18
Italiano: Pagina 24
Nederlands: Badzijde 30
Español: Página 36
Dansk: Side 42
Svenska: Sid 48
Norsk: Side 54
Suomi: Sivu 60
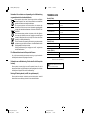
1
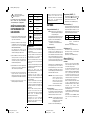
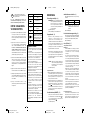
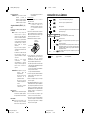
Functional description
Funktionsbeschreibung
Description des fonctions
Descrizione delle funzioni
Functiebeschrijving
Descripción funcional
Beskrivelse af funktionerne
Funktionsbeskrivning
Funksjonsbeskrivelse
Toimintakuvaus
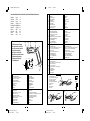
Hexagonal driving shaft
Hexagonalantriebswelle
Arbre d’entraînement hexagonal
Albero motore esagonale
Zeshoekige aandrijfas
Eje de transmisión hexagonal
Sekskantet skaft
Drivenhet
Drivmekanisme
Vetoakseli
(A)
Clutch handle
Kupplungsgriff
Manche d’embrayage
Manopola dell’innesto
Koppelhendel
Mango del embrague
Koblingshåndtag
Momentinställning
Clutch grep
Vääntövoiman säädin
(B)
Speed selector switch
Bereichsschalter
Sélecteur de vitesse de rotation
Selettore di velocità
Snelheidskeuzeschakellar
Conmutador selector de velocidad
Hastighedsomskifter
Varvtalsomkopplare
Hastighetsvelger
Nopeudenvalintakytkin
(C)
Main switch lock
Schaltersperre
Verrou d’interrupteur principal
Dispositivo di blocco dell’interruttore principale
Hoofdschakelaarvergrendeling
Seguro del interruptor principal
Afbryderkontaktlås
Låsknapp
Bryter for låsing
Lukitsin
(D)
Lock
(A) (B)
(E)
(C) (D)
(F)
(G)
(K)
(I)
(J)
(H)
3
Main switch
Haupschalter
Interrupteur principal
Interruttore principale
Hoofdschakelaar
Interruptor principal
Afbryderkontakt
Fram/backomkopplare
Bryter for fremover/revers
Eteen/taakse valitsin
(E)
Battery pack release button
Akkupack-Entriegelungsknopf
Bouton de libération de batterie
Tasto di rilascio blocco batteria
Accu-ontgrendeltoets
Botón de liberación de la batería recargable
Udløserknap til batteripakning
Batteriets låsknappar
Batteriets utløserknapper
Akkupaketin irrotuspainikeet
(G)
Battery charger
Ladegerät
Chargeur de batterie
Caricabatterie
Acculader
Cargador de baterías
Batterioplader
Batteriladdare
Batterilader
Akkulaturi
(H)
Li-ion battery pack dock
Li-Ion-Akkuladeschacht
Poste d’accueil de la batterie autonome Li-ion
Spazio raccordo pacco batteria Li-ion
Li-ion accuhouder
Enchufe de carga de batería Li-ión
Li-ion batteripakningsdok
Docka för litiumjonbatteri
Dokk for Li-ion-batteripakke
Li-ioniakun liitin
(I)
Ni-MH battery pack dock
Ni-MH-Akkuladeschacht
Poste d’accueil de la batterie autonome Ni-MH
Spazio raccordo pacco batteria Ni-MH
Ni-MH accuhouder
Enchufe de carga de batería Ni-MH
Ni-MH batteripakningsdok
Docka för Ni-MH-batteri
Dokk for Ni-MH-batteripakke
Ni-MH akun liitin
(J)
Battery pack
Akkupack
Batterie
Pacco batteria
Accu
Bloque de pilas
Batteri
Batteri
Batteri
Akkupaketti
Battery dock cover
Ladeschachtabdeckung
Couvercle du poste d’accueil de la batterie
Coperchio vano batteria
Deksel van accuhouder
Cubierta de enchufe de carga de batería
Batteridokdæksel
Batteridockningslucka
Batteridokkdeksel
Akkuliittimen kansi
(F)
(K)
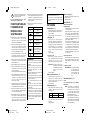
9.0
6.35
Lock
2
Lock
4
Lock
3
Hexagonal driving shaft
Hexagonalantriebswelle
Arbre d’entraînement hexagonal
Albero motore esagonale
Zeshoekige aandrijfas
Eje de transmisión hexagonal
Sekskantet skaft
Drivenhet
Drivmekanisme
Vetoakseli
Refine_10-08-23 14:32:26
Refine_EY6220.03.p1.pdfRefine_EY6220.02.p1.pdf
Refine_10-08-18 10:30:43
B536502_EY6220_Tori_EU 2 10-08-23 15:56:38

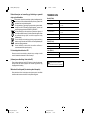
4
Lock
10
9
Battery pack
Akkupack
Batterie
Pacco batteria
Accu
Bloque de pilas
Batteri
Batteri
Batteri
Akkupaketti
Lock
8
$
#
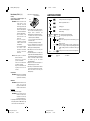
Battery pack release button
Akkupack-Entriegelungsknopf
Bouton de libération de batterie
Tasto di rilascio blocco batteria
Accu-ontgrendeltoets
Botón de liberación de la batería recargable
Udløserknap til batteripakning
Batteriets låsknappar
Batteriets utløserknapper
Akkupaketin irrotuspainikeet
Battery charger
Ladegerät
Chargeur de batterie
Caricabatterie
Acculader
Cargador de baterías
Batterioplader
Batteriladdare
Batterilader
Akkulaturi
To power source
An Netzsteckdose
Vers la source d’alimentation
ad una fonte di alimentazione
Naar stopkontakt
A la fuente de alimentación
Til strømkilde
Till strömkälla
Til strømkilde
Virtalähteeseen
Lock
5
Main switch
Haupschalter
Interrupteur principal
Interruttore principale
Hoofdschakelaar
Interruptor principal
Afbryderkontakt
Fram/backomkopplare
Bryter for fremover/revers
Eteen/taakse valitsin
7
Main switch lock
Schaltersperre
Verrou d’interrupteur principal
Dispositivo di blocco
dell’interruttore principale
Hoofdschakelaarvergrendeling
Seguro del interruptor principal
Afbryderkontaktlås
Låsknapp
Bryter for låsing
Lukitsin
Lock
Lock
Verrou
Blocco
Vergendelde stand
Seguro puesto
Lås
Lås
Lås
Lukko
Lock
6
Speed selector switch
Bereichsschalter
Sélecteur de vitesse de rotation
Selettore di velocità
Snelheidskeuzeschakellar
Conmutador selector de velocidad
Hastighedsomskifter
Varvtalsomkopplare
Hastighetsvelger
Nopeudenvalintakytkin
Low
Niedrig
Lent
Lento
Laag
Lento
Lav
Låg
Lav
Alhainen
High
Hoch
Rapide
Veloce
Hoog
Rápido
Høj
Hög
Høy
Korkea
5
Read “Safety Instructions” booklet and the
following before using.
ADDITIONAL
SAFETY RULES
1) Be aware that this tool is always in an
operating condition, since it does not have to
be plugged into an electrical outlet.
2) When drilling into walls, floors, etc., “live”
electrical wires may be encountered. DO NOT
TOUCH THE CHUCK OR ANY FRONT
METAL PARTS OF THE TOOL! Hold the tool
only by the plastic handle to prevent electric
shock in case you drill into a “live” wire.
3) If the bit becomes jammed, immediately turn
the main switch off to prevent an overload
which can damage the battery pack or motor.
Use reverse motion to loosen jammed bits.
4) During charging, the charger may become
slightly warm. This is normal. Do not charge
the battery for a long period.
5) Use only a dry, soft cloth for wiping the unit. Do
not use a damp cloth, thinner, benzine, or
other volatile solvents for cleaning.
6) Wear ear protectors when using the tool for
extended periods.
GB
Original instructions: English
Translation of the original instructions:
Other languages
To reduce the risk of
injury, user must read and
understand instruction
manual.
Volts
V
n
0
… min
-1
Ah
Direct current
No load speed
Revolutions or reciprocations
per minutes
Electrical capacity of battery
pack
For indoor use only.
Symbol Meaning
WARNING:
• Do not use other than the Panasonic battery
packs that are designed for use with this
rechargeable tool.
• Panasonic is not responsible for any damage
or accident caused by the use of the recycled
battery pack and the counterfeit battery pack.
• Do not dispose of the battery pack in a fire, or
expose it to excessive heat.
• Do not drive the likes of nails into the battery
pack, subject it to shocks, dismantle it, or
attempt to modify it.
• Do not allow metal objects to touch the
battery pack terminals.
• Do not carry or store the battery pack in the
same container as nails or similar metal
objects.
• Do not charge the battery pack in a high-
temperature location, such as next to a fire or
in direct sunlight. Otherwise, the battery may
overheat, catch fire, or explode.
• Never use other than the dedicated charger
to charge the battery pack. Otherwise, the
battery may leak, overheat, or explode.
• When the Battery Pack Has Deteriorated,
Replace It with a New One. Continued use of
a damaged battery pack may result in heat
generation, ignition or battery rupture.
Refine_10-08-18 16:12:10
Refine_EY6220.05.p1.pdfRefine_EY6220.04.p1.pdf
Refine_10-08-18 10:30:43
B536502_EY6220_Tori_EU 3 10-08-23 15:56:39

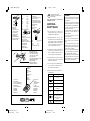
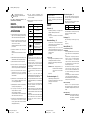
6
Main switch (ON/OFF)···(E)
Push the upper half of the switch for forward
( ) rotation, or the lower half for reverse
( ) rotation.
(Refer figure 5)
Speed selector switch···(C)
To suit the application of this tool, two
different rotational speeds are available.
Depending upon use, either the high or low
speed should be selected.
LOW
HIGH
200min
-1
(RPM)
400min
-1
(RPM)
strong torque
less torque
CAUTION: Check rotational speed selection
before operating this tool.
(Refer figure 6)
Main switch lock···(D)
After use, set the main switch lock at the lock
position to prevent accidental operation.
(Refer figure 7)
Battery pack (EY9221)···(F)
Appropriate Use of Battery Pack
Ni-MH Battery Pack
• Charge the Ni-MH battery fully before
storage in order to ensure a longer service
life.
• The ambient temperature range is between
0˚C (32˚F) and 40˚C (104˚F). If the battery
pack is used when the battery temperature
is below 0˚C (32˚F), the tool may fail to
function properly. In that case, charge the
battery until charging is completed for
appropriate functioning of the battery.
• When battery pack is not in use, keep it
away from other metal objects such as
paper clips, coins, keys, nails, screws, or
other small metal objects that can make a
connection from one terminal to another.
Short-circuiting the battery terminals
together may cause sparks, burns or a fire.
• When operating with a Ni-MH battery pack,
make sure the area is well ventilated.
Battery Pack Life
The rechargeable batteries have a limited life.
If the operation time becomes extremely short
after recharging, replace the battery pack with
a new one.
OPERATION
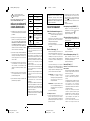
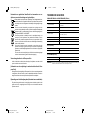
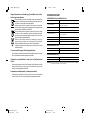
Hexagonal driving shaft···(A)
NOTE: When attaching or removing bit, be
sure to set the main switch lock at the
lock position.
Select the suitable bit and lightly push it into
the hexagonal driving shaft of the main unit.
(Refer figure 2)
E
Refer figure 2 for useable bits.
Clutch handle···(B)
When using the tool for driving screws into
soft material or for terminal screws, etc., there
is the possibility of damaging the material or
threads if the torque is too high. To
compensate for this, the clutch torque may be
adjsuted by turning the clutch handle to the
required setting.
Clutch position 1 is the minimum and the
clutch torque increases with positions 2, 3, 4,
and 5. When the device is set at position 6,
the clutch will not slip and the connection to
the motor will be direct.
CAUTION: If the battery pack loses its power
during usage, the clutch may not
slip even at positions 4 or 5, if this
occurs, recharge the battery pack.
(Refer figure 3)
Bit locking function
With the switch at off, the bit is locked in place,
and the tool can be used as a manual screw-
driver.
There will be a little play in the driving shaft,
but this is not a malfuncton.
CAUTION: Exact torque should be verified
with a torque wrench for precise
limits as the screw can be
damaged.
(Refer figure 4)
7
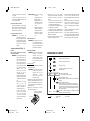
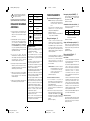
2. Select the current battery dock (Li-ion Battery
pack or Ni-MH Battery pack) cover. Slide the
battery dock cover to allow insertion.
3. Insert the battery pack firmly into the charger.
4. During charging, the charging lamp will be lit.
When charging is completed, an internal
electronic switch will automatically be triggered
to prevent overcharging.
• Charging will not start if the battery pack is
warm (for example, immediately after heavy-
duty operation). The orange standby lamp will
be flashing until the battery cools down.
Charging will then begin automatically.
5. The charge lamp (green) will flash slowly once
the battery is approximately 80% charged. (Li-
ion Battery Only)
6. When charging is completed, the charging lamp
in green color will turn off.
7. If the temperature of the battery pack is 0˚C or
less, charging takes longer to fully charge the
battery pack than the standard charging time.
Even when the battery is fully charged, it will
have approximately 50% of the power of a fully
charged battery at normal operating
temperature.
8. Consult an authorized dealer if the charging
lamp (green) does not turn off.
9. If a fully charged battery pack is inserted into
the charger again, the charging lamp lights up.
After several minutes, the charging lamp in
green color will turn off.
Battery Recycling
ATTENTION: For environmental protection
and recycling of materials, be
sure that it is disposed of at an
officially assigned location, if
there is one in your country.
Battery charger (EY0L11)···(H)
Charging
Common Cautions for the Li-ion/Ni-MH Battery
Pack
NOTE: • When a cold battery (of about 0˚C or
less) is to be charged in a warm
room, leave the battery in the room
for at least one hour and charge it
when it has warmed up to room
temperature. (Failing to do so may
result in less than a full charge.)
• Cool down the charger when
charging more than two battery
packs consecutively.
• Do not insert your fingers into
contact hole, when holding charger
or any other occasions.
• When charging continuously, wait
about 5 seconds after removing one
battery pack before inserting the
next.
CAUTION: To prevent the risk of fire or
damage to the battery charger.
• Do not use power source from
an engine generator.
• Do not cover vent holes on the
charger and the battery pack.
• Unplug the charger when not in
use.
Li-ion Battery Pack
NOTE: Your battery pack is not fully charged
at the time of purchase. Be sure to
charge the battery before use.
Ni-MH Battery Pack
NOTE: When you charge the battery pack for
the first time, or after prolonged
storage, charge it for about 24 hours to
bring the battery up to full capacity.
Battery charger
1. Plug the charger into the AC outlet.
NOTE: Sparks may be produced when the
plug is inserted into the AC power
supply, but this is not a problem in
terms of safety.
#
%
$
To AC
outlet
Pictured:
Ni-MH Battery Pack
Refine_10-08-18 16:12:10
Refine_EY6220.07.p1.pdfRefine_EY6220.06.p1.pdf
Refine_10-08-18 10:30:43
B536502_EY6220_Tori_EU 4 10-08-23 15:56:41

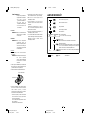
8
I
m
F
[
U
N
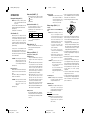
Charging is completed. (Full charge.)
Battery is approximately 80% charged.
Now charging.
Charger is plugged into the AC outlet. Ready to charge.
(Green) (Orange)
Charging Status Lamp.
Left: green Right: orange will be displayed.
Battery pack is cool.
The battery pack is being charged slowly to reduce the load on the battery.
Battery pack is warm.
Charging will begin when temperature of battery pack drops. If the temperature of the
battery pack is -10° or less, the charging status lamp (orange) will also start flashing .
Charging will begin when the temperature of the battery pack goes up"
Charging is not possible. Clogged with dust or malfunction of the bat-
tery pack.
Turn off Lit
Flashing
LAMP INDICATIONS
9
Information for Users on Collection and Disposal of Old Equip-
ment and used Batteries
These symbols on the products, packaging, and/or accompanying docu-
ments mean that used electrical and electronic products and batteries
should not be mixed with general household waste.
For proper treatment, recovery and recycling of old products and used bat-
teries, please take them to applicable collection points, in accordance with
your national legislation and the Directives 2002/96/EC and 2006/66/EC.
By disposing of these products and batteries correctly, you will help to
save valuable resources and prevent any potential negative effects on
human health and the environment which could otherwise arise from inap-
propriate waste handling.
For more information about collection and recycling of old products and bat-
teries, please contact your local municipality, your waste disposal service
or the point of sale where you purchased the items.
Penalties may be applicable for incorrect disposal of this waste, in ac-
cordance with national legislation.
For business users in the European Union
If you wish to discard electrical and electronic equipment, please contact your
dealer or supplier for further information.
[Information on Disposal in other Countries outside the European
Union]
These symbols are only valid in the European Union. If you wish to discard these
items, please contact your local authorities or dealer and ask for the correct
method of disposal.
Note for the battery symbol (bottom two symbol examples):
This symbol might be used in combination with a chemical symbol. In this case it
complies with the requirement set by the Directive for the chemical involved.
Refine_10-08-18 10:30:43
Refine_EY6220.09.p1.pdfRefine_EY6220.08.p1.pdf
Refine_10-08-18 10:30:43
B536502_EY6220_Tori_EU 5 10-08-23 15:56:41

10
SPECIFICATIONS
CORDLESS DRILL & DRIVER (EY6220)
Motor DC Motor 2.4 V
No load speed
LOW: 200 min
-1
(rpm)
HIGH: 400 min
-1
(rpm)
Hexagonal driving shaft 6.35 mm, (1/4″) across flats
Maximum drilling dia. for metal 2 mm (5/64″)
Maximum torque
LOW: 2.9 Nm (30 kg-cm, 26 in.lbs)
HIGH: 1.5 Nm (15 kg-cm, 13 in.lbs)
Maximum clutch torque 2.0 Nm (20 kg-cm, 17.5 in.lbs) at 5 position
Overall length 239 mm (9-3/8″)
Weight (with battery pack) 0.4 kg (0.9 lbs)
BATTERY PACK (EY9221)
Storage battery Ni-MH battery
Battery voltage 2.4 V DC (1.2 V × 2 cells)
BATTERY CHARGER (EY0L11)
Charging time 45 min
Mass (Weight) 0.6 kg (1.54 lbs)
NOTE: For applicable battery packs to this charger, see the label on the charger or the latest general
catalog.
11
ELECTRICAL PLUG
INFORMATION
FOR YOUR SAFETY PLEASE READ THE
FOLLOWING TEXT CAREFULLY
This appliance is supplied with a moulded
three pin mains plug for your safety and
convenience.
A 3 amp fuse is fitted in this plug.
Should the fuse need to be replaced please
ensure that the replacement fuse has a
rating of 3 amp and that it is approved by
ASTA or BSI to BS1362.
Check for the ASTA mark 7 or the BSI
mark 6 on the body of the fuse.
If the plug contains a removable fuse cover
you must ensure that it is refitted when the
fuse is replaced.
If you lose the fuse cover the plug must not
be used until a replacement cover is
obtained.
A replacement fuse cover can be purchased
from your local Panasonic Dealer.
IF THE FITTED MOULDED PLUG IS
UNSUITABLE FOR THE SOCKET OUTLET
IN YOUR HOME THEN THE FUSE
SHOULD BE REMOVED AND THE PLUG
CUT OFF AND DISPOSED OF SAFELY.
THERE IS A DANGER OF SEVERE
ELECTRICAL SHOCK IF THE CUT OFF
PLUG IS INSERTED INTO ANY 13 AMP
SOCKET.
If a new plug is to be fitted please observe
the wiring code as shown below.
If in any doubt please consult a qualified
electrician.
IMPORTANT: The wires in this mains lead
are coloured in accordance
with the following code:
Blue: Neutral
Brown: Live
As the colours of the wire in the mains lead
of this appliance may not correspond with
the coloured markings identifying the
terminals in your plug, proceed as follows.
The wire which is coloured BLUE must be
connected to the terminal in the plug which
is marked with the letter N or coloured
BLACK.
The wire which is coloured BROWN must be
connected to the terminal in the plug which
is marked with the letter L or coloured RED.
Under no circumstances should either of
these wires be connected to the earth
terminal of the three pin plug, marked with
the letter E or the Earth Symbol L .
How to replace the fuse: Open the fuse
compartment with a screwdriver and replace
the fuse and fuse cover if it is removable.
Fuse Cover
This apparatus was produced to BS800.
ONLY FOR U.K.
Refine_10-08-18 10:30:44
Refine_EY6220.11.p1.pdfRefine_EY6220.10.p1.pdf
Refine_10-08-18 10:30:43
B536502_EY6220_Tori_EU 6 10-08-23 15:56:41
Page is loading ...
Page is loading ...
Page is loading ...
Page is loading ...
Page is loading ...
Page is loading ...
Page is loading ...
Page is loading ...
Page is loading ...
Page is loading ...
Page is loading ...
Page is loading ...
Page is loading ...
Page is loading ...
Page is loading ...
Page is loading ...
Page is loading ...
Page is loading ...
Page is loading ...
Page is loading ...
Page is loading ...
Page is loading ...
Page is loading ...
Page is loading ...
Page is loading ...
Page is loading ...
Page is loading ...
Page is loading ...
-
 1
1
-
 2
2
-
 3
3
-
 4
4
-
 5
5
-
 6
6
-
 7
7
-
 8
8
-
 9
9
-
 10
10
-
 11
11
-
 12
12
-
 13
13
-
 14
14
-
 15
15
-
 16
16
-
 17
17
-
 18
18
-
 19
19
-
 20
20
-
 21
21
-
 22
22
-
 23
23
-
 24
24
-
 25
25
-
 26
26
-
 27
27
-
 28
28
-
 29
29
-
 30
30
-
 31
31
-
 32
32
-
 33
33
-
 34
34


Panasonic ey 6220 d dr Owner's manual
- Category
- Cordless combi drills
- Type
- Owner's manual
- This manual is also suitable for
Ask a question and I''ll find the answer in the document
Finding information in a document is now easier with AI
in other languages
- italiano: Panasonic ey 6220 d dr Manuale del proprietario
- français: Panasonic ey 6220 d dr Le manuel du propriétaire
- español: Panasonic ey 6220 d dr El manual del propietario
- Deutsch: Panasonic ey 6220 d dr Bedienungsanleitung
- Nederlands: Panasonic ey 6220 d dr de handleiding
- dansk: Panasonic ey 6220 d dr Brugervejledning
- svenska: Panasonic ey 6220 d dr Bruksanvisning
- suomi: Panasonic ey 6220 d dr Omistajan opas
Related papers
-
Panasonic EY6220 User manual
-
-
Panasonic EY75A1 Owner's manual
-
-
Panasonic EY7840 Owner's manual
-
-
-
-
Panasonic Li-ion EY0L82 Owner's manual
-