Page is loading ...

2
1
IMPORTANTSAFEGUARDS
When using electrical appliances, basic safety precautions should
always be followed, including the following:
❑
Read all instructions.
❑
To protect against risk of electrical shock, do not put blender base,
cord or plug in water or other liquid.
❑
Close supervision is necessary when any appliance is used by or
near children.
❑
Unplug from outlet when not in use, before putting on or taking
off parts and before cleaning.
❑
Avoid contacting moving parts.
❑
Do not operate any appliance with a damaged cord or plug
or after the appliance malfunctions or is dropped or damaged
in any manner. Return the appliance to the nearest authorized
service facility for examination, repair, or electrical or mechanical
adjustment. Or, call the appropriate toll-free number listed on the
cover of this manual.
❑
The use of attachments, including canning jars, not recommended
or sold by the appliance manufacturer may cause fire, electric
shock or injury.
❑
Do not use outdoors.
❑
Do not let the plug or cord hang over the edge of table or counter.
❑
Keep hands and utensils out of container while blending to reduce
the risk of severe injury to persons or damage to the blender.
A scraper may be used but must be used only when the blender
is not running.
❑
Blades are sharp. Handle carefully.
❑
To reduce the risk of injury, never place cutter assembly blades
on base without the jar properly attached.
❑
Always operate blender with cover in place.
❑
When blending hot liquids, remove center piece of two-piece
cover.
❑
Do not use appliance for other than intended use.
SAVETHESEINSTRUCTIONS.
POLARIZEDPLUG(120VModelsOnly)
This appliance has a polarized plug (one blade is wider than the other). To
reduce the risk of electric shock, this plug is intended to fit into a polarized
outlet only one way. If the plug does not fit fully into the outlet, reverse the
plug. If it still does not fit, contact a qualified electrician. Do not attempt to
modify the plug in any way.
ELECTRICALCORD
The cord of this appliance was selected to reduce the possibility of
tangling in or tripping over a longer cord. If more length is needed, use
an extension cord rated no less than 15-amperes. (For 220 volts rated
products, use an extension cord rated no less than 6-amperes). When
using an extension cord, do not let it drape over the working area or
dangle where someone could accidentally trip over it. Handle cord
carefully for longer life; avoid jerking or straining it at outlet and appliance
connections.
TAMPER-RESISTANTSCREW
Warning: This appliance is equipped with a tamper-resistant screw to prevent
removal of the outer cover. To reduce the risk of fire or electric shock, donot
attempttoremovetheoutercover.
There are no user-serviceable parts inside.
Repair should be done only by authorized service personnel.
Note:Ifthepowersupplycordisdamaged,itshouldbereplacedby
qualifiedpersonnelorinLatinAmericabyanauthorizedservicecenter.
Thissymbolisplacednearinformationthat
requiresyourspecialattention.

4
3
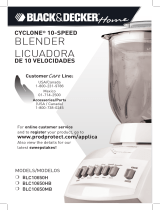
† 1. Lidcap(Part#BLC12650-01)
† 2. Lid(Part#BLC12650-02)
† 3. Jar(Part#BLC12650-03)
4. Handle
† 5. Bladeassembly(Part#BLC12650-05)
† 6. Gasket(Part#BLC12650-04)
† 7. Jarbase(Part#BLC12650-06)
8. Speedbuttons
9. Base
10. PULSE/OFFbutton
†Consumerreplaceable/removableparts
Productmayvaryslightlyfromwhatisillustrated.
HowtoUse
This unit is for household use only.
GETTINGSTARTED
• Remove all packing material and any stickers from the product.
• Wash all removable parts as instructed in CARE AND CLEANING section of this
manual.
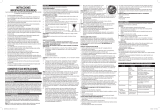
BLENDERJARASSEMBLY
1. Turn blender jar upside-down and place flat on countertop or work surface.
2. Put the gasket on top of the blade assembly.
3. Place the blade assembly with gasket in bottom opening of the jar, with blades
down.
4. Place jar base onto jar and rotate clockwise until it is
tight (A).
5. Turn assembled jar right-side-up.
6. Place lid with lid cap on blender jar.
7. Uncoil power cord from storage area under the base.
8. Place jar in unlocked position on base and turn jar
clockwise until jar is in locked position on base (B).
9. Blender is now ready for use.
READYTOUSE
1. Make sure appliance is OFF.
2. Place foods to be blended into jar.
3. Place lid on jar; make sure lid cap is in place.
4. Plug power cord into standard electrical outlet.
Note: When in use, do not leave blender unattended. When using hard foods,
such as ice, cheese, nuts and coffee beans, keep one hand on the lid to keep
blender in place.
5. Select the speed that best suits your desired task.
6. For blending tasks such as grinding coffee
beans or nuts – or when blending thick
mixtures – use the PULSE button for
several seconds; then release. Repeat until
food has desired consistency. Releasing
the PULSE button automatically turns the
blender off (C).
CUPS OZS
A
ff
Stir
Off
Puls e
B
Clean
Grate
Grind
Smoothie
Liquefy
Chop
Blend
Stir
Aerate
Puree
Low
Hi
ff
Off
Pulse
ff
ff
Off
Pulse
C
ff
Chop
B
l
end
S
tir
A
erat
e
Puree
Of
f
Low
C
le
a
n
Grate
G
rin
d
Smoo
thie
Liquef
y
Puls e
H
i
CUPS OZS
2
4
3
5
6
7
8
9
10
1

6
5
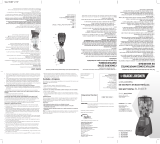
7. Open the lid cap to add ingredients while the blender
is running, and drop ingredients through the opening
(D).
Important:Donotremovethelidwhiletheblenderis
running.
8. When finished, press the PULSE/OFF button.
Make sure blades have completely stopped before
attempting to remove the blender jar from the base.
9. To remove the jar, grasp the handle, turn slightly counterclockwise
to unlock position and lift up.
10. Remove the lid to pour.
11. Always unplug the appliance when not in use.
BLENDINGTIPSANDTECHNIQUES
• Cut food into pieces no larger than ¾-inch for use in the blender.
• When preparing foods that have several different kinds of ingredients, always
add liquid ingredients first.
• When ingredients splatter onto the sides of the jar or the mixture is very thick,
press the PULSE/OFF button to turn appliance off. Remove the lid and use a
rubber spatula to scrape down the sides of the jar and to redistribute the food,
pushing food toward the blades. Replace the lid and continue blending.
Important:Applianceshouldalwayshavelidinplacewheninuse.
Caution:Donotplaceblenderjarontobasewhenmotorisrunning.
• The lid cap holds up to 2 oz. of liquid and can be used
as a measure when adding ingredients such as juices,
milk, cream and liquor (E).
• When making bread crumbs, chopping nuts or
grinding coffee beans, make sure blender jar is
completely dry.
• When using PULSE function, use short bursts. Allow
the blades to stop rotating between pulses. Do not use
PULSE for more than 2 minutes.
• Use the PULSE/OFF button to begin the blending process when preparing
beverages that include ice cubes; this helps to produce a smoother texture.
• The PULSE function is helpful when short bursts of power are needed, such as
when preparing thick smoothies or milkshakes, chopping nuts or grinding coffee
beans.
• It is helpful to begin the blending process on the lowest speed and then
increase to a higher speed, if necessary.
• To stop blending at any time, press the PULSE/OFF button.
• When blending hot ingredients, always open the lid
cap and replace it ajar with the opened side away
from you. Cover lid with a cloth to avoid splattering
and only use the lowest speed. Do not blend more
than 2½ to 3 cups at a time (F).
• DO NOT place any of the following in the blender:
Large pieces of frozen foods
Tough foods such as raw turnips, sweet potatoes and potatoes
Bones
Hard salami, pepperoni
Boiling liquids (cool for 5 minutes before placing in blender jar)
• Several other don’ts:
Do not operate blender without the lid on the blender jar.
Do not store foods in the blender jar.
Do not overfill the blender (the blender is more efficient with less rather
than more).
Do not put boiling liquids into blender.
Do not use PULSE for more than 10 seconds at a time; release the PULSE/OFF
button regularly, allow the blender to rest briefly, then continue.
Do not run blender for longer than 1½ minutes at a time. Scrape down sides
of blender jar, if necessary, and continue blending.
Do not use if blender jar is chipped or cracked.
• Tasks not recommended for the blender:
Whipping cream
Beating egg whites
Mixing dough
Mashing potatoes
Grinding meats
Extracting juice from fruits and vegetables
CUPS OZS
D
CUPS OZS
E
CUPS OZS
F

8
7
SELECTINGASPEED
PULSE/OFF Use for thick mixtures
STIR Reconstitute frozen juices, drink mixes and condensed
soups
Prepare salad dressings
Blend puddings
Puree hot liquids
AERATE Aerate soups and beverages
PUREE Puree baby foods – fruits and vegetables
CHOP Chop fruits and vegetables
Chop cooked meats
BLEND Blend salsas
Prepare sauces
Remove lumps from gravies
CLEAN Blend drop of dishwashing liquid and hot water
to clean blender
GRATE Grate hard cheeses and vegetables
Make superfine sugar
GRIND Chop nuts, coarse-to-fine
Grind coffee beans, spices and chocolate
Grind hard cheese, cooked meats and coconut
LIQUEFY Blend protein drinks
Liquefy frozen drinks; smoothies
SMOOTHIE Blend milk shakes and malts
Prepare smoothies
HI/LOW Select to change speed between Hi and Low
Hi – the button is out
Low – the button is in
CareandCleaning
This product contains no user serviceable parts. Refer service to qualified service
personnel.
CLEANING
1. Before cleaning, turn off and unplug the appliance.
2. Lift the jar off the power base by the handle.
3. Remove jar base by turning it counterclockwise until loose.
4. Remove the gasket and the blade assembly.
Caution:Bladesaresharp,handlecarefully.
5. Remove lid and lid cap.
6. Wash removable parts by hand or in the dishwasher. Place the jar on the
bottom rack and the rest of the parts on the top rack only.
HelpfulTip:
• For quick cleanup, combine 1 cup hot water and a drop of liquid dish soap
in the blender jar.
• Cover and blend on CLEAN for about 30 seconds.
• Discard liquid and rinse thoroughly.
Important:
•Donotplacethejarpartsinboilingliquids.
•Donotimmersethebaseinliquid.Wipetheunitbasewithadampclothand
drythoroughly.
•Removestubbornspotsbyrubbingwithadampclothandnonabrasivecleaner.
Note: If liquids spill onto the power base, wipe with a damp cloth and dry
thoroughly. Do not use rough scouring pads or cleansers on blender parts or
finish.

10
9
RECIPES
WILDBERRYYOGURTCOOLER
2 cups pineapple juice
1 cup wild berry frozen yogurt
1 cup frozen cubed mango
1 cup frozen hulled strawberries
Combine all ingredients in order listed in blender jar and close with lid. PULSE
for several seconds, three to four times. Press SMOOTHIE and let cycle run until
mixture is smooth and well blended; about 30 seconds.
Makes about 4½ cups.
CRAN-PINEAPPLECOLADA
1½ cups cran-apple juice
1 cup fresh pineapple chunks
²/
³
cup frozen piña colada drink mix
1 ripe banana, cut into pieces
2 cups ice cubes
In blender jar, combine all ingredients in order listed and close with lid.
PULSE several times, for about 5 seconds each time, to blend ingredients and
begin crushing ice. Press LIQUEFY and blend until smooth and creamy; about
25 seconds. Serve immediately.
Makes about 3½ cups.
PEARBERRYDELIGHT
1½ cups pear nectar
1 cup pineapple/passion fruit sorbet
2 cups fresh strawberries
2 cups ice cubes
In blender container, combine all ingredients in order listed. Place lid on jar.
PULSE several times, for about 5 seconds each time, to blend ingredients and
begin crushing ice. Press LIQUEFY and run until smooth and well blended; about
30 seconds. Turn blender OFF and serve immediately.
Makes about 3 cups.
PROBLEM POSSIBLECAUSE SOLUTION
Jar bottom does A vacuum has been Place the jar on the
not come off of jar. formed. blender and turn
counter clockwise until
jar is released from the
bottom.
Liquid is leaking Gasket is either missing Check that jar is
from bottom of jar. or not in place correctly. assembled correctly.
Appliance does Appliance is not Check that appliance
not turn on. plugged in. is plugged into
a working outlet.
Mixture in blender Not enough liquid in Turn the blender off
does not seem to mixture being blended and use a rubber
be blending. or too much ice. spatula to redistribute
the food; add some
liquid and pulse the
mixture to aid in the
blending process.
Herbs or bread are Blender jar, food to be Always make sure that
sticking to sides of chopped and blade are the jar, the blade and
blender and not not dry. the food to be chopped
getting chopped. are dry.
Jar separates from Jar was twisted when When removing jar
bottom when being being removed from from blender base,
removed from base of blender. simply lift up; do
blender. Liquid not twist.
spills onto counter.
TROUBLESHOOTING

12
11
MANGORASPBERRYFIZZ
1½ cups pineapple mango juice
1½ cups raspberry sorbet
1 cup frozen sliced peaches
Cold club soda
Mint sprigs
Combine first 3 ingredients in order listed in blender jar. Close cover. PULSE for
several seconds, three to four times. Press SMOOTHIE and let run until mixture is
smooth and well blended; about 30 seconds.
Fill tall beverage glasses half-full with raspberry mixture; top of with club soda.
Stir to blend. Garnish with mint sprig.
Makes 4 to 6 drinks.
BREAKFASTINAGLASS
1 cup milk
½ cup plain yogurt
½ cup creamy peanut butter
1 banana, cut into pieces
¼ cup wheat germ
¼ cup peanuts
1 tbsp. honey
2 cups ice cubes.
In blender jar, combine all ingredients in order listed. Place lid on jar. PULSE
several times, for about 5 seconds each, to blend ingredients and begin crushing
ice. Press SMOOTHIE and run until smooth and well blended; about 30 seconds.
Turn blender OFF and serve immediately.
Makes about 4 cups.
MANGOANDCORNSALSA
½ cup orange pepper, cut into ¾-inch chunks
½ cup purple onion, cut in ½-inch pieces
2 to 3 medium jalapeños, seeded and quartered
2 large cloves garlic
Juice of 1 lime
1½ cups tomato, cubed
1 large mango, cubed
½ cup fresh cilantro leaves
1 cup canned whole kernel corn
In blender jar, combine pepper, onion, jalapenos and garlic. Place lid on jar.
PULSE several times, for about 5 seconds each, to chop ingredients. Add lime
juice, tomato, mango and cilantro and PULSE several times until vegetables are
chopped and mixture is blended. Spoon mixture into bowl; stir in corn. Cover and
refrigerate until ready to serve.
Serve with tortilla chips.
Makes about 4½ cups.
BALSAMICTOMATOVINAIGRETTE
1 small purple onion, cut in ¾-inch pieces
2 large cloves garlic
1 small tomato, cut in ¾-inch pieces
3 tbsp. Balsamic vinegar
¼ tsp. salt
¼ tsp. black pepper
²/
³
cup olive oil
In blender jar, combine onion, garlic and tomato. Place cover on jar. PULSE
several times, for about 5 seconds each, to chop ingredients. Add vinegar, salt and
pepper. Replace lid on jar; remove lid cap. With blender running on STIR, add oil
through opening in a slow, steady stream until mixture is completely blended.
Cover and refrigerate until ready to serve.
Use as dressing for crisp green salad or to marinate cooked vegetables such as
asparagus or broccoli.
Makes about 1¼ cups.

14
13
PEAANDPOTATOBISQUE
1 small onion, chopped
2 medium cloves garlic, minced
2 tbsp. butter or margarine
4 cups chicken broth or stock
2 cups cubed peeled potatoes
½ tsp. ground ginger
½ tsp. salt
¼ tsp. black pepper
1½ cups frozen peas
¼ cup loosely packed parsley leaves
½ cup heavy cream
In medium saucepan, cook onion and garlic in butter over medium heat until
tender. Add chicken broth, potatoes ginger, salt and pepper. Bring to boil. Cover
and simmer 8 minutes. Add peas and parsley; continue cooking until potatoes are
tender. Remove from heat and let stand at least 5 minutes.
Spoon about 2½ cups soup mixture into blender jar. Cover and remove lid cap;
replace it ajar with open side facing away. Cover lid with cloth. Blend on STIR
until creamy and smooth; pour into measuring cup. Repeat with remaining
mixture until all is pureed. Return soup to saucepan; stir in cream. Heat, stirring;
do not allow bisque to boil.
Serve with a dollop of sour cream, if desired. Garnish with additional chopped
parsley.
Makes about 6½ cups.
MEDIDASIMPORTANTES
DESEGURIDAD
Cuando se utilizan aparatos eléctricos, siempre se debe respetar
ciertas medidas de seguridad, incluyendo las siguientes:
❑
Por favor lea todas las instrucciones.
❑
A fin de protegerse contra el riesgo de un choque eléctrico,
asegúrese que la base de la licuadora, el cable y el enchufe no
puedan entrar en contacto con agua u otro líquido.
❑
Todo aparato eléctrico utilizado en la presencia de menores de
edad o por ellos mismos requiere la supervisión de un adulto.
❑
Desconecte el aparato de la toma de corriente cuando no esté
en funcionamiento, antes de instalar o retirar las piezas y antes de
limpiarlo.
❑
Evite el contacto con las piezas móviles.
❑
No se debe utilizar ningún aparato eléctrico que tenga el cable
o el enchufe averiado, que presente un problema de
funcionamiento o que esté dañado. Devuelva el aparato al
centro de servicio autorizado más cercano para que lo examinen,
reparen o ajusten o llame gratis al número que aparece en la
cubierta de este manual.
❑
El uso de accesorios no recomendados por el fabricante del
aparato, podría ocasionar fuego, descarga eléctrica o lesiones
personales.
❑
Este aparato no se debe utilizar a la intemperie.
❑
No permita que el cable cuelgue del borde de la mesa ni del
mostrador.
❑
No se debe introducir las manos ni los utensilios adentro de la
jarra, a fin de evitar el riesgo de serias lesiones a las personas
o daños a la licuadora. Se puede utilizar un raspador siempre
que la licuadora no esté en funcionamiento.
❑
Las cuchillas tienen filo y se deben manejar con prudencia.
❑
A fin de evitar el riesgo de lesiones, nunca coloque el montaje de
las cuchillas sobre la base sin antes ajustar bien la jarra.
❑
Siempre haga funcionar la licuadora con la tapa en su lugar.

NEEDHELP?
For service, repair or any questions regarding your appliance, call the appropriate
"800" number on the cover of this book. Do not return the product to the place
of purchase. Do not mail the product back to the manufacturer nor bring it to a
service center. You may also want to consult the website listed on the cover of
this manual.
One-YearLimitedWarranty
(AppliesonlyintheUnitedStatesandCanada)
Whatdoesitcover?
• Any defect in material or workmanship; provided; however, Applica’s liability
will not exceed the purchase price of the product.
Forhowlong?
• One year after the date of original purchase.
Whatwillwedotohelpyou?
• Provide you with a reasonably similar replacement product that is either
new or factory refurbished.
Howdoyougetservice?
• Save your receipt as proof of the date of sale.
• Check our on-line service site at www.prodprotect.com/applica, or call our
toll-free number, 1-800-231-9786, for general warranty service.
• If you need parts or accessories, please call 1-800-738-0245.
Whatdoesyourwarrantynotcover?
• Damage from commercial use
• Damage from misuse, abuse or neglect
• Products that have been modified in any way
• Products used or serviced outside the country of purchase
• Glass parts and other accessory items that are packed with the unit
• Shipping and handling costs associated with the replacement of the unit
• Consequential or incidental damages (Please note, however, that some states
do not allow the exclusion or limitation of consequential or incidental damages,
so this limitation may not apply to you.)
Howdoesstatelawrelatetothiswarranty?
• This warranty gives you specific legal rights, and you may also have other rights
that vary from state to state or province to province.
¿NECESITAAYUDA?
Para servicio, reparaciones o preguntas relacionadas al producto, por favor llame
al número del centro de servicio en el país donde usted compró su producto.
NO devuelva el producto al fabricante. Llame o lleve el producto a un centro de
servicio autorizado.
DOSAÑOSDEGARANTÍALIMITADA
(NoaplicaenMéxico,EstadosUnidosoCanadá)
¿Quécubrelagarantía?
• La garantía cubre cualquier defecto de materiales o de mano de obra. Applica
no se responsabiliza por ningún costo que exceda el valor de compra del
producto.
¿Porcuántotiempoesválidalagarantía?
• Por dos años a partir de la fecha original de compra.
¿Cómosepuedeobtenerservicio?
• Conserve el recibo original de compra.
• Por favor llame al número del centro de servicio autorizado.
Estagarantíanocubre:
• Los productos que han sido utilizados en condiciones distintas a las normales
• Los daños ocasionados por el mal uso, el abuso o negligencia
• Los productos que han sido alterados de alguna manera
• Los daños ocasionados por el uso comercial del producto
• Los productos utilizados o reparados fuera del país original de compra
• Las piezas de vidrio y demás accesorios empacados con el aparato
• Los gastos de tramitación y embarque asociados al reemplazo del producto
• Los daños y perjuicios indirectos o incidentales
BESOIND’AIDE?
Pour communiquer avec les services d’entretien ou de réparation, ou pour
adresser toute question relative au produit, composer le numéro sans frais
approprié indiqué sur la page couverture. Ne pas retourner le produit où il a
été acheté. Ne pas poster le produit au fabricant ni le porter dans un centre de
service. On peut également consulter le site web indiqué sur la page couverture.
Garantielimitéedeunan
(ValableseulementauxÉtats-UnisetauCanada)
Quelleestlacouverture?
• Tout défaut de main-d’oeuvre ou de matériau; toutefois, la responsabilité de la
société Applica se limite au prix d’achat du produit.
Quelleestladurée?
• Un an après l’achat original.
Quelleaideoffronsnous?
• Remplacement par un produit raisonnablement semblable nouveau ou réusiné.
Commentseprévaut-onduservice?
• Conserver son reçu de caisse comme preuve de la date d’achat.
• Visiter notre site web au www.prodprotect.com/applica, ou composer sans
frais le 1 800 231-9786, pour obtenir des renseignements généraux relatifs à la
garantie.
• On peut également communiquer avec le service des pièces et des accessoires
au 1 800 738-0245.
Qu’est-cequelagarantienecouvrepas?
• Des dommages dus à une utilisation commerciale.
• Des dommages causés par une mauvaise utilisation ou de la négligence.
• Des produits qui ont été modifiés.
• Des produits utilisés ou entretenus hors du pays où ils ont été achetés.
• Des pièces en verre et tout autre accessoire emballés avec le produit.
• Les frais de transport et de manutention reliés au remplacement du produit.
• Des dommages indirects (il faut toutefois prendre note que certains états ne
permettent pas l’exclusion ni la limitation des dommages indirects).
Quellesloisrégissentlagarantie?
• Les modalités de la présente garantie donnent des droits légaux spécifiques.
L’utilisateur peut également se prévaloir d’autres droits selon l’état ou la
province qu’il habite.
43
44

2007/11-15-64E/S/F
Copyright © 2008 Applica Consumer Products, Inc.
Made in People’s Republic of China
Printed in People’s Republic of China
Importadopor:
APPLICADEMEXICO,S.DER.L.DEC.V.
Presidente Mazaryk No111, 1er Piso
Col. Chapultepec Morales, Mexico D.F
Deleg. Miguel Hidalgo
CP 11570
MEXICO
Teléfono: (55) 1106-1400
Delinteriormarquesincosto
01 (800) 714-2503
Fabricado en la República Popular de China
Impreso en la República Popular de China
Fabriqué en République populaire de Chine
Imprimé en République populaire de Chine
is a trademark of The Black & Decker Corporation, Towson, Maryland, USA
Marca registrada de The Black & Decker Corporation, Towson, Maryland, E.U.
Marque de commerce déposée de la société The Black & Decker Corporation, Towson, Maryland, É.-U.
SellodelDistribuidor:
Fechadecompra:
Modelo:
Comercializadopor:
Applica de México, S. de R. L. de C.V.
Presidente Mazaryk No111, 1er Piso
Col. Chapultepec Morales, Mexico D.F
Deleg. Miguel Hidalgo
CP 11570
MEXICO
ServicioyReparación
Art. 123 No. 95
Col. Centro, C.P. 06050
Deleg. Cuauhtemoc
ServicioalConsumidor,
Venta de Refacciones y Accesorios
01 800 714 2503
/