American Standard 2475 Series User manual

Category
Sanitary ware
Type
User manual

This manual is also suitable for

Conecte el suministro de agua a la llave (1)con los conectores flexibles
roscados de 1/2" o con los tubos de cobre de 3/8" con conexiones
macho. Utilice la llave ajustable para apretar las conexiones . No apriete
de manera excesiva Sea cuidadoso, no retuerza los tubos de cobre
cuando los doble. Utilice un cortador para tubo, para cortar a la
longitud apropiada.
Asegure la llave(1) con las tuercas de fijación incluidas (2) (APRIETE
MANUALMENTE)
ASEGURE LA LLAVE Y HAGA LAS CONEXIONES DE ALIMENTACION
Connect water supply to FAUCET (1) with 1/2" IPS FLEXIBLE SUPPLIES
(3) or 3/8" O.D. BULL-NOSE RISERS (4). Use adjustable wrench to
tighten connections. Do not over tighten. Be careful not to kink copper
supply when bending. Use tubing cutter to cut to proper length.
Secure FAUCET (1) with ATTACHMENT NUTS (2) supplied.
(HAND TIGHTEN).
SECURE FAUCET AND MAKE WATER SUPPLY CONNECTIONS
©American Standard Inc. 2002
Product names listed herein are trademarks of American Standard Inc.
ADVERTENCIA: Cierre la tuberia de la ali mentación
del agua caliente y fría antes de comenzar lainstalación
INSTALACION
DE LA LLAVE
Instale la llave (1) sobre el lavabo. (No es necesario sellar
a menos que la cubierta de montaje en el lavabo no este
uniforme).
Desarmador Regular
Masilla de Plomero
Llave Ajustable
HERRAMIENTAS NECESARIAS
Pinzas de Plomero
Gracias por preferir American Standard…. El punto de referencia de la más fina calidad por más de
100 años. Para asegurar que su instalación se efectue de la mejor forma favor de leer estas
instrucciones cuidadosamente antes de empezar.
MEZCLADORA DE LAVABO
DUOMANDO
Raccorder l'alimentation d'eau au ROBINET (1) avec des TUYAUX
FLEXIBLES DE 1/2" IPS (3) ou des TUYAUX D'ÉVENT DÉSAXÉS DE
3/8" D.E. (4). Serrer les raccords avec la clé universelle. Ne pas trop
serrer. Veiller à ne pas crochir les tuyaux de cuivre en les pliant.
Utiliser une scie à métaux pour ramener le tuyau à la bonne longueur.
Fixer le ROBINET (1) avec les ÉCROUS DE FIXATION (2) inclus.
(SERRER À LA MAIN).
FIXER LE ROBINET ET FAIRE LES RACCORDEMENTS
D'ALIMENTATION D'EAU
ATTENTION Fermer l'alimentation d'eau chaude
et froide avant de commencer.
Installer le ROBINET (1) sur le lavabo. (Aucun scellant n'est
requis sauf si la surface du lavabo est inégale)
INSTALLER
LE ROBINET
M968740C
Turn off hot and cold water
supplies before beginning.
CAUTION
Plumbers' Putty or Caulking
Adjustable Wrench
Phillips Screwdriver
Channel Locks
TOOLS REQUIRED
1 2
Install FAUCET (1) on lavatory. (No sealant is required unless
mounting deck on lavatory is uneven)
Tournevis cruciforme
Mastic de plomberie
Clé universelle
OUTILS REQUIS
Pinces de sûreté
INSTALL FAUCET
2475 SERIES
Certified to comply with ASME A112.18.1M
Certifié ASME A112.18.1M
Nous vous remercions d'avoir choisi American Standard... synonyme de qualité
supérieure depuis plus de 100 ans. Pour s'assurer d'une installation sans
inconvénients, veuillez lire attentivement ces instructions avant de commencer.
Thank you for selecting American-Standard...the benchmark of fine
quality for over 100 years. To ensure that your installation proceeds smoothly--
please read these instructions carefully before you begin.
ROBINETS MONOPIÈCES COLONY
Installation Instructions
Instrucciones de Instalacion
Instructions d'installation
COLONY/COLONY SOFT
BAR/PANTRY FAUCETS
1
ANILLO SELLO
TUERCA DE CONEXION
(APRIETE MANUALMENTE)
2
4
3
1
EMBOUT
FERRULE
COUPLING NUT
SERRER À LA MAIN
(HAND TIGHTEN)
NOTE: LES CONDUITES D'ALIMETATION FLEXIBLES DIVENT ETRE ACHETEES SEPAREMENT
NOTA: LAS MANGUERAS FLEXIBLES DE ALIMENTACION SE TIENEN QUE COMPRAR
POR SEPARADO
NOTE: FLEXIBLE SUPPLIES HAVE TO BE PURCHASED SEPARATELY
ASSISTANCE TÉLÉPHONIQUENUMBERO DE EMERGENCIAHOTLINE FOR HELP
CANADA 1-800-387-0369 (TORONTO 1-905-306-1093)
For toll-free information and answers to your questions, call:
Para información y respuestas a sus preguntas, llame sin costo al:
Pour information et réponses à vos questions, composer sans frais:
1 800 442-1902
Weekdays Días laborales de las
Sur semaine:
8:00 to 8:00 p.m. EST
Weekdays Días laborales de las
Sur semaine:
8:00 to 7:00 p.m. EST
C
C
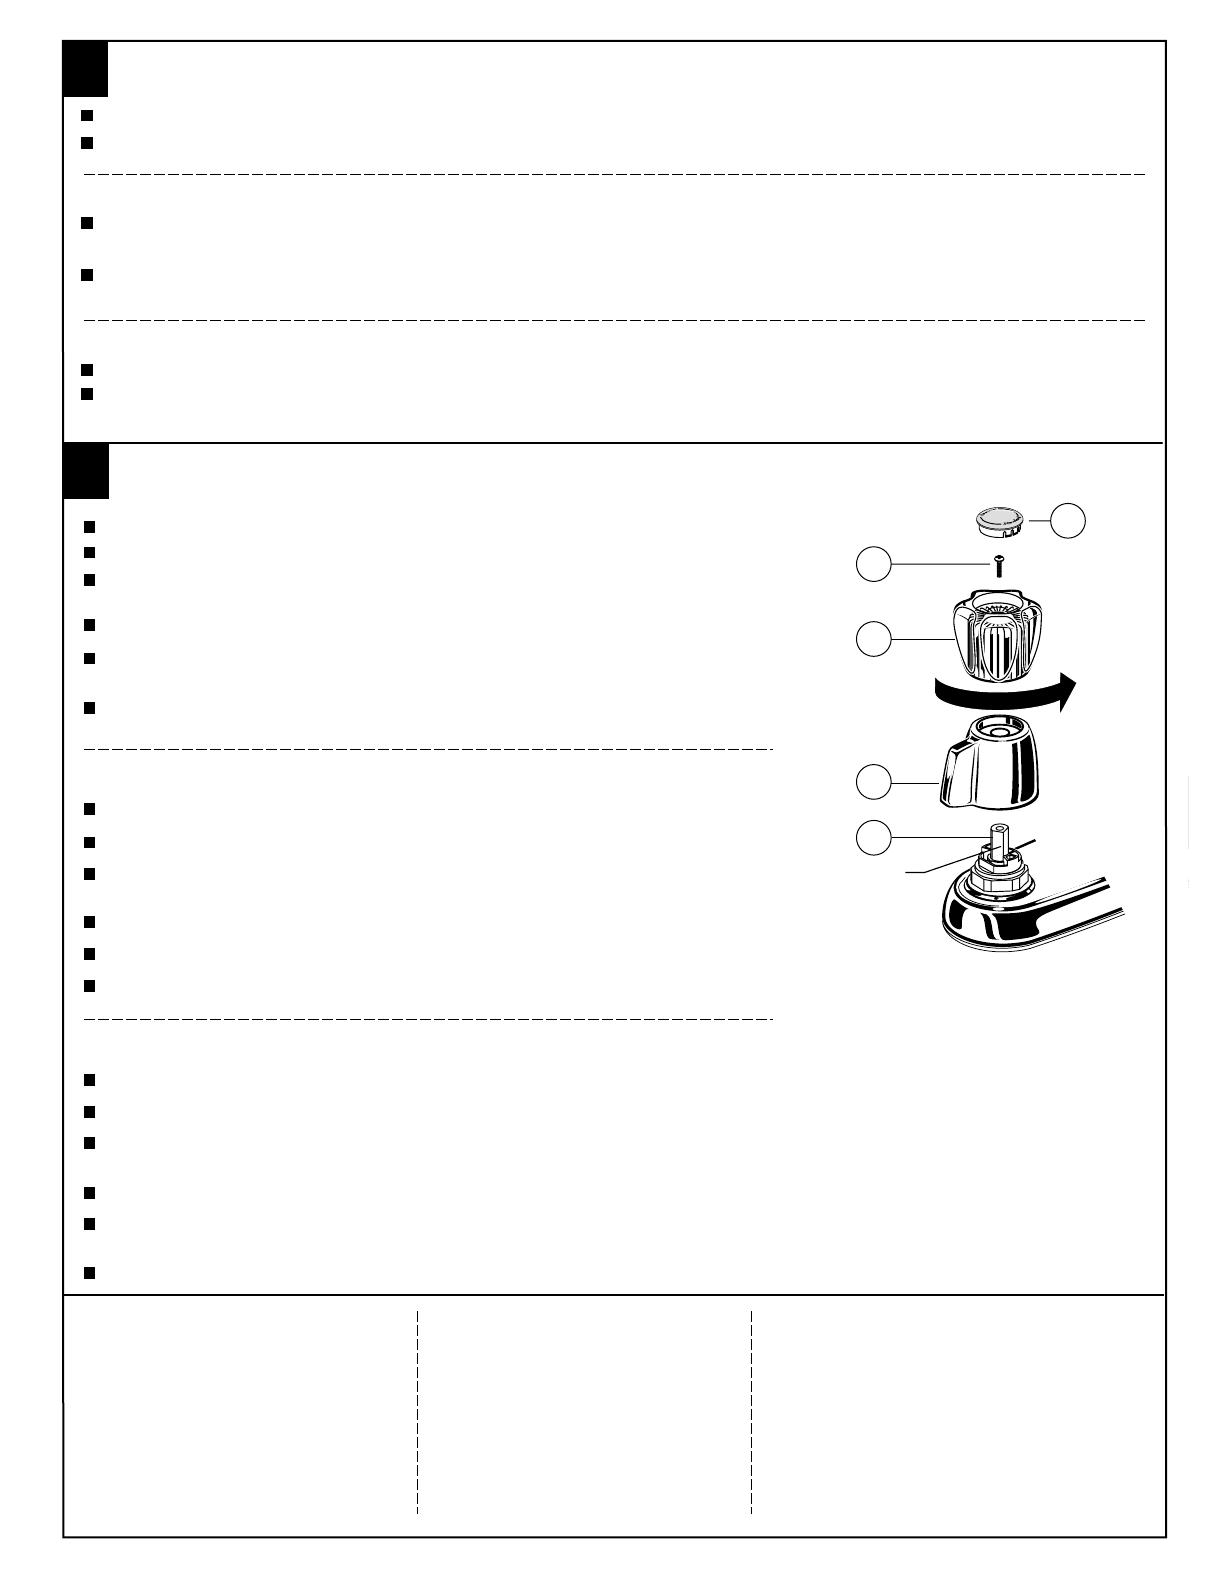
Pull out INDEX BUTTON (1) and remove HANDLE SCREW (2).
Turn VALVE to OFF position.
Girar la valvula a posición de cerrado.
Desmontar el tapón indicador (1) y el tornillo del maneral (2).
Desmontar el maneral (3) del vastago del cartucho y girar el vastago a 90 grados de tal manera
que la superficie plana en el maneral (3) atrape un plano diferente en el vastago del cartucho.(4).
Reinstalar el tornillo del maneral(2) y el botón indicador (1).
El aireador tal vez acumule suciedad, causando un flujo no uniforme del agua Remover el aireador, enjuagar y limpiar.
Si la salida gotea gire los manerales varias veces desde la posición de cerrado a la posición de abierto. No force
los manerales, solamente girelos a 90 grados.
Para cambiar la dirección de rotación
del maneral, proceda como sigue:
To change direction of handle
rotation, proceed as follows:
4
MANTENIMIENTO
SERVICE
TESTER L'INSTALLATION DU ROBINET
Operate both handles to flush water lines thoroughly. Operate LIFT ROD and check DRAIN for leaks. Replace AERATOR.
Remover el aireador con los manerales en la posición de cerrado, abrir la alimentación de agua y checar todas las
conexiones contra goteo (contra fugas)
Girar ambos manerales para dejar fluir el agua de las tuberias. Accionar la varilla del drenaje y cheque contra fugas. Reinstalar el aireador.
Remove AERATOR. With handles in OFF position, turn on water supplies and check all connections for leaks.
PRUEBA DE LA LLAVE INSTALADA
TEST INSTALLED FAUCET
Enlever l'AÉRATEUR. Les poignées en position FERMÉ, ouvrir l'alimentation d'eau et vérifier si les raccords fuient.
Ouvrir les deux POIGNÉES, rincer les conduits d'eau abondamment. Opérer la TIGE DE LEVAGE et vérifier si le VIDAGE fuit. Replacer l'AÉRATEUR.
3
FERMER la VALVE
.
Enlever le BOUTON INDEX (1) et la VIS DE LA POIGNÉE (2).
Enlever la POIGNÉE (3) de la TIGE DE LA VALVE (4) et tourner à 90° de manière à ce que le côté plat dans la POIGNÉE (3) s'emboîte à un autre
côté PLAT de la TIGE DE LA VALVE (4).
Installer à nouveau la VIS DE LA POIGNÉE (2) et le BOUTON INDEX (1).
La saleté peut s'accumuler dans l'aérateur et causer un débit d'eau plus faible ou inégal. Enlever l'aérateur
et rincer.
Si le bec coule, ouvrir et fermer les poignées plusieurs fois de suite. Ne pas forcer. Tourner seulement à 90˚.
Pour changer la direction de la rotation des poignées,
suivre les instructions suivantes
M968740C
LLANURA
FLAT
PLAT
1
2
3
4
3
Pull HANDLE (3) off VALVE STEM (4) and turn 90˚ in a way that flat in HANDLE (3) catches a different
FLAT in on VALVE STEM (4).
If spout drips, operate handles several times from OFF to ON position. Do not force-handles
turn only 90˚.
Aerator may accumulate dirt causing distorted and reduced water flow.
Remove aerator and rinse clean.
Reinstall HANDLE SCREW (2) and INDEX BUTTON (1).
CARE INSTRUCTIONS:
DO: SIMPLY RINSE THE PRODUCT CLEAN WITH
CLEAR WATER. DRY WITH A SOFT COTTON
FLANNEL CLOTH.
INSTRUCCIONES DE CUIDADO
DEL PRODUCTO:
LIMPIE EL PRODUCTO CON AGUA LIMPIA
Y SÉQUELO CON UNA TELA SUAVE DE
FRANELA DE ALGODÓN.
INSTRUCTIONS POUR L'ENTRETIEN
FAIRE : SIMPLEMENT RINCER LE PRODUIT AVEC DE
L'EAU CLAIRE JUSQU'À CE QU'IL SOIT PROPRE SÉCHER
AVEC UN LINGE DE FLANELLE DE COTON DOUX.
DO NOT: DO NOT CLEAN THE PRODUCT WITH
SOAPS, ACID, POLISH, ABRASIVES, HARSH
CLEANERS, OR A CLOTH WITH A COARSE
SURFACE.
NO LIMPIE EL PRODUCTO CON JABÓN,
ÁCIDOS, PULIDORES, ABRASIVOS,
LIMPIADORES FUERTES O TELAS ÁSPERAS.
NE PAS FAIRE : NE PAS NETTOYER LE PRODUIT AVEC
DES SAVONS, DE L'ACIDE, DU POLISH, DES ABRASIFS,
DES NETTOYANTS AGRESSIFS OU UN LINGE À TEXTURE
RUGUEUSE.
012577-YYY0A
AERATOR
AIREADOR
AÉRATEUR
012577-YYY0A
AERATOR
AIREADOR
AÉRATEUR
M961738-YYY0A
SPOUT KIT
BOQUILLA
BEC
M962210-YYY0A
SPOUT KIT
BOQUILLA
BEC
024220-0070A
SUPPLY NUT
TUERCA DE ALIMENTACION
ÉCROU DE L'ALIMENTATION
065800-0070A
ATTACHMENT NUT
Tuerca de Fijacion
ÉCROU DE FIXATION
A954120-0070A
VALVE
CARTUCHO
VALVE
M904900-0070A
VALVE NUT
TUERCA PARA LA VALVULA
ÉCROU DE LA VALVE
M918021-0070A
ADAPTER
ADAPTAR
APPROPRIER
M918075-0070A
M918504-0070A
SCREW
TORNILLO
VIS
M918504-0070A
SCREW
TORNILLO
VIS
M968740C
HANDLE SCREW
TORNILLO DE LA MANIJA
VIS DE LA POIGNÉE
M961642-YYY0A
METAL LEVER HANDLE
MANIJA METÁLICA
POIGNÉE MÉTALLIQUE PLEINE
M916516-YYY0A
LEVER HANDLE
MANERAL PALANCA
POIGNÉE LEVIER
M950152-0070A
INDEX, BUTTON, HOT
BOTON INDICADOR DE AQUA CALIENTE
BOUTON INDEX, CHAUD
M950151-0070A
INDEX, BUTTON, COLD
BOTON INDICADOR DE AQUA FRIA
BOUTON INDEX, FROID
H
CHROME, CROMO, CHROME
POLISHED BRASS, BRONCE PULIDO, LAITON POLI
002
099
Replace the "YYY" with appropriate finish code
Reemplace las letras "YYY" por el código de acabado
Remplacer le "YYY" par le code de finition approprié
2475.220
2475.300
2475.340
2475.350
2475.500
2475.540
2475.550
H
M950143-0070A
INDEX, BUTTON, COLD
Boton Indicador de Agua Fria
BOUTON INDEX, FROID
M950144-0070A
INDEX, BUTTON, HOT
Boton Indicador de Agua Caliente
BOUTON INDEX, CHAUD
M908413-0070A
ACRYLIC HANDLE
Maneral Acrilico
POIGNÉE ACRYLIQUE
M918504-0070A
SCREW
Tornillo
VIS
M953119-YYY0A
SPOUT KIT
BOQUILLA
BEC
MEZCLADORA DE LAVABO
DUOMANDO
ROBINETS MONOPIÈCES
COLONY
COLONY/COLONY SOFT
BAR/PANTRYFAUCETS
MODEL NUMBER
NÚMERO DE MODELO
NUMÉRO DE MODÈLE
1 / 1

American Standard 2475 Series User manual

Category
Sanitary ware
Type
User manual
This manual is also suitable for

Ask a question and I''ll find the answer in the document

Finding information in a document is now easier with AI

Ask the document