Rollei Actioncam S30 WiFi Owner's manual
- Category
- Camcorders
- Type
- Owner's manual
This manual is also suitable for

USER GUIDE
FOR ENGLISH | GERMAN | SPANISH | PORTUGUESE | ITALIAN
GREEK | FRENCH | DUTCH | POLISH | CZECH | RUSSIAN | HUNGARIAN
SWEDISH | FINNISH | NORWEGIAN | DANISH
facebook.com/
rollei.actioncam.en
facebook.com/
rollei.actioncam.de
24
Months Warranty
and Replacement
24
Monate
Austauschservice
Rollei Actioncam
S-30 WiFi
Page is loading ...

3
English ................................... 4 – 17
German ................................. 18 – 31
Spanish ................................. 32 – 45
Portuguese .............................. 46 – 59
Italian ................................... 60 – 73
Greek ................................... 74 – 87
French ................................. 88 – 101
Dutch ................................. 102 – 115
Polish ................................. 116 – 129
Czech ................................. 130 – 143
Russian ............................... 144 – 157
Hungarian ............................. 158 – 172
Swedish ............................... 173 – 185
Finnish ................................ 186 – 199
Norwegian ............................ 200 – 213
Danish ................................ 214 – 227
Rollei Actioncam S-30 WiFi

4
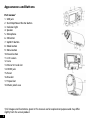
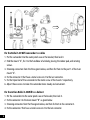
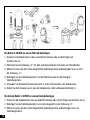
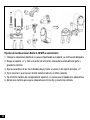
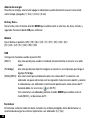
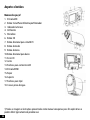
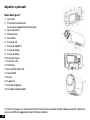
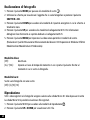
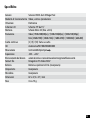
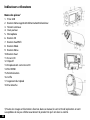
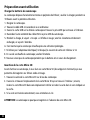
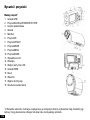
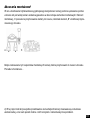
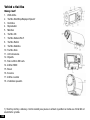
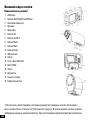
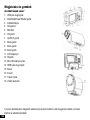
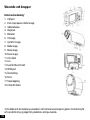
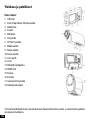
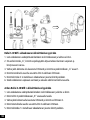
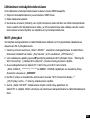
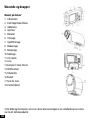
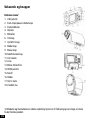
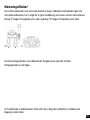
Appearances and Buttons
Part names
1
1. USB jack
2. Start/Stop/Power/Shutter button
3. Indicator light
4. Speaker
5. Microphone
6. OK button
7. Up/Wi-Fi button
8. Mode button
9. Menu button
10. Down button
11. LCD screen
12. Lens
13. Micro SD Card slot
14. HDMI jack
15. Reset
16. Bracket
17. Tripod slot
18. Water proof case
1) All images and illustrations given in this manual are for explanation purpose and may differ
slightly from the actual product.

5
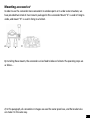
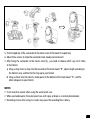
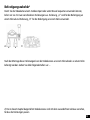
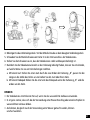
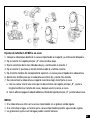
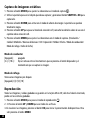
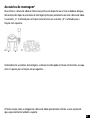
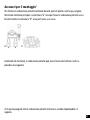
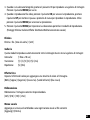
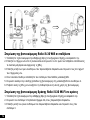
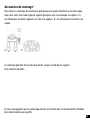
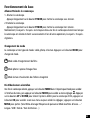
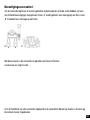
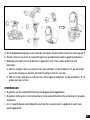
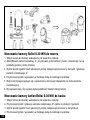
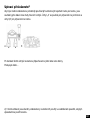
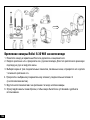
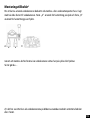
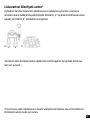
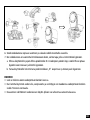
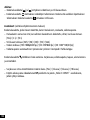
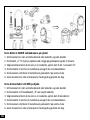
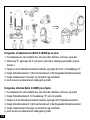
Mounting accessories
2
In order to use the camcorder more convenient in outdoor sports or in under water situations, we
have provided two kinds of main mounts packaged in this camcorder. Mount “A” is used in fixing to
a bike, and mount “B” is used in fixing to a helmet.
A B
By installing these mounts, the camcorder can be fixed to bikes or helmets. The operating steps are
as follow…
2) In this paragraph, all camcorders in images are used the water proof case, and the bracket also
can make it in the same way.

6
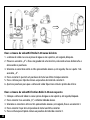
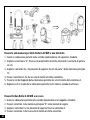
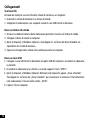
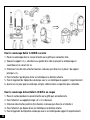
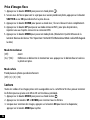
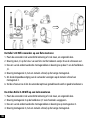
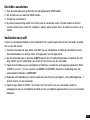
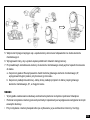
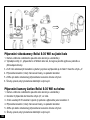
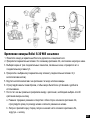
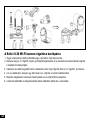
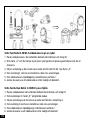
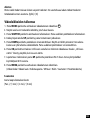
Fix the Rollei S-30 Wifi camcorder to a bike
1. Put the camcorder into the water proof case or the bracket, then lock it.
2. Find the mount “A”, fix it to the handlebar of a bike by placing the rubber pad, and rotating
screws.
3. Choosing connectors from the three given below, and then fix them to the part 1 of the main
mount “A”.
4. Fix the connector 2 that have a metal screw on it to the last connector.
5. Fix the tripod slot of the camcorder to the metal screw of the mount 2 respectively.
6. Adjust those screws to make the camcorder more steady and convenient.
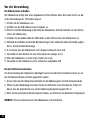
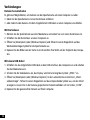
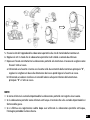
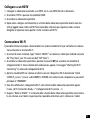
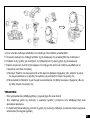
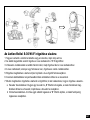
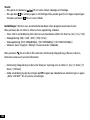
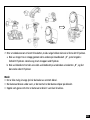
Fix the Action Rollei S-30 Wifi to a helmet
1. Put the camcorder into the water proof case or the bracket, then lock it .
2. Fix the connector 3 to the main mount “B” as given below.
3. Choosing connectors from the three given below, and then fix them to the connector 3.
4. Fix the connector 2 that have a metal screw on it to the last connector.

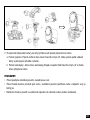
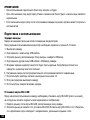
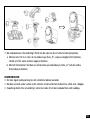
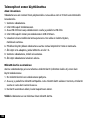
7
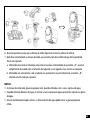
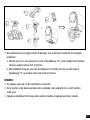
5. Fix the tripod slot of the camcorder to the metal screw of the mount 2 respectively.
6. Adjust those screws to make the camcorder more steady and convenient.
7. After fixing the camcorder to the mount correctly , you need to choose which way to fix them
to the helmet.
a) Using a strap: Insert a strap into the two ends of the main mount “B”, adjust length according to
the helmet’s size, and then tie the strap up to your helmet.
b) Using a sticker: Use the side of a sticker paste to the bottom of the main mount “B”, and the
other side paste to your helmet.
NOTES:
• Itwillrecordnosoundswhenusingthewaterproofcase
• Whenusedunderwater,thewaterproofcasewithsprayordropsisanormalphenomenon.
• Recordingatonceafterusingitinwatermaycausetherecordinglesisblurry.

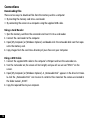
8
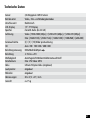
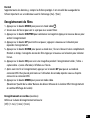
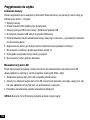
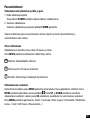
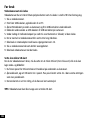
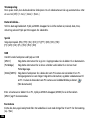
Preparing before using
Charging the camcorder
The camcorder has an internal lithium-polymer battery;
please charge it for about 6-10 hour, the first time.
1. Turn off the camcorder.
2. Find the USB cable, and connect to a computer.
3. Open the USB cover at the side of the camcorder, and find the USB jack in it.
4. Connect the other side of the USB cable to the USB jack of the camcorder.
5. During charging, the busy indicator light turns red, once the battery is fully charged, the busy
indicator light will turn off.
6. Its normal that the camcorder will become warm after extend using.
7. Don’t use the power adapter output current is below 1A.
8. Over heat of the camcorder, please turn it off.
9. Don’t use the camcorder when charging.
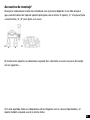
Inserting the Micro SD card
Before using this camcorder, a Micro SD Card (at least Class 4) that can save your video files and
images is necessary.
1. Find the Micro SD Card cover at the bottom of the camcorder.
2. Open it and find the Micro SD Card slot in it, then put the Micro SD Card into the slot, make sure
the direction of the card is the same as shown on the slot cover.
3. If it’s inserted successfully, you will hear a litter clear buzzer.
TIPS: The camcorder cannot record without a Micro SD Card.

9
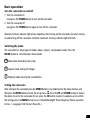
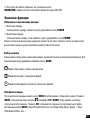
Basic operation
Turn the camcorder on and off.
1. Turn the camcorder on
Long press the POWER button to turn on the camcorder.
2. Turn the camcorder off
Long press the POWER button again to turn off the camcorder.
Normally the busy indicator light always keep blue after turning on the camcorder, but when turning
on and turning off the camcorder and other movement, the busy indicator light will flash.
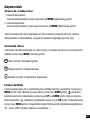
Switching the mode
The camcorder has three types of modes: video-, capture-, and playback mode. Press the
MODE button to switch between these modes.
Video mode. Recording movie clips
Capture mode. Taking still images
Playback mode. Viewing the recorded files
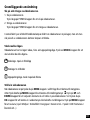
Setting the camcorder
After turning on the camcorder, press the MENU button in any mode to enter the menu interface, and
then press the MODE button to enter the set-up menu . Press the UP and DOWN button to choose
the option to set for the camcorder. At last, press the OK button to enter its submenu or to confirm
the settings, press the MENU button to exit. (Sounds/Backlight/ Power frequency/ Power save/Date
& time... / Language/ USB/ Format / Reset All...)

10
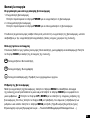
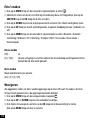
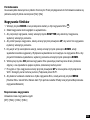
Powers save
To save power, using this function, the camcorder will turn off automatically after a period of time.
[Off] / [1 min] / [3min] / [5min]
Date & time...
Set the date and time. Press the MODE button to switch between year, month, date, hour, minute,
second. Press the OK button to confirm.
Language
Set on-screen language. [EN] / [FR] / [NL] / [ES] / [IT] /[PT] / [DE] / [DK] / [SE] /
[FI] / [GR] / [CZ[ / [PL] / [HU] / [RU] / [NO]
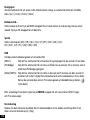
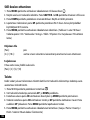
USB
Extend other functions by using USB.
[MSDC]: choose this option to enter the storage mode when connecting to a computer.
[Pictbridge]: choose this option to print images when connecting to a printer marked with the
Pictbridge logo.
[H264]/[MJPG]: choose this function to set it as a PC camera when connecting to a computer. The
operating steps as below:
Select this option; and connect the camcorder to a computer; then you can use it as
a PC camera by double click the icon in [my computer]
After connecting to a computer, Press the MODE button to switch between [MSDC] and
PC camera mode.

11
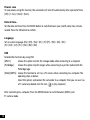
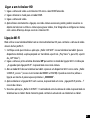
Format
Delete all datas including protected files. It is advised to download important files to a computer
before formatting.[Yes] / [No]
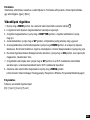
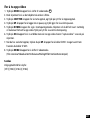
Recording movie clips
1. Press the MODE button to switch the camcorder to video mode .
2. Use the screen to view the object that you want to record.
3. Press the SHUTTER button to start recording, press it again to stop recording.
4. Press the UP button to have a pause, repeat it to recovery.
5. Press the DOWN button to enter the power save mode, and the screen is totally black. During this
time, it still records movie clips. Press it again to recover.
6. Pressing the OK button to capture a still image while recording movies, and the icon “capture
done” will show on the screen.
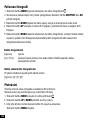
7. After exit the recording, Press the UP button to enter the Wi-Fi connection mode, for detail usage
refer to the chapter Wi-Fi connecting.
8. Press the MENU button to set the camcorder in video mode.
(Movie size/ Video quality/ White balance/ Metering / Effect /Seamless/Date stamp)
Seamless
Set the loop recording time:
[Off] / [1Min] / [3 Min] / [5 Min]

12
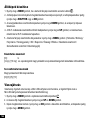
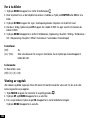
Taking still images
1. Press the MODE button to switch the camcorder to capture mode .
2. Use the screen to view the object that you want to take, press the SHUTTER or the OK button to
capture it.
3. Press the DOWN button to enter the power save mode, the screen is totally black.
4. Press the UP button to enter the Wi-Fi connection mode, the detail use refers to Wi-Fi connecting.
5. Press the MENU button to set the camcorder in capture mode. (Resolution/ Quality/ Metering/
White balance/ ISO/ Exposure / Sharpness/ Effect/Drive mode/Burst mode/ Date stamp)
Driver mode
[Off]: off
[2s] / [10s]: set a delay from the time the shutter button is pressed to the time the image is shot.
Driver mode
Take several pictures per shoot
[Off] /[3] /[5]/ [10]
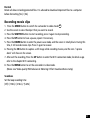
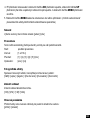
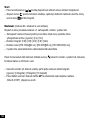
Playback
All recorded videos and images are saved on the Micro SD card, only after insert the Micro SD card
you can view the recorded files.
1. Press the MODE button to enter the playback mode .
2. Press the UP and DOWN button to view all the files.
3. When viewing images, press the OK button to start the slide show, press the MENU button to exit.
3. When playing video files, press the OK button to start playing, press the UP button to have a
pause, press it again to recover. At last, press the MENU button to stop the replay.
4. Press the MENU button to set the camcorder in playback mode. (Protect/ Delete/ Slide show/
Photo effect/ Rotate/ Resize/ Voice memo)

13
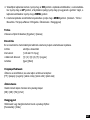
Delete
Choose to delete files. [Single] / [all]
Slide show
This mode playback all images on your memory card automatically.
Start: starts the slide show
Interval: [1 up to 10sec]
Transition: [1] /[2] /[3] /[4] /[5] /[mix]
Repeat: [Yes] /[No]
Photo effect
Set the color effect to add a color tone to the image:
[B&W] /[sepia] /[negative] /[vivid red] /[vivid green] /[vivid blue]
Resize
Resize the current image to a smaller size image.
[3M] / [2M] / [1M] / [VGA]
Voice memo
Add background music or voice recording for the current file:
[Add] /[delete]

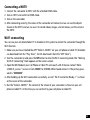
14
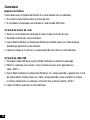
Connections
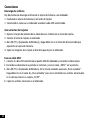
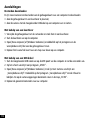
Downloading files
There are two ways to download files from the memory card to a computer:
• Byinsertingthememorycardintoacardreader
• ByconnectingthecameratoacomputerusingthesuppliedUSBcable.
Using a Card Reader
1. Eject the memory card from the camcorder and insert it into a card reader.
2. Connect the card reader to the computer.
3. Open [My Computer] or [Windows Explorer] and double-click the removable disk icon that repre-
sents the memory card.
4. Copy images from the card into a directory of your choice on your Computer.
Using a USB Cable
1. Connect the supplied USB cable to the computer‘s USB port and turn the camcorder on.
2. Turn the Camcorder on, the screen will turn bright, and you will see an icon”MSDC” on the
screen.
3. Open [My Computer] or [Windows Explorer]. A „Removable Disk“ appears in the drive list. Doub-
le-click the „Removable Disk“ icon to view its contents. Files stored on the camera are located in
the folder named „DCIM“.
4. Copy the required files to your computer.

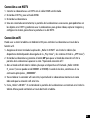
15
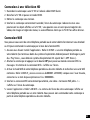
Connecting a HDTV
1. Connect the camcorder to HDTV with the attached HDMI-cable.
2. Turn on HDTV and switch to HDMI-mode.
3. Turn on the camcorder.
4. After connecting correctly, the screen of the camcorder will darken, but we can see the objects
shown on the HDTV, and we can use it to record videos, images, and set menus, just the screen is
the HDTV.
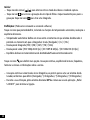
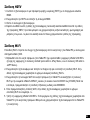
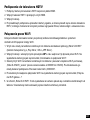
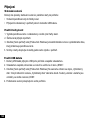
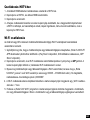
Wi-Fi connecting
You can use your cell phone/tablet PC in Android or IOS system to control the camcorder through the
Wi-Fi function.
1. Make sure you have installed the APP “Rollei S-30 WiFi” on your cell phone or tablet PC (Androids
can download from the “Play Store”, for IOS download it from the “APP Store”).
2. Turn the camcorder on and press the UP button to enter the Wi-Fi connecting mode. The “Waiting
for Wi-Fi Connecting”-Note appears on the camera screen.
3. Open the Wifi-Mode of your Cell Phone or Tablet PC and search a Wi-Fi-Device named “Rollei
S-30Wi-Fi_xxxxxx”((xxxxxx is from 000001 to 010200). When found connect it. The primary pass-
word is “00000000”
4. After building up the Wi-Fi connection successfully, an icon” Wi-Fi Connection Ready...!” is shown
on the screen of the camcorder.
5. Run the “Rollei S-30 WiFi”. The content of the Screen of your camcorder is shown on your cell
phone or tablet PC. At this time you can control it by your cell phone or tablet PC.

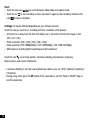
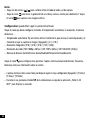
16
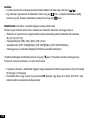
Start:
– Touch the two icon [ ][ ] to switch between video mode and capture mode.
– Touch the ico to start recording a movie clip, touch it again to stop recording. And touch the
icon to take a still photo.
Settings: (It may be different depending on your software version)
Touch the icon you want to set, including self-timer, resolution, white balance.
– Self-timer: Set a delay from the time the shutter icon is touched to the time the image is shot.
[Off] / [2s] / [10s]
– Photo resolution: [5M] / [3M] / [2M] / [1M] / [VGA]
– Video resolution: [FHD 1080p@30fps] / [HD 720P@60fps] / [HD 1280x720(30fps)]
– White balance: Auto/Daylight/Cloudy/Fluorescent/Incandescent
Touch the icon , to set more options. Continues shooting, white balance, frequency,
format camera, and version information.
– Continues shooting: it will take several photos per shoot as you set. [Off]/ [3 photos]/ [5 photos] /
[10 photos]
– During using, either press the UP button of the camcorder or exit the “Rollei S-30 WiFi” App to
end the connection.

17
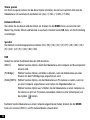
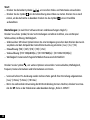
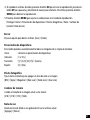
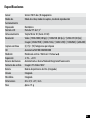
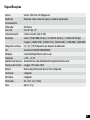
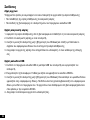
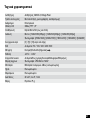
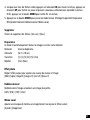
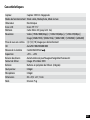
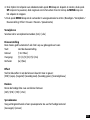
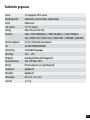
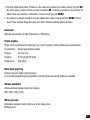
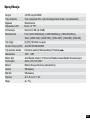
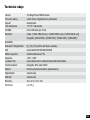
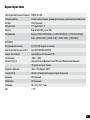
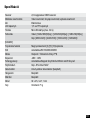
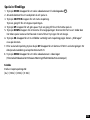
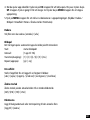
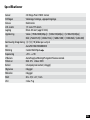
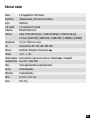
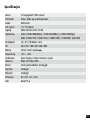
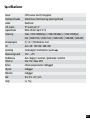
Specification
Sensor 2.0 Mega Pixel CMOS Sensor
Operation modes Video mode, Capture mode, Playback mode
Shutter Electronic
LCD screen 1.5“ TFT Screen
Storage Micro SD card (up to 32G)
Resolution Video: [1920x1080(30fps)] / [1280x720(60fps)] / [1280x720(30fps)]
Image: [2560x1920] / [2048x1536] / [1600x1200] / [1280x960] / [640x480]
Continue shoot [3] / [5] / [10] frames per shoot
ISO Auto/50/100/200/400/800
Metering Center/Multi/Spot
Exposure -2EV~ +2EV
White balance Auto/Daylight/Cloudy/Tungsten/Fluor H
File format Image: JPG Video: MOV
Battery Lithium-polymer battery(build in)
Speaker Build in
Microphone Build in
Dimension 82 x 47.2 x 27.1 mm
Weight About 75 g
Page is loading ...
Page is loading ...
Page is loading ...
Page is loading ...
Page is loading ...
Page is loading ...
Page is loading ...
Page is loading ...
Page is loading ...
Page is loading ...
Page is loading ...
Page is loading ...
Page is loading ...
Page is loading ...
Page is loading ...
Page is loading ...
Page is loading ...
Page is loading ...
Page is loading ...
Page is loading ...
Page is loading ...
Page is loading ...
Page is loading ...
Page is loading ...
Page is loading ...
Page is loading ...
Page is loading ...
Page is loading ...
Page is loading ...
Page is loading ...
Page is loading ...
Page is loading ...
Page is loading ...
Page is loading ...
Page is loading ...
Page is loading ...
Page is loading ...
Page is loading ...
Page is loading ...
Page is loading ...
Page is loading ...
Page is loading ...
Page is loading ...
Page is loading ...
Page is loading ...
Page is loading ...
Page is loading ...
Page is loading ...
Page is loading ...
Page is loading ...
Page is loading ...
Page is loading ...
Page is loading ...
Page is loading ...
Page is loading ...
Page is loading ...
Page is loading ...
Page is loading ...
Page is loading ...
Page is loading ...
Page is loading ...
Page is loading ...
Page is loading ...
Page is loading ...
Page is loading ...
Page is loading ...
Page is loading ...
Page is loading ...
Page is loading ...
Page is loading ...
Page is loading ...
Page is loading ...
Page is loading ...
Page is loading ...
Page is loading ...
Page is loading ...
Page is loading ...
Page is loading ...
Page is loading ...
Page is loading ...
Page is loading ...
Page is loading ...
Page is loading ...
Page is loading ...
Page is loading ...
Page is loading ...
Page is loading ...
Page is loading ...
Page is loading ...
Page is loading ...
Page is loading ...
Page is loading ...
Page is loading ...
Page is loading ...
Page is loading ...
Page is loading ...
Page is loading ...
Page is loading ...
Page is loading ...
Page is loading ...
Page is loading ...
Page is loading ...
Page is loading ...
Page is loading ...
Page is loading ...
Page is loading ...
Page is loading ...
Page is loading ...
Page is loading ...
Page is loading ...
Page is loading ...
Page is loading ...
Page is loading ...
Page is loading ...
Page is loading ...
Page is loading ...
Page is loading ...
Page is loading ...
Page is loading ...
Page is loading ...
Page is loading ...
Page is loading ...
Page is loading ...
Page is loading ...
Page is loading ...
Page is loading ...
Page is loading ...
Page is loading ...
Page is loading ...
Page is loading ...
Page is loading ...
Page is loading ...
Page is loading ...
Page is loading ...
Page is loading ...
Page is loading ...
Page is loading ...
Page is loading ...
Page is loading ...
Page is loading ...
Page is loading ...
Page is loading ...
Page is loading ...
Page is loading ...
Page is loading ...
Page is loading ...
Page is loading ...
Page is loading ...
Page is loading ...
Page is loading ...
Page is loading ...
Page is loading ...
Page is loading ...
Page is loading ...
Page is loading ...
Page is loading ...
Page is loading ...
Page is loading ...
Page is loading ...
Page is loading ...
Page is loading ...
Page is loading ...
Page is loading ...
Page is loading ...
Page is loading ...
Page is loading ...
Page is loading ...
Page is loading ...
Page is loading ...
Page is loading ...
Page is loading ...
Page is loading ...
Page is loading ...
Page is loading ...
Page is loading ...
Page is loading ...
Page is loading ...
Page is loading ...
Page is loading ...
Page is loading ...
Page is loading ...
Page is loading ...
Page is loading ...
Page is loading ...
Page is loading ...
Page is loading ...
Page is loading ...
Page is loading ...
Page is loading ...
Page is loading ...
Page is loading ...
Page is loading ...
Page is loading ...
Page is loading ...
Page is loading ...
Page is loading ...
Page is loading ...
Page is loading ...
Page is loading ...
Page is loading ...
Page is loading ...
Page is loading ...
Page is loading ...
Page is loading ...
Page is loading ...
Page is loading ...
Page is loading ...
Page is loading ...
Page is loading ...
Page is loading ...

Service:
Rollei Service Germany
Denisstraße 28a
D-67663 Kaiserslautern
Hotline +49 (0)6 31/3 42 84 49
Distribution:
RCP Technik GmbH & Co. KG
Tarpen 40/Gebäude 7b
D-22419 Hamburg
Subject to technical changes!
www.rollei.com
-
 1
1
-
 2
2
-
 3
3
-
 4
4
-
 5
5
-
 6
6
-
 7
7
-
 8
8
-
 9
9
-
 10
10
-
 11
11
-
 12
12
-
 13
13
-
 14
14
-
 15
15
-
 16
16
-
 17
17
-
 18
18
-
 19
19
-
 20
20
-
 21
21
-
 22
22
-
 23
23
-
 24
24
-
 25
25
-
 26
26
-
 27
27
-
 28
28
-
 29
29
-
 30
30
-
 31
31
-
 32
32
-
 33
33
-
 34
34
-
 35
35
-
 36
36
-
 37
37
-
 38
38
-
 39
39
-
 40
40
-
 41
41
-
 42
42
-
 43
43
-
 44
44
-
 45
45
-
 46
46
-
 47
47
-
 48
48
-
 49
49
-
 50
50
-
 51
51
-
 52
52
-
 53
53
-
 54
54
-
 55
55
-
 56
56
-
 57
57
-
 58
58
-
 59
59
-
 60
60
-
 61
61
-
 62
62
-
 63
63
-
 64
64
-
 65
65
-
 66
66
-
 67
67
-
 68
68
-
 69
69
-
 70
70
-
 71
71
-
 72
72
-
 73
73
-
 74
74
-
 75
75
-
 76
76
-
 77
77
-
 78
78
-
 79
79
-
 80
80
-
 81
81
-
 82
82
-
 83
83
-
 84
84
-
 85
85
-
 86
86
-
 87
87
-
 88
88
-
 89
89
-
 90
90
-
 91
91
-
 92
92
-
 93
93
-
 94
94
-
 95
95
-
 96
96
-
 97
97
-
 98
98
-
 99
99
-
 100
100
-
 101
101
-
 102
102
-
 103
103
-
 104
104
-
 105
105
-
 106
106
-
 107
107
-
 108
108
-
 109
109
-
 110
110
-
 111
111
-
 112
112
-
 113
113
-
 114
114
-
 115
115
-
 116
116
-
 117
117
-
 118
118
-
 119
119
-
 120
120
-
 121
121
-
 122
122
-
 123
123
-
 124
124
-
 125
125
-
 126
126
-
 127
127
-
 128
128
-
 129
129
-
 130
130
-
 131
131
-
 132
132
-
 133
133
-
 134
134
-
 135
135
-
 136
136
-
 137
137
-
 138
138
-
 139
139
-
 140
140
-
 141
141
-
 142
142
-
 143
143
-
 144
144
-
 145
145
-
 146
146
-
 147
147
-
 148
148
-
 149
149
-
 150
150
-
 151
151
-
 152
152
-
 153
153
-
 154
154
-
 155
155
-
 156
156
-
 157
157
-
 158
158
-
 159
159
-
 160
160
-
 161
161
-
 162
162
-
 163
163
-
 164
164
-
 165
165
-
 166
166
-
 167
167
-
 168
168
-
 169
169
-
 170
170
-
 171
171
-
 172
172
-
 173
173
-
 174
174
-
 175
175
-
 176
176
-
 177
177
-
 178
178
-
 179
179
-
 180
180
-
 181
181
-
 182
182
-
 183
183
-
 184
184
-
 185
185
-
 186
186
-
 187
187
-
 188
188
-
 189
189
-
 190
190
-
 191
191
-
 192
192
-
 193
193
-
 194
194
-
 195
195
-
 196
196
-
 197
197
-
 198
198
-
 199
199
-
 200
200
-
 201
201
-
 202
202
-
 203
203
-
 204
204
-
 205
205
-
 206
206
-
 207
207
-
 208
208
-
 209
209
-
 210
210
-
 211
211
-
 212
212
-
 213
213
-
 214
214
-
 215
215
-
 216
216
-
 217
217
-
 218
218
-
 219
219
-
 220
220
-
 221
221
-
 222
222
-
 223
223
-
 224
224
-
 225
225
-
 226
226
-
 227
227
-
 228
228


Rollei Actioncam S30 WiFi Owner's manual
- Category
- Camcorders
- Type
- Owner's manual
- This manual is also suitable for
Ask a question and I''ll find the answer in the document
Finding information in a document is now easier with AI
in other languages
- italiano: Rollei Actioncam S30 WiFi Manuale del proprietario
- français: Rollei Actioncam S30 WiFi Le manuel du propriétaire
- español: Rollei Actioncam S30 WiFi El manual del propietario
- Deutsch: Rollei Actioncam S30 WiFi Bedienungsanleitung
- русский: Rollei Actioncam S30 WiFi Инструкция по применению
- Nederlands: Rollei Actioncam S30 WiFi de handleiding
- português: Rollei Actioncam S30 WiFi Manual do proprietário
- dansk: Rollei Actioncam S30 WiFi Brugervejledning
- polski: Rollei Actioncam S30 WiFi Instrukcja obsługi
- čeština: Rollei Actioncam S30 WiFi Návod k obsluze
- svenska: Rollei Actioncam S30 WiFi Bruksanvisning
- suomi: Rollei Actioncam S30 WiFi Omistajan opas
Related papers
Other documents
-
Easypix DVC-5227 User manual
-
Easypix DVC 5227 Operating instructions
-
AIPTEK Z5X5P User manual
-
-
Silvercrest SCW 5 A2 User Manual And Service Information
-
-
AIPTEK SportyCam Z3 User manual
-
Midland Street Guardian + User manual
-
Clas Ohlson SD18B User manual
-
Midland Street Guardian Flat, Dashcam Kamera Owner's manual