Page is loading ...

ENGLISH
FRANÇAIS
ESPAÑOL
Hide-away TV tuner
Syntoniseur de télévision déporté
Owner’s Manual
GEX-6100TV
Mode d’emploi

1
Contents
Dear Customer ............................................ 2
Before Using This Product ...................... 3
About This Product .......................................... 3
About This Manual ............................................ 4
Important .......................................................... 4
Precaution .......................................................... 5
-
After-sales Service for Pioneer Products
Basic Operation ........................................ 6
Basic Operation of TV Tuner ............................ 6
Preset Tuning .................................................... 8
BSSM (Best Station Sequential Memory) ........ 8
Confirming Current Channel and
Other Settings ............................................ 9
Manual Preset Channel Setting ........................ 9
Connecting the Units .............................. 11
The Booster Switch ........................................ 11
Installation ................................................ 13
Installing the unit ............................................ 13
Setting the Antenna unit .................................. 14
-
Mounting Location
Installing the Antenna unit .............................. 16
Specifications .......................................... 17

2
ENGLISH ESPAÑOL DEUTSCH FRANÇAIS
ITALIANO NEDERLANDS
Selecting fine audio equipment such as the unit you’ve just purchased is only the start of your
musical enjoyment. Now it’s time to consider how you can maximize the fun and excitement your
equipment offers. This manufacturer and the Electronic Industries Association’s Consumer
Electronics Group want you to get the most out of your equipment by playing it at a safe level.
One that lets the sound come through loud and clear without annoying blaring or distortion—and,
most importantly, without affecting your sensitive hearing.
Sound can be deceiving. Over time your hearing “comfort level” adapts to higher volumes of
sound. So what sounds “normal” can actually be loud and harmful to your hearing. Guard against
this by setting your equipment at a safe level BEFORE your hearing adapts.
To establish a safe level:
• Start your volume control at a low setting.
• Slowly increase the sound until you can hear it comfortably and clearly, and without distor-
tion.
Once you have established a comfortable sound level:
• Set the dial and leave it there.
Taking a minute to do this now will help to prevent hearing damage or loss in the future. After all,
we want you listening for a lifetime.
We Want You Listening For A Lifetime
Used wisely, your new sound equipment will provide a lifetime of fun and enjoyment. Since
hearing damage from loud noise is often undetectable until it is too late, this manufacturer and the
Electronic Industries Association’s Consumer Electronics Group recommend you avoid pro-
longed exposure to excessive noise. This list of sound levels is included for your protection.
Decibel
Level Example
30 Quiet library, soft whispers
40 Living room, refrigerator, bedroom away from traffic
50 Light traffic, normal conversation, quiet office
60 Air conditioner at 20 feet, sewing machine
70 Vacuum cleaner, hair dryer, noisy restaurant
80 Average city traffic, garbage disposals, alarm clock at two feet.
THE FOLLOWING NOISES CAN BE DANGEROUS UNDER CONSTANT EXPOSURE
90 Subway, motorcycle, truck traffic, lawn mower
100 Garbage truck, chain saw, pneumatic drill
120 Rock band concert in front of speakers, thunderclap
140 Gunshot blast, jet plane
180 Rocket launching pad
Information courtesy of the Deafness Research Foundation.

3
Before Using This Product
About This Product
This product is a TV tuner for reception of TV broadcasts. Combining it with a separately
sold Over Head display AVR-W6100 lets you enjoy TV entertainment. The tuner frequen-
cies on this product are allocated for use in Western and Eastern Europe. Use in other areas
may result in improper reception. (This product is not compatible with channels in France.)
WARNING
• Do not place the display in a position where it will impede the driver’s visi-
bility or affect the operation of your vehicle’s airbags.
• The driver should not operate this product, which should be installed in a
location where the driver cannot see it.
[For Canadian model]
This Class B digital apparatus complies with Canadian ICES-003.
Information to User
Alternation or modifications carried out without appropriate authorization may
invalidate the user’s right to operate the equipment.

About This Manual
In this manual, the remote control is explained on the AVR-W6100’s Owner’s Manual.
This product features a number of sophisticated functions ensuring superior reception and
operation. All are designed for the easiest possible use, but many are not self-explanatory.
This operation manual is intended to help you benefit fully from their potential and to
maximize your listening enjoyment.
We recommend that you familiarize yourself with the functions and their operation by
reading through the manual before you begin using this product. It is especially important
that you read and observe the “Precaution” on next page and in other sections.
Important
The serial number of this device is located on the bottom of this product. For your own
security and convenience, be sure to record this number on the enclosed warranty card.
When using with a Pioneer Over Head Display AVR-W6100, please read the Over
Head display’s Owner’s Manual.
4
ENGLISH ESPAÑOL DEUTSCH FRANÇAIS
ITALIANO NEDERLANDS

5
Before Using This Product
Precaution
• Keep this manual handy as a reference for operating procedures and precautions.
• Always keep the volume low enough for outside sounds to be audible.
• Protect this product from moisture.
• If the battery is disconnected, the preset memory will be erased and must be
reprogrammed.
After-sales Service for Pioneer Products
Please contact the dealer or distributor from where you purchased the product for its after-
sales service (including warranty conditions) or any other information. In case the necessary
information is not available, please contact the companies listed below:
Please do not ship your product to the companies at the addresses listed below for repair
without advance contact.
For warranty information please see the Limited Warranty sheet included with your product.
7 U.S.A.
Pioneer Electronics (U.S.A.), Inc.
CUSTOMER SUPPORT
DIVISION
P.O. Box 1760
Long Beach, CA 90801-1760
800-421-1404
7 CANADA
Pioneer Electronics of Canada, Inc.
CUSTOMER SATISFACTION
DEPARTMENT
300 Allstate Parkway,
Markham, Ontario L3R OP2
(905) 479-4411
1-877-283-5901

Basic Operation
Basic Operation of TV Tuner
1. Select the TV source on the Over Head Display.
For details, refer to the connected unit’s manual.
Each press changes the Source ... Source Channel
2. Select the desired band.
TV1 = TV2
TV1
4
2345812
21 30 38 45 56 69
TV 4ch
When using with a Pioneer Over Head Display AVR-W6100, please read the Over
Head display’s Owner’s Manual.
6
ENGLISH ESPAÑOL DEUTSCH FRANÇAIS
ITALIANO NEDERLANDS

7
Basic Operation
3. Select the desired channel.
This product’s lets you select the tuning by changing the length of the time you press the
button.
Manual Tuning (step by step) 0.5 seconds or less
Seek Tuning 0.5 seconds or more
Note:
• If you continue pressing the button for longer than 0.5 seconds, you can skip broadcasting stations.
Seek Tuning starts as soon as you stop pressing the button.
• To select channels with the AVR-W6100’s main unit, first switch the selection mode to
MANUAL/SEEK. Each time you simultaneously press the 2/3 CH button, the mode switches
between MANUAL/SEEK and PRESET. Next, switch channels with a CH button.
4. Turn off the system.
TV1
4
SEEK

Preset Tuning
Up to 12 stations can be memorized in 1 Band.
In regions where reception of no more than 12 station is possible, previously memorized
stations may remain in memory.
• Select the desired preset channel.
Band Preset Number Selection mode
Note:
• To select channels with the AVR-W6100’s main unit, first switch the selection mode to
MANUAL/SEEK. Each time you simultaneously press the 2/3 CH button, the mode switches
between MANUAL/SEEK and PRESET. Next, switch channels with a CH button.
BSSM (Best Station Sequential Memory)
The BSSM function automatically memorizes strongly transmitted broadcast stations in
order from the lowest channel up.
• To switch the BSSM ON, press the CH CALL button for 2 seconds.
Each press changes the Mode ...
• To cancel the process, press the CH CALL button for 2 seconds again before
memorization is complete.
BSSM
JUST A MOMENT PLEASE.
TV1
4
PRESET
P12
8
ENGLISH ESPAÑOL DEUTSCH FRANÇAIS
ITALIANO NEDERLANDS

9
Basic Operation
Confirming Current Channel and Other Settings
If the current audio source is TV, reception information such as the channel and band is
displayed. You can also display to the preset channel list.
• Select the desired mode in the following order:
(CH CALL)
Each press changes the Mode ...
Channel Recall = Preset channel list = Indication OFF
(Preset channel list)
Channels memorized (preset) in that Band
Note:
• Recalled indications are displayed for 8 seconds.
Manual Preset Channel Setting
You can preset up to 12 channels per band manually.
1. Display a menu screen and select [PRESET CHANNEL SETTING] menu.
(Refer to the connected unit’s manual.)
2. Choose [PRESET NO.].
PRESET NO .
1[2
ch
]
COUNTRY SETTING
TV1
4
2345812
21 30 38 45 56 69
TV1
4

3. Select the Preset Number you want to use for presetting.
4. Select [CHANNEL NO.].
5. Select the channel you want to preset.
6. Select [OK].
7. Press the 22/33 button to preset.
COUNTRY SETTING
COUNTRY SETTING
COUNTRY SETTING
COUNTRY SETTING
PRESET NO .
3[4
ch
]
COUNTRY SETTING
10
ENGLISH ESPAÑOL DEUTSCH
FRANÇAIS ITALIANO
NEDERLANDS

Note:
• This unit is for vehicles with a 12-volt battery and
negative grounding. Before installing it in a recre-
ational vehicle, truck, or bus, check the battery
voltage.
• To avoid shorts in the electrical system, be sure to
disconnect the (–) battery cable before beginning
installation.
• Refer to the owner’s manual for details on con-
necting the other units, then make connections
correctly.
• Secure the wiring with cable clamps or adhesive
tape. To protect the wiring, wrap adhesive tape
around them where they lie against metal parts.
• Route and secure all wiring so it cannot touch any
moving parts, such as the gear shift, handbrake
and seat rails. Do not route wiring in places that
get hot, such as near the heater outlet. If the insu-
lation of the wiring melts or gets torn, there is a
danger of the wiring short-circuiting to the vehicle
body.
• To minimize noise locate the TV antenna cable,
radio antenna cable and RCA cable as far away
from each other as possible.
The Booster Switch
This product features a booster switch.
Usually, leave this set to the ON posi-
tion to boost reception sensitivity. Set
to the OFF position if the picture is
unstable.
Change the switch’s ON/OFF setting
using the tip of a ballpoint pen or other
pointed object.
11
Connecting the Units

12
ENGLISH ESPAÑOL DEUTSCH FRANÇAIS
ITALIANO NEDERLANDS
This product
TV antenna plug
6 m [236 in.]
Element
Booster amp
section
Fuse resistor [1 A]
Black (ground)
To vehicle (metal )body.
Red (ACC)
To the electric terminal
controlled by the ignition
switch (12 V DC)
ON/OFF.
Do not connect this lead
to power source
terminals to which
power is continuously
supplied. If the lead is
connected to such
terminals, the battery
may be drained.
Cap
When not using this
terminal, do not
remove the cap.
TV tuner connection cable
Commercially
available diversity
unit
AVR-W6100
6 m [236 in.]
6 m [236 in.]
6 m [236 in.]

13
Installation
Installing the unit
Car mat or chassis
Velcro tape

14
ENGLISH ESPAÑOL DEUTSCH FRANÇAIS
ITALIANO NEDERLANDS
Note:
• Before finally installing the unit, connect the
wiring temporarily, making sure it is all connect-
ed up properly, and the unit and the system work
properly.
• Use only the parts included with the unit to ensure
proper installation. The use of unauthorized parts
can cause malfunctions.
• Consult with your nearest dealer if installation
requires the drilling of holes or other modifica-
tions of the vehicle.
• Install the unit where it does not get in the dri-
ver’s way and cannot injure the passenger if there
is a sudden stop, like an emergency stop.
• When mounting this unit, make sure none of the
leads are trapped between this unit and the sur-
rounding metalwork or fittings.
• Do not mount this unit near the heater outlet,
where it would be affected by heat, or near the
doors, where rainwater might splash onto it.
(Never install in locations such as the above
because of the danger of malfunction due to high
temperatures.)
• Before drilling any mounting holes always check
behind where you want to drill the holes. Do not
drill into the gas line, brake line, electrical wiring
or other important parts.
• If this unit is installed in the passenger compart-
ment, anchor it securely so it does not break free
while the car is moving, and cause injury or an
accident.
• If this unit is installed under a front seat, make
sure it does not obstruct seat movement. Route all
leads and cords carefully around the sliding mech-
anism so they do not get caught or pinched in the
mechanism and cause a short circuit.
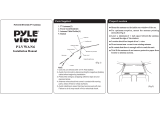
Setting the Antenna unit
Note:
• Mount the antenna on the inside of the car on
fixed windows such as rear windows or hatchback
windows.
• To assure optimum reception, it is recommended
you mount the TV antenna on a rear (hatchback)
windows pointing down as shown in the Fig. 1,
Fig. 2 and Fig. 3.
• Mounting the antenna near a radio antenna (par-
ticularly a booster type) will result in noise. In
this case, consult your dealer concerning mount-
ing location.
• If the antenna is mounted near a radio antenna,
reception quality may be effected during simulta-
neous reception of TV and radio broadcasts.
• You may not be able to mount the antenna on
windows of certain size, Be sure to select a win-
dow that is large enough.
• Before mounting the antenna, check the location of
the unit you are going to connect the antenna to, and
make sure it is near enough for the antenna cable to
reach (Antenna cable length: 6 m [236 in.]).
• If you use this product in areas where the broad-
cast signal is weak, the included antenna’s sensi-
tivity may fall, resulting in a poor picture.
• Never install on top of a glass antenna or heating
wires.
• Secure the antenna firmly, and do not use if it
comes loose. If the antenna falls down, the tips of
the elements may cause injury.
• After installing, make sure children don’t play
with it as it may result in unexpected injury.

Mounting Location
7 Example 1: Mounting on a rear
window (Fig. 1)
1. Clamps
7 Example 2: Mounting on a hatchback
window (Fig. 2)
1. Clamps
When mounting on a hatchback win-
dow, use clamps where necessary to
assure the cable is not stretched or does
not cause an obstruction when the hatch
is opened or closed.
7 Example 3: Mounting on a rear side
window (Fig. 3)
1. Clamps
Note:
• Install the antenna on the window on the driver’s
side of the car.
• Do not install with the antenna elements together
as this reduces reception sensitivity.
Warm the window glass when the
air temperature is low.
To prevent a reduction in adhesive strength ON
the car heater or rear defogger to warm the glass
to a temperature of 20˚C or more.
1
1
1
15
Installation

16
ENGLISH ESPAÑOL DEUTSCH FRANÇAIS
ITALIANO NEDERLANDS
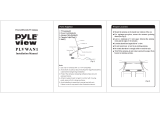
Installing the Antenna unit
1. Decide on the location for the boost-
er amp section.
When sticking on the booster amp sec-
tion, make sure there is a space of
20 mm [3/4 in.] or more between the
edge of the window and the antenna
elements.
1. Boost amp section
Decide on a suitable location for
mounting before removing the pro-
tective paper.
2. Antenna element
2. Remove humidity, dirt and oil from
the window with the supplied
cleaner.
• Apply the supplied cleaner to a clean cloth
and wipe, applying a little pressure.
• Dry thoroughly with another clean cloth.
1. Cleaner (supplied)
2. Window glass
3. Mounting the booster amp section.
1. Remove the protective paper and
stick on.
2. Boost amp section
4. Sticking antenna elements to a win-
dow.
Stick on the holder near the booster
amp section, and then the antenna tops.
2
1
1
2
20 mm
[3/4 in.]
20 mm
[3/4 in.]
1
2

General
Power source ............................................................................................................................................ 9.0 V DC
Grounding system .............................................................................................................................. Negative type
Max. current consumption .............................................................................................................................. 0.5 A
Dimensions ............................................................................................................ 82 (W) × 28 (H) × 166 (D) mm
............................................................................................................[3-1/4 (W) × 1−1/8 (H) × 6−1/2 (D) in.]
Weight ............................................................................................................................................ 0.35 kg [0.8 lbs]
TV tuner
Reception channel/TV system ............................................................ US/M: VHF 2 — 13 ch, UHF 14 — 69 ch
Color system ....................................................................................................................................NTSC compatible
Usable sensitivity .................................................................................................................... 14 dBµ (75 Ω, mono)
Video S/N ................................................................................ Over 37 dB (59 dBµ RF input, White Peak 100%)
Video S/N 30 dB usable sensitivity ............................................................................................................ 46 dBµ
Antenna input ........................................................................................................ 1 ch (φ 3.5 mm Mini plug type)
Antenna cable ...................................................................................................................................... 6 m [236 in.]
Note:
• Specifications and the design are subject to possible modification without notice due to improvements.
17
Specifications

Published by Pioneer Corporation.
Copyright © 2002 by Pioneer Corporation.
All rights reserved.
Publication de Pioneer Corporation.
Copyright © 2002 Pioneer Corporation.
Tous droits de reproduction et de traduction
réservés.
Printed in Japan
Imprimé au Japon
<CRD3641-B> UC<KFJNF/02D00001>
PIONEER CORPORATION
4-1, MEGURO 1-CHOME, MEGURO-KU, TOKYO 153-8654, JAPAN
PIONEER ELECTRONICS (USA) INC.
P.O. Box 1540, Long Beach, California 90801-1540, U.S.A.
TEL: (800) 421-1404
PIONEER EUROPE NV
Haven 1087, Keetberglaan 1, B-9120 Melsele, Belgium
TEL: (0) 3/570.05.11
PIONEER ELECTRONICS ASIACENTRE PTE. LTD.
253 Alexandra Road, #04-01, Singapore 159936
TEL: 65-6472-1111
PIONEER ELECTRONICS AUSTRALIA PTY. LTD.
178-184 Boundary Road, Braeside, Victoria 3195, Australia
TEL: (03) 9586-6300
PIONEER ELECTRONICS OF CANADA, INC.
300 Allstate Parkway, Markham, Ontario L3R OP2, Canada
TEL: (905) 479-4411
PIONEER ELECTRONICS DE MEXICO, S.A. de C.V.
San Lorenzo 1009 3er. Piso Desp. 302
Col. Del Valle Mexico, D.F. C.P. 03100
TEL: 55-5688-52-90
/