Page is loading ...
Page is loading ...
Page is loading ...
Page is loading ...

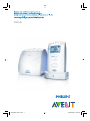
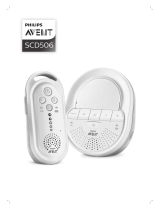
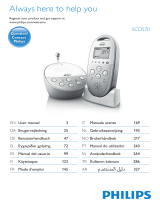
SCD520
ENGLISH 6
ESPAÑOL 26
FRANÇAIS (CANADA) 48
4222.002.7190.1.indd 54222.002.7190.1.indd 5 03-09-2008 14:30:5103-09-2008 14:30:51

6
IMPORTANT
SAFETY
INSTRUCTIONS
Some of the following information may not apply to your particular
product; however, when using baby monitor equipment, basic safety
precautions should always be followed to reduce the risk of fi re, electric
shock and injury to persons, including the following:
1 Read these instructions.
2 Keep these instructions.
3 Heed all warnings.
4 Follow all instructions.
5 Do not use this apparatus near water.
6 Clean only with dry cloth.
7 Do not block any ventilation openings. Install in accordance with the
manufacturer’s instructions.
8 Do not install near any heat sources such as radiators, heat registers,
stoves or other apparatus (including amplifi ers) that produce heat.
9 Do not defeat the safety purpose of the polarized or grounding-type
plug. A polarized plug has two blades with one wider than the other.
A grounding-type plug has two blades and a third grounding prong.
The wide blade or the third prong are provided for your safety. If the
provided plug does not fi t into your outlet, consult an electrician for
replacement of the obsolete outlet.
10 Protect the power cord from being walked on or pinched particularly
at plugs, convenience receptacles, and the point where they exit from
the apparatus.
11 Only use attachments/accessories specifi ed by the manufacturer.
12 Unplug this appliance during lightning storms or when not used for
long periods of time.
13 Refer all servicing to qualifi ed service personnel. Servicing is required
when the apparatus has been damaged in any way, such as power-
supply cord or plug is damaged, liquid has been spilled or objects have
fallen into the apparatus, the apparatus has been exposed to rain or
moisture, does not operate normally, or has been dropped.
14 This baby monitor is intended as an aid. It is not a substitute for
responsible and proper adult supervision and should not be used as
such.
15 Use this appliance only for its intended use as described in this manual.
16 Unplug this product from the wall outlet before cleaning. Do not use
liquid cleaners or aerosol cleaners.
17 Products should not be used while you are in a bathtub, shower or
pool. Immersion of the product in water could cause an electrical
shock.
18 This product should be operated only from the type of power source
indicated on the type plate of the adapters (A15,B9). If you are not
sure of the type of power supply to your home, consult your dealer or
local power company.
ENGLISH
4222.002.7190.1.indd 64222.002.7190.1.indd 6 03-09-2008 14:30:5203-09-2008 14:30:52

19 Do not overload wall outlets and extension cords as this can result in
the risk of fi re or electric shock.
20 Never push objects of any kind into this product through casing slots as
they may touch dangerous voltage points or short out parts that could
result in a risk of fi re or electric shock. Never spill liquid of any kind on
the product.
21 To reduce the risk of electric shock, do not disassemble this product,
but call 1-800-54-AVENT (1-800-542-8368) for assistance. Opening or
removing covers (except battery compartment lids) may expose you
to dangerous voltage or other risks. Incorrect reassembly can cause
electric shock when the appliance is subsequently used.
22 To prevent strangulation with power cord, never place monitor within
reach of child. Do not use with extension cords.
If your product utilizes batteries, the following additional
precautions should be observed:
1 Use only the type and size of batteries specifi ed in the user manual.
2 Do not dispose of batteries in fi re. They may explode. Check with local
regulations for possible special disposal instructions.
3 Exercise care in handling batteries in order not to short out the
batteries with conducting materials such as rings, bracelets and
keys. Overcharging, short circuiting, reverse charging, mutilation, or
incineration of batteries must be avoided to prevent one or more
of the following occurrences: release of toxic materials, release of
hydrogen and/or oxygen gas, rise in surface temperature.
4 Do not attempt to recharge batteries provided with or identifi ed
for use with this product that are not intended to be charged. The
batteries may leak corrosive electrolyte or explode.
5 Do not attempt to rejuvenate the batteries provided with or identifi ed
for use with this product by heating them. Sudden release of battery
electrolyte may occur, causing burns or irritation to eyes or skin.
6 If and when necessary, the batteries must be replaced with identical
new ones from the same manufacturer. If a battery to be replaced
is connected with other batteries in series, it is recommended that
the other batteries be replaced with new ones at the same time.
7 Reverse polarity installation of the batteries in the end product must
be avoided. Reverse insertion of batteries can cause charging, and that
may result in leakage or explosion.
8 Remove batteries from this product if you store the product over 30
days because the batteries could leak and damage the product.
9 Discard ‘dead’ batteries as soon as possible since ‘dead’ batteries are
more likely to leak in a product. If a battery has leaked or vented, it
should be replaced immediately using protective gloves.
10 Do not store this product, or the batteries provided with or identifi ed
for use with this product, in high-temperature areas. Batteries that
are stored in a freezer or refrigerator for the purpose of extending
shelf life should be protected from condensation during storage and
defrosting. Batteries should be stabilized at room temperature prior to
use after cold storage.
11 If your product uses rechargeable batteries, charge the batteries only
in accordance with the instructions and limitations specifi ed in the user
manual.
ENGLISH 7
4222.002.7190.1.indd 74222.002.7190.1.indd 7 03-09-2008 14:30:5203-09-2008 14:30:52

12 There is a risk of explosion if batteries are replaced with an
incorrect type. For the parent unit, always use the SCD520 NiMH
rechargeable battery pack as supplied with the appliance.
SAVE THESE
INSTRUCTIONS
CAUTION: THE SYMBOL SHOWN IN FIGURE 1 MEANS
THAT THERE IS A RISK OF EXPLOSION OF THE
BATTERIES AND/OR OF SERIOUS DAMAGE TO THE
BABY MONITOR IF THE BATTERIES OR THE ADAPTER
ARE REPLACED WITH AN INCORRECT TYPE.
Adapters for baby unit and charger:
Input: 120 VAC 60 Hz
Output: 7.5 VDC 400 mA
Adapter no. UD075040B
The socket-outlet shall be installed near the equipment and shall be easily
accessible.
For the baby unit, only use 1.5V AA alkaline batteries (batteries not
supplied).
For the parent unit, only use the SCD520 NiMH rechargeable battery pack
as supplied with the appliance.
Dispose of used batteries according to the instructions.
Compliance information
The FCC ID number is located on the casing bottom of the parent unit
and in the battery compartment of the baby unit.
The term ‘IC’ before the certifi cation number signifi es that Industry
Canada technical specifi cations were met.This certifi cation means that
the equipment meets certain radio communications and operational
requirements. This device complies with Part 15 of the FCC Rules and
ICES-003 of Industry Canada. Operation is subject to the following two
conditions: (1) this device may not cause harmful interference, and (2) this
device must accept any interference received, including interference that
may cause undesired operation.This device complies also with RSS-213 of
Industry Canada.
Radio interference
This equipment has been tested and found to comply with the limits
for a Class B digital device, pursuant to Part 15 of the FCC Rules and
applicable Industry Canada specifi cations. These limits are designed to
provide reasonable protection against harmful interference in a residential
installation. This equipment generates, uses and can radiate radio frequency
energy and, if not installed and used in accordance with the instructions,
may cause harmful interference to radio communications. However, there
is no guarantee that interference will not occur in a particular installation.
If this equipment does cause harmful interference to radio or television
reception, which can be determined by turning the equipment off and on,
-
-
-
-
ENGLISH8
4222.002.7190.1.indd 84222.002.7190.1.indd 8 03-09-2008 14:30:5303-09-2008 14:30:53

the user is encouraged to try to correct the interference by one or more
of the following measures:
Reorient or relocate the receiving antenna.
Increase the separation between the equipment and receiver.
Connect the equipment to an outlet on a circuit different from that to
which the receiver is connected.
RF Radiation Exposure Statement
This equipment complies with FCC RF radiation exposure limits set forth
for an uncontrolled environment. This equipment should be installed and
operated with a minimum distance of 20 centimeters between the radiator
and your body. For handheld operation, this equipment has been tested
and meets the FCC RF exposure guidelines. For body-worn operation,
this product has been tested and meets the FCC RF exposure guideline
when used with the belt clip or neck strap supplied with this product. This
transmitter must not be co-located or operating in conjunction with any
other antenna or transmitter. This equipment also complies with Industry
Canada RSS-102 with respect to Canada’s Health Code 6 for Exposure of
Humans to RF Fields.
Do not attempt to repair or modify this equipment
Any repairs or alterations made by the user to the equipment may
void the warranty and compliance of the equipment. Refer servicing to
authorized or designated service centers.
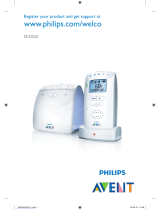
Introduction
Congratulations on your purchase and welcome to Philips AVENT! To fully
benefi t from the support that Philips AVENT offers, register your product
at www.philips.com/welcome.
Philips AVENT is dedicated to producing caring, reliable products
that give parents the reassurance they need. This Philips AVENT baby
monitor provides round-the-clock support by ensuring you can always
hear your baby clearly without any distracting noise. The DECT technology
guarantees zero interference from other wireless appliances and a crystal
clear signal between the baby unit and the parent unit. The temperature
sensor enables you to monitor the temperature in your baby’s room,
and offers you personalized settings to help keep your baby’s room
comfortable.
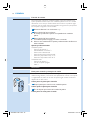
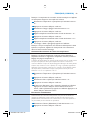
General description (Fig. 2)
A Parent unit
1 On/off button 3
2 Slot for belt clip
3 TALK button
4 MENU button
5 LINK light
6 Microphone
7 Loudspeaker
8 Menu and volume +/– buttons
9 OK button
10 Display
11 Sound level lights
12 Belt clip
-
-
-
ENGLISH 9
4222.002.7190.1.indd 94222.002.7190.1.indd 9 03-09-2008 14:30:5303-09-2008 14:30:53

13 Adapter
14 Small appliance plug
15 Socket for small appliance plug
16 Charger
17 Charging light
18 Compartment for rechargeable battery pack
19 Neck strap
20 Lid of compartment for rechargeable battery pack
21 Rechargeable battery pack (included)
22 Opening for neck strap
B Baby unit
1 On/off button 3
2 PAGE button
3 Play/stop button E
4 Lullaby button K
5 Battery light T
6 Nightlight button Q
7 Power-on light
8 Volume +/– buttons
9 Microphone
10 Adapter
11 Large appliance plug
12 Loudspeaker
13 Temperature sensor
14 Socket for large appliance plug
15 Compartment for non-rechargeable batteries
16 Lid of compartment for non-rechargeable batteries
17 Non-rechargeable batteries (not included)
C Display
1 Ñ ° = room temperature indication
2 R = sound alert
3 K = lullaby
4 T = battery symbol
5 Q = nightlight
For other display indications and volume/sensitivity levels, see chapters
‘Features’ and ‘Menu options’.
Important
Read the user manual carefully before you use the appliance and save
it for future reference.
This baby monitor is intended as an aid. It is not a substitute for
responsible and proper adult supervision and should not be used as
such.
This monitor is not intended to be used as a medical monitor and its
use should not replace adult supervision.
Check if the voltage indicated on the adapter corresponds to the
local electrical voltage before you connect the appliance.
Use and store the appliance at a temperature between 50°F (10°C)
and 104°F (40°C).
This appliance is suitable for electrical outlet voltages of 120V.
,
,
,
,
,
,
ENGLISH10
4222.002.7190.1.indd 104222.002.7190.1.indd 10 03-09-2008 14:30:5403-09-2008 14:30:54

Do not expose the baby monitor to extreme cold or heat or to
direct sunlight.
Make sure the baby unit and power cord are always out of reach of
the baby (at least 3 feet / 1 meter away).
Never place the baby unit inside the baby’s bed or playpen.
Never cover the baby monitor with a towel or blanket.
Never immerse any part of the baby monitor in water or any other
liquid.
Never use the baby monitor in moist places or close to water.
Except for the battery compartment, do not open the housing of the
baby unit and parent unit in order to prevent electric shock.
Only use the adapters supplied.
The adapters contain a transformer. Do not cut off the adapters
to replace them with other plugs, as this will cause a hazardous
situation.
If one of the adapters is damaged, always have it replace with one of
the original type in order to avoid a hazard.
If you place the parent unit next to a transmitter or other DECT
appliance (e.g. a DECT telephone), the connection with the baby unit
may be lost.
The temperature sensor only measures the temperature in the
baby’s room. It cannot be used to control or adjust the temperature
in the baby’s room.
The power outlet should be located near the appliance and easily
accessible.
Preparing for use
Baby unit
You can use the baby unit corded or on non-rechargeable batteries. Even
if you are going to use the unit corded, we advise you to insert the non-
rechargeable batteries. This guarantees automatic back-up in case of power
failure.
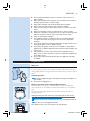
Corded operation
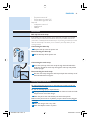
1 Put the large appliance plug in the baby unit and put the adapter in a
wall socket.
The power-on light goes on.
Battery operation (non-rechargeable batteries)
The baby unit runs on four 1.5V R6 AA batteries (not included). We
recommend you to use Philips LR6 PowerLife batteries or an equivalent
type.
Do not use rechargeable batteries, as the baby unit does not have a
charging function.
Unplug the baby unit and make sure your hands and the unit are dry
when you insert the non-rechargeable batteries.
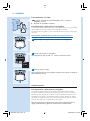
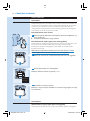
1 Remove the lid of the compartment for non-rechargeable batteries.
2 Insert four non-rechargeable batteries.
Note: Make sure the + and - poles point in the right direction.
,
,
,
,
,
,
,
,
,
,
,
,
,
,
ENGLISH 11
4222.002.7190.1.indd 114222.002.7190.1.indd 11 03-09-2008 14:30:5403-09-2008 14:30:54

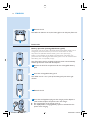
3 Reattach the lid.
Note: When the batteries are low, the battery light on the baby unit fl ashes red.
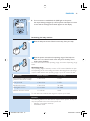
Parent unit
Battery operation (rechargeable battery pack)
The parent unit comes with a SCD520 NiMH rechargeable battery pack.
Charge the parent unit before you use it for the fi rst time or when
the parent unit indicates that the battery pack is low (the empty
battery symbol fl ashes on the display and the parent unit beeps). The
parent unit starts indicating that the battery pack is low 30 minutes before
the battery pack is completely empty.
Note: If the battery pack is completely empty, the parent unit automatically
switches off and loses contact with the baby unit.
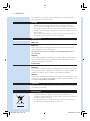
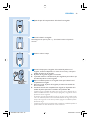
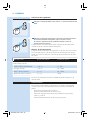
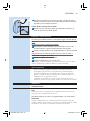
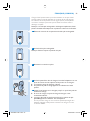
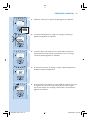
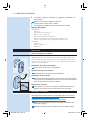
1 Remove the lid of the compartment for the rechargeable battery
pack.
2 Insert the rechargeable battery pack.
Note: Make sure the + and - poles of the battery pack point in the right
direction.
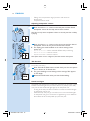
3 Reattach the lid.
4 Insert the small appliance plug into the charger, put the adapter in
a wall socket and place the parent unit in the charger.
The charging light on the charger goes on.
The display shows a charging battery symbol to indicate that the
parent unit is charging.
,
,
ENGLISH12
4222.002.7190.1.indd 124222.002.7190.1.indd 12 03-09-2008 14:30:5503-09-2008 14:30:55

5 Leave the parent unit in the charger until the battery pack is fully
charged.
During charging, the charging light on the charger lights
up continuously.
When the battery pack is fully charged, the display of the parent unit
shows a full battery symbol T .
When you charge the parent unit for the fi rst time or after a long
period of disuse, switch it off and let it charge continuously for at least
10 hours.
Charging normally takes 8 hours, but it takes longer when the parent
unit is switched on while charging. To keep the charging time as short
as possible, switch off the parent unit during charging.
When the battery pack is fully charged, the parent unit can be used
cordlessly for at least 24 hours.
Note: When the parent unit is charged for the fi rst time, the operating time
is less than 24 hours. The battery pack only reaches its full capacity after you
have charged and discharged it four times.
Note: When the parent unit is not connected to a power outlet or even when
the parent unit is switched off, the battery pack gradually discharges.
Using the appliance
Use the baby monitor for its intended household use as described in this
manual.
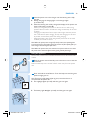
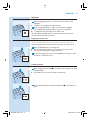
1 Place the parent unit and the baby unit in the same room to test the
connection.
Make sure the baby unit is at least 3 feet/1 meter away from the parent
unit.
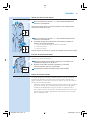
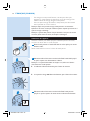
2 Press and hold the on/off button 3 on the baby unit until the green
power-on light goes on.
Note: The power-on light always lights up green, even when there is no
connection with the parent unit.
The nightlight lights up briefl y and then goes out again.
The battery light T lights up briefl y and then goes out again.
,
,
-
-
-
,
,
ENGLISH 13
4222.002.7190.1.indd 134222.002.7190.1.indd 13 03-09-2008 14:30:5603-09-2008 14:30:56

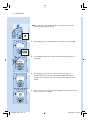
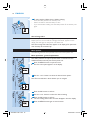
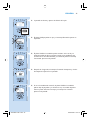
3 Press and hold the on/off button 3 on the parent unit until the
sound level lights light up briefl y.
The display goes on and the battery symbol appears on the display.
The LINK light fl ashes red and the message ‘Searching’ appears on
the display.
The LINK light on the parent unit turns green and lights up
continuously when a connection has been established between
the baby unit and parent unit. The message ‘Linked’ appears on the
display.
After 2 seconds the message ‘Linked’ disappears and the temperature
value is shown on the display.
,
,
,
,
ENGLISH14
4222.002.7190.1.indd 144222.002.7190.1.indd 14 03-09-2008 14:30:5703-09-2008 14:30:57

If no connection is established, the LINK light on the parent
unit stops fl ashing and lights up red. The parent unit beeps from time
to time and the message ‘Not Linked’ appears on the display.
Positioning the baby monitor
1 Place the baby unit at least 3 feet/1 meter away from your baby.
2 Place the parent unit within the operating range of the baby unit.
Make sure it is at least 3 feet/1 meter away from the baby unit to
avoid acoustic feedback.
For more information on the operating range, see section ‘Operating range’
below.
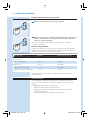
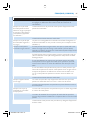
Operating range
The operating range of the baby monitor is 330 meters/1000 feet in open
air. Depending on the surroundings and other disturbing factors, this range
may be smaller. Indoors the operating range is up to 50 meters/150 feet.
Dry materials Material thickness Loss of range
Wood, plaster, cardboard, glass
(without metal, wires or lead)
< 30cm/12in 0-10%
Brick, plywood < 30cm/12in 5-35%
Reinforced concrete < 30cm/12in 30-100%
Metal grilles or bars < 1cm /0.4in 90-100%
Metal or aluminum sheets < 1cm/0.4in 100%
For wet and moist materials, the range loss may be up to 100%.
Features
The following features are described in chapter ‘Menu options’, as they can
only be operated in the menu of the parent unit:
Adjusting microphone sensitivity
Sound alert on/off
,
-
-
ENGLISH 15
4222.002.7190.1.indd 154222.002.7190.1.indd 15 03-09-2008 14:30:5803-09-2008 14:30:58

Setting room temperature range (minimum and maximum
temperature)
Temperature alert on/off
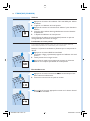
Adjusting loudspeaker volume
1 Press the volume + or – button on the baby unit until the desired
loudspeaker volume for the baby unit has been reached.
Note: You can only set the loudspeaker volume on the baby unit when a lullaby
is playing.
2 Press the volume + or – button on the parent unit until the desired
loudspeaker volume for the parent unit has been reached.
The display gives visual feedback on the volume settings of the
parent unit:
j = volume switched off/silent baby monitoring
k = minimum volume
l = maximum volume
Note: If the volume is set to a high level, the units consume more power.
Talk function
You can use the TALK button on the parent unit to talk to your baby (e.g.
to comfort your baby).
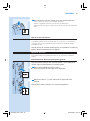
1 Press and hold the TALK button and talk clearly into the microphone
from a distance of 15-30cm/6-12in.
The green LINK light starts fl ashing and the message ‘Talk’ appears
on the display.
2 Release the TALK button when you have fi nished talking.
Sound level lights
The parent unit continuously monitors the sound level in your baby´s room
and the sound level lights let you know if there is any activity. If your baby
cries, you see the sound level lights light up on the parent unit.
As long as the baby unit does not detect a sound, all sound level lights
on the parent unit are out.
When the baby unit picks up a sound, one or more sound level lights
on the parent unit go on. The number of lights that go on is related to
the loudness of the sound picked up by the baby unit.
-
-
,
-
-
-
,
-
-
ENGLISH16
4222.002.7190.1.indd 164222.002.7190.1.indd 16 03-09-2008 14:30:5903-09-2008 14:30:59

Nightlight
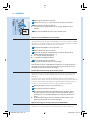
1 Press the nightlight button Q on the baby unit to switch on the
nightlight.
Q appears on the display of the parent unit.
2 Press the nightlight button Q again to switch off the nightlight.
The nightlight dims gradually before it goes out completely.
Q disappears from the display of the parent unit.
Tip: Switch off the nightlight when you operate the baby unit on the non-
rechargeable batteries. This saves power.
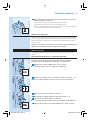
Paging the parent unit
If you have misplaced the parent unit and its volume is switched off, you
can use the PAGE button on the baby unit to locate the parent unit.
Note: The paging function only works when the parent unit is switched on.
1 Press the PAGE button on the baby unit.
The message ‘Paging’ appears on the display of the parent unit.
The parent unit produces a paging alert tone.
2 To stop the paging alert tone, press the PAGE button again or press
any button on the parent unit.
Lullaby function
1 Press the play/stop button E on the baby unit to play the currently
selected lullaby.
The lullaby starts to play and repeats continuously.
2 To stop the lullaby, press the play/stop button E on the baby unit
again.
,
,
,
,
,
,
ENGLISH 17
4222.002.7190.1.indd 174222.002.7190.1.indd 17 03-09-2008 14:31:0003-09-2008 14:31:00

3 To select another lullaby when a lullaby is playing:
Press the lullaby button K on the baby unit.
Wait 2 seconds for the next lullaby to start.
If you want another lullaby, press the lullaby button K on the baby unit
again.
Out of range alert
When the parent unit is out of range of the baby unit, the parent unit
beeps from time to time and the message ‘Not linked’ appears on the
display. The LINK light on the parent unit fl ashes red.
Note: The message ‘Not Linked’ also appears on the display of the parent unit
when the baby unit is switched off.
Menu options
The following functions are operated in the menu of the parent unit.
Menu operation - general explanation
Note: Menu functions can only be operated when a connection has been
established between the baby unit and the parent unit.
1 Press the MENU button to open the menu.
The fi rst menu option appears on the display.
2 Use the – and + buttons to select the desired menu option.
Note: The arrow indicates in which direction you can navigate.
3 Press the OK button to confi rm.
4 Use the + and - buttons to select the desired setting.
5 Press the OK button to confi rm.
The new setting fl ashes twice and then disappears from the display.
6 Press the MENU button again to exit the menu.
-
-
-
,
,
ENGLISH18
4222.002.7190.1.indd 184222.002.7190.1.indd 18 03-09-2008 14:31:0003-09-2008 14:31:00

Adjusting microphone sensitivity
You can set the microphone sensitivity of the baby unit to the desired
level. You can only change the microphone sensitivity when a connection
between the baby unit and the parent unit has been established, i.e. when
the LINK light on the parent unit lights up green continuously.
1 Select ‘Sensitivity’ with the + and - buttons.
2 Press the OK button to confi rm.
3 Select the desired microphone sensitivity level for the baby unit
with the + and - buttons.
k = minimum sensitivity level
l = maximum sensitivity level
4 Press the OK button to confi rm.
The message ‘Saved’ appears on the display.
Note: When the microphone sensitivity of the baby unit is set to a high level, it
picks up more sounds and therefore transmits more often. As a result, the units
consume more power.
Sound alert on/off
This feature allows you to monitor your baby silently. It enables you to
switch off the volume on your parent unit and still be alerted if your baby
cries.
If the sound alert is switched on, the parent unit beeps as soon as the
fourth sound level light lights up blue while the volume is switched off. In
addition, the backlight of the parent unit display goes on and the sound
alert symbol ( R ) fl ashes on the display.
1 Select ‘Sound Alert’ with the + and - buttons.
2 Press the OK button to confi rm.
3 If the alert is off, the display shows ‘On?’. Press the OK button to
switch on the alert. If the alert is on, the display shows ‘Off?’. Press
the OK button to switch off the alert.
If you have set the sound alert to ‘on’, the sound alert symbol ( R )
appears on the display of the parent unit.
Setting room temperature range
A baby will sleep comfortably in a room heated to a temperature between
61°F and 68°F. This is important, since a baby cannot regulate its body
temperature as well as an adult. A baby needs more time to adjust to
temperature changes.
If you do not set a temperature range, the baby monitor alerts you when
the temperature in your baby’s room drops below 57°F or rises above
86°F. In this case, the backlight of the parent unit display goes on and
‘High’ or ‘Low’ appears on the display. To change the default minimum and
maximum temperature, follow the instructions below.
Note: The temperature of the baby’s room is shown on the display of the
parent unit when they are linked.
1 Select ‘Temperature’ with the + and - buttons.
2 Press the OK button to confi rm.
,
,
,
,
ENGLISH 19
4222.002.7190.1.indd 194222.002.7190.1.indd 19 03-09-2008 14:31:0103-09-2008 14:31:01

3 Select ‘Range’ with the + and - buttons.
4 Press the OK button to confi rm.
5 Set the desired minimum temperature with the + and - buttons.
6 Press the OK button to confi rm.
7 Set the desired maximum temperature with the + and - buttons.
8 Press the OK button to confi rm.
The message ‘Saved’ appears on the display.
Note: If the temperature in the baby’s room drops below or exceeds the set
temperature range, the display of the parent unit is on continuously. This causes
the unit to consume more power.
Temperature alert on/off
Note: If the temperature alert is activated too often, reduce the set minimum
temperature and/or increase the set maximum temperature (see ‘Setting room
temperature range’).
If the temperature alert is switched on, the parent unit beeps if the actual
room temperature exceeds the set maximum temperature or drops below
the set minimum temperature. In addition, the backlight of the parent unit
display goes on and ‘High’ or ‘Low’ appears on the display. If no minimum
and maximum temperatures have been set, the temperature alert is given
when the room temperature drops below 57°F or rises above 86°F.
1 Select ‘Temperature’ with the + and - buttons.
2 Press the OK button to confi rm.
3 Select ‘Alert’ with the + and - buttons.
4 Press the OK button to confi rm.
5 If the alert is off, the display shows ‘On?’. Press the OK button to
switch on the alert. If the alert is on, the display shows ‘Off?’. Press
the OK button to switch off the alert.
Reset function
This function in the menu of the parent unit allows you to reset both the
parent unit and the baby unit to the default settings at the same time. You
can use this function if problems occur that you cannot solve by following
the suggestions in chapter ‘Frequently asked questions’.
1 Select ‘Reset’ with the + and - buttons.
2 Press the OK button to confi rm.
The message ‘Confi rm?’ appears on the display of the parent unit.
3 Press the OK button to confi rm.
The parent unit switches off and then switches on again.
The units have now both been reset to the default factory settings.
Default settings
Parent unit
Loudspeaker volume: 1
Microphone sensitivity: 3
Sound alert: off
,
,
,
,
-
-
-
ENGLISH20
4222.002.7190.1.indd 204222.002.7190.1.indd 20 03-09-2008 14:31:0203-09-2008 14:31:02

Temperature alert: off
‘Temperature low’ alert: 57°F
‘Temperature high’ alert: 86°F
Baby unit
Loudspeaker volume: 3
Nightlight: off
Lullaby: 1
Accessories
Belt clip and neck strap
If the battery pack of the parent unit is suffi ciently charged, you can take
the unit with you inside and outside the house if you attach the unit to
your belt or waistband with the belt clip or if you hang it around your neck
with the neck strap. This allows you to monitor your baby while you are
moving around.
Connecting the belt clip
1 Snap the belt clip onto the parent unit.
Disconnecting the belt clip
1 Pull the belt clip off the parent unit.
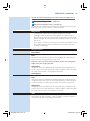
Connecting the neck strap
1 Insert the end loop of the neck strap through the hole behind the
strap post. Thread the neck strap through the end loop and pull the
neck strap tight.
Disconnecting the neck strap
1 Pass the neck strap though the end loop and pull the end loop out of
the hole behind the strap post.
Cleaning and maintenance
Do not immerse the parent unit or the baby unit in water and do not
clean them under the tap.
Do not use cleaning spray or liquid cleaners.
1 Unplug the baby unit if it is connected to an electrical outlet and take
the parent unit out of the charger.
2 Clean the parent unit and the baby unit with a damp cloth.
Make sure the parent unit is dry before you put it back into the plugged-
in charger.
3 Clean the charger with a dry cloth.
4 Clean the adapters with a dry cloth.
-
-
-
-
-
-
ENGLISH 21
4222.002.7190.1.indd 214222.002.7190.1.indd 21 03-09-2008 14:31:0203-09-2008 14:31:02

This appliance has no other user-serviceable parts. For assistance call 1-
800-54-AVENT (1-800-542-8368).
Storage
When you are not going to use the baby monitor for some time,
remove the non-rechargeable batteries from the baby unit and the
rechargeable battery pack from the parent unit. Store the parent unit,
the baby unit, the charger of the parent unit and the adapters in a cool
and dry place.
Do not wrap cord around the monitor when storing. Store cord in a
safe location where it will not be cut or damaged.
Replacement
Baby unit
Batteries
Only replace the non-rechargeable batteries of the baby unit with four
non-rechargeable 1.5V R6 AA batteries.
Note: We recommend you to use Philips non-rechargeable batteries or an
equivalent type.
Adapter
Only replace the adapter of the baby unit with an adapter of the original
type. For assistance call 1-800-54-AVENT (1-800-542-8368) or visit our
website: www.philips.com/AVENT.
Parent unit
Batteries
Only replace the SCD520 NiMH rechargeable battery pack of the parent
unit with a pack of the original type. For assistance, call 1-800-54-AVENT
(1-800-542-8368) or visit our website: www.philips.com/AVENT.
Adapter
Only replace the adapter of the parent unit charger with an adapter of the
original type.For assistance call 1-800-54-AVENT (1-800-542-8368) or visit
our website: www.philips.com/AVENT.
Assistance
For assistance call 1-800-54-AVENT (1-800-542-8368) or visit our website:
www.philips.com/AVENT.
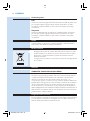
Environment
Dispose of batteries properly. Do not incinerate. Batteries may
explode if overheated. Do not wrap in metal or aluminum foil. Wrap in
newspaper before discarding.
It is suggested that you contact your local town or city to determine
proper battery redemption site(s) in your area.
-
-
-
-
ENGLISH22
4222.002.7190.1.indd 224222.002.7190.1.indd 22 03-09-2008 14:31:0303-09-2008 14:31:03

Warranty
FULL TWO YEAR WARRANTY
Philips Electronics North America Corporation (USA) and Philips
Electronics Ltd (CANADA) warrant each new Philips AVENT product,
model SCD520/00, against defects in materials or workmanship for a
period of two years from the date of purchase, and agrees to repair or
replace any defective product without charge. IMPORTANT: This warranty
does not cover damage resulting from accident, misuse or abuse, lack
of reasonable care, or the affi xing of any attachment not provided with
the product. NO RESPONSIBILITY IS ASSUMED FOR ANY SPECIAL,
INCIDENTAL OR CONSEQUENTIAL DAMAGES. In order to obtain
warranty service, simply call toll-free 1-800-54-AVENT.
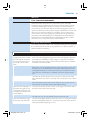
Frequently asked questions
This chapter lists the questions most frequently asked about the appliance.
If you cannot fi nd the answer to your question, call 1-800-54-AVENT (1-
800-542-8368) for assistance.
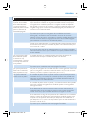
Question Answer
Why don’t both the power-
on light of the baby unit and
the LINK light of the parent
unit come on when I press
the on/off buttons of the
units?
Perhaps the battery pack of the parent unit are empty and the parent
unit is not in the plugged-in charger. Insert the small appliance plug into
the charger, put the adapter of the charger in a wall socket and place
the parent unit in the charger. Then press the on/off button to establish
connection with the baby unit.
Perhaps the non-rechargeable batteries of the baby unit are empty and
the baby unit is not connected to an electrical outlet. Replace the non-
rechargeable batteries or connect the baby unit to an electrical outlet.
Then press the on/off button to establish connection with the parent
unit.
The baby unit and the parent unit may be out of range of each other.
Move the parent unit closer to the baby unit, but not closer than 3 feet/1
meter.
If the LINK light on the parent unit still does not start to fl ash, use the
reset function to reset the units to their default settings.
Why does the LINK light on
the parent unit light up red
continuously and why is the
message ‘Not Linked’ shown
on the display?
The baby unit and the parent unit are out of range of each other. Move
the parent unit closer to the baby unit.
The baby unit may be switched off. Switch on the baby unit.
Why does the battery light
on the baby unit fl ash red?
The non-rechargeable batteries of the baby unit are running low. Replace
the non-rechargeable batteries or connect the baby unit to an electrical
outlet (see chapter ‘Preparing for use’).
ENGLISH 23
4222.002.7190.1.indd 234222.002.7190.1.indd 23 03-09-2008 14:31:0403-09-2008 14:31:04

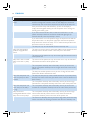
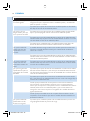
Question Answer
Why does the parent unit
beep?
If the parent unit beeps while the LINK light lights up red continuously
and the message ‘Not Linked’ is shown on the display, the connection
with the baby unit is lost. Move the parent unit closer to the baby unit.
If the parent unit beeps and the battery symbol on the display is
empty, the rechargeable battery pack of the parent unit is running low.
Recharge the battery pack.
If you have switched off the volume while the sound alert is on, the
parent unit beeps whenever the fourth sound level light lights up
because the baby unit has picked up a sound.
If you have set the room temperature range on the parent unit and the
temperature alert is on, the parent unit beeps when the temperature
drops below the set level or below 57°F or when the temperature rises
above the set level or above 86°F.
The baby unit may be switched off. Switch on the baby unit.
Why does the appliance
produce a high-pitched
noise?
The units may be too close to each other. Make sure the parent unit and
the baby unit are at least 3 feet/1 meter away from each other.
The volume of the parent unit may be set too high. Decrease the volume
of the parent unit.
Why don’t I hear a sound/
Why can’t I hear my baby
cry?
The volume of the parent unit may be set too low or may be switched
off. Increase the volume of the parent unit.
The microphone sensitivity level of the baby unit may be set too low.
Set the microphone sensitivity level to a higher level in the menu of the
parent unit.
The baby unit and the parent unit may be out of range of each other.
Reduce the distance between the units.
Why does the parent unit
react too quickly to other
sounds?
The baby unit also picks up other sounds than those of your baby. Move
the baby unit closer to the baby (but observe the minimum distance of 3
feet/1 meter).
The microphone sensitivity level of the baby unit may be set too high.
Decrease the microphone sensitivity level in the menu of the parent unit.
Why does the parent unit
react slowly to the baby’s
crying?
The microphone sensitivity level of the baby unit may be set too low.
Increase the microphone sensitivity level in the menu of the parent unit.
Why do the non-
rechargeable batteries of the
baby unit run low quickly?
The microphone sensitivity level of the baby unit may be set too high,
which causes the baby unit to transmit more often. Decrease the
microphone sensitivity level in the menu of the parent unit.
The volume on the baby unit may be set too high, which causes the baby
unit to consume a lot of energy. Decrease the volume of the baby unit.
ENGLISH24
4222.002.7190.1.indd 244222.002.7190.1.indd 24 03-09-2008 14:31:0403-09-2008 14:31:04
Page is loading ...
Page is loading ...
Page is loading ...
Page is loading ...
Page is loading ...
Page is loading ...
Page is loading ...
Page is loading ...
Page is loading ...
Page is loading ...
Page is loading ...
Page is loading ...
Page is loading ...
Page is loading ...
Page is loading ...
Page is loading ...
Page is loading ...
Page is loading ...
Page is loading ...
Page is loading ...
Page is loading ...
Page is loading ...
Page is loading ...
Page is loading ...
Page is loading ...
Page is loading ...
Page is loading ...
Page is loading ...
Page is loading ...
Page is loading ...
Page is loading ...
Page is loading ...
Page is loading ...
Page is loading ...
Page is loading ...
Page is loading ...
Page is loading ...
Page is loading ...
Page is loading ...
Page is loading ...
Page is loading ...
Page is loading ...
Page is loading ...
Page is loading ...
Page is loading ...
Page is loading ...
Page is loading ...
Page is loading ...
Page is loading ...
Page is loading ...
-
 1
1
-
 2
2
-
 3
3
-
 4
4
-
 5
5
-
 6
6
-
 7
7
-
 8
8
-
 9
9
-
 10
10
-
 11
11
-
 12
12
-
 13
13
-
 14
14
-
 15
15
-
 16
16
-
 17
17
-
 18
18
-
 19
19
-
 20
20
-
 21
21
-
 22
22
-
 23
23
-
 24
24
-
 25
25
-
 26
26
-
 27
27
-
 28
28
-
 29
29
-
 30
30
-
 31
31
-
 32
32
-
 33
33
-
 34
34
-
 35
35
-
 36
36
-
 37
37
-
 38
38
-
 39
39
-
 40
40
-
 41
41
-
 42
42
-
 43
43
-
 44
44
-
 45
45
-
 46
46
-
 47
47
-
 48
48
-
 49
49
-
 50
50
-
 51
51
-
 52
52
-
 53
53
-
 54
54
-
 55
55
-
 56
56
-
 57
57
-
 58
58
-
 59
59
-
 60
60
-
 61
61
-
 62
62
-
 63
63
-
 64
64
-
 65
65
-
 66
66
-
 67
67
-
 68
68
-
 69
69
-
 70
70
-
 71
71
-
 72
72
-
 73
73
-
 74
74


Ask a question and I''ll find the answer in the document
Finding information in a document is now easier with AI
in other languages
- français: Avent SCD520/00 Manuel utilisateur
- español: Avent SCD520/00 Manual de usuario
Related papers
-
Avent SCD525/00 User manual
-
Philips SCD535 User manual
-
Avent SCD520/00 User manual
-
-
Philips AVENT SCD560 User manual
-
-
-
 Philips AVENT SCD506 Avent User manual
-
 Philips AVENT SCD570/10 User manual
-
 Avent SCD570/10 Important information


Other documents
-
Philips SCX468/84 User manual
-
Philips SCD465 User manual
-
-
-
Philips SCD489/00 User manual
-
-
 Philips AVENT AVENT SCD525 User manual
-
-
-
Philips SCD468/84 User manual
