Page is loading ...

PLL ALARM CLOCK RADIO
Model : FRA252
INSTRUCTION MANUAL
MANUEL D'INSTRUCTION
BEDIENUNGSANLEITUNG
MANUALE D'USO
HANDLEIDING
MANUAL DE INSTRUÇÕES
EN
FR
DE
IT
NL
PT

WARNING:
TO REDUCE THE RISK OF FIRE OR ELECTRIC SHOCK, DO NOT EXPOSE THIS APPARATUS TO
RAIN OR MOISTURE.
The lighting flash with
arrowhead symbol, with
an equilateral triangle is
intended to alert the user
to the presence of
uninsulated dangerous
voltage within the
products enclosure that
may be of sufficient
magnitude to constitute a
risk of electric shock to
persons.
CAUTION
The exclamation point
within an equilateral
triangle is intended to alert
the user to the presence
of important operating and
maintenance (servicing)
instruction in the literature
accompanying the
appliance.
RISK OF ELECTRIC SHOCK
DO NOT OPEN
CAUTION: TO REDUCE THE RISK OF
ELECTRIC SHOCK, DO NOT REMOVE
COVER (OR BACK). NO USER
SERVICEABLE PARTS INSIDE REFER
SERVICING TO QUALIFIED SERVICE
PERSONNEL.
WARNING
• The ventilation should not be impeded by covering the ventilation openings with items, such as
newspapers, table-cloths, curtains, etc.
• No naked flame sources, such as lighted candles, should be placed on the apparatus.
• It shall not be exposed to dripping or splashing and that no objects filled with
shall be placed on the apparatus.
liquids, such as vases,
• Do not place the product in
closed bookcases or racks without proper ventilation.
• The batteries (Battery pack or batteries installed) shall not be exposed to excessive heat such as
sunshine, fire or the like.
• Excessive sound pressure from earphones and headphones can cause hearing loss.
• Where the mains plug or an appliance coupler is used as the disconnect device,
device shall remain readily operable.
the disconnect
-EN1-
INSTRUCTION MANUAL
EN

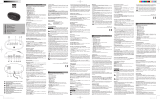
1
CLK/MEM Button
•
In CLOCK mode, use this button to set the clock
•
In RADIO mode, use this button to store radio stations in the memory.
2
/HR Button
• In CLOCK mode, use this button to adjust the minute in CLOCK or ALARM time.
• In RADIO mode, use this button to search the radio station in backward direction.
3
/MIN Button
• In CLOCK mode, use this button to adjust the hour in CLOCK or ALARM time.
•
In CLOCK mode, use this button to adjust the hour in CLOCK or ALARM time.
4
DIMMER Button
•
Use this button to change the brightness of the display.
5
ALM2/VOL− Button
•
In CLOCK mode, use this button to set the alarm time in ALARM2
•
In RADIO mode, use this button to decrease the volume
6
ALM1/VOL+ Button
•
In CLOCK mode, use this button to set the alarm time in ALARM1
• In RADIO mode, use this button to increase the volume
7
ALARM OFF/SOURCE Button
• Use this button to turn the ALARM off after Alarm activates.
• Use this button to select RADIO or AUX mode
8
SNOOZE/SLEEP Button
• Use to button to temporarily suspend the ALARM for a short period
• In RADIO mode, use this set the SLEEP time..
9
LED Display
•
Display for the CLOCK and RADIO frequency..
10
ALARM2 BUZZER Indicator
• This indicator shows that the unit is set in ALARM2 buzzer mode.
11
ALARM2 RADIO Indicator
• This indicator shows that the unit is set in ALARM2 radio mode.
12
ALARM1 BUZZER Indicator
• This indicator shows that the unit is set in ALARM1 buzzer mode.
13
ALARM1 RADIO Indicator
• This indicator shows that the unit is set in ALARM1 radio mode.
14
BATTERY Compartment
•
Compartment for the back-up battery.
15
AC Power Cord
•
Connect the unit to the wall outlet.
-2-
-EN2-

16
FM Wire Antenna
•
Extent this wire antenna to obtain better FM broadcasting.
17
AUX-IN Jack
•
Connect the unit to the external audio device.
•
Sound output
18
Speaker
SETTING THE CLOCK
1. With the unit in CLOCK mode, press and hold the CLK/MEM button for about 1 second, the time will begin to flash on
the LED display.
2. Press the /HR button to adjust the hour.
3. Press the /MIN button to adjust the minute.
4. When the correct time is selected, press the CLK/MEM button again to confirm.
SETTING THE ALARMS
1. With the unit in CLOCK mode, press the ALM1/VOL+ or ALM2/VOL− button. The ALARM time will
begin to flash on the LED display.
2. Press the /HR button to adjust the alarm hour.
3. Press the /MIN button to adjust the alarm minute.
4. When the correct time is selected, press the ALM1/VOL+ or ALM2/VOL− button to confirm.
5. Press the ALM1/VOL+ or ALM2/VOL− button to select the ALARM sound mode - buzzer or currently
set radio station. The alarm buzzer or radio indicator will light up.
SNOOZE FUNCTION
1. Whenever the alarm (radio or buzzer) activates, it can be temporarily suspended for a short period of 9 minutes by
pressing the SNOOZE/SLEEP button once.
2. The buzzer or radio will then automatically activate again after the 9 minutes SNOOZE period has ended.
3. This procedure can be repeated for up to approximately one hour.
CONNECTING THE UNIT TO POWER
Plug AC power cord to the AC wall outlet. Before switching on the unit, make sure that the voltage of your electricity supply
is the same as that indicated on the rating plate.
BATTERY BACKUP
Insert two pieces UM-4 batteries into the battery compartment. Be sure to observe the proper polarity (the "+" and "-" signs)
as indicated inside the battery compartment.
In case of power failure or interrupted AC power, the current time and alarm time settings, the stored radio stations are
preserved in the memory of the unit by means of battery back-up function.
TURN OFF THE ALARM
When the Alarm activate, press the ALM OFF/SOURCE button to turn off the Alarm.
LISTENING TO THE AM/FM RADIO
1. Press the ALM OFF/SOURCE button to select the FM or AM mode.
2. Press the
/HR button or
/MIN button step by step to tune to the desired radio stations.
3. Press and hold the
/HR button or
/MIN buttons for approx. 1 second, it will start to search the
in the direction of the search.
next radio station
The search operation simply finds stations with strong signals. Stations with weak
reception
can only be tuned in manually.
ANTENNA
For best reception, fully extend the FM wire antenna to receive FM stations. For AM reception, the unit has
turn the whole unit for best reception.
a built-in antenna,
-EN3-

SAVING A RADIO STATION TO THE MEMORY
1. Tune the radio to the desired station.
2. Press and hold the CLK/MEM button for approx. 1 second, the LED display will show P01 and flash,
will stored in the memory.
the radio station
3. Up to 10 AM and 10 FM radio stations can be stored in the memory.
TO LISTEN TO A SAVED RADIO STATION
1. Press the ALM OFF/SOURCE button to select FM or AM model
2. Press the CLK/MEM button to select the stored radio station.
SLEEP TO MUSIC FUNCTION
1. This function allows you to listen to the radio while you fall asleep.
2. Press the SNOOZE/SLEEP button, the display will show the default sleep time of 90 minutes
3. Press the SLEEP button again to adjust the desired sleep time.
4. The options are 90-80-70-60-50-40-30-20-10-min. or OFF
5. Now you can enjoy listening to the radio for the pre-set period of sleep time.
6. After this pre-set tim
e has elapsed, the unit will switch off automatically.
AUX IN CONNECTION
1. Insert one side of the audio cable (requires 3.5mm stereo plug, not supplied) into the line-out jack or
your MP3 player
phones jack on
or audio device and the other side to the aux-in jack on the unit.
2. Press the ALM OFF/SOURCE button to select AUX mode, AUX will display in the LED display for a few seconds.
3. Turn on your MP3 player and follow the playback instruction.
4. To stop this functi
on, simply turned off your MP3 player.
SPECIFICATIONS
Frequency Range: AM 522 - 1620 KHz
FM 87.5 – 108 MHz
Power Supply: AC 230V ~ 50 Hz
Back-Up Battery: 2 pc. UM4 ‘AAA’ size
Specifications are subject to change without prior notice.
This is to certify that FRA252 is in conformity with:
Council directive 2004/108/EC (EMC direction):
Applicable standards:
EN55013:2001+A1:2003+A2:2006
EN61000-3-2:2006+A1:2009+A2:2009
EN61000-3-3:2008
EN55020:2007
Made in PRC
For more information please visit our website
www.mpmaneurope.com
-EN4-
/