iON Game Day Lights Quick start guide
- Category
- Portable speakers
- Type
- Quick start guide

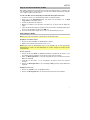
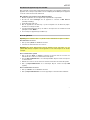
Quickstart Guide English ( 3 – 9 )
Guía de inicio rápido Español ( 10 – 17 )
Guide d’utilisation rapide Français ( 18 – 25 )
Guida rapida Italiano ( 26 – 33 )
Schnellstart-Anleitung Deutsch ( 34 – 41 )
Snelstartgids Nederlands ( 42 – 49 )
Appendix English ( 50 )
Page is loading ...

3
Quickstart Guide (English)
Introduction
Thank you for purchasing Game Day Lights. At ION, your entertainment is as important to us as it is
to you. That’s why we design our products with one thing in mind—to make your life more fun and
more convenient.
Note: Before you first use the product, please fully charge the battery. Your unit was purposely
shipped with a reduced battery charge to ensure safe transit.
Use the included power cable to connect the unit to a power outlet and let it charge for up to 5
hours. This helps ensure the longest life for your battery.
Box Contents
Game Day Lights
Microphone with mic cable
1/8” (3.5 mm) Stereo Aux Cable
Power Cable (2-pin IEC)
Quickstart Guide
Safety & Warranty Manual
Support
For the latest information about this product (documentation, technical specifications, system
requirements, compatibility information, etc.) and product registration, visit ionaudio.com.
For additional product support, visit ionaudio.com/support.
Rechargeable Batteries
Rechargeable lead-acid batteries are the same type used in automobiles. As with your car battery,
how you use this battery has a significant impact on its lifespan. With proper use and treatment, a
lead-acid battery can last for years. Here are some recommendations for getting the longest life from
the internal battery.
General Usage
Charge fully before use.
Charge fully before storing.
Storage
For best product longevity, do not store at exceedingly hot (greater than 90°F /
32°C) or exceedingly cold (less than 32°F / 0°C) temperatures.
It is acceptable to leave your sound system plugged in. This will not overcharge
the battery.
If you leave the battery level low and do not charge it for 3 months, it may
permanently lose capacity.
Repair
If the battery fails to charge, check the fuse near the power cable input. If the fuse
is not intact, please replace it.
The battery can be replaced (details in the Technical Specifications).
For Warranty and Parts, visit ionaudio.com.
Disposal
Bring the unit to a recycling center or dispose of in accordance with local
ordinances.

4
iPA80A
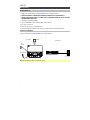
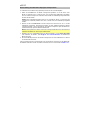
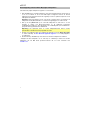
Quick Setup
Getting Started
1. Make sure all items listed in the Box Contents are included in the box.
2. READ THE SAFETY & WARRANTY MANUAL BEFORE USING THE PRODUCT.
3. MAKE SURE THE BATTERY IS COMPLETELY CHARGED PRIOR TO FIRST USE FOR
MAXIMUM BATTERY LIFE.
4. Study the connection diagram.
5. Ensure the Master Volume on Game Day Lights is at zero.
6. Connect your devices.
7. Raise the volume to a comfortable level.
8. Return the Master Volume to zero when you are finished using Game Day Lights.
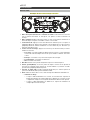
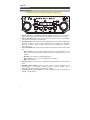
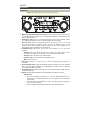
Connection Diagram
Items not listed under the Box Contents are sold separately.
Note: North America/Japan model shown here.
REAR PANEL
POWER
(for charging)
TOP PANEL
MICROPHONE
MP3
PLAYER
TABLET

5
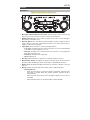
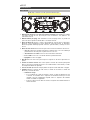
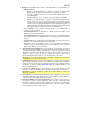
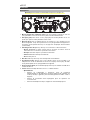
Features
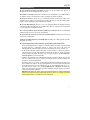
Front Panel
1. Microphone Input with Volume Control (1/4"): This mono input accepts a 1/4" (6.35 mm)
audio source such as a microphone, guitar, or other musical instrument.
2. Auxiliary Input (1/8”): This stereo 3.5 mm (1/8”) input can be used to connect a CD player,
MP3 player, or other audio source.
3. Bluetooth Button: Press and release the Bluetooth button to pair to a Bluetooth device.
Tap this button to disconnect a paired Bluetooth device. Press and hold this button to
disable (or enable) the voice prompts.
4. Lights Button: Press this button to select how the lights function:
• Color Cycle: The lights slowly glow and cycle through colors. Press and hold the light
mode button to freeze the lights on one color.
• Beat Sync: The lights react to the beat of the music. If there is no music playing, the
lights will cycle through colors.
• Static Color: The lights are lit solidly white.
• Off: The lights turn off.
5. Bass Boost: Press this button to enhance the overall bass frequency response.
6. Master Volume Control: This adjusts the speaker’s main mix volume, which includes the
Microphone Input, Auxiliary Input, Radio, and the audio of a paired Bluetooth device.
7. Radio Selector (North America/Japan): This button sets the radio to AM, FM, or turns the
radio off.
8. Display: Displays the current radio station, battery status, and Bluetooth status.
• Charging Indicator:
o When the power cable is connected, movement of the battery segments shows
the battery is charging. When fully charged, all battery segments will be lit
without blinking.
o When the power cable is disconnected, the battery segment shows the level of
the battery.
o When the battery level is low, the bottom battery segment will blink.
Note: North America/Japan model shown here.
1
2
3
4
7
8
9
10
10
5
6
11
11
12
12
1
1
13
13
1

6
o If a front panel button is not pressed within 60 seconds, the battery level
indicator will turn off (to save energy). The battery level indicator will reappear
when any button is pressed. Also, when the battery gets to the lowest battery
icon segment, the battery level indicator will turn back on.
• Lightning Bolt Icon: The lightning bolt icon will illuminate when the power cable is
connected to wall power.
• Bluetooth Icon: The Bluetooth icon will be lit solid when a device is paired to Game
Day Lights.
• Power Icon: The power icon will be lit when Game Day Lights is powered on. The
power icon will not be lit when Game Day Lights is powered off.
• Bass Boost Icon: The Bass Boost icon will be on when the Bass Boost function is
activated. The icon will be off when the function is deactivated.
• Link Icon: The Link icon will be on when stereo-linked to another speaker. The Link
icon will be off when a single speaker is used.
9. Tune/Track Buttons: Tap these buttons to tune in a radio station (North America/Japan
only) or go to the previous/next track on a Bluetooth-connected device. To "seek" (jump to
the next available station), hold either button down for a few seconds until it starts to seek
a station. The unit will remember the last station it was on and start at that station when
powered off and on again.
Note: With some apps, pressing the Track – button or Track + button may go to another
playlist or music genre.
10. Play/Pause/Preset: Press to play or pause a track from a connected Bluetooth device. In
Radio Mode (North America/Japan only), press and release this button to select a
previously saved preset station. See the section Using the Radio for more details on
saving and recalling presets.
11. USB Charging Port: Connect your device’s charge cable here to charge it. USB charging
only functions when the unit’s power is turned on.
Note: To charge smartphones and tablets faster, put the device’s screen to sleep.
12. Link: Press and hold this button to start stereo-linking to another Game Day Lights
speaker. Double press this button to disconnect the link to another Game Day Lights
speaker.
13. Power ON/OFF Switch: Press and hold this button for 3 seconds to power Game Day
Lights on/off. Please note that while Game Day Lights is connected to a power source, it
does not need to be powered on to charge the battery. When the power is on, the display
will show the decimal icon or your current radio station.
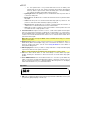
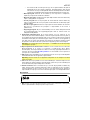
Top Panel
1. NFC: Tap your NFC (near-field communication) supported and enabled device here to pair
your phone by gently bumping on the ‘N’ logo.
1
2
3
4
7
8
9
10
5
6
11
12
1
1
13
1

7
Rear Panel
1. Power Cable Input: Insert the included power cable here to charge the unit. Note that the
Game Day Lights can be used with the power cable while it simultaneously charges the
battery.
Operation
Pairing a Bluetooth Device
1. Turn on your Bluetooth device.
2. Power on Game Day Lights. Press and release the Bluetooth button to enter Bluetooth
pairing mode.*
3. Navigate to your Bluetooth device’s setup screen, find Game Day Lights and connect.
Note: If your Bluetooth device prompts for a pairing code, enter “0000”.
4. The Bluetooth icon will be lit solid when a device is “paired” to Game Day Lights. *
Note: Users should consider updating their OS if experiencing trouble with pairing or
playing music.
5. Tap the Bluetooth button to disconnect a paired Bluetooth device. *
6. To connect to another Bluetooth device, repeat steps 3-4.
Note: Maximum range will be achieved when using devices with Bluetooth 4.0.
* Tip: If you would like to disable (or enable) the voice prompts, double press the Bluetooth
button.
Pairing a Bluetooth Device Using NFC
NFC (near-field communication) allows data exchange from devices, such as pairing, by gently
bumping them together. Check in your device’s manual to see if this feature is supported.
To use NFC to pair with Game Day Lights:
1. In order to use NFC, your device must be turned on and unlocked.
2. Enter your device’s Settings menu and check that NFC is turned On (one time step).
3. Power on Game Day Lights.
4. Touch and briefly hold your device to the NFC logo.
5. Follow the pairing instructions that appear on your phone. If a passcode is required, enter
“0000”.
6. To unpair, gently bump your device against the NFC logo on Game Day Lights.
iPA80A
1
2
3
4
7
8
9
10
5
6
11
12
1
1
13
1

8
Using the Radio
Note: This section for use with North America/Japan models only.
Selecting a Radio Station:
1. Press the Radio button to choose AM/FM.
2. Select a radio station using the –/+ buttons.
Note: If there is poor AM reception, disconnect AC power for optimal AM radio reception. To
further adjust AM reception, move the entire unit.
Saving a preset:
1. Press the Radio button to choose AM/FM and select a radio station that you want to save
to a preset location using the –/+ buttons.
2. Press and hold Play/Pause for 1 second. A preset number will appear on the screen.
3. Use the –/+ buttons to select which preset you want to save it to.
4. Press Play/Pause to confirm. SAV will appear on the screen.
Selecting a preset:
1. Press the Radio button to select AM/FM.
2. Press Play/Pause to cycle through the saved presets.
Stereo-Linking Two Game Day Lights Speakers*
To link two Game Day Lights speakers together for stereo sound:
1. Press and hold the Link button on both speakers to enter Stereo-Link mode. A tone will be
heard and the word LINK will blink when in the process of linking to the second speaker.
Once a link has been established, the word LINK will be lit solid.
Note: The linking process can take up to a minute to complete. The closer the two
speakers are to each other, the quicker the linking process occurs.
2. Press and release the Bluetooth button on either speaker to start the pairing process. The
Bluetooth icon will flash on the randomly assigned master speaker when in pairing mode.
The speaker assigned as master (with the Bluetooth icon illuminated) will play the Left
channel audio.
Note: The assigned left and right speaker channels can be switched by pressing and
holding the Bluetooth button.
3. Navigate to your Bluetooth device’s setup screen, find Game Day Lights and connect.
See Pairing a Bluetooth Device for Bluetooth setup details.
4. To disconnect/cancel linking between the two speakers, double press the Link button.
* This speaker may be able to link to different speakers in the ION Audio product line. For
more information, please visit ionaudio.com.

9
Troubleshooting
If the unit is not charging: Make sure the power cable is properly connected to the power
input and the power outlet.
If the sound is distorted: Try lowering the volume control of your sound source, musical
instrument, or microphone. Also, try to reduce the overall volume of Game Day Lights using
the Master Volume knob.
If there is too much bass: Try adjusting the tone or EQ control on your sound source to lower
the bass level. This will allow you to play the music louder before clipping (distortion) occurs.
If there is poor AM reception: When you have a Bluetooth device that is connected,
disconnect your Bluetooth device in order to listen to AM radio. To adjust AM reception, move
the entire unit.
If there is a high-pitched whistling noise when using microphones: This is probably
feedback. Point the microphone away from the speaker.
If you can’t hear the microphone over the music volume: Turn down the music volume
from your source.
If you can’t play music from a flash drive: The USB port is only for charging USB devices.
If you cannot connect your audio device to Game Day Lights via Bluetooth:
• Have your audio device (e.g., smartphone or tablet) and Game Day Lights as close
together as possible while trying to connect. Make sure both the audio device and Game
Day Lights are unobstructed by walls, furniture, etc.
• Reset the Bluetooth connection on Game Day Lights to disconnect Game Day Lights
from any other audio device and restart the search process. If this does not work right
away, power off Game Day Lights and then power it back on. See Pairing a Bluetooth
Device for more information.
• Reset the Bluetooth connection on your audio device by turning Bluetooth off and back
on. You can find this under the Bluetooth menu in the Settings for your phone or other
audio device.
If this does not work, and you have connected to Game Day Lights before, find Game
Day Lights in the list of available or previously connected devices in your audio device's
Bluetooth menu, tap the "gear" or “i” icon located next to it and then select Unpair or
Forget. Turn Game Day Lights off and back on and try pairing again once it reappears in
your available devices list.
Note: If Game Day Lights has been paired to another audio device recently that is still
within range, you may need to repeat this process with that audio device to fully
disconnect.
Page is loading ...
Page is loading ...
Page is loading ...
Page is loading ...
Page is loading ...
Page is loading ...
Page is loading ...
Page is loading ...
Page is loading ...
Page is loading ...
Page is loading ...
Page is loading ...
Page is loading ...
Page is loading ...
Page is loading ...
Page is loading ...
Page is loading ...
Page is loading ...
Page is loading ...
Page is loading ...
Page is loading ...
Page is loading ...
Page is loading ...
Page is loading ...
Page is loading ...
Page is loading ...
Page is loading ...
Page is loading ...
Page is loading ...
Page is loading ...
Page is loading ...
Page is loading ...
Page is loading ...
Page is loading ...
Page is loading ...
Page is loading ...
Page is loading ...
Page is loading ...
Page is loading ...
Page is loading ...

50
Appendix (English)
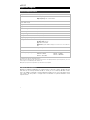
Technical Specifications
Output Power
50 W (peak)
Drivers Low-Frequency: 6.5” / 165 mm woofer
High-Frequency: 2.0” / 51 mm tweeter
Dimensions
(Depth x Width x Height)
9.9” x 13.1” x 13.3” / 252 x 333 x 338 mm
Weight
13.5 lbs. / 6.15 kg
Supported Bluetooth Profile
A2DP, AVRCP
Bluetooth Range
Up to 100' / 30.5 m
Linked Range
Up to 50’ / 15 m
Microphone Type
Dynamic microphone
Aux Input
1/8” (3.5 mm) line-level
Frequency Response (+ 3dB)
77 Hz – 20 kHz
Batter
y
Battery life: Up to 50 hours
Recharge time: 5 hours
Type: 12 V, 2.8 Ah, SLA
Dimensions:
(Depth x Width x Height) 3.1” x 2.2” x 3.9” / 79 x 56 x 99
mm
Power Input Voltage: 100–240 V 50/60 Hz
Charge Port
USB; +5 V, 1 A
Radio Frequency Range
US:
AM 520 – 1710 kHz
FM 87.5 – 107.9 MHz
JAPAN:
AM 522 – 1710 kHz
FM 75.5 – 108.0 MHz
Specifications are subject to change without notice.
Bluetooth range is affected by walls, obstructions, and movement. For optimal performance, place the product in your room
at line of sight, so it is unaffected by walls, furniture, etc.
Battery life may vary based on temperature, age, and volume usage of product.
Trademarks & Licenses
ION Audio is a trademark of ION Audio, LLC, registered in the U.S. and other countries. The Bluetooth word
mark and logos are owned by the Bluetooth SIG, Inc. and any use of such marks by ION Audio is under
license. The N Mark is a trademark or registered trademark of NFC Forum, Inc. in the United States and in
other countries. All other product or company names are trademarks or registered trademarks of their
respective owners.
Page is loading ...

ionaudio.com
Manual Version 1.3
-
 1
1
-
 2
2
-
 3
3
-
 4
4
-
 5
5
-
 6
6
-
 7
7
-
 8
8
-
 9
9
-
 10
10
-
 11
11
-
 12
12
-
 13
13
-
 14
14
-
 15
15
-
 16
16
-
 17
17
-
 18
18
-
 19
19
-
 20
20
-
 21
21
-
 22
22
-
 23
23
-
 24
24
-
 25
25
-
 26
26
-
 27
27
-
 28
28
-
 29
29
-
 30
30
-
 31
31
-
 32
32
-
 33
33
-
 34
34
-
 35
35
-
 36
36
-
 37
37
-
 38
38
-
 39
39
-
 40
40
-
 41
41
-
 42
42
-
 43
43
-
 44
44
-
 45
45
-
 46
46
-
 47
47
-
 48
48
-
 49
49
-
 50
50
-
 51
51
-
 52
52


iON Game Day Lights Quick start guide
- Category
- Portable speakers
- Type
- Quick start guide
Ask a question and I''ll find the answer in the document
Finding information in a document is now easier with AI
in other languages
- italiano: iON Game Day Lights Guida Rapida
- français: iON Game Day Lights Guide de démarrage rapide
- español: iON Game Day Lights Guía de inicio rápido
- Deutsch: iON Game Day Lights Schnellstartanleitung
- Nederlands: iON Game Day Lights Snelstartgids
Related papers
-
iON Game Day Quick start guide
-
-
iON Sport Quick start guide
-
-
iON Pathfinder Charger Quick start guide
-
-
iON Sport XL Quick start guide
-
iON 300 User guide
-
-
iON BLOCK ROCKER BLUETOOTH iPA56C Owner's manual
