Page is loading ...

F
o
r
T
h
e
r
m
a
d
o
r
®
P
r
o
f
e
s
s
i
o
n
a
l
Indoor Grill
CARE AND USE MANUAL
Model
PB30

Thermador
®
Professional
®
Indoor GrillCare and Use Manual
A SPECIAL MESSAGE TO OUR CUSTOMERS
Thank you for selecting the Thermador
®
PROFESSIONAL
®
Indoor Grill. We
recommend that you take time to read this entire booklet before using your
new appliance for the first time.
The booklet contains suggestions we believe will be helpful as well as direc-
tions for using all the features of this Indoor Grill. Keep it in a handy place, as
it has the answers to questions that may occur when you start to cook.
Let us know if we can help you. When you write, please include the model
and serial numbers of your Indoor Grill.
Sincerely,
Thermador Test Kitchen Consumer Scientists
WARNING:
If the information in this manual is not
followed exactly, a fire or explosion may
result causing property damage, per-
sonal injury or death.
— Do not store or use gasoline or other
flammable vapors and liquids in the vicin-
ity of this or any other appliance.
— WHAT TO DO IF YOU SMELL GAS
■ Do not try to light any appliance.
■ Do not touch any electrical switch.
■ Do not use any phone in your building.
■ Immediately call your gas supplier from a
neighbor’s phone. Follow the gas
supplier’s instructions.
■ If you cannot reach your gas supplier, call
the fire department.
— Installation and service must be performed
by a qualified installer, service agency or
the gas suppler.
— Ne stockez pas et n’utilisez pas d’essence
ou autres produits inflammables à
proximité des appareils.
—
SI VOUS SENTEZ UNE ODEUR DE GAZ
■ N’allumez aucun appareil.
■ Ne touchez pas aux interrupteurs
électriques.
■ N’utilisez pas les téléphones du bâtiment.
■ Appelez immédiatement votre compagnie
de gaz de chez un voisin. Suivez les in-
structions de la compagnie.
■ Si vous n’arrivez pas à contacter votre
compagnie de gaz, appelez les pompiers.
— L’installation et les réparations doivent
être réalisées par un installateur qualifié,
un centre de réparation agréé ou la
compagnie de gaz.
AVERTISSEMENT
L’information fournie dans ce manuel
doit être rigoureusement respectée, sous
peine d’incendie ou d’explosion
entraînant des dommages, des blessures
ou la mort.

Thermador
®
Professional
®
Indoor GrillCare and Use Manual
TABLE OF CONTENTS
Introduction..........................................................................1
Gas Type Verification...........................................................1
General Safety Instructions
Safety ..................................................................2
Precautions....................................................3 – 4
Before You Begin
Remove All Packing Materials.................................... 5
Model Description
Parts Identification ..............................................5
Using the Grill
Before the First Use ............................................6
If You Smell Gas ..................................................6
General Information............................................6
For Best Results ..................................................6
Excessive Flaming or Flare Ups ..........................7
Manual Lighting Instructions...............................7
Grilling Hints .......................................................7
Grilling Recommendations ...........................8 – 9
Care and Maintenance
Cleaning the Indoor Grill ..................................10
Service
Do-It-Yourself Maintenance ..............................11
Data Rating Plate ..............................................12
Before Calling For Service ................................12
Calling for Service.............................................12
Warranty............................................................13
INTRODUCTION
The Thermador PROFESSIONAL
®
Indoor Grill is a
built-in unit with two burners rated at 20,000 BTU each.
The total gas consumption of the Indoor Grill with all
burners on HI is 40,000 BTU/hour.
TESTED IN ACCORDANCE WITH ANSI
Z21.1 CURRENT ISSUE, THE STANDARD
FOR HOUSEHOLD COOKING GAS
APPLIANCES. IN CANADA TESTED IN
ACCORDANCE WITH CAN/CGA 1.1 -
M81, STANDARD FOR DOMESTIC GAS
RANGES, CURRENT ISSUE.
Check your local building codes for the proper
method of installation. In the absence of
local codes, this unit should be installed in
accordance with the National Fuel Gas Code
No. Z223.1/NFPA54-current issue and the
National Electrical Code ANSI/NFPA70-cur-
rent issue or the Can B149 Installation Codes
for Gas Burning Appliances and C22.1 Cana-
dian Electrical Code Part 1.
1
GAS TYPE VERIFICATION
Verify the type of gas supplied to the location. En-
sure that the appliance is connected to the type of
gas for which it is certified. This grill is certified for
use with natural gas. Field conversion of the appli-
ance for use with LP gas supply can be accom-
plished by following the directions in the installa-
tion instructions.
CAUTION:
When connecting the unit to propane gas,
make certain the propane gas tank is
equipped with its own high-pressure regula-
tor. The pressure of the gas supplied to the
appliance regulator must not exceed 14"
(34.9 millibars) water column.
!
IMPORTANT
When there is less than 12" (305 mm) hori-
zontal clearance between combustible mate-
rials and the back edge of the grill, model
GP30LBS must be installed. If more than 12"
(305 mm) horizontal clearance exists, Model
GP30ITS Island Trim may be used instead of
the backguard. Attach the backguard or is-
land trim before lowering the unit into the fi-
nal installed position. The backguard or island
trim must be ordered separately.

Thermador
®
Professional
®
Indoor GrillCare and Use Manual
ELECTRICAL REQUIREMENTS AND GROUNDING INSTRUCTIONS
CAUTION
In Case of an Electrical Failure
If for any reason a gas control knob is turned ON and there is no electric power to operate the
electronic igniters on the grill burners, turn OFF the gas control knob and wait 5 minutes for
the gas to dissipate before lighting the grill burner manually.
To light the grill burners manually, carefully hold a long-stem lighted match or a multi-purpose
long disposable lighter to the burner ports and turn the gas control knob to HI. During a power
failure, you can manually light the grill burners, but each burner must be lit with a long-stem
match or a multi-purpose long disposable lighter.
See Page 7 for additional information on manually lighting the burners.
PLEASE READ CAREFULLY
The Thermador PROFESSIONAL Indoor Grill re-
quires an electrical circuit rated at 120 volts, 60
Hz., 10 Amps.
For personal safety, this appliance must be
connected to a properly grounded and polarized
electrical power supply.
Always disconnect the electrical plug from the wall
receptacle before servicing this unit.
See Installation Instructions for electrical
requirements and grounding instructions.
It is the personal responsibility and obligation of
you, the user, to have this appliance connected to
the electrical power supply in accordance with the
National Electrical Code and/or applicable local
codes and ordinances by a qualified electrician.
It is recommended that a dedicated circuit servic-
ing this appliance be provided.
!
2
DO NOT UNDER ANY CIRCUMSTANCES
CUT OR REMOVE THE SEPARATE
GROUND WIRE OR THE THIRD (GROUND)
PRONG FROM THE POWER CORD PLUG.
Important Safety Instructions
!

Thermador
®
Professional
®
Indoor GrillCare and Use Manual
Your new Thermador
PROFESSIONAL Indoor Grill has
been designed to be a safe,
reliable appliance when properly
used and cared for. If not
properly used, it could be
dangerous. Read all instructions
in this Care and Use Manual
carefully before using this Grill.
WARNING: These pre-
cautions will reduce the risk of
burns, electric shock, fire, and
injury to persons. Use extreme
care when using this restaurant
caliber Grill as this appliance
provides intense heat and can
increase the accident poten-
tial.
When using kitchen appli-
ances, these basic safety pre-
cautions must be followed:
• Insure proper installation and
servicing. Follow the installation
instructions provided with this
product. Have the Grill installed
and grounded by a qualified
technician.
• Have the installer show you
where the gas supply shut-off
valve is located so that you
know how and where to turn off
the gas to the Grill.
• If you smell gas:
- Do not try to light any appli-
ance.
- Do not touch any electrical
switch; do not use any phone in
your building.
- Immediately call your gas sup-
plier from a neighbor’s phone.
- Follow the gas supplier’s in-
struction.
- If you cannot reach your gas
supplier, call the fire department.
- Installation and service must be
performed by a qualified installer,
service agency or the gas sup-
plier.
• In the event a burner goes out
and gas escapes, open a window
or a door. Do not attempt to use
the Grill until the gas has had
time to dissipate. Wait at least
5 minutes before using the
Grill.
• Do not repair or replace any
part of the appliance unless
specifically recommended in this
manual. All other servicing
should be referred to a qualified
technician.
• Children should not be left
alone or unattended in an area
where appliances are in use.
They should never be allowed to
sit or stand on any part of the
appliance. If children are allowed
to use the appliance, they must
be closely supervised.
CAUTION: Do not
store items of interest to chil-
dren above the Grill or at the
back of it. If children should
climb onto the appliance to
reach these items, they could be
seriously injured.
• Never use any part of the
Grill for storage. Flammable
materials can catch fire and
plastic items may melt or ig-
nite.
• If the Grill is near a window, be
certain the curtains do not
blow over or near the Grill
burners; they could catch on
fire.
• DO NOT USE WATER ON
GREASE FIRES. Turn appliance
off and smother fire with baking
soda or use a dry chemical or
foam-type extinguisher.
• Never let clothing, pot hold-
ers, or other flammable mate-
rials come in contact with or
close to the grates until they
have cooled. Fabric may ignite
and result in personal injury.
• Use only dry pot holders.
Moist or damp pot holders on
hot surfaces may cause burns
from steam. Do not use a towel
or other bulky cloth in place of
pot holders. Do not let pot hold-
ers touch hot grill grates.
• For personal safety, wear
proper apparel. Loose fitting
garments or hanging sleeves
should never be worn while us-
ing this appliance. Some syn-
thetic fabrics are highly flam-
mable and should not be worn
while cooking.
WARNING: The appli-
ance is designed for grilling
food. Based on safety consider-
ations, never use the Grill to
warm or heat a room or for other
purposes. Such use can also
damage the Grill.
• When using the Grill: DO NOT
TOUCH THE BURNER GRATES
OR THE IMMEDIATE SUR-
ROUNDING AREAS. They be-
come hot enough to cause
burns.
SAFETY PRACTICES TO AVOID PERSONAL INJURY
!
!
!
3
Important Safety Instructions
Please read all instructions before using this appliance.
SAVE THESE INSTRUCTIONS
!

Thermador
®
Professional
®
Indoor GrillCare and Use Manual
• Never leave the Grill unat-
tended. If the burner flames are
smothered, unburned gas will es-
cape into the room. See inside
the front cover regarding gas
leaks.
• Do not heat unopened food
containers; a buildup of pres-
sure may cause the container to
burst.
• Use caution to insure that drafts
like those from forced air vents
or fans do not blow flammable
material toward the flames.
• Do not use the grill for grill-
ing fatty meats or products
which promote flare-ups.
• Do not operate the grill with-
out the splashguard.
• The grill radiants must be in
place for proper operation of
the grill.
• The grill grate covers must be
removed
before operating the
Grill burners beneath.
• DO NOT USE COOKING
UTENSILS (pots, pans, etc.) ON
THE GRILL. The appliance is in-
tended for grilling only.
• For proper lighting and perfor-
mance of the burners, keep the
ports clean. Failure to keep port
holes clean can also result in nui-
sance sparking. If a spray type
non-stick coating is used, spray
the grill only when it is cool. The
spray aerosol if flammable.
SAVE THESE INSTRUCTIONS
4
• Install a smoke detector in or
near the kitchen.
• If a burner goes out and gas
escapes, turn the control knob
off. Open a window or door. Do
not attempt to use the Grill until
the gas has had time to dissi-
pate.
• California Proposition 65
Warning: The burning of gas grill-
ing fuel generates some by-prod-
ucts which are on the list of sub-
stances which are known by the
State of California to cause can-
cer or reproductive harm. Cali-
fornia law requires businesses to
warn customers of potential ex-
posure to such substances. To
minimize exposure to these sub-
stances, always operate this unit
according to the instructions con-
tained in this booklet and pro-
vide good ventilation to the room
when grilling with gas.
• Clean the Grill with caution.
Avoid steam burns; do not use a
wet sponge or cloth to clean the
Grill while it is hot. Some clean-
ers produce noxious fumes if ap-
plied to a hot surface. Follow
directions provided by the
cleaner manufacturer.
• Do not use flammable clean-
ers when cleaning the grill.
• Be sure all Grill controls are
turned off and the Grill is cool
before using any type of aerosol
cleaner on or around the Grill.
The chemical that produces the
spraying action could, in the pres-
ence of heat, ignite or cause
metal parts to corrode.
• Service should only be done
by authorized technicians.
Technicians must disconnect the
power supply before servicing
this unit.
• Clean the ventilator hood and
filters above the Grill fre-
quently so grease from grilling
vapors does not accumulate on
them.
• When there is a fire or when
intentionally “flaming” liquor
or other spirits on the Grill,
follow the hood ventilator
manufacturer's instructions.
Important Safety Instructions
Please read all instructions before using this appliance.
!

Thermador
®
Professional
®
Indoor GrillCare and Use Manual
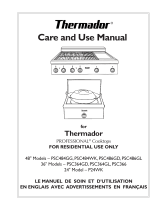
Model and Parts Identification
Key for Model PB30
1 – Control Knobs
2 – Grease Tray
3 – Grill Grates
4 – Backguard*
5 – Leveling Legs
6 – Grill Burner
7 – Splash Guard
8 – Radiant
9 – Grill “ON” Light
10 – Grill Cover (left side shown)
* Backguard is not included and must be ordered separately.
5
4
1
3
2
8
7
6
5
9
10
Professional

Thermador
®
Professional
®
Indoor GrillCare and Use Manual
For Best Results
• Thaw food items before grilling.
• Preheating provides the high heat needed to
brown and seal in juices.
• After preheating, reduce the flame to setting
listed on Grilling Recommendations.
• The degree of doneness is influenced by the
type of meat, cut of meat (i.e. size, shape and
thickness), heat setting selected, and length of
time on the grill.
• Shorten the preheat time when grilling high-fat
cuts of meat or poultry, such as chicken thighs.
This will help reduce flare-ups.
• Cuts of meat with high fat content should not
be grilled.
• Lightly oil grill when cooking low-fat cuts of
meat, fish or poultry, such as lean hamburger
patties, shrimp or skinless chicken breasts.
• For best results food should be turned only
once.
• Avoid puncturing or cutting the meats to test
doneness. This will allow juices to escape.
• When using a high flame, add barbecue sauce
to food during the last 10 minutes before
removing from grill.
6
Using Your Indoor Grill
Before the First Use
1. Burn off residual manufacturing oils. Follow
Burner Lighting Instructions (Page 7) and then:
✓ Turn all burners on HI setting for 15 - 20
minutes.
✓ Cool.
2. Prepare for use.
✓ Optional step: Line drip tray with heavy-duty
aluminum foil and a thin layer of sand or bird
gravel.
✓ Protect the finish with a stainless steel
cleaner or protective polish. See care sug-
gestions Page 10.
General information
1. Estimate the grilling time and heat settings
according to the suggestions on the Grilling
Chart, Pages 8 – 9.
2. For manual lighting due to power failure, follow
directions, Page 7.
3. Preheat the grill about 10 minutes.
If you smell gas, do not at-
tempt to light the indoor grill.
— WHAT TO DO IF YOU SMELL GAS
■ Do not try to light any appliance.
■ Do not touch any electrical switch.
■ Do not use any phone in your building.
■ Immediately call your gas supplier from a
neighbor’s phone. Follow the gas
supplier’s instructions.
■ If you cannot reach your gas supplier, call
the fire department.
— Installation and service must be performed
by a qualified installer, service agency or
the gas suppler.
A VENTILATING HOOD of adequate cubic -feet-per minute capacity vented to the outside of the
house is recommended for installation. ABOVE THE GRILL: For most kitchens with a wall-mounted
hood, a certified hood rating of not less than 940 CFM is recommended. The hood must be installed
according to installation instructions furnished with the hood and local building code requirements.
Refer to ventilation requirements in the Installation Instructions for additional information.

Thermador
®
Professional
®
Indoor GrillCare and Use Manual
Using Your Indoor Grill
7
Excessive Flaming or Flare Ups
This Professional Indoor Grill is equipped with two
20,000 BTU/HR U-shaped burners to provide the high
heat and uniform temperature distribution required
for quality grilling. The intense heat, however, may
result in flareups due to drippings of grease and fat.
This is a normal part of the cooking process. It is
imperative that the grilling process be supervised at
all times, so that the user can oversee this active
cooking method.
Should the flame become excessive, remove the food
from the grill and turn the control knob to OFF. Use
baking soda to extinguish the flames. Excessive
flaming may occur when cooking meat with a lot of
fat (i.e., 30% ground beef, steaks with a heavy fat layer
around the edge, lamb chops, etc.)
Use caution when turning any kind of meat. The melted
fat dropping onto the stainless radiant may create a
flare-up. If a flare-up occurs, use a long handled spatula
to move food to another area until the flames subside.
Follow these steps to light the grill burners
manually:
1. Turn off all the burners.
2. Wait 5 minutes to allow any accumulated
gas to dissipate.
Use a long stem match or a multipurpose
long disposable lighter to light manually:
3. Remove the grill grates.
4. Find the ports on top of the burner by
looking through the opening at the end of
the radiant. Keep your hands and face as
far away from the burner as possible.
5. Place the lighted long-stem match or
lighter through the hole in the radiant.
This positions it near the burner ports.
6. Turn the knob to the LITE position. The
burner will light within 4 to 10 seconds.
LIGHTING INSTRUCTIONS
for Manual Lighting
– Read Before Lighting –
Grilling Hints
◆ DO NOT leave the grill unattended while
cooking.
◆ The doneness of meat, whether rare, medium
or well done, is affected to a large degree by
the thickness of the cut. Expert chefs say it is
impossible to have a rare doneness with a thin
cut of meat.
◆ The cooking time is affected by the kind of
meat, the size and shape of the cut, the
temperature of the meat when cooking begins
and the degree of doneness desired.
◆ Use a spatula or tongs instead of a fork to turn
the meat. A spatula will not puncture the meat
and let the juices run out.
◆ To get the juiciest meats, add seasoning or salt
after the cooking is finished and turn the meat
only once (juices are lost when the meat is
turned several times). Turn the meat just after
the juices begin to bubble to the surface.
◆ Trim any excess fat from the meat before
cooking.To prevent steaks or chops from curling
during cooking, slit the fat around the edges
at 2-inch (51 mm) intervals.
◆ To test for doneness, make a small slash in the
center of the meat, not at the edge.This
prevents loss of juices.
◆ To prepare rarer meats or maintain warmth,
place the food at the front section of the grill.

Thermador
®
Professional
®
Indoor GrillCare and Use Manual
Grilling Recommendations
8
T
HICKNESS/ BURNER INTERNAL DONENESS APPROXIMATE
FOOD ITEM WEIGHT SETTING OR TEMPERATURE (ºF) GRILLING TIME
BEEF
Ground Beef Patties
4 oz.-
1
/2"
thick MED No pink color 10 to 15 minutes
Roast, Tri Tip 2" thick MED HI 140º Rare 50 to 60 minutes
145º Medium Rare
Steaks
Ribeye 1" thick HI 140º Rare 12 to 15 minutes
145º Medium Rare 15 to 18 minutes
Ribeye 1
-1
/2" thick HI 140º Rare 20 to 25 minutes
145º Medium Rare 25 to 30 minutes
New York Strip 1" thick HI 140º Rare 20 to 24 minutes
145º Medium Rare 24 to 27 minutes
New York Strip 1
--1
/2" thick HI 140º Rare 27 to 30 minutes
145º Medium Rare 30 to 33 minutes
T-Bone 1" thick HI 140º Rare 18 to 20 minutes
145º Medium Rare 20 to 22 minutes
T-Bone 1
-1
/2" thick HI 140º Rare 30 to 33 minutes
145º Medium Rare 33 to 35 minutes
Tenderloin 1
-1
/2" thick HI 140º Rare 18 to 25 minutes
145º Medium Rare
Flank
1
/2" to 1" thick HI 140º Rare 20 to 25 minutes
145º Medium Rare
PORK
Boneless Chops 1" thick HI 160º Well Done 25 to 28 minutes
Rib Chops 1
-1
/2" thick HI 160º Well Done 25 to 30 minutes
Whole Tenderloin 1 lb. HI 160º Well Done 28 to 35 minutes
Spareribs 4 lb. LO 160º Well Done 2
-1
/2 to 3 hours
Baby Back Ribs 2 lbs. LO 160º Well Done 2
-1
/2 to 3 hours
Ham Slice 1" thick HI 160º Well Done 20 to 25 minutes
Smoked Kielbasa 1" diameter HI 160º Well Done 17 to 19 minutes
Fresh Bratwurst 1" diameter HI 160º Well Done 23 to 25 minutes
Measuring Heat Settings:
Knobs have HI and LO setting for flame adjustment.
Heat settings indicated below are approximate.
For best results, keep hood fan speed on low.

Thermador
®
Professional
®
Indoor GrillCare and Use Manual
Grilling Recommendations
THICKNESS/ BURNER INTERNAL DONENESS APPROXIMATE
FOOD ITEM WEIGHT SETTING OR TEMPERATURE (ºF) GRILLIN
G TIME
9
POULTRY
Chicken
Boneless Breasts 4-6 oz. HI 160º or until the 15 to 20 minutes
juices run clear
Bone-in Pieces 2
-1
/2
–
3
-1
/2
lbs. MED 160º in breast 20 to 45 minutes
170º in thigh depending upon
size of piece
Halves 1
-1
/2
–
2 lbs. MED 160º in breast 1
-1
/4 to 1
-1
/2 hour
each half LO 170º in thigh
Cornish Game Hens
Halves
1
/2
lbs. each half MED 160º in breast 30 to 45 minutes
170º in thigh
Turkey:
Boneless Breast 2" thick MED HI 160º 50 to 60 minutes
Tenderloins
1
/2
lbs. each MED 160º 35 to 40 minutes
LAMB
Chops
Loin 1" thick HI 145º Medium Rare 8 to 10 minutes
150º Medium 10 to 12 minutes
FISH
Fillets
1
/2" to 1” thick HI Flakes with a fork 6 to 7 minutes per
each
1
/2" of
thickness
Whole 7
–
10 oz. HI Flakes with a fork 15 to 20 minutes
SHELLFISH
Scallops Large MED Opaque 15 to 18 minutes
Shrimp Medium MED Opaque 5 to 8 minutes
Lobster Tails Medium HI Opaque 20 to 25 minutes
FRUIT
Fresh Pineapple Quarters MED HI 150º Sof 1 Tf0.818j6.4 0 0 6.4 498.48 340.86 Tm0 TcG Tw9p0 6enderloins

Thermador
®
Professional
®
Indoor GrillCare and Use Manual
Cleaning the Indoor Grill
10
Grill Safety Instructions
1. When disassembling or reassembling the Grill,
use extreme caution to avoid contact with the
fragile ceramic igniter.The igniters may break,
preventing operation of the grill.
2. To reduce flare ups during grilling, operate the
grill for 15 minutes after cooking is complete
to burn off excess grease.
Brand Names
The use of brand names is intended only to
indicate a type of cleaner. This does not constitute
an endorsement. The omission of any brand name
cleaner does not imply its adequacy or inadequacy.
Many products are regional in distribution and can
be found in the local markets. Strictly follow
instructions for use.
CLEANING RECOMMENDATIONS
PART and MATERIAL
SUGGESTED CARE
Exterior Finish - Stainless Steel Finish Protector: Stainless Steel Magic
®
and EZ Brite
®
.
Stainless Steel The quality of this material resists most stains and pitting, providing the surface is kept
clean and protected. Apply to a clean surface.
Nonabrasive cleaners: detergent and water, Fantastik
®
, Formula 409
®
, vinegar.
Mild abrasive cleaners: liquid Kleen King
®
,
Drip Tray – Tip: Keep a thin layer of sand or bird gravel on top of foil liner to absorb grease.
Stainless Steel Cool indoor grill. Remove tray and set on a flat surface. Remove foil liner. Wipe up
excess grease with paper towels. Wash with detergent and hot water or multi-
purpose cleaner, i.e. Formula 409
®
or Fantastik
®
. Rinse and dry; reline with heavy-duty
foil. Replace tray. Clean often to avoid possibility of a grease fire.
Knobs Wash with detergent and warm water; rinse and dry.
Plastic
Reflectors, Discoloration of stainless steel on these parts is to be expected, due to the intense
Burner Box – heat from the burners. Use a spatula to scrape food particles and residual grease into
Stainless Steel the drip tray. Wipe out with cloth or sponge as necessary. Use cleaners such as Zud
®
or BarKeepers Friend
®
.
Grates/Grill – Refer to the Quick Clean Method.
Porcelain on iron Grates may also be scrubbed with an SOS
®
pad and hot water when cool.
Double-U™ shape Cool indoor grill. Remove grates and radiant baffles. Lift grill burner from the rear and
Grill Burner remove. Clean the exterior of the grill burner with a plastic dishwashing
Aluminized Steel pad. Use a straightened paper clip to clear clogged ports. Shake out any debris
through the air shutter. (Do not use a wooden toothpick to clear any debris in the
clogged ports.)
Quick Clean Method for Grates
1. Immediately after cooking, turn off the burners.
Fill a container with very hot water.
2. Using a long handled, brass barbecue brush dipped
in hot water, scrub the hot grates. Use a heavy mitt
to protect your hand from the heat and steam.
3. Repeat. Scrub each grate with the wire brush to
remove cooked on food soil. The steam created
from applying water to the hot grate softens the soil,
making it easier to remove.
4. Charred particles will fall into the drip tray below.
Wipe out particles; replace aluminum foil liner.
Quick Clean Method for the Drip Tray
Cleaning the Overhead Hood
CAUTION:
To reduce the risk of fire, keep the exhaust
hood free of grease build-up. It is recommended that the
grease collection tray and the baffles be removed and
cleaned after each use when grilling large amounts of
meats, or meats with high fat content. Clean the interior
surfaces of the hood frequently.
DO NOT CLEAN ANY REMOVABLE PARTS OF THE GRILL IN A SELF-CLEANING OVEN
.
▲
!
Check tray after each use.
1. Line tray with heavy foil.
2. Spread thin layer of sand or bird gravel over foil to
absorb grease.
3. When time to replace foil liner and sand, pull corners
of foil to center, bundle and throw away.

Thermador
®
Professional
®
Indoor GrillCare and Use Manual
11
Do-It-Yourself Maintenance
Intermittant or Constant Igniter Sparking
Intermittent or constant sparking of the grill burners can result from a number of
preventable conditions. Eliminate these conditions as indicated in the chart.
SYMPTOM CAUSE REMEDY
Intermittent sparking • Burner ports are clogged. • Clean ports in burner with
a wire, a needle or
straightened paper clip.
Constant Sparking • Indoor Grill is not properly • Refer to Installation Instructions.
grounded
• Electrical power supply • Refer to Installation Instructions.
incorrectly polarized. • Have a qualified electrician
ground the grill properly
for correct installation.
Burner Grate
Porcelain on iron
Radiant
Stainless
Steel
U-shaped Grill Burner
Grill Cover
Stainless Steel
(left side shown;
2 included)
Control Knobs,
Plastic
Backguard,
Splash Guard
Stainless Steel
Grease Tray
Professional
See Installation Instructions.

Thermador
®
Professional
®
Indoor GrillCare and Use Manual
Before calling for service, check the following to avoid
unnecessary service charges.
Be sure to check these items first:
Is there a power outage in the area?
Is the household fuse blown or the circuit breaker
tripped?
Is the grill disconnected from the electrical supply?
IF THE BURNERS DO NOT IGNITE
• Are the burner ports clogged?
• Is a fuse blown or is the circuit breaker tripped?
• Is the manual shut-off valve closed, preventing the flow
of gas?
• Is the spark igniter sparking?
PRODUCT RATING PLATE
Indoor Grill:
The product rating plate shows the model and serial numbers
of your Indoor Grill. It is located on the underside of the Grill
chassis near the gas inlet connection and electric power cord.
SERVICE
INFORMATION
______________________________
Serial Number
______________________________
Date of Purchase
______________________________
Dealer’s Name
______________________________
Dealer’s Phone Number
______________________________
Service Center's Name
______________________________
Service Center's Phone Number
Also, enter this information on the
Product Registration Form in-
cluded with this product, then
mail it to the indicated address.
— Thank You.
Before Calling For Service
CUSTOMER SERVICE:
800/735-4328
or see our website:
www.thermador.com
12
Product Rating Label Location – Indoor Grill Model
3" Min.
36"
Power
Cord
3/4" flex line
3-Prong grounding type
receptacle connected to
a properly grounded and
polarized electrical
supply rated at 120VAC,
10 Amps, Single Phase,
60 HZ.
▲
Product Rating
Label/Serial Tag
All Installer supplied parts must
conform to Local Codes.
A manual valve must be
installed external to the
appliance, in an accessible
location from the front, for the
purpose of shutting off the gas
supply.
Regulator (supplied
with unit) Install
horizontally,
Front - Bottom of Unit
Threading compounds must
be Resistant to Propane Gas
▲
▲
▲
▲
▲
gas flow
➞
1/2" or 3/4" NPT
▲

Thermador
®
Professional
®
Indoor GrillCare and Use Manual
Warranty
FULL ONE-YEAR WARRANTY
Covers one year from the date of installation or date of occupancy for a new previously unoccupied
dwelling. Save your dated receipt or other evidence of the installation/occupancy date.
Thermador
®
Will Not Pay For:
1. Service by an unauthorized agency. Damage
or repairs due to service by an unauthorized
agency or use of unauthorized parts.
2. Service visits to:
• Teach you how to use the appliance.
• Correct the installation. You are responsible
for providing electrical wiring and other
connecting facilities.
• Reset circuit breakers or replace home
fuses.
3. Damage caused from accident, alteration, mis-
use, abuse, improper installation or installation
not in accordance with local electrical codes
or plumbing codes, or improper storage of the
appliance.
4. Repairs due to other than normal home use.
5. Service labor during limited warranty period.
6. Travel fees and associated charges incurred
when the product is installed in a location with
limited or restricted access (i.e., airplane flights,
ferry charges, isolated geographic regions).
Thermador
®
Will Pay For:
All repair labor and replacement parts found to be
defective due to materials and workmanship.
Service must be provided by a Factory Authorized
Service Agency during normal working hours.
For a Service Agency nearest you, please dial 800/
735-4328.
Warranty applies to appliances used in residential
application: it does not cover their use in commer-
cial installations.
This warranty is for products purchased and re-
tained in the 50 states of the U.S.A., the District of
Columbia and Canada. Should the appliance be
sold by the original purchaser during the warranty
period, the new owner continues to be protected
until the expiration date of the original purchaser’s
warranty period.
The warranty applies even if you should move.
Thermador does not assume any responsibility for
incidental or consequential damages. Some states
do not allow the exclusion or limitation of incidental
or consequential damages, so the above limitation
or exclusion may not apply to you. This warranty
gives you specific legal rights and you may also
have other rights which may vary from state to state
or province to province.
13
/