
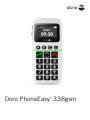
Doro PhoneEasy
®
338gsm
Page is loading ...

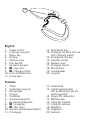
Power on/off
Side key (volume)
Menu key
Display
Memory keys
Call key/OK
Numeric keypad
* / Key lock
# / Change prole
End call/back/Clear
Arrow keys
1.
2.
3.
4.
5.
6.
7.
8.
9.
10.
11.
Phonebook key
Charging contacts (for use
with charging stand)
Emergency call key
Headset socket
Battery cover
Charging socket
Microphone
Loudspeaker
Lanyard
12.
13.
14.
15.
16.
17.
18.
19.
20.
English
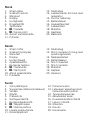
På/av
Sidoknapp (volym)
Menyknapp
Display
Snabbval
Samtalsknapp/OK
Numerisk knappsats
* / Knapplås
# / Byt prol
Avsluta samtal/radera/bakåt
Pilknappar
1.
2.
3.
4.
5.
6.
7.
8.
9.
10.
11.
Telefonbok
Laddningskontakter
(för användning med ett
laddningsställ)
Knapp för nödsamtal
Batterilucka
Uttag för headset
Uttag för laddare
Mikrofon
Högtalare
Halsrem
12.
13.
14.
15.
16.
17.
18.
19.
20.
Svenska
20
Page is loading ...

1
English
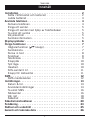
Contents
Installation . . . . . . . . . . . . . . . . . . . . . . . . . . . . . . . . . . . . 2
Installing the SIM card and battery . . . . . . . . . . . . . . . . . . 2
Charging . . . . . . . . . . . . . . . . . . . . . . . . . . . . . . . . . . . . 3
Operation . . . . . . . . . . . . . . . . . . . . . . . . . . . . . . . . . . . . . . 4
Activating the phone . . . . . . . . . . . . . . . . . . . . . . . . . . . . 4
Making a call . . . . . . . . . . . . . . . . . . . . . . . . . . . . . . . . . 5
Making a call from the Phonebook . . . . . . . . . . . . . . . . . . 5
Receiving a call . . . . . . . . . . . . . . . . . . . . . . . . . . . . . . . 5
Volume control . . . . . . . . . . . . . . . . . . . . . . . . . . . . . . . . 5
Call information . . . . . . . . . . . . . . . . . . . . . . . . . . . . . . . 5
Display symbols . . . . . . . . . . . . . . . . . . . . . . . . . . . . . . . . . 6
Additional functions . . . . . . . . . . . . . . . . . . . . . . . . . . . . . . 7
Handsfree mode (
q
key) . . . . . . . . . . . . . . . . . . . . . . . . 7
Call log . . . . . . . . . . . . . . . . . . . . . . . . . . . . . . . . . . . . . 7
Text input . . . . . . . . . . . . . . . . . . . . . . . . . . . . . . . . . . . . 8
Speed dial . . . . . . . . . . . . . . . . . . . . . . . . . . . . . . . . . . . 8
Phonebook . . . . . . . . . . . . . . . . . . . . . . . . . . . . . . . . . . . 9
Key lock . . . . . . . . . . . . . . . . . . . . . . . . . . . . . . . . . . . . 10
Silent mode . . . . . . . . . . . . . . . . . . . . . . . . . . . . . . . . . 10
Headset . . . . . . . . . . . . . . . . . . . . . . . . . . . . . . . . . . . . 10
SOS calls 999/112/911 . . . . . . . . . . . . . . . . . . . . . . . . 11
Emergency Call key . . . . . . . . . . . . . . . . . . . . . . . . . . . . 11
SMS messaging . . . . . . . . . . . . . . . . . . . . . . . . . . . . . . . . 12
Incoming messages . . . . . . . . . . . . . . . . . . . . . . . . . . . . 12
Settings . . . . . . . . . . . . . . . . . . . . . . . . . . . . . . . . . . . . . . 13
Time and date . . . . . . . . . . . . . . . . . . . . . . . . . . . . . . . . 13
User setup . . . . . . . . . . . . . . . . . . . . . . . . . . . . . . . . . . 14
SMS receive . . . . . . . . . . . . . . . . . . . . . . . . . . . . . . . . . 16
Emergency . . . . . . . . . . . . . . . . . . . . . . . . . . . . . . . . . . 16
Network setup . . . . . . . . . . . . . . . . . . . . . . . . . . . . . . . 17
Security settings . . . . . . . . . . . . . . . . . . . . . . . . . . . . . . 18
Safety instructions . . . . . . . . . . . . . . . . . . . . . . . . . . . . . . 19
Troubleshooting . . . . . . . . . . . . . . . . . . . . . . . . . . . . . . . . 22
Care and maintenance . . . . . . . . . . . . . . . . . . . . . . . . . . . 26
Warranty and technical data . . . . . . . . . . . . . . . . . . . . . . . 27

2
English
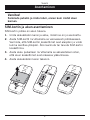
Installation
Warning!
Turn off the phone and disconnect the charger before
removing the battery cover.
Installing the SIM card and battery
Remove the battery cover and the battery if it is already
installed.
Insert the SIM card by carefully sliding it into the holder.
Make sure that the SIM card’s contacts are facing inwards
and that the cut-off corner is pointing upwards. Take care not
to scratch or bend the contacts on the SIM card.
Insert the battery by sliding it into the battery compartment
with the contacts facing upwards to the right.
Replace the battery cover.
1.
2.
3.
4.

3
English
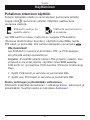
Charging
Warning!
Only use batteries, charger and accessories that have been
approved for use with this particular model. Connecting
other accessories may be dangerous and may invalidate the
phone’s type approval and guarantee.
When the battery is running low, is displayed and a warning
signal is heard. To charge the battery, connect the mains adapter
to a wall socket and to the charging socket
y
.
If the phone is turned on when the charger is connected to the
phone is displayed briey in the display and when it
is disconnected. The battery charge indicator is displayed while
charging.
If the phone is turned off when the charger is connected to the
phone only the battery charge status indicator will be shown in
the display.
It takes approximately 3 hours to fully charge the battery.
is displayed when charging is completed.
Save energy
When you have fully charged the battery and disconnected the
charger from the device, unplug the charger from the wall outlet.
Note!
To save power the LCD backlight goes off after a short while
but the phone is still charging. Press any key to illuminate the
display.
Full battery capacity will not be reached until the battery has
been charged 3–4 times.
Batteries degrade over time, which means that call time and
standby time will normally decrease with regular use.

4
English
Operation
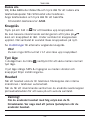
Activating the phone
Press and hold 1 on the top of the phone for a few seconds to
turn it on/off. The following messages may be displayed:
Insert SIM
SIM card missing or
incorrectly inserted.
SIM card damaged or not
valid.
If the SIM card is valid but protected with a PIN code (Personal
Identication Number), PIN: is displayed. Enter the PIN code
and press OK. Skip backwards with
L
.
Note!
If PIN and PUK codes were not provided with your SIM card,
please contact your network operator.
Attempts: �: � shows the number of PIN attempts left. When
no more attempts remain, SIM blocked is displayed. The
SIM card must now be unlocked with the PUK code (Personal
Unblocking Key).
1. Enter the PUK code and conrm with OK.
2. Enter a new PIN code and conrm with OK.
Changing the language, time and date
The default language is determined by the SIM card. See Settings
on how to change language, time and date.

5
English
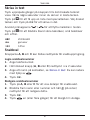
Making a call
Enter the phone number. Skip backwards with
L
.
Press
q
to dial.
Press
L
to end the call.
Note!
When making international calls, press
*
twice for the
international prex "+".
Making a call from the Phonebook
Press
b
to open the phonebook.
Use the arrow keys / to scroll through the
phonebook, or quick search by pressing the key corresponding
to the rst letter of the entry, see Text input.
Press
q
to dial the selected entry, or press
L
to return to
standby mode.
Receiving a call
Press
q
to answer.
Alternately, press
L
to reject the call directly.
Press
L
to end the call.
Volume control
Use the side keys +/– to adjust the sound volume. The volume
level is indicated on the display.
Call information
During a call, the called or calling phone number and the elapsed
call time is displayed.
If the identity of the caller is withheld, Unknown is displayed.
1.
2.
3.
1.
2.
3.
1.
2.

6
English
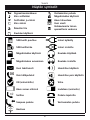
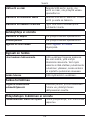
Display symbols
Signal strength Missed call
Ring only Keylock on
Ring + vibration Battery level
Vibration only New message
Silent mode
Roaming (connected to
other network)
Headset connected
SIM card missing Charger connected
SIM card error Charger disconnected
Keypad locked Headset connected
Unlocking keypad Headset disconnected
New SMS message Handsfree on
SOS calls only Handsfree off
OK (conrmed) Error
Battery level low Charging (animated)
Calling Call ended
Incoming call Missed call
Searching

7
English
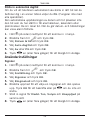
Additional functions
Handsfree mode (
q
key)
Activates handsfree mode during a call, which allows you to
speak without holding the phone.
Speak clearly into the microphone at a maximum distance of 1 meter
(3 feet). Use the side keys +/– to adjust the loudspeaker volume.
Press
q
to return to normal mode.
Note!
The handsfree function allows only one person at a time
to talk. Switching between talk/listen is triggered by the
sound of the person talking. Loud noises (music, etc.) in the
background may interfere with the handsfree function.
Call log
Answered, missed, and outgoing calls are saved in a combined call
log. 20 calls of each type can be stored in the log. For multiple
calls related to the same number, only the most recent call is saved.
Retrieving and dialling
Press
q
.
Use the arrow keys / to scroll through the call list.
= Incoming call
= Outgoing call
= Missed call
Press
q
to show details for the selected call.
Press
q
to dial the number or press and hold
w
for the
following settings:
Delete
Delete the call
Delete all
Delete all calls in the call log
Save
Save the number in the Phonebook
1.
2.
3.
4.

8
English
Text input
Text is entered by pressing the numerical keys repeatedly to
select characters.
Press the key repeatedly until the desired character is shown.
Wait a few seconds before entering the next character.
Press
*
for a list of special characters. Select the desired
character and press OK to enter it.
Use the arrow keysarrow keys / to move the cursor within the text.
Press
#
to cycle upper case, lower case and numerals.
ABC
UPPER CASE
abc
lower case
123
Numerals
Speed dial
The keys A, B and C can be used for speed dialling.
Adding speed dial numbers
Enter the phone number.
Press and hold A.
Enter a name for the contact, see Text input.
Delete with
L
.
Press OK. You can now speed-dial this entry by press and
hold A.
Repeat to add speed dial entries for keys B and C.
If you need to change a number, store the new number in the
same location as the old one.
1.
2.
3.
4.
5.

9
English
Phonebook
The phonebook can store 50 entries.
Creating a phonebook entry
Press and hold
w
, scroll to and press OK.
Select Add new and press OK.
Select Name and press OK.
Enter a name for the contact, see Text input. Delete with
L
.
Press OK.
Select Number and press OK.
Enter the phone number, then press OK.
Press
L
one or more times to return to stand-by.
Managing phonebook entries
Press and hold
w
, scroll to and press OK.
Select an entry and press and hold
w
.
Select one of the following options and press OK.
Add new
View Creating a phonebook entry above.
View
Will show details of contact. Press
q
to call the contact.
Edit
Edit the name/number. Skip backwards with
L
.
Delete
Press OK to delete the selected phonebook entry. Press OK to
conrm or
L
to abort.
1.
2.
3.
4.
5.
6.
7.
8.
1.
2.
3.

10
English
Delete all
Select From SIM or From phone and press OK to delete all
phonebook entries from the SIM card or phone memory.
Enter the phone code and press OK to conrm.
The default Phone code is 1234.
Key lock
Press and hold
*
to lock/unlock the keypad.
Incoming calls can be answered by pressing
q
even if the
keypad is locked. During the call, the keypad is unlocked. When
the call is ended or rejected, the keypad is locked again.
See Settings for key lock options.
Note!
The emergency numbers 999/112/911 can be dialled without
unlocking the keypad.
Silent mode
Silent mode is a xed prole with SMS and ring signals disabled,
while vibration and key tone settings are unchanged. Press and
hold
#
to activate/deactivate Silent mode.
Headset
When a headset is connected, the internal microphone in the
phone is automatically disconnected.
When receiving a call you can use the answer key on the headset
cable (if it has one) to answer and end calls.
Warning!
Using a headset at high volume can damage your hearing.
Adjust the sound volume carefully when using a headset.

11
English
SOS calls 999/112/911
As long as the phone is switched on, it is always possible to place
an emergency call by entering 999, 112 or 911 followed by
q
.
Most – but not all – networks accept calls to 999, 112 or 911
without a valid SIM card. Contact your network operator for more
information.
Emergency Call key
To make an emergency call, press and hold the Emergency Call
key on the back of the phone for 3 seconds, or press it two times
within 1 second. The phone will send an emergency SMS text
message to all numbers in the Emergency numbers list. The
phone will then dial the rst number on the list. If the call is not
answered within 25 seconds, the next number is dialled.
Dialling is repeated 3 times or until the call is answered, or until
L
is pressed.
The Emergency Call function must be activated before use.
See Settings on how to activate this function, enter Emergency
Numbers, and edit the emergency SMS message.
Note!
When an emergency call is activated the phone is pre-set to
handsfree mode.
Automatic calls to 112 is normally not allowed. Do not save
this number in the list of numbers to be called automatically.
Some private security companies can accept automatic calls
from their clients. Always contact the security company before
programming in its number.

12
English
SMS messaging
Incoming messages
The phone can receive (but not send) SMS text messages.
is shown in the display when a message is received.is shown in the display when a message is received.
Press and hold
w
, scroll to and press OK.
Select a message from the list and press OK. Use the arrow
keys to scroll the message up/down.
Press
q
to dial the number or press and hold
w
for the
following settings:
Call sender
Call the selected number.
Delete
Press OK to delete the message, or
L
to return to the menu.
Use number
Displays all phone numbers contained in the message as well as
the number of the sender.
Use the arrow keys to select one of the displayed numbers.
Press and hold
w
.
Select one of the following options and press OK.
Call
Call the selected number
Save
Save the number in the phonebook
1.
2.
3.
1.
2.
3.

13
English
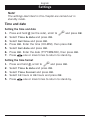
Settings
Note!
The settings described in this chapter are carried out in
standby mode.
Time and date
Setting the time and date
Press and hold
w
(on the side), scroll to and press OK.
Select Time & date and press OK.
Select Set time and press OK.
Press OK. Enter the time (HH:MM), then press OK.
Select Set date and press OK.
Press OK. Enter the date (YYYY/MM/DD), then press OK.
Press
L
one or more times to return to stand-by.
Setting the time format
Press and hold
w
, scroll to and press OK.
Select Time & date and press OK.
Select Time Format and press OK.
Select 12 hours or 24 hours and press OK.
Press
L
one or more times to return to stand-by.
1.
2.
3.
4.
5.
6.
7.
1.
2.
3.
4.
5.

14
English
Setting Auto time on/off
To set the phone to automatically update the time and date
according to the current time zone, select On. (Does only work
with some operators.)
Automatic update of date and time does not change the time you
have set for the alarm clock, calendar or the alarm notes. They
are in local time. Updating may cause some alarms you have set
to expire.
Press and hold
w
, scroll to and press OK.
Select Time & date and press OK.
Select Auto time and press OK.
Select On or Off and press OK.
Press
L
one or more times to return to stand-by.
User setup
Tone setup
Press and hold
w
, scroll to and press OK.
Select User setup and press OK.
Select Tone setup and press OK.
Select Ring tone and press OK.
Select one of the available tones, the tone will be played.
Press OK to conrm, or press
L
to discard changes.
Set up the Message tone and Keypad tone in the same way.
Press
L
one or more times to return to stand-by.
1.
2.
3.
4.
5.
1.
2.
3.
4.
5.
6.
7.

15
English
Tone volume
Press and hold
w
, scroll to and press OK.
Select User setup and press OK.
Select Tone setup and press OK.
Select Volume and press OK.
Scroll up/down to change the ring volume, then press OK.
Press
L
one or more times to return to stand-by.
Alert type (ring/vibrate)
Incoming calls can be signalled by a ring tone and/or vibration, or
by display message only.
Vib->ring means that the incoming call rst activates the
vibrator, after a short time also the ringing tone is activated.
Press and hold
w
, scroll to and press OK.
Select User setup and press OK.
Select Alert type and press OK.
Select the desired signalling mode and press OK.
Press
L
one or more times to return to stand-by.
Changing the language
The default language for the phone menus, messages etc. is
determined by the SIM card. You can change this to any other
language supported by the phone.
Press and hold
w
, scroll to and press OK.
Select User setup and press OK.
Select Language and press OK.
Scroll up/down to select a language, then press OK.
Press
L
one or more times to return to stand-by.
1.
2.
3.
4.
5.
6.
1.
2.
3.
4.
5.
1.
2.
3.
4.
5.

16
English
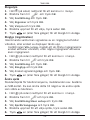
SMS receive
You can disable SMS receive to simplify use of the phone.
Press and hold
w
, scroll to and press OK.
Select SMS Receive and press OK.
Select On/Off and press OK.
Emergency
Settings for the Emergency Call key function.
See also Operation/Emergency call.
Press and hold
w
, scroll to and press OK.
Select Emergency and press OK for the following settings:
Activation
Select one of the following options and press OK.
Off
Emergency call key disabled.
On Normal
Emergency Call key enabled. To activate, press and hold key
for >3 seconds, or press 2 times within 1 second.
On (3)
Emergency Call key enabled.
To activate, press key 3 times within 1 second.
Message
The SMS text message to be sent when the Emergency Call key is
pressed. Enter/edit text, then press OK to save.
Numbers list
The list of numbers that will be called when the Emergency Call
key is pressed.
Be careful about including numbers with automatic answering
in the call list, as the alarm sequence stops once the call is
answered.
1.
2.
3.
1.
2.

17
English
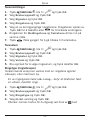
Add a new contact in the numbers list
Press and hold
w
(on the side) >4 seconds.
Scroll to and press OK.
Scroll to Emergency and press OK.
Select Numbers list and press OK.
Select Empty and press OK.
Select Name and press OK.
Enter a name for the contact, see Text input. Delete with
L
.
Press OK to conrm.
Select Number, and press OK.
Enter the number and press OK.
Press
L
to return to the list.
Repeat steps 5 - 10 until you have max. 5 emergency numbers.
To edit an existing entry, select it and press OK, then select
name/number and press OK. Delete with
L
.
Alarm information
Please read this important safety information before enabling the
Emergency Call function.
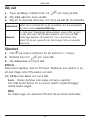
Network setup
Press Menu, scroll to and press OK.
Select Network setup and press OK.
Select one of the following options and press OK to conrm.
Automatic
Network is selected automatically.
Manual
A list of available network operators is displayed (after a
short delay). Select the desired operator and press OK.
1.
2.
3.
4.
5.
6.
7.
8.
9.
10.
1.
2.
3.

18
English
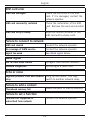
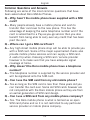
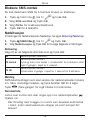
Security settings
Press and hold
w
, scroll to and press OK.
Select Security and press OK.
SIM lock
The SIM card is protected with a PIN code (Personal
Identication Number). The phone can be set to ask for the PIN
code on startup.
Select On/Off/Auto and press OK to enable/disable SIM card
lock.
Auto - You do not need to enter the PIN code when the phone
is started. If SIM card is moved to another phone (lost/stolen),
the PIN code needs to be entered to unlock.
Note!
You need to input the current PIN code to disable SIM lock.
Phone lock
Select On/Off and press OK to enable/disable the Phone lock.
Note!
You need to input the current Phone code to change this
setting. The default Phone code is 1234.
Auto key lock
Select the time delay for automatic keypad locking and press OK
to conrm.
Change Passwords (PIN/PIN2/Phone lock code)
Enter the current code and conrm with OK.
Enter a new code and conrm with OK.
Enter the new code again and conrm with OK.
Reset
Resets the phone to the factory settings.
Input the phone lock password and press OK to reset.
1.
2.
1.
2.
3.
Page is loading ...
Page is loading ...
Page is loading ...
Page is loading ...
Page is loading ...
Page is loading ...
Page is loading ...
Page is loading ...
Page is loading ...
Page is loading ...
Page is loading ...
Page is loading ...
Page is loading ...
Page is loading ...
Page is loading ...
Page is loading ...
Page is loading ...
Page is loading ...
Page is loading ...
Page is loading ...
Page is loading ...
Page is loading ...
Page is loading ...
Page is loading ...
Page is loading ...
Page is loading ...
Page is loading ...
Page is loading ...
Page is loading ...
Page is loading ...
Page is loading ...
Page is loading ...
Page is loading ...
Page is loading ...
Page is loading ...
Page is loading ...
Page is loading ...
Page is loading ...
Page is loading ...
Page is loading ...
Page is loading ...
Page is loading ...
Page is loading ...
Page is loading ...
Page is loading ...
Page is loading ...
Page is loading ...
Page is loading ...
Page is loading ...
Page is loading ...
Page is loading ...
Page is loading ...
Page is loading ...
Page is loading ...
Page is loading ...
Page is loading ...
Page is loading ...
Page is loading ...
Page is loading ...
Page is loading ...
Page is loading ...
Page is loading ...
Page is loading ...
Page is loading ...
Page is loading ...
Page is loading ...
Page is loading ...
Page is loading ...
Page is loading ...
Page is loading ...
Page is loading ...
Page is loading ...
Page is loading ...
Page is loading ...
Page is loading ...
Page is loading ...
Page is loading ...
Page is loading ...
Page is loading ...
Page is loading ...
Page is loading ...
Page is loading ...
Page is loading ...
Page is loading ...
Page is loading ...
Page is loading ...
Page is loading ...
Page is loading ...
Page is loading ...
Page is loading ...
Page is loading ...
Page is loading ...
Page is loading ...
Page is loading ...
Page is loading ...
Page is loading ...
Page is loading ...
Page is loading ...
Page is loading ...
Page is loading ...
Page is loading ...
Page is loading ...
Page is loading ...
Page is loading ...
Page is loading ...
Page is loading ...
Page is loading ...
Page is loading ...
Page is loading ...
Page is loading ...
Page is loading ...
Page is loading ...
Page is loading ...
Page is loading ...
-
 1
1
-
 2
2
-
 3
3
-
 4
4
-
 5
5
-
 6
6
-
 7
7
-
 8
8
-
 9
9
-
 10
10
-
 11
11
-
 12
12
-
 13
13
-
 14
14
-
 15
15
-
 16
16
-
 17
17
-
 18
18
-
 19
19
-
 20
20
-
 21
21
-
 22
22
-
 23
23
-
 24
24
-
 25
25
-
 26
26
-
 27
27
-
 28
28
-
 29
29
-
 30
30
-
 31
31
-
 32
32
-
 33
33
-
 34
34
-
 35
35
-
 36
36
-
 37
37
-
 38
38
-
 39
39
-
 40
40
-
 41
41
-
 42
42
-
 43
43
-
 44
44
-
 45
45
-
 46
46
-
 47
47
-
 48
48
-
 49
49
-
 50
50
-
 51
51
-
 52
52
-
 53
53
-
 54
54
-
 55
55
-
 56
56
-
 57
57
-
 58
58
-
 59
59
-
 60
60
-
 61
61
-
 62
62
-
 63
63
-
 64
64
-
 65
65
-
 66
66
-
 67
67
-
 68
68
-
 69
69
-
 70
70
-
 71
71
-
 72
72
-
 73
73
-
 74
74
-
 75
75
-
 76
76
-
 77
77
-
 78
78
-
 79
79
-
 80
80
-
 81
81
-
 82
82
-
 83
83
-
 84
84
-
 85
85
-
 86
86
-
 87
87
-
 88
88
-
 89
89
-
 90
90
-
 91
91
-
 92
92
-
 93
93
-
 94
94
-
 95
95
-
 96
96
-
 97
97
-
 98
98
-
 99
99
-
 100
100
-
 101
101
-
 102
102
-
 103
103
-
 104
104
-
 105
105
-
 106
106
-
 107
107
-
 108
108
-
 109
109
-
 110
110
-
 111
111
-
 112
112
-
 113
113
-
 114
114
-
 115
115
-
 116
116
-
 117
117
-
 118
118
-
 119
119
-
 120
120
-
 121
121
-
 122
122
-
 123
123
-
 124
124
-
 125
125
-
 126
126
-
 127
127
-
 128
128
-
 129
129
-
 130
130
-
 131
131
-
 132
132
-
 133
133
-
 134
134
-
 135
135
-
 136
136


Ask a question and I''ll find the answer in the document
Finding information in a document is now easier with AI
in other languages
- dansk: Doro 338 Brugervejledning
- svenska: Doro 338 Bruksanvisning
- suomi: Doro 338 Omistajan opas