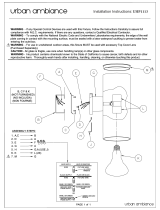
Portfolio MPA-2JBZ is a recessed light conversion kit and pendant fitter that allows you to convert your existing recessed light fixture into a stylish pendant light. With its easy-to-install design, you can update your home's lighting in just minutes. The kit includes a fixture, socket ring, and all the necessary hardware for installation. The fixture is compatible with standard-base 60-watt max. incandescent bulbs or CFL/LED equivalents, giving you the flexibility to choose the right bulb for your lighting needs.
Portfolio MPA-2JBZ is a recessed light conversion kit and pendant fitter that allows you to convert your existing recessed light fixture into a stylish pendant light. With its easy-to-install design, you can update your home's lighting in just minutes. The kit includes a fixture, socket ring, and all the necessary hardware for installation. The fixture is compatible with standard-base 60-watt max. incandescent bulbs or CFL/LED equivalents, giving you the flexibility to choose the right bulb for your lighting needs.


-
 1
1
-
 2
2
-
 3
3
-
 4
4
-
 5
5
-
 6
6
-
 7
7


Portfolio MPA-2JBZ is a recessed light conversion kit and pendant fitter that allows you to convert your existing recessed light fixture into a stylish pendant light. With its easy-to-install design, you can update your home's lighting in just minutes. The kit includes a fixture, socket ring, and all the necessary hardware for installation. The fixture is compatible with standard-base 60-watt max. incandescent bulbs or CFL/LED equivalents, giving you the flexibility to choose the right bulb for your lighting needs.
Ask a question and I''ll find the answer in the document
Finding information in a document is now easier with AI
Related papers
Other documents
-
Feiss WB1460ORB Installation guide
-
 urban ambiance UHP1113 Installation guide
-
 urban ambiance UHP1110 Installation guide
-
 urban ambiance UHP1112 Installation guide
-
 mirrea 36in Modern LED Vanity Light for Bathroom Lighting Dimmable 36w Cold White 5000K User manual
-
 mirrea W000033200022 User manual
-
 urban ambiance UHP1362 Installation guide
-
 urban ambiance UHP1360 Installation guide
-
 urban ambiance UHP2654 Installation guide
-
 urban ambiance UHP2655 Installation guide


