Page is loading ...

Model:AAC3000
This appliance is intended for domestic use only.

CONTENTS
INDOOR UNIT INSTALLATION
INSTALLATION MANUAL
03
OUTDOOR UNIT INSTALLATION
12
DRAIN PIPE INSTALLATION
REFRIGERANT PIPE INSTALLATION
14
09
ACCESSORIES
01
ELECTRICAL WIRING
19
AIR EVACUATION 22
TEST RUN
24
OWNER'S MANUAL
REMOVE CONTROLLER RECEIVER
PARTS AND FUNCTIONS
SAFTY PRECAUTIONS 25
28
30
MAINTENANCE 31
TROUBLESHOOTING 33
DISPOSAL GUIDELINE 37
INFORMATION SERVICING 38
INSTALLATION OVERVIEW
02

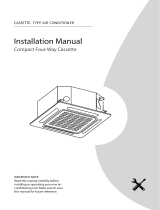
ACCESSORIES
The air conditioning system comes with the following accessories. Use all of the installation
parts and accessories to install the air conditioner. Improper installation may result in water
leakage, electrical shock and fire, or cause the equipment to fail.
NOTE :
NAME Figure Quantity
Pipe Clasp 1
Drain pipe accessories
(sectional view)
1
Remote Controller
MODEFAN
ECOTURBO
OPTION
1
2
Dry Battery AAA
Copper Nut
(two specification)
2
INSTALLATION MANUAL
Installation Owner' manual
Remote Controller Instruction
Remote Controller Instruction
/
/
/
1
1
1
1
Remote Controller
Receiver
1

INSTALLATION OVERVIEW
1122
33
44
Read The Safety Precaution Install The Indoor Unit
Install The Outdoor Unit
Install The Drainage Pipe
55
Install The Refrigerant Pipe
88
Perform The Test Run
66
Electrical Wiring
77
Air Evacuation 2

INDOOR UNIT INSTALLATION
Indoor Unit Parts
!!
WARNING
The indoor unit shall be firmly installed on the structure capable of bearing its weight. If the
structure is too weak, the unit may fall and cause personal injury, property loss or death
DO NOT install the indoor unit in the bathroom or laundry because too much moisture will
short circuit the indoor unit and corrode the wiring.
Install the indoor unit at a height of more than 2.5m (8') above the floor.
CAUTION
!!
Install indoor and outdoor equipment, cables and wires at least 1 m (3.2 ') from TV and
radio to prevent static electricity or image distortion. The distance can be increased
appropriately according to different equipment
If the indoor unit is installed on metal, it must be electrically grounded.
DO NOT install the unit in the following locations:
In areas with oil drilling or fracking
In coastal areas with high salt content in the air
In areas with caustic gases in the air, such as near hot springs
In areas with power fluctuations, such as factories
In enclosed spaces, such as cabinets
In kitchens that use natural gas
In areas with strong electromagnetic waves
In areas that store flammable materials or gas
In rooms with high humidity such as bathrooms or laundry rooms
PRECAUTION
³ö·ç³ö·ç
Air Outlet
Air InletFilter
Refrigerant Pipe
Pipe Juntion
Drainage Pipe
Mounting Hook
Electric Control Box
3

Select installation location
Indoor Unit Installation lnstructions
The indoor unit should be installed in a location that meets the following requirements:
There is enough room for installation and maintenance.
There is enough room for the connecting pipe and drainpipe.
The ceiling is horizontal and its structure can sustain the weight of the indoor unit.
The air inlet and outlet are not impeded.
The airflow can fill the entire room.
There is no direct radiation from heaters.
Body Dimension
Air inlet size
Size of mounted hook
1.The positioning of celling hole, indoor
unit and hanging screw bolts.
2.Position size of descensional
ventilation opening.
A
B
F
E
HG
C
D
J
I
M
L
30K
36-60K
18-24K
ABCDEFGHIJKLM
Size of
mounted lug
1140
1200
920
270
300
270
775
865
635
710
800
570
65
80
65
933
968
713
35
40
35
179
204
179
1035
1094
815
260
268
260
45
45
20
1240
1240
960
500
500
350
Air return opening size
Air outlet opening size
Outline dimension
NOTE:All the figures in this manual are for explanation prupose only. They may be
slightly different from the air conditioner you purchased. The actual unit shall prevail.
4

1.Air return backward
3. Loose the nut and dismantle flannel plate
and filter; Loose the nut dismantel the back
over.
This indoor unit is fitted with downward air return, which can be change to its backward counterpart if
necessary. Please follow the steps below(2-5) to change it into the mode of air return backward(6).
.Choice of air return ways
The air conditioner should be installed securely; otherwise poor installation may lead to
abnormal noises and vibration.
2. Install the flannel plate and filter at the
backside; Install the cover to the
downside.
4.Air return downward
5

Hang Indoor Unit(For finished concrete bricks)
RECOMMENDED DISTANCES BETWEEN THE INDOOR UNIT AND THE CEILING
The distance between the mounted indoor unit and the internal ceiling should meet
the following specifications.
100mm/3.9"
1 Drill 4 holes 5cm (2") deep at the ceiling hook positions in the internal ceiling. Be sure
to hold the drill at a 90 angle to the ceiling.
2 Using a hammer, insert the ceiling hooks into the pre-drilled holes. Secure the bolt
using the washers and nuts.
3 Install the four suspension bolts.
Hanging screw bolt
Hanging bolts
Supporting
angle steel
Wooden construction
Put the square timber over the roof beam,
then install the hanging screw bolts.
Timber over the beam
Roof beam
Hanging Screw
Ceiling
New Concrete Bricks
For finished concrete bricks
(Blade shape
insertion)
(Slide insertion)
Inlaying or embedding the screw bolts.
Install the hanging hook with expansible
bolt into the concrete deep to 45~50mm
to prevent loose.
Steel bar
Embedding screw bolt
(Pipe hanging and embedding
screw bolt)
Install the supporting angle steel.
Steel roof beam structure
Bolt
4 Mount the indoor unit. You will need two people to Iift and secure it. Insert suspension
bolts into the units hanging holes. Fasten them using the washers and nuts.
NOTE: L shoulId be long
enough to prevent the nuts
from coming off
L
Hanging Bolt
Nuts(Up)
Gasket(Upside)
Installing Ear
Gasket(Downside)
Nut(Downside)
Below the ceiling
6

Air conditionerAir conditioner
Plastic pinPlastic pin
Heat preserving
wool
Heat preserving
wool
Tin foilTin foil
Plastic pin capPlastic pin cap
Outlet Air Pipe Installation
Generally, we have two types of outlet pipe available, i.e. rectangular or round ones.
Rectangular air conduit can be directly connected to air outlet of indoor unit by rivets. For
outlet dimensions, see outline drawing of the unit.
Round air conduit should be connected to a piece of transitional air conduit before it is
connected to air outlet of indoor unit, the other end of it can be separately connected to air
conduit window or connected to air conduit window after air flow diversion, and the total length
should not be over 6m. As shown in figure below, air speeds at all air outlets should be set to
basically consistent so as to meet the room air-conditioning requirements.
Indoor unit
Air-outlet window
Outlet pipe
Transitional air
conduit
Air inlet
In case sidewise air intake is adopted, return air pipe should be fabricated and rivet-connected
to return air orifice, and the other end of it should be connected to return air window.
In case of underside air intake, purchase or fabricate a section of pleated canvas air conduit
serving as transition joint for return air orifice and return air window. in this way, it can be freely
adjusted according to height of indoor ceiling board; in addition, during operation of the unit ,
canvas air conduit may avoid vibration of ceiling board, as shown in figure below.
Installation mode for sidewise air intake
Installation mode for underside air intake
Tips for installation of return air pipe and outlet pipe
To minimize energy loss occurring in transmission process and condensed water during heating
operation, return air pipe and outlet pipe should be equipped with heat-insulating layer as shown in the
7
Return Air Pipe Installation
Unit
Canvas air conduit
Return air pipe
Return air window
Rivet
Unit
Return air pipe
Canvas air conduit
Rivet

Return air pipe and outlet pipe should be fixed to floor precast slabs by iron stand; in
addition, all ports of the air conduit should be tightly sealed by gasket cement, and it is
advisable that the edge clearance of return air pipe should be 150mm at least.
Drain pipe for condensed water should be installed with minimum gradient of 1 , and the
drain pipe should be insulated with heat-preserving pipe casing as well.
Suspension rod Unit
Return air pipe
Canvas air conduit
Transitional air conduit
Outlet pipe
Air-out window
Installation diagram for indoor unit
Return air window
including filter screen
NOTE:Ensure sufficient space
for installation and repair.
(see the picture for details)
Air outlet side
100mm
Canvas tunnel
00
NOTE: Hang the nut inside the U slot of the installation panel.To confirm
level degree with gradienter . Leaning downside toward non-draining side
is prohibited. (see below)
Hanging
Screw Bolt
Hanging Ear Must Be Fixed Tight
Level Indicator
8

OUTDOOR UNIT INSTALLATION
Outdoor Unit Installation Instructions
Select installation location
The outdoor unit should be installed in a location that meets the following requirements:
Keep the outdoor unit as close to the indoor unit as possible.
Make sure there is enough space for installation and maintenance.
The installation area must be dry and well ventilated.
Make sure that the location of the unit is not affected by snow, leaf deposits or other
seasonal debris. If possible, provide a awning for this unit. Make sure that the awning
does not obstruct the air flow.
There must be enough space to install connecting pipes and cables and access them
for maintenance.
The area must be free of combustible gases and chemicals.The length of pipeline
between outdoor unit and indoor unit shall not exceed the maximum allowable
pipeline length.
If possible, do not install the unit in direct sunlight.
If possible, make sure the device is away from the property of your neighbors so that
the noise from the device does not interfere with them.
Air inlet and air outlet shall not be blocked or exposed to strong wind.If the location is
exposed to strong winds (for example, near the coast), you must place the unit
against the wall to block the wind. If necessary, use a sunshade.
Install indoor and outdoor equipment, cables and wires at least 1 meter away from TV
or radio to prevent static electricity or image distortion. Depending on the radio waves,
a distance of 1 meter may not be enough to eliminate all interference.
Strong wind
Strong wind
Strong wind
CAUTION
!!
Be sure to remove any obstacles that may block air circulation.
Make sure you refer to Length Specifications to ensure there is enough room for
installation and maintenance.
9

Install Outdoor Unit
Fix the outdoor unit with anchor bolts (M10)
A
H
Body Dimensions
B
F
D
C
E
A
H
MODE ABCDEFH
845 586 347 372 312
342 700
18-24K
30-42K 940 600 375 400 340 338 885
600mm
600mm
4 pieces for one unit
Bolt
4 pieces for one unit
Bolt
48K 940 600 375 400 340 338 1250
60K 938 605 410 440 417 372 1369
10

>300/11.8"
>2000/78"
>600/23.6"
>300/11.8"
>600/23.6"
NOTE: The minimum distance
between the outdoor unit and walls
described in the installation guide
does not apply to airtight rooms.
Be sure to keep the unit unobstructed
In at least two of the three directions
(Front,Left,Right).
(As shown on the right)
Drilling Hole In Wall
You must drill a hole in the wall for the refrigerant piping, and the signal cable that will
connect the indoor and outdoor units.
1. Determine the location of the wall hole according to the location of the outdoor unit.
2. Use a 65 mm (2.5 ") core drill to drill holes in the wall.
3. Place the cuff on the hole. This protects the edge of the hole and helps seal the hole
when the installation process is complete.
NOTE: When drilling the wall hole, make sure to avoid wires,
plumbing, and other sensitive components.
Outdoor unit condensed water drainage(Optional)
The condensed water and the ice formed in the outdoor
unit during heating operation can be drained away thro-
ugh the drain pipe
1.Fasten the drain port in the 25mm hole placed in the
part of the unit as shown in the picture.
2.Connect the drain port and the drain pipe.
Pay attention that water is drained in a suitable place.
11

DRAINPIPE INSTALLATION
CAUTION
!!
Insulate all piping to prevent condensation.
Do not pull on the drain strongly, as this may cause it to disconnect.
If the drain is bent or installed incorrectly, water may leak and cause the water level
switch to fail.In heating mode, the outdoor unit will drain water.
Make sure that the drain hose is placed in a suitable area to avoid water damage and
slippage due to freezen drain water.
The drainpipe is used to drain water. Improper installation may cause damage to
equipment and property.
NOTE:
When using an extended drain, use an additional protective tube to tighten the indoor
connection to prevent it from loosening..
The drain pipes shall be sloped down at least 1 / 100 to prevent water from flowing back
to the air conditioner.
In order to prevent pipe sagging, a support shall be set every 1-1.5m (40-59 ").
Flexible Hose Hose band
Attached Heat-insulation
Material
Polyvinyl Chloride PipeField-arranged
Heat-insulation
Material
Support
1m~1.5m
Lean Downward over 1/100
Indoor Drainpipe Installation
Install the drainpipe as shown below.
1.Attach the mouth of the drain hose to the unit's outlet pipe.Sheath the mouth of
the hose and clip it firmly with a pipe clasp.
2.Cover the drainpipe with heat insulation to prevent condensation and leakage.
3.Using a 65-mm (2.5")core drill, drill a hole in the wall. Make sure that the hole is
drilled at a slight downward angle, so that the outdoor end of the hole is lower
than the indoor end by about 12mm (0.5") This will ensure proper water drainage
(as shown). Place the protective wall cuff in the hole. This protects the edges of
the hole and will help seal it when you finish the installation process.
4. Pass the drain hose through the wall hole.Make sure the water drains to a safe
location where it will not cause water damage or a slipping hazard.
NOTE: When drilling the wall hole,
make sure to avoid wires, plumbing,
and other sensitive components.
The drainpipe outlet should be at
least 50mm (1.9") above the ground.
If it touches the ground, the unit may
become blocked and malfunction.
Outdoor Indoor
Wall
12(0.5") Drill a hole
in the wall
12

Warning:
Must install drainpipes according to the following figure , avoiding generating condensed
water and leakage water.
a.Assemble the main body according to Figure .
b.The opening of drainpipes can be installed on the leftside or the right side . Could remove
the drainstopper and put it on the left side or the right side.
c.For the best effect, should keep pipes as short as possible. Tilt the pipes to ensure the flow
of fluid.
d.Make sure the drainpipes have admirable heat insulation.
e.It is necessary to install a trap near the opening of the drainpipe,so that when the machine is
working, the pressure in the inside of the machine is lower than atmospheric pressure. If there
isn't a elbow , the water will splash and the pipe will produce a bad smell.
f.keep straightness of drainpipes so as to remove dirt.
g.Seal the drainpipe on the other side of the machine , then wrap up the drainpipe in the
heat-barriermaterials .
h.Put water into the drain pan to test whether the water can be discharged swimmingly.
i.In humid conditions , please must use a add-on drain pan(commercially available) to cover
the whole area of the indoor unit.
Indoor unit
Heat insulation
Site Preparation
Add-on drain pan
(sold separately)
Drain stopper
Heat insulation
Site Preparation
The structure of the drainpipe
should be convenient for clean.
Trap
Bottom of unit body
50
50
Unit:mm
Tilt
Hight static pressure drainage pipe installation
13

Refrigerant Piping Connection
!!
WARNING
All field piping must be completed by certified technicians and must comply with local
and national regulations.
When installing the refrigeration system, ensure that air, dust, moisture or foreign
substances do not enter the refrigerant circuit. Contamination in the system may cause
poor operating capacity,high pressure in the refrigeration cycle, explosion or injury.
When the air conditioner is installed in a small room, measures must be taken to
prevent the refrigerant concentration in the room from exceeding the safety limit
when the refrigerant leaks. If the refrigerant leaks and the concentration exceeds
its appropriate limit, it may cause a risk of hypoxia.
SAFETY PRECAUTION
If refrigerant leaks during installation, ventilate the area immediately. The leaked
refrigerant gas is toxic and flammable. After completing the installation work, make
sure that there are no refrigerant leaks.
Outdoor pipe dimension and ways of install (in sequence of cooling capacity
Allowed value
Longest pipe (L)
65/213
30/98.4
Height drop between indoor
and outdoor unit H
Maximum
height drop
Conventional pipe, cooling capacity 36KBtu/h
Allowed value
Longest pipe(L)
50/164
25/82
Height drop between indoor
and outdoor unit
Maximum
height drop
Conventional pipe, cooling capacity 24K- 36KBtu/h
The maximum length and drop height based on models. (Unit: m/ft.)
Height Drop between
indoor and outdoor unitH
Outdoor Unit
Indoor Unit
Longest PipeL
Oil Return
NOTE: Ensure that the length of the refrigerant pipe, the number of bends, and
the drop height between the indoor and outdoor units meets the requirements
Pipe dimension and ways of installation
Allowed value
Longest pipe(L)
30/98.4
20/65.6
Height drop between indoor
and outdoor unit
Maximum
height drop
Conventional pipe, cooling capacity 24KBtu/h
14
Copper Pipe for Air ConditionerPipe Material
Size(mm)
Gas side
Liquid side
Model 18k-24k 30k-42k 48k-60k
f6.35(1/4inch)
f12.7(1/2inch)
f15.8(5/8inch)
f9.52(3/8inch)
f15.8(5/8inch)
f9.52(3/8inch)

Oil Traps
1 If the indoor unit is installed higher than the outdoor unit:
CAUTION
If oil flows back into the outdoor unit's compressor, this might cause liquid compression or
deterioration of oil return. Oil traps in the rising gas piping can prevent this.
An oil trap should be installed every 1 0m (32.Sft) of vertical suction line riser.
2 If the outdoor unit is installed higher than the indoor unit:
It is recommended that vertical suction risers not be upsized. Proper oil return to the
compressor shouId be maintained with suction gas velocity. If velocities drop below
7.62m/s(1 500fpm (feet per minute)), oil return will be decreased. An oil trap should
be installed every 6m(20ft) of vertical suction line riser.
Indoor unit
Outdoor unit
Gas piping
Liquid piping
10m/32.8ft
10m/32.8ft
Oil trap
Indoor unit
Outdoor unit
Gas piping
Liquid piping
6m/20ft
6m/20ft
!!
15

Refrigerant Piping Connection lnstructions
1 If the indoor unit is installed higher than the outdoor unit:
CAUTION
DO NOT install the connecting pipe until both indoor and outdoor units have been installed.
Insulate both the gas and liquid piping to prevent water leakage.
DO NOT deform pipe while cutting.Be extra carefull not to damage,dent,or deform the pipe
while cutting.This will drastically reduce the heating efficiency of the unit
Cut pipes
When preparing refrigerant pipes, take extra care to cut and flare them properly. This will
ensure efficient operation and minimize the need for future maintenance.
1.Measure the distance between the indoor and outdoor units.
2.Using a pipe cutter, cut the pipe a little longer than the measured distance.
Remove burrs
Burrs can affect the air-tight seal of refrigerant piping connection. They must be completely
removed.
1.Hold the pipe at a downward angle to prevent burrs from falling into the pipe.
2.Using a reamer or deburring tool, remove all burrs from the cut section of the pipe.
Pipe
Reamer
Point down
Flare pipe ends
Proper flaring is essential to achieve an airtight seal.
1.After removing burrs from cut pipe, seal the ends with PVC tape to prevent foreign
materials from entering the pipe.
2.Sheath the pipe with insulating material.
3.Place flare nuts on both ends of pipe. Make sure they are facing in the right direction,
because you can't put them on or change their direction after flaring.
90
slant roughess
Burr
pipe
Flare nut
!!
16

4.Remove PVC tape from ends of pipe when ready to perform flaring work.
5.Clamp flare form on the end of the pipe. The end of the pipe must extend beyond the
flare form.
6.Place flaring tool onto the form.
7.Turn the handle of the flaring tool clockwise until the pipe is fully flared. Flare the pipe in
accordance with the dimensions
8. Remove the flaring tool and flare form,then inspect the end of the pipe for cracks and even
flaring
Pipe
Flare form
Outside
Diameter
7/16"
5/8"
3/4"
7/8"
17/16"
Tightening
Torque
18-20N m
(183-204kgf.cm)
25-26N m
(255-265kgf.cm)
35-36N m
(357-367kgf.cm)
45-47N m
(459-480kgf.cm)
65-67N m
(765-867kgf.cm)
Flare dimension(A)
(unit:mm/inch)
8.4/0.33 8.4/0.33
13.2/0.52 13.5/0.53
16.2/0.64 16.5/0.65
19.2/0.76 19.7/0.78
23.2/0.91 23.7/0.93
A
90 4
NOTE:Connect the copper pipes to the indoor unit first, then connect it to the outdoor unit.
You should first connect the low-pressure pipe, then the high-pressure pipe.
1 When connecting the flare nuts, apply a thin coat of refrigeration oil to the flared ends of
the pipes.
2 Align the center of the two pipes that you will connect.
3 Tighten the flare nut as tightly as possible by hand.
4 Using a spanner, grip the nut on the unit tubing.
5 While firmly gripping the nut, use a torque wrench to tighten the flare nut according to the
torque values.
NOTE: Use two spanners to
connect the pipe with indoor
/outdoor pipes to avoid the
copper pipe cracking.
1 If the indoor unit is installed higher than the outdoor unit:
CAUTION
Ensure to wrap insulation around the piping. Direct contact with the bare piping may result in
burns or frostbite.
Make sure the pipe is properly connected. Over tightening may damage the bell mouth and
under tightening may lead to leakage .
!!
17

6 After connecting the copper pipes to the indoor unit, wrap the power cable, signal cable and
the piping together with binding tape.
7 Thread this pipeline through the wall and connect it to the outdoor unit.
8 Insulate all the piping, including the valves of the outdoor unit.
9 Open the stop valves of the outdoor unit to start the flow of the refrigerant between the indoor
and outdoor unit.
NOTE:While bundling these items together, DO NOT intertwine or cross the signal cable
with any other wiring.
Drain pipe outlet should be
led to a place that can avoid
affecting the environment.
Liquid pipe
Liquid-pipe heat preservation
Drain pipe
Heavy-current cable
Gas-pipe heat pre ser vat ion
Gas pipe
Light current cable
1 If the indoor unit is installed higher than the outdoor unit:
CAUTION
Check to make sure there is no refrigerant leak after completing the installation work. If there
is a refrigerant leak, ventilate the area immediately and evacuate the system (refer to the Air
Evacuation section of this manual) .
!!
18
/