Page is loading ...

AssemblyInstructionSheet 26-Jun-15
GRONOMICS® RUSTIC SERIES
“TOOL FREE ASSEMBLY”
48” x 48” x 6.5” MODULAR RAISED GARDEN BED – ONE LEVEL
Parts Check List and Assembly Instructions
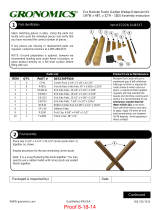
STEP I
A) Unpack all of the parts and organize them in ‘like’ stacks. Please read the
instructions in its entirety before beginning assembly.
You should have: Model #MRGB-1L 48-48
QUANTITY
PART DESCRIPTION
PART #
4
4” x 4” x 6.5” Corner Post
R8001
Parts for the Sides
4
45” x 5½” x 1” Side Rail (One w/logo)
R4501,R4501L
Packaged & Inspected by:__________________________ Date____________________
If any pieces are missing or replacement parts are required, contact Gronomics at
1-855-299-6727.
Product Care and Maintenance
Western Red Cedar will turn a weathered grey if left unfinished. Although no finish
is required for cedar when used outdoors, a natural oil finish aplied regularly will
help maintain the beauty and minimize cracking and drying. It is recommended to
use Gronomics Garden Bed Oil (Item# GBO-1Q), a non-toxic, food safe finish that is
very easy to apply.
Apply oil when air and wind temperatures are between 50-90 degrees. Avoid
applying in direct sunlight.

GRONOMICS® RUSTIC SERIES
“TOOL FREE ASSEMBLY”
Note: Ground preparation is optional; we recommend leveling
area under frame of bed before placing bed and filling with soil.
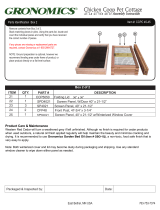
STEP II
A) Start with two 4” x 4” x 6.5” corner posts, place
the posts upside down.
B) Slide one 45” x 5½” x 1” side rail between the
two posts. (see figure 1) Repeat the same
process with the other two 4” x 4” x 6.5” corner
posts and another 45” x 5½” x 1” side rail.
STEP III
A) Connect the two corner posts by sliding a
45” x 5½” x 1” side rail into each post.
(see figure 2)
B) Slide the remaining 45” x 5½” x 1” side rail into
the posts. Make sure to place the 45” x 5½” x
1” side rail w/logo on the top, with logo facing
right side up.
STEP IV for MUTIPLE KITS
A) See box labeling for multiple configuration
options. Simply stack or expand in any
direction. Posts can be left as is for future
expansion or add a decorative cap to complete
the look.
(Figure 1)
(Figure 2)
(Figure3)
AssemblyInstructionSheet 26-Jun-15
/