Page is loading ...

CAN-CBM-AI410 Hardware Manual Rev. 1.1
CAN-CBM-AI410
4 Analo
g
In
p
uts
Hardware Manual

CAN-CBM-AI410 Hardware Manual Rev. 1.1
Document file: I:\texte\Doku\MANUALS\CAN\CBM\AI410\Englisch\AI410_11H.en9
Date of print: 17.02.2005
PCB-version: AI410 Rev. 1.1
Chan
g
es in the chapters
The changes in the manual listed below affect changes in the hardware as well as changes in the
description of facts only.
Chapter Chan
g
es versus previous version
1.3 Order Notes supplemented
--
Technical details are subject to change without further notice.

CAN-CBM-AI410 Hardware Manual Rev. 1.1
N O T E
The information in this document has been carefully checked and is believed to be entirely reliable.
esd makes no warranty of any kind with regard to the material in this document, and assumes no
responsibility for any errors that may appear in this document. esd reserves the right to make
changes without notice to this, or any of its products, to improve reliability, performance or design.
esd assumes no responsibility for the use of any circuitry other than circuitry which is part of a
product of esd gmbh.
esd does not convey to the purchaser of the product described herein any license under the patent
rights of esd gmbh nor the rights of others.
esd electronic s
y
stem desi
g
n
g
mbh
Vahrenwalder Str. 207
30165 Hannover
Germany
Phone: +49-511-372 98-0
Fax: +49-511-372 98-68
E-mail: [email protected]
Internet: www.esd-electronics.com
USA / Canada:
esd electronics Inc.
12 Elm Street
Hatfield, MA 01038-0048
USA
Phone: +1-800-732-8006
Fax: +1-800-732-8093
E-mail: [email protected]
Internet: www.esd-electronics.us

Contents Page
CAN-CBM-AI410 Hardware Manual Rev. 1.1 1
1. Overview .................................................................... 3
1.1 Module Description ..................................................... 3
1.2 Summary of Technical Data .............................................. 4
1.2.1 General Technical Data .......................................... 4
1.2.2 CAN- and Microcontroller Units ................................... 4
1.2.3 Analog Inputs .................................................. 5
1.2.4 Software Support ............................................... 5
1.3 Order Notes ........................................................... 6
2. View of the Housing and LED Description ........................................ 7
2.1 Housing .............................................................. 7
2.2 Front View with Position of LEDs and Coding Switches ........................ 7
2.3 LED-Displays ......................................................... 8
3. Hardware Configuration ...................................................... 11
3.1 PCB-View ........................................................... 11
3.2 Default Setting of Bridges and Coding Switches ............................. 12
3.3 Manual Configuration via Coding Switches ................................. 13
3.3.1 Save Default Configuration in EEPROM ............................ 13
3.3.2 Changing Parameters ........................................... 14
3.3.3 Setting the Module Number ...................................... 16
4. Description of Units .......................................................... 17
4.1 Transmit and Receive Circuit of CAN-Interface (Physical Layer) ................ 17
4.2 Analog Inputs ......................................................... 17
5. Connector Assignments ....................................................... 19
5.1 CAN-Bus (X200, 5-pole Combicon Style) .................................. 20
5.2 Analog Inputs and Power Supply (X300, 12-pole Combicon Style) ............... 21
6. Correctly Wiring Electrically Isolated CAN Networks ............................. 23

CAN-CBM-AI410 Hardware Manual Rev. 1.1
2
This page has intentionally been left blank

i
Overview
CAN-CBM-AI410 Hardware Manual Rev. 1.1 3
X200
Physical
CAN
Layer
ISO11898
µC
C505CA
RAM
Watchdog
X300
CAN 2.0B
C
A
N
B
U
S
+5 V=
+5 V=
DC/DC-
Converter
ROM
Power Supply
24 V (DC)
Digital
I/O Ports
Analog
Inputs
Electrical Isolation
Coding Switches
4 Analog Inputs
X300 Connection
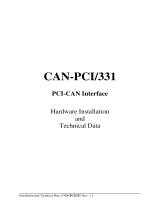
1. Overview
1.1 Module Description
Fig. 1.1.1: Block-circuit diagram of the CAN-CBM-AI410 module
The CAN-CBM-AI410 offers four analog inputs. These are led to micro controller C505CA, which has
got a resolution of 10 bit, via a low pass filter.
The bit rate of the CAN-bus and the module number (node ID) can be modified or re-programmed via
the coding switches.
The CAN-interface is designed according to ISO 11898 and permits a maximum data-transfer rate of
1 Mbit/s (a maximum line length of 35 m). The CAN-interface is electrically isolated from the other
potentials by optocouplers and DC/DC-converters.
An additional safety feature is the watchdog timer integrated in the microcontroller. It automatically
resets the CAN-module, if the watchdog time has expired.

iOverview
CAN-CBM-AI410 Hardware Manual Rev. 1.1
4
1.2 Summary of Technical Data
1.2.1 General Technical Data
Supply voltage permissible voltage range: 10...30 V/DC
current (at 20 C): typ. 30 mA
Connectors
X300 (COMBICON design, 12-pole MSTB 2.5/12-ST-08)
- 4 analog inputs, supply voltage
X200 (COMBICON design, 5-pole MSTB2.5/5-5.08)
- CAN-interface
Ambient temperature 0...50 C (CAN-CBM-AI410),
-20...+85 C (CAN-CBM-AI410-T)
Humidity max. 90%, non-condensing
Housing dimensions width: 25 mm, hight: 88 mm, depth: 85 mm
(dimensions including top hat rail and connector projection)
Weight ca. 85 g
Table 1.2.1: General technical data
1.2.2 CAN- and Microcontroller Units
CAN-interface physical layer in accordance with ISO 11898,
electrical isolation
Transfer rate can be selected via coding switches or programmed from 10 Kbit/s to
1 Mbit/s
CANopen module
number (node ID) can be programmed or set via coding switches
Microcontroller C505CA, OTP
EEPROM I²C-EEPROM for storage of parameters
LED-display four LEDs, two of the LEDs display CANopen status
Table 1.2.2: Technical data of CAN- and micro controller units

i
Overview
CAN-CBM-AI410 Hardware Manual Rev. 1.1 5
1.2.3 Analog Inputs
Resolution 10 Bit
Input voltage 0...10 V
Input current 0...20 mA, when using an external shunt 500 (not included in the
scope of delivery)
Table 1.2.3: Technical data of analog inputs
1.2.4 Software Support
The entire EPROM-resident communication firmware to operate the CAN-CBM-AI410-module is
included in the scope of delivery.

iOverview
CAN-CBM-AI410 Hardware Manual Rev. 1.1
6
1.3 Order Notes
Type Features Order No.
CAN-CBM-AI410 4 analog inputs, input voltage range 0...10 V,
temperature range: 0C ... + 50CC.2835.02
CAN-CBM-AI410-T as C.2835.02 but with extended temperature range:
-20C ... + 85CC.2835.04
CAN-CBM-Cable
Manufactured CAN cable for CAN-CBM-modules,
length 0.3 m, one end DSUB9 male, one end wire-end
sleeves
C.1323.03
CAN-CBM-AI410-ME User manual in English 1*)
(this manual) C.2835.21
CAN-CBM-AI410-ENG
Engineering manual in English 2*),
Contents: schematic diagrams, PCB top overlay
drawing, data sheets of significant components
C.2835.25
1*)... If module and manual are ordered together, the manual is free of charge.
2*)... This manual is liable for costs, please contact our support.
Table 1.3.1: Order notes for the CAN-CBM-AI410

LED-Displa
y
s
CAN-CBM-AI410 Hardware Manual Rev. 1.1 7
+24V
GND
AI1
GND
AI2
AI3
AI4
GND
GND
GND
Coding switch SW100 (Low)
Coding switch SW101 (High)
LEDTxD (yellow)
LEDRxD (yellow)
LED1 (red)
LED2 (green)
2. View of the Housin
g
and LED Descri
p
tion
2.1 Housin
g
The board is placed in a polyamide housing (UEGM–MSTB) made by Phoenix Contact.
The power supply and the analog inputs can be connected via a 12-pole COMBICON connector
(MSTBT 2.5/12-ST-5.08) in the front panel.
Two yellow, a red and a green LED are placed next to the connector.
The two HEX-coding switches for manual configuration are placed in the top side of the housing.
The CAN-connection, a 5-pole COMBICON connector (MSTBT2.5/5-5.08), is placed in the bottom
side of the housing.
The housing can be mounted on top-hat rails in accordance with EN 500 22 via the clip at its back side.
2.2 Front View with Position of LEDs and Codin
g
Switches
Fi
g
. 2.2.1: Position of LEDs and coding switches

LED-Displa
y
s
CAN-CBM-AI410 Hardware Manual Rev. 1.1
8
2.3 LED-Displa
y
s
The module has got two yellow, a red and a green LED (see page 7). The yellow LEDs (LED TxD,
LED RxD) are not being supported yet and will always be switched off, therefore.
The red and the
g
reen LED display the CANopen-ERROR and the CANopen-RUN status. Its various
signals will be explained in the following tables.
Name Colour LED
LED1 red Error
LED2 green Run
Table 2.3.1: Designation of red and green LED
Status of green CANopen-
RUN-LED
RUN-status of CAN-
module Note
1 short flash of LED
(200 ms on, 1 s off) STOPPED -
LED flashes
(200 ms on, 200 ms off) PRE-OPERATIONAL -
LED is on permanently OPERATIONAL -
Table 2.3.2: Status of green LED

LED-Displa
y
s
CAN-CBM-AI410 Hardware Manual Rev. 1.1 9
Status of red CANopen-Error-
LED
Status of CAN-
module Note
LED is off no error - module is operational
1 short flash of LED
(200 ms on, 1 s pause)
warn threshold has
been reached
- at least one of the error counters of the
CAN-controller has reached the warn
value for error messages (too many
errors)
2 successive flashes of LED
(each 200 ms on, 200 ms off, 1 s pause) NMT-error - a ‘Guard Event’ or a ‘Heartbeat Error’
occurred.
3 successive flashes of LED
(each 200 ms on, 200 ms off, 1 s pause) Sync-error
- Sync-message has not been received
within the set communication-cycle
period (see object 1006h )
4 successive flashes of LED *
(each 200 ms on, 200 ms off, 1 s pause) I²C-error - check-sum error in I²C-EEPROM
5 successive flashes of LED *
(each 200 ms on, 200 ms off, 1 s pause) No Valid Node-ID - module number (node ID) which has
been set is not permissible
6 successive flashes of LED *
(each 200 ms on, 200 ms off, 1 s pause)
No Valid Baud
rate - CAN-bit rate is not permissible
* these errors will only be displayed when the module has been configured via the coding switches
Table 2.3.3: Display of red LED

LED-Displa
y
s
CAN-CBM-AI410 Hardware Manual Rev. 1.1
10
This page has intentionally been left blank.

Hardware Confi
g
uration
CAN-CBM-AI410 Hardware Manual Rev. 1.1 11
3. Hardware Confi
g
uration
3.1 PCB-View
Fi
g
. 3.1.1: PCB-view with position of coding switches and jumpers
The coding switches for manual configuration and setting of identifiers (SW100, SW101) are
accessible via the top side of the housing (see also page 7).

Hardware Confi
g
uration
CAN-CBM-AI410 Hardware Manual Rev. 1.1
12
3.2 Default Settin
g
of Brid
g
es and Codin
g
Switches
The respective default setting of the bridges (see following table) when leaving the manufacturer will
be represented in the following figures.
Bridge/
coding switch Function Setting
Jumper
X100 configuration not assigned
Coding switch
SW100 - LOW
SW101 - HIGH
manual configuration
(CAN-bit rate, node ID)
depending on the user (please refer to
following chapter)
Jumpers
JP300...JP330 I/O-port configuration
analog operation
These
j
umpers must not be chan
g
ed b
y
the user !
Table 3.2.1: Default setting of bridges and coding switches

Hardware Confi
g
uration
CAN-CBM-AI410 Hardware Manual Rev. 1.1 13
3.3 Manual Confi
g
uration via Codin
g
Switches
3.3.1 Save Default Confi
g
uration in EEPROM
In default configuration the CAN-CBM-AI410 module is preconfigured with certain default values,
such as a fixed bit rate. The default configuration is stored in the EEPROM.
Procedure:
1. In order to load the default configuration, both coding switches have to be set to 00h before
applying any voltage.
2. If voltage is supplied to the CAN-CBM-AI410 module, the red and the green LED start flashing
(frequency about 5 Hz). After about 10 s the default configuration is stored in the EEPROM and
both LEDs are turned off.
Note: If only the green LED turns off after 10 s while the red remains ‘on’, an error has occurred
while storing the configuration in the EEPROM. This error is serious. Please contact service,
if this should happen.
Parameters of default confi
g
uration:
Parameter CANopen Object
[Hex]
Default value in
default configuration
CAN-bit rate - 125 Kbit/s
COB-ID SYNC message 1005 80h
Guard Time 100C 0
Life Time Factor 100D 0
Producer Heartbeat Time 1017 0
Configuration Date 1020 0
Configuration Time 1020 0
Analog Input Interrupt Trigger 6421 4
Analog Input Interrupt Delta 6426 0
Table 3.3.1: Default-parameter values in default configuration
(see also software manual of the module)

Hardware Confi
g
uration
CAN-CBM-AI410 Hardware Manual Rev. 1.1
14
3.3.2 Chan
g
in
g
Parameters
Procedure:
1. Set both coding switches to FFh before supplying power.
2. When you supply power the red LED quickly flashes (about 5 Hz) and the green LED is
constantly on.
3. Now you can configure the CAN-CBM-AI410 module via both coding switches. Doing this
coding switch HIGH is used to select a parameter and coding switch LOW is used to set the
parameter.
Switch HIGH
(type of parameter)
Switch LOW
(parameter) Description
0 0 ... 7 setting the baud rate
1 ... E - not defined
F F exit input cycle
Table 3.4.1: Permissible settings of coding switches at manual configuration
Switch LOW Bit rate in kbit/s
0 1000
1 500
2 250
3 125
4 100
550
620
710
8 800
Table 3.4.2: Setting the CAN-bit rate via coding switch LOW
As soon as one of the coding switches is turned, you can start setting the parameters. The green
LED now flashes more slowly (frequency about 1 Hz).

Hardware Confi
g
uration
CAN-CBM-AI410 Hardware Manual Rev. 1.1 15
4. After about 10 s the parameter has to be set. If the setting has been successful, the green LED
is constantly on again, the red LED keeps on flashing.
5. The next parameter can be set or the first configuration can be changed by turning the coding
switch again.
If the parameter has not been set within 10 s and the coding switches will be turned after these
10 s, the green LED flashes quickly (5 Hz) for 10 s while the red LED is on permanently. After
these 10 s the configuration can be repeated.
6. You can leave the configuration mode by setting FFh.
After the configuration has successfully been stored in the EEPROM both LEDs turn off.
Notes: If an error occurs while storing the values in the EEPROM, only the green LED
turns off while the red LED flashes four successive times (see page 8). This is a
serious error. Please contact service, if this should happen.

Hardware Confi
g
uration
CAN-CBM-AI410 Hardware Manual Rev. 1.1
16
3.3.3 Settin
g
the Module Number
When the configuration has been successful, the module number (node ID) has to be set by means of
the coding switches before the module is connected to power.
The module number can be assigned with values between 1 and 127 (01h to 7Fh ).
The CAN-CBM-AI410-module wakes up in preoperational status, defined in accordance with
CANopen, and shows this by transmitting the boot-up protocol to the CAN-bus.
If the CAN-CBM-AI410-module is booted-up with a module number outside the permissible range,
the red LED flashes five times successively (see page 8). The green LED is off in this case.
As long as the module number is outside the defined range, the CAN-CBM-AI410 module does not get
into preoperational status.
In order to correct the module number, you have to disconnect the module from power again to a new
module number and then apply power again. Then the CAN-CBM-AI410 module wakes up in
preoperational status and the green LED flashes permanently.
The default setting of the module number (node ID) is 01h at the coding switch.

Description of Units
CAN-CBM-AI410 Hardware Manual Rev. 1.1 17
ANALOG4
BAS40-04
BAS40-04
10µF 8,2k 0,1 %
11,8 k 0,1 % Ferrit AI1
Pin 5
VREF = 4,096V
Jumper
X300
12-pole Combicon
4. Descri
p
tion of Units
4.1 Transmit and Receive Circuit of CAN-Interface (Ph
y
sical La
y
er)
The CAN-CBM-AI410 module has got a CAN-interface in accordance with ISO 11898.
It is connected to the bus line via a 5-pole COMBICON connector.
The power supply of the CAN-bus is electrically isolated from the applied 24 V-supply and the micro
controller.
The signals are electrically isolated from the CAN-bus via optical couplers.
4.2 Analo
g
Inputs
Fi
g
. 4.2.1: Circuit of analog inputs
The analog input circuit is connected to the internal A/D converter of microcontroller C505CA. The
converter has got a resolution of 10 bit. The circuit has been designed in such a way that it is possible
to measure voltages from 0...10 V. If an external shunt of 500 is used, it is also possible to measure
current from 0...20 mA.
Attention: The position of the jumpers on the module must not be changed by the user !
/