Page is loading ...

InstallatIon InstructIons
skIrted het two pIece toIlet
Tools Needed
A. Screw Driver
B. Adjustable Wrench
C. Marker
D. Tape Measure
E. Level
F. Drill
G. Toilet Flange
H. Wax Ring
I. T-bolts (2), Nuts (2),
Washers (2)
J. Flexible Supply Tube
Items Included
K. Fixing Screws (2),
Decorative Caps (2),
Cap Base (2)
L. Flange Connecting
“L” Brackets (2)
Note: Views in this illustrations are for general representation and may not necessarily define the exact contours of the product.
Remove Old Toilet
Shut off water supply line to toilet. Flush toilet
and remove all water from the bowl and tank
using a sponge. Disconnect the water supply
from the tank. Remove the tank from bowl,
use a screw driver and adjustable wrench or
socket wrench. Loosen toilet bowl flange nuts
under bolt caps. Remove old bowl by carefully
lifting it off the floor. Clean flange and plug
drain with a rag to prevent sewer gas from
escaping. Replace or repair if required.
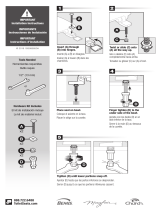
Install Connecting “L” Brackets and
the Wax Ring Seal
1. Check the rough-in dimension, this is the
distance from wall to center of outlet.
2. Place two new T-connection bolts into the
slot on the toilet flange.
3. Install the connecting “L” brackets onto
the T-bolts with the flat side toward the
outside of the flange, adjust the spacing
on the outside of the bracket to be 8-1/4"
(210mm), now attach the washers and nuts
to the T-connection bolts and tighten the “L”
brackets snug and direct to the floor flange.
4. Set the wax ring into the outlet between the
T-connection bolts.
Install Water Closet Base
1. Place toilet bowl upside down on clean
surface.
2. Install a bead of sealant or plumbers putty
around the outside foot base on 3 sides.
3. Now lift the bowl over the flange and
lower the bowl into place allowing the “L”
Brackets to align with the holes on the skirt
of the toilet bowl.
4. Firmly push the toilet down seating the bowl
horn into the wax ring seal.
5. Set the bowl in place by gently rocking back
and forth on the bowl rim. The “L” brackets
should extend up through the slots on both
sides of the outlet horn.
6. With bowl firmly set, insert fixing screws
into the seat base, slide the connection
screw and base into the flange
connection holes and tighten on both sides
of the bowl evenly until snug.
7. Snap decorative cap over connection
screw head.
A. B. C.
D.
E.
F.
G. H. I.
J.
K.
L.
Flange
Connection
Holes
Sealant or
Plumber Putty
Outlet Horn
Decorative Cap Connection Screw Base
Floor
Outlet
Flange
8-1/4" (210mm)
Important
T-Bolts
T-Bolt,
Nuts &
Washer
Wax Ring
NOTE: If installing the PF9002SWH please disregard the installation instructions included with the tank and use this set of installation instructions

NOTE: DO NOT OVERTIGHTEN!
DO NOT SPIN HEAD OF BRASS
BOLT WITH SCREWDRIVER!
DO NOT use sealants or silicon
on this fitting.
Connect the Water Supply
1. Route the supply tube from behind the bowl
and connect to the Water Shut-Off Valve.
2. Open valve slowly and check for all leaks in
connections and toilet.
WARNING: Do not use plumbers putty, pipe
dope or any other sealant on the water
supply connections to this tank.
CAUTION: Over tightening of Lock Nut or
Coupling Nut could result in breakage and
possible flooding.
CAUTION: Do not use cone washer with
plastic supply line.
WaterLine
Install Toilet Tank to Bowl
1. Carefully remove the tank from the packag-
ing and lay it on a clean and stable surface
on the tank back.
2. Check tank fittings and handles for tight-
ness, then install the rubber coupling
gasket onto the stem of the flush valve.
3. Connect the flexible supply tube to the fill
valve and snug the connection tight by
hand.
4. Insert the brass washer onto the tank con-
nection bolts first, then insert the rubber
gasket onto the tank connection bolts and
slide them to the base head of the bolt.
5. Now insert the connection bolt
assemblies into the tank to bowl
connection holes.
6. Gently lift the tank to the upright position
and place it on the bowl making sure to
align the flexible supply tube, flush valve
gasket and connection bolts with the
proper locations on the bowl. Now set in
place carefully holding the tank from
tipping and holding in a downward force.
7. Slide the brass washer first, then the con-
nection nuts onto the end of the connection
bolts located from around the back of the
bowl. Tighten the bolts evenly and in equal
pressure until a snug and water tight seal
is made.
3. Use the thumb screw on the fill valve to
adjust water level to the waterline mark.
InstallatIon InstructIons
skIrted het two pIece toIlet
WARRANTY is void if any type of sealant is
used on the water supply connection.
Chain Hook to
be attached to
trip lever
Tank Flapper
Tank
Connection
Bolts (2)
Tank
Connection
Washer (2)
Tank
Connection
Gasket (2)
Rubber
Coupling
Gasket
Flexible
Supply
Tube
Bottom Tank
Connection
Washer (2)
Nuts (2)
Water
Shut-Off
Valve

Care and Maintenance
When cleaning your toilet, wash it with mild,
soapy water, rinse thoroughly with clear
water and dry with a soft cloth.
Avoid detergents, disinfectants or cleaning
products in aerosol cans.
NEVER use abrasive scouring powders or
abrasive pads on your toilet seat. Some
bathroom chemicals and cosmetics may
damage the seat’s finish.
CAUTION: Product is Fragile. To avoid break-
age and possible injury handle with care!
DO NOT use abrasive powder or liquid
cleaners which can damage the product
surface. Over tightening of the lock nut
or coupling nut could result in breakage
and flooding.
Problem Reason Solution
Fill Valve will not fill. Fill Valve will not fill?
Float valve is stuck?
Drain Guards are stuck?
Turn on water supply at angle stop valve.
Loosen fill valve nut and turn fill valve away from back of tank.
Clean drain guard of debris.
Fill valve will not
shut off.
Water supply continues to run?
Float is stuck?
Flapper is stuck open?
Turn off water and clean the inside fill valve.
Loosen fill valve nut and turn fill valve away from back of tank.
Check chain length and flush valve seat.
Leakage. Fill valve nut is loose?
Flapper is not seated properly?
Flapper is not seated properly?
Check the flush valve is tightened into place.
Check hex nut on fill valve to assure it is tight.
Clean flush valve seat, replace flapper if necessary.
Poor Flush. Water level is not set to
proper height?
Low water pressure?
Obstruction in bowl?
Short Flush?
Adjust the water level set screw to assure water is at the
maximum level line.
Make sure the minimum water pressure is above 35 PSI.
Plunger the bowl and clean the drain line as necessary.
Adjust the chain length of the flapper.
InstallatIon InstructIons
skIrted het two pIece toIlet
!
WARNING
DO NOT USE IN-TANK
TOILET BOWL CLEANERS
CONTAINING BLEACH
OR CHLORINE!
1. Result in damage to tank components and
may cause flooding and property damage.
2. Void PROFLO Fixtures Limited Warranty.
N
O
B
L
E
A
C
H
D
R
O
P
-
I
N
S
N
O
B
L
E
A
C
H
D
R
O
P
-
I
N
S
DO NOT use the cone washer with a plastic
supply line.
DO NOT use pipe dope or other silicon based
materials to tighten supply coupling nut.
NOTE: All trouble shooting should be done by a
qualified plumbing technician.
Install Tank Lid and Seat
1. Gently set the lid on the toilet tank.
2. Install the toilet seat to the specifications of
the seat supplier or manufacture.
Tank Replacement Part Information
The inside back of your tank is stamped with
replacement part information. Please record
and maintain this record for future maintenance
and reliable service of your new toilet.
Fill valve body
Float Cup
Rubber Seal
Adjustable
Rod
Triangle Gasket
Plastic Seal
Hexagon Seal

Warranty
WHAT IS COVERED?
Ferguson Enterprises, Inc. “Ferguson” or the “Company” warrants its
products to be free from defects in material and workmanship under
normal use and service FOR A PERIOD OF ONE (1) YEAR FROM THE
DATE OF INSTALLATION.
WHAT IS NOT COVERED?
The warranty set forth in paragraph 1 does not cover installation or
any other labor charges and does not apply to products which have
been damaged as a result of any accident, abuse, improper instal-
lation or maintenance, or modification of original plumbing product.
The warranty of such products is limited to the warranty extended to
Ferguson by the product manufacturer. Finally, FERGUSON SHALL
NOT BE RESPONSIBLE OR LIABLE FOR ANY FAILURE OR DAMAGE TO
THIS PRODUCT OR ANY COMPONENT THEREOF CAUSED BY THE USE
OF ABRASIVE CLEANERS.
HOW TO OBTAIN WARRANTY SERVICE
The purchaser should contact their local Ferguson location, installing
contractor or builder from whom the product was purchased or
upon written request addressed to Ferguson Enterprises, Inc.,
12500 Jefferson Avenue, Newport News, VA 23602,
Attention Consumer Affairs. Any shipping charges, associated with
warranty service, must be prepared by the consumer. In all cases,
proof of purchase will be required. Call PROFLO customer service at
800-221-3379 for customer service, defective issues and technical
inquiries. LIMITATIONS OF IMPLIED WARRANTY AND DISCLAIMER OF
CONSEQUENTIAL OR INCIDENTAL DAMAGES FERGUSON DISCLAIMS
ANY LIABILITY FOR CONSEQUENTIAL OR INCIDENTAL DAMAGES AND
DISCLAIMS ALL EXPRESS OR IMPLIED\ WARRANTIES, INCLUDING
THOSE OF MERCHANTABILITY AND FITNESS FOR A PARTICULAR
PURPOSE, AS SET FORTH ABOVE. IMPLIED WARRANTIES OF THE
PRODUCTS AND PRODUCT COMPONENTS SET FORTH IN
PARAGRAPH 1 ABOVE ARE LIMITED TO THE DURATIONS OF THE
RESPECTIVE WARRANTY. Some states do not allow the exclusion or
limitation of incidental or consequential damages or limitations on how
long an implied warranty lasts, so the above limitations may not apply
to you. This warranty gives you specific legal rights and you may also
have other rights, which vary from state to state.
InstallatIon InstructIons
skIrted het two pIece toIlet
© 2017 Ferguson Enterprises, Inc. 08/17 549975
/