Page is loading ...

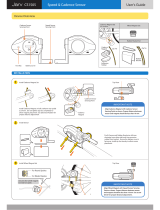
MANUALE MD JARVIS
1

assembly and connection instructions MD JARVIS
1. introduction:
1.1. TECNICHE TECHNICAL DATA;
1.2. PACKAGE CONTENTS;
1.3. DIMENSIONS;
1.4. PARTS DESCRIPTION.
2. ASSEMBLY:
2.1. OPENING THE SYSTEM;
2.2. MOUNTING THE BIKE.
3. Peripherals CONNECTIONS:
3.1. POWER SUPPLY CONNECTION;
3.2. PC CONNECTION (VIA CABLE);
3.3. WIRELESS RPM SENSOR CONNECTION;
3.4. RPM SENSOR CONNECTION (VIA CABLE);
3.5. OPTICAL KEYS CONNECTION.
4. TECHNICAL SECTION:
4.1. BELT STRETCHER ADJUSTMENT;
4.2. MOTOR ELECTRONIC BOARD REPLACEMENTE;
4.3. MOTHER BOARD REPLACEMENT;
4.4. MOTHER BOARD SETTING RESET.
ìì
MAGNETICDAYS JARVIS
!2

1.1. TECHNICAL DATA
•
Weight: 9 Kg;
•
Battery (2800 mA, approx. 4 h use);
•
Connectivity: Bluetooth 4.0, USB, ANT+, Wifi.
1.2. PACKAGE CONTENTS:
•
MD JARVIS spinner;
•
Calibration certificate
•
Accessory pack:
•
Power cable;
•
PC connector cable (USB/A male – USB male) length 4.5 m;
•
RPM Sensor Ant+ Garmin (or Sigma);
•
Heartbeat monitor Ant+;
•
Remote control optical keys;
•
Mechanical accessories (for assembly): right crank, left crank (with a longer threaded shaft), n° 4 shims to adapt the
chassis, crank locking key (seated inside the right crank and is easily extracted with the ring on the end.
Optional:
•
Lowered bushing for Fixed bikes (rear carriage 125 mm).
1. introduCTION
!3

CLOSED:
L = 432 mm;
W = 173mm;
H = 464mm.
HEIGHT (H)
WIDTH (W)LENGHT (L)
OPEN:
L = 576 mm;
W = 595mm;
H = 464mm.
1.3. dimensionS
!4
1. introduCTION

A: Fly wheel
B: Brake
C: Brake motor with
cooling fan
D: Left stand
E: Mother board cover
F: Bike carriage width
adjustment bush
G: Large pulley
H: Pinion rack
I: Right stand
J: Serial number
K: Battery
L: Power connector
M: Brake motor electronic board
N: Belt cover
MD000XX
A
B
C
D
E
c
G
N
M
L
K
J
I
H
LEFT SIDE RIGHT SIDE
1.4. parts description
!5
1. introduCTION

2. package contents
RIGHT SIDE LEFT SIDE
Swing forward up to
the mechanical stop
Swing the two stands (D and J) forward up to the mechanical stop. So the
system then rests on three points guaranteeing perfect adherence even on
unlevel surfaces, thanks to the adjustable supports.
2.1. system opening
!6

Right crank
Left crank
Left crank (longer
threaded shaft)
Right crank
Adjustment
shims
Right crank
Shim
2.2. MOunting the bike
The Jarvis fits on the bike like a rear wheel using the provided mechanical accessories.
- Insert the cranks into their housings on the Jarvis, lightly screwing them in.
- If the rear carriage of the bike is 125 mm (Fixed Bike) the Standard bushing can be replaced (F) with a lowered bushing (optional);
- Leaving the Standard bushing (F) in place, the width of the MD fits bikes with a rear carriage of 130 mm (Road Bikes);
- Settings for wider carriages (MTB) are carried out using the shims provided.
For narrower settings the shims may be used externally like washers.
!7
2. package contents

B) ) Insert the rear carriage fork;
C) Fit the chain onto the pinion rack aligning it correctly;
D) Verify that the fork is correctly fitted on both crank pins, tighten them by hand to
grip the chassis.
.
Once finished, lock both cranks using the key provided inserted into the external
holes.
The key is housed inside the right crank and is easily removed thanks to the ring on
the end. Once both cranks are tightened replace the key in it’s housing.
B
C D
!8
2. package contents
2.2. MOunting the bike

3. Peripherals connections
Jarvis start button
Insert the power cable to
charge the battery
•
During the battery charge the Jarvis
must be switched on (start button in
postion ON).
•
The first charging must last 6 hours.
•
When the battery is on, the RED LED
will be lit.
•
When the battery is on and there is an
electrical supply connected both LEDS
RED and GREEN will be lit.
3.1. POWER SUPPLY CONNECTION
!9

JARVIS start button
Electronic motor
board
Do not insert the PC cable into the other two
USB sockets.
Battery housing
cover
Insert the PC cable
provided
3.2. pc connection
!10
3. Peripherals connections

3. Peripherals connections
3.3. WIRELESS RPM SENSOR CONNECTION
A
A) Mount the Cadence Sensor on one of the chainstay of the
bike (i.e. the left one) using the fixing cable ties.
!11

B2
3. Peripherals connections
3.3. WIRELESS RPM SENSOR CONNECTION
B1
Magnete per
pedivella
B1) Fix the crankarm magnet on on of the bike crankarm. The
magnet has to face directly to the chainstay where the ANT+
Cadence sensor is mounted.
C) Be sure that the ANT+ Cadence Sensor and the magnet
(either the crankarm or the cadence magnet) are correctly
aligned. The magnet has to pass in front of the sensor at a
distance less than 1 cm, as shown in the picture.
C
!12
B2) Is also possible to fix the cadence magnet to one of the bike
crankarm using the fixing cable ties. The magnet has to face
directly to the chainstay where the ANT+ Cadence sensor is
mounted.

3.4. rpm sensor connection (via cable)
Clamps
Frequency sensor
USB
Magnet for crank
A
Left horizontal
stay
Frequency
sensor
A) Fix the frequency sensor to one of the horizontal stays of
the bike (eg left) using the clamps;
B) Insert the RPM sensor lead into one of the two USB sockets
as shown.
Jarvis start
button
B
USB sockets
(Optical keys and
RPM sensor)
!13
3. Peripherals connections

C
Crank magnet
C) Fix the crank magnet to one of the bike cranks. It must face
the horizontal stay where the frequency sensor is fixed.
D) Make sure that the frequency sensor and the crank magnet
are correctly aligned. The magnet must pass in front of the end of
the sensor as shown in the illustration.
D
Crank magnet
Frequency
sensor
Horizontal bike stay
!14
3. Peripherals connections
3.4. rpm sensor connection (via cable)

In case of RPM cabled sensor, insert the cable into the remaining
USB socket.
LATO DESTRO LATO SINISTRO
A) Fix the sensor to the handlebar in a functional position;
B) Insert the optical keys lead for remote control into one of the
USB sockets shown in the illustration;
You can use either of the sockets for both the optical keys and
the RPM sensor.
Obstructing one sensor at a time will vary (+/-) the workloads:
positive, obstructing the left sensor, negative obstructing the
right sensor
N.B. Do not cover the sensore completely
Finestra “ottica” sensibile
A
Jarvis start
button
B
USB sockets
(Optical keys and
RPM sensor)
!15
3. Peripherals connections
3.5. connecting the optical keys for remote control

4. tEChnical section
If the adjustment is necessary a warning will be
received via the App.
A: Fly wheel
B: Battery housing cover
C: Belt cover
A
B
C
4.1. belt stretcher adjustment
!16

Q
P
O
•
Eccessive tension, apart from causing an abnormal force on the flywheel
also increases friction on the system, distorting the Watt reading calibrated in
the laboratory.
•
Always check that the roller (Q) is slick and if necessary lubricate with chain
spray (ORPC-GR http://www.magneticdays.com/index.php/it/shop/accessori/
grasso-bianco-spray-per-catena-detail) paying maximum care not to
contaminate the Poly-V belt. The lubricant must be applied to the sides of the
Roller.
1) Remove the bolt (O);
2) Turn the grub screw (P)
A B
C
P
N
Q
4.1. belt stretcher adjustment
!17
4. tEChnical section

A) Use the 2 mm Allen wrench to remove the screws as shown in
the illustration;
B) Lift the Battery housing cover (K).
Necessary tools:
•
2 mm Allen wrench;
•
3 mm Allen wrench.
K
4.2. replacing the electronic motor board
!18
4. tEChnical section

K
W
V
U
T
S S
R
K: Battery housing cover
R: Electronic motor board plate
S: Electronic motor board
T: Battery pack
U: Battery connector
V: USB connector
W: Mother board connector
!19
4. tEChnical section
4.2. replacing the electronic motor board

Remove the
battery pack
C
U
T
!20
4. tEChnical section
4.2. replacing the electronic motor board
C) Delicately remove the battery connector (U)
and remove the battery pack (T);
/