DeWalt DCL079B Installation guide
- Category
- Car battery chargers
- Type
- Installation guide
This manual is also suitable for
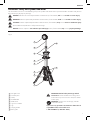
The DeWalt DCL079B is a versatile and powerful tripod light designed to illuminate your workspace with ease. With its adjustable brightness and long runtime, it's ideal for a variety of tasks, including construction, automotive repair, camping, and more. The DCL079B features a durable design with a sturdy tripod stand and a protective lens cover, making it suitable for use in harsh environments. It also has a convenient carrying handle for easy portability. The light head can be rotated and tilted to direct the light exactly where you need it.
The DeWalt DCL079B is a versatile and powerful tripod light designed to illuminate your workspace with ease. With its adjustable brightness and long runtime, it's ideal for a variety of tasks, including construction, automotive repair, camping, and more. The DCL079B features a durable design with a sturdy tripod stand and a protective lens cover, making it suitable for use in harsh environments. It also has a convenient carrying handle for easy portability. The light head can be rotated and tilted to direct the light exactly where you need it.


-
 1
1
-
 2
2
-
 3
3
-
 4
4
-
 5
5
-
 6
6
-
 7
7
-
 8
8
-
 9
9


DeWalt DCL079B Installation guide
- Category
- Car battery chargers
- Type
- Installation guide
- This manual is also suitable for
The DeWalt DCL079B is a versatile and powerful tripod light designed to illuminate your workspace with ease. With its adjustable brightness and long runtime, it's ideal for a variety of tasks, including construction, automotive repair, camping, and more. The DCL079B features a durable design with a sturdy tripod stand and a protective lens cover, making it suitable for use in harsh environments. It also has a convenient carrying handle for easy portability. The light head can be rotated and tilted to direct the light exactly where you need it.
Ask a question and I''ll find the answer in the document
Finding information in a document is now easier with AI
Related papers
Other documents
-
MAC TOOLS BWP152 User manual
-
 Sunjoy 110203018 User guide
-
-
-
Klein Tools BAT20-716 User guide
-
-
Porter Cable PCCR701 User manual
-
-
Flex FX5471 User manual
-
 Larson Electronics 108W Portable Emergency LED Light Tower - 10 000 Lumens - USB Port & 12V Socket - 5.25' Tall Tower Installation guide

