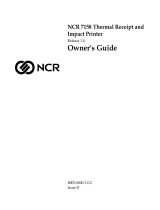
SEWOO SLK-TS100 User manual

Category
POS/mobile printers
Type
User manual

SEWOO SLK-TS100 is a high-speed thermal printer with a print speed of up to 220mm/s, capable of producing clear text and graphics even at maximum speed. It supports Windows, Linux operating systems, and network printing, making it ideal for kitchen applications. The SLK-TS100 features black mark detection for form printing, 2D barcode printing, and multiple international fonts.

SEWOO SLK-TS100 is a high-speed thermal printer with a print speed of up to 220mm/s, capable of producing clear text and graphics even at maximum speed. It supports Windows, Linux operating systems, and network printing, making it ideal for kitchen applications. The SLK-TS100 features black mark detection for form printing, 2D barcode printing, and multiple international fonts.

Rev. 23 Oct
Do not use or store in locaons subject to high temperature, humidity or polluon levels.
Connect the power adapter into a properly grounded outlet. Do not share the same plug
socket with electrical motors or other equipment which may cause the power supply voltage
fluctuaons.
Avoid water or conducve materials like metal, from geng inside the printer. If this happens,
immediately unplug the AC power cord.
Do not aempt to print without paper.
Unplug power supply from the printer if it will be unused for an extended period.
Only use power adapter supplied with printer.
Only use approved accessories.
Never disassemble or modify the printer for repair or reconstrucon.
Be sure to use the original specified power source.
High quality paper is recommended for best print quality and to extend the life of the printer.
Be sure to turn the power switch to OFF before plugging and unplugging the power supply.
Do not use this printer above 5,000 meters (16,000) above-sea-level in tropical climates or in
high humidity condions.
Fast prinng speed of up to 220mm/s.
Large paper roll capacity: up to 120mm diameter.
High speed text and graphic prinng: Excellent prinng quality and reliable performance
even at maximum speed.
Supports printer status monitoring funcon offering remote user visibility at any me.
Printer “announces” when the receipt is being printed resulng in orders being expedited
and processed more quickly.
High speed download and logo prinng mode.
Supports Windows, plus Linux operang systems.
Supports black mark detecon for form prinng.
256k Bytes NV Flash RAM for store and print of logo’s.
Standard with serial + USB + Ethernet interfaces.
Supports network prinng; perfect for kitchen applicaons.
Mechanism life can reach to 100km and Auto cuer life with 100 million cuts.
Supports 2D barcodes: QR Code & PDF417.
Supports mulple internaonal fonts (as opons) .
Chinese GB18030 code page as an opon; Simplified/tradional Chinese are converble.
Built-in web page allows for setup of printer directly through IE port.
58MM/80MM paper roll can be oponal.
Specifications
PAPER ROLL INSTALLATION
CONNECTING THE PRINTER
A. Connect AC power cord to power, DC power cord to printer.
B. Connect printer to computer or device.
C. Connect cash drawer.
A
C
Power adaptor
Power cord
B
03
04
An 80mm wide thermal paper roll is recommended for 80mm series printers.
Follow the steps below to install the roll paper:
1. Open the top cover by pressing
the COVER OPEN buon.
2.Insert the roll paper per the following illustraons:
3.Pull out a small amount of paper, and close the cover
4.Printer will automacally feed the paper and cut
Model
Prinng method
Prinng speed
Resoluon
Interface
Paper width
Printable area
Paper thickness
Column capacity
Line space
Commands
Drivers
Bar code
Code page
Cuer
Cuer life
Print head life
Mechanism life
Input buffer
NV Flash
Black mark
Network monitoring
Adaptor input voltage
Power supply
Printer input voltage
Cash drawer control
Working environment
Storage environment
Dimension
Gross weight
SLK-TS100
Direct thermal
220mm/s
203dpi
USB+Serial+Ethernet
79.5±0.5mm
72mm(adjustable by commands)
Φ80 mm
0.06~0.08mm
576 dots/line
3.75mm(Changeable by commands)
Compable with ESC/POS
Win 9X/Win 2000~2003/Win XP/Win 7~8/ Win 10/Linux
UPC-A, UPC-E, JAN13(EAN13), JAN8(EAN8), CODE39, ITF,
CODABAR, CODE93, CODE128, QR CODE, PDF417
Paral
1.5 million cuts
100 KM
100 KM
64 Kbytes
256 Kbytes
Support
Support
AC110V/220V, 50~60Hz
DC 24V/2.5A
DC 24V/2.5A
DC 24V/1A
Temperature: 0~45°C , humidity: 10~80RH%
Temperature: -10~60°C, humidity: 10~90RH%
185×142×136 mm (D×W×H)
1.025 kg
Maximum paper diameter
PC437(Std.Europe)(Katakana)\n\ PC850(Mullingual)
PC860(Portugal)PC863(Canadian)PC865(Nordic)(West Europe)
(Greek)(Hebrew)(East Europe)(Iran) (WPC1252)
PC866(Cyrillic#2)PC852(Lan2)(PC858) (IranII)(Latvian)
(Arabic)(PT1511251)
05 06
1. Double click driver.
POS Printer
Driver Setup
V7.17
3. Create a shortcut on the desktop:
2. Select: “I accept the agreement”
4. Setup Completed:
FUNCTION OVERVIEW: Get to know your printer
- POWER LED: Indicates when printer is powered on
- ERROR LED: ON or BLINKING indicates error condition (see Troubleshooting Chart below)
- PAPER LED: ON or BLINKING indicates error condition (see Troubleshooting Chart below)
- FEED button: Press to feed paper. Hold to feed paper continuously
- COVER OPEN button: Press to open the top cover, to insert paper roll
DRIVER INSTALLATION
Two methods to print receipts: 1) Printing directly through the port
2) Using the printer driver.
1) Printing directly through the port
a. There is no need to install the printer driver. Just select the correct port (i.e., USB, LAN, Serial,
Parallel) in the application software.
2) Install driver under WINDOWS OS (Steps as below):
0807
5.Select the correct interface port: 7. Click “Yes” to configure the port.
8. Choose the detected USB001, click apply, shown as below:
6. Select the proper printer series and click “Install Now”
1009
9. Select the “General” tab and then “Print Test Page”:
TROUBLESHOOTING GUIDE
Self-Test instrucons:
Make sure the printer is connected to power and turned off. While pressing the FEED
buon, turn on the power. Release the FEED buon aer both the ERROR and PAPER
LEDs blink twice. The printer will automacally print out a self-test which includes the
printer's firmware version, status and configuraon.
Config Mode
You can set serial communicaon speed,print density and melody type by using feed buon.
You can select an item by pressing feed buon as many mes as the number of the item you
want to set.
How to enter hexadecimal mode
Make sure the printer is connected to power and turned off. While pressing the FEED
buon, turn on the power and keep it pressed, waing for both the ERROR and PAPER
LEDs to blink twice simultaneously, and then for the ERROR LED to stay on. At this point,
release the FEED buon and the printer will enter hexadecimal mode. Pressing the FEED
buon twice will cause the printer to print ”Hexadecimal Dump” on the first line of the
paper indicang that it is now in hexadecimal mode. To exit Hexadecimal Dump mode and
return back into normal print mode, press the FEED buon three mes, or cycle the power.
Reseng to Factory (default) Sengs
Make sure the printer is connected to power and turned off. While pressing the FEED
buon, turn on the power, waing for both the ERROR and PAPER LEDs to blink twice
simultaneously, then for the ERROR LED to turn on, and then for both the ERROR and
PAPER LEDs to blink twice more. Release the FEED buon when the buzzer alarms,
confirming that the unit has been reset to factory default sengs.
How to resolve cuer paper jams
- Method 1 : Cycle the power to the unit.
- Method 2 : A. Turn the printer off.
(5)
B. Open the top cover.
(2)
(3)
(1)
C. Turn the white gear on the cuer, and take jammed paper out.
D. Only when the cuer is turned back to the inial (home) posion,
can the cover be opened.
(4)
12
11
n
48
49
50
51
Correct proporon (%)
7
15
25
30
Level
Grade L
Grade M
Grade Q
Grade H
Parameter Range: 48 n 51
Default: n = 48
Note: QR Code uses RS error correcon algorithm and the command seng will reset when printer is
reset or powered off.
Characters
Numeric
Alpha, Numeric and special characters
Chinese Character
8 bits data
Including the below character in the table
“0”~“9”
“0”~“9”, “A”~“Z”, SP, $, %, *, +, -, , ,:
GB18030-2000, Shi-JIS, JISX0208 standard
00H~FFH
The ESC @ command setup failed when printer is powered off and reset.
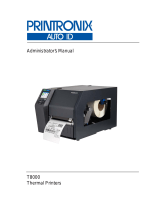
LED TROUBLESHOOTING CHART
Follow these steps to clean the printhead and roller:
CLEANING THE THERMAL PRINTHEAD and ROLLER
Hex: 1D 28 6B 30 67 n
Funcon Descripon: Set the unit size of QR Code into "n"
Parameter Range: 1 n 16
Default n = 3
Note: n = Unit width in dots = Unit height in dots
The ESC @ command setup failed when printer is powered off and reset.
2. QR Code: Set up error correcon level
[Command Code]
ASCII: GS (0 i n
Decimal: 29 40 107 48 105 n
Hex: 1D 28 6B 30 69 n
Funcon Descripon: Set up QR Code error correcng grade,
The value for “n” is as below:
QR Code: Data transmission to code cache
[Command Code]
ASCII: GS (0 nL nH d1...dk
Decimal: 29 40 107 48 103 nL nH d1...dk
Hex: 1D 28 6B 30 80 nL nH d1...dk
Funcon Descripon: Seng QR Code data transmission to code cache
Parameter Range: 4 (nL + nH×256) 2710
32 d 255
Default: None
Note: Aer receiving, the data will be kept in the cache unl next reset
K byte d1...dk be regarded as coded data
d1....dk must only contain data in the following table:
LED INDICATOR
POWER ERROR PAPER
OPERATING
CONDITION
REMEDY
OFF OFF OFF
OFFOFF
OFF
OFF
OFF
ON
ON
ON
ON
ON
ON
ON
BLINKING
BLINKING
BLINKING
BLINKING
ON
ON
Power off
Normal mode
Ready to print
Out of paper
Top Cover open
Out of paper
Paper Inserted
Top Cover Open
Cuer Jam
Thermal Head
Overheated
1) Plug in AC adapter
2) Turn on power
None required
1) Open Top Cover
2) Insert paper roll
3) Close Top Cover
1) Insert paper roll
2) Close Top Cover
1) Close Top Cover
1) Cycle the power on the unit
1) Power down printer
2) Open Top Cover
3) Wait 10 min to cool down
Clean the thermal printhead on a roune basis, or if one of the below condions occurs:
(1) Blurred prinng.
(2) “White” vercal streaks on printed receipt.
(3) Noise during paper movement.
(1) Power off the printer and open the roll paper cover. Remove the roll paper, if any.
(2) If the thermal printhead is hot, wait for it to cool before cleaning.
(3) Clean the elements of the thermal printhead with a printhead cleaning pen or cleaning swipe
made specifically for thermal printhead, or with a coon swab moistened with an alcohol
(isopropyl alcohol) solvent.
(4) Clean the rubber roller with the solvent
(5) Wait ll the solvent completely evaporates or dries before inserng the paper roll and closing
the top cover. Print self-test page and repeat if necessary as it may take a few cleaning cycles to
remove all debris from printhead. If problem persists, contact the party you had purchased the
product from, to request service.
QR Code funcon
1. QR Code: Set unit size
[Command Code]
ASCII: GS (0 g n
Decimal: 29 40 107 48 103 n
13
To use this command, the printer must be connected as follows:
[Command Code]
ASCII: GS ( 0 ?
Decimal: 29 40 107 48 129
Hex: 1D 28 6B 30 81
Funcon Descripon: Prinng the encoded data in the code cache
Parameter Range: None
Default: None
Note: If the QR code size is outside prinng area, the QR code will not be printed
If the code cache data is empty, the QR code will not be printed
[Command code]
ASCII: US ESC ……………………….
Decimal: 31 27 31 184 19 20 N
Hex: 1F 1B 1F B8 13 14 N
Descripon: Select Real USB port or Virtual Com Port
Range: N=0 USB; N=1 Virtual Com Port.
USB port and Virtual Com Port exchange command set
QR Code: Prinng QR Code of code cache
  • Page 1 1
  • Page 2 2
  • Page 3 3
  • Page 4 4
  • Page 5 5
  • Page 6 6
  • Page 7 7
  • Page 8 8

SEWOO SLK-TS100 User manual

Category
POS/mobile printers
Type
User manual

SEWOO SLK-TS100 is a high-speed thermal printer with a print speed of up to 220mm/s, capable of producing clear text and graphics even at maximum speed. It supports Windows, Linux operating systems, and network printing, making it ideal for kitchen applications. The SLK-TS100 features black mark detection for form printing, 2D barcode printing, and multiple international fonts.

Ask a question and I''ll find the answer in the document

Finding information in a document is now easier with AI