Page is loading ...

Installation Instructions
Contents - 2 Piece Set
Page 1 of 2
Contents - 4 Piece Set
I - Sheet Number VV143 Rev.A
For proper installation and best possible fit, please read all instructions BEFORE you begin.
For technical assistance or to obtain missing parts, please call Customer Relations at 1-800-241-7219.
Important Safety Information
• CAUTION - Before driving, ensure that the vent visor is properly secured to vehicle.
• Do not use automatic “brush-style” car washes.
• Do not use cleaning solvents of any kind.
• Periodically check all components for tightness.
Tools Required
Car Wash Supplies Clean Towel
Preparation Before Painting / Installation
• A trial fit is recommended to ensure proper positioning and fit.
• Check fit of parts before painting as we will not accept the return of modified or painted parts.
• Wash and dry your vehicle to remove any debris and/or dirt from the installation area.
NOTE: Actual product may vary from illustration.
Installation Steps
NOTE: Actual application may vary slightly from illustrations.
Alcohol Pad x2
Front Driver
Side Visor
Front Passenger
Side Visor
Scotch Brite
Pad
Alcohol Pad x4
Front Driver
Side Visor
Front Passenger
Side Visor
Rear Driver
Side Visor
Rear Passenger
Side Visor
Scotch Brite
Pad
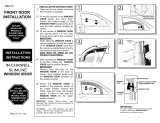
1 2
Roll down window. Buff the inside felt surface
with scotch brite pad. Then clean with alcohol
pad.
clean
inside of vehicle
NOTE: visors mount on the inside of the window
channel.
Ventvisor® Deflector
free end
top flange
rear
flange
front
flange
Remove tape liner from front flange. Peel back 2”
(5 cm) of tape line from each end of top flange.

Installation Steps
NOTE: Actual application may vary slightly from illustrations.
3
Page 2 of 2
5 6
4
Insert visor into window channel,
rear flange first. Rear flange inserts
between the trim and the exterior
suraface. The front & top flange
slides into the window channel.
4 Piece Set
Install the rear visor using the same preparation and installation methods as front visor. Note
that the top & rear flanges slide into the window channel, and the front flange fits between the
rubber & window frame.
Care and Cleaning
• Wash only with mild soap & dry with a clean cloth.
Congratulations!
Press the exposed area of tape against the surface and
verify position.
7
Repeat steps 1 thru 7 for passenger side
You have purchased one of the many quality Auto Ventshade™ branded products offered by Lund International, Inc. We take the utmost pride in our
products and want you to enjoy years of satisfaction from your investment. We have made every effort to ensure that your product is top quality in
terms of fit, durability, finish and ease of installation.
© 2015 Lund International, Inc. All rights reserved.
Auto Ventshade
TM
, the Auto Ventshade
TM
logo and the AVS
TM
logo are trademarks of Lund International, Inc.
Lund International
800-241-7219 • Visit us at lundinternational.com
™
Remove tape liner by pulling on free ends.
Continue to apply pressure to ensure that the visor
remains properly seated inside the window channel
as window is slowly closed. Leave window up for 72
hours to secure visor to window channel.
72
50°F / 10°C Min.

Page 1 de 2
Instructions d’installation
I – Feuille numéro VV143 Rév.A
Pour obtenir une installation correcte et le meilleur ajustement possible, lire toutes les instructions AVANT de commencer.
Pour toute assistance technique ou obtention de pièces manquantes, appeler le service des relations avec la clientèle au
1-800-241-7219.
Informations importantes concernant la sécurité
• ATTENTION – Avant de conduire, s’assurer que la visière est solidement assujettie sur le véhicule.
• Ne pas utiliser les stations de lavage de voitures à brosses.
• Ne pas utiliser de solvants.
• Vérifier régulièrement le serrage des composants.
Contenu - Ensemble 2 pièces
NOTE: Le produit réel peut changer de l’illustration.
Visière avant côté
conducteur
Visière avant côté
passager
Tampons à l’alcool
(2)
Visière avant côté
conducteur
Visière avant côté
passager
Visière arrière
côté conducteur
Visière arrière
côté passager
Tampons à
l’alcool (4)
Contenu - Ensemble 4 pièces
Outils nécessaires
Fournitures pour lavage de voiture Serviette propre
Préparation pour la peinture/l’installation
• Il est recommandé de procéder à un essai pour s’assurer que le positionnement et l’ajustement sont corrects.
• Vérifier l’ajustement des pièces avant peinture, car nous n’acceptons pas le retour de pièces modifiées ou peintes.
• Laver les glissières de glaces de la portière du véhicule pour éliminer toute poussière et tous débris.
• Sécher les glissières avec une serviette propre.
REMARQUE : La méthode d’application peut être légèrement différente de celle représentée par les illustrations.
Étapes d’installation
Garniture Écossaise De
BRITE
Garniture
Écossaise De
BRITE
1 2
Abaissez la glace. Polissez la surface de
feutre intérieure avec un tampon Scotch Brite.
Nettoyez-a ensuite avec un tampon à l’alcool.
nettoyer
intérieur du véhicule
REMARQUE : Les visières se montent à l’intérieur
de la glissière de la glace.
Ventvisor® Deflector
Extrémité libre
Rebord supérieur
Rebord arrière
Rebord avant
Retirer la protection d’adhésif du rebord avant.
Décoller environ 5 cm (2 po) de protection d’adhésif
à chaque extrémité du rebord supérieur.

Page 2 de 2
REMARQUE : La méthode d’application peut être légèrement différente de celle représentée par les illustrations.
Étapes d’installation
3
4
Insérer le rebord arrière de la visière
dans la glissière de glace en premier.
Le rebord arrière s’insère entre la
garniture de glace et la surface exté-
rieure. Les rebords avant et supérieur
s’engagent dans la glissière de glace.
Ensemble 4 pièces
Installer la visière arrière en utilisant la même méthode de préparation et d’installation
que pour la visière avant. Noter que les rebords supérieur et arrière s’engagent en glis-
sant dans la glissière de la glace, et que le rebord avant s’insère entre le caoutchouc et le
cadre de glace.
Entretien et nettoyage
• Laver exclusivement avec de l’eau savonneuse et sécher avec un chiffon propre.
Félicitations !
5
7
6
Poussez la région exposée de l’adhésif contre la surface
et vérifiez-en la position.
Répétez les étapes 1 à 7 pour le côté passager.
Félicitations !
Vous avez acheté l’un des nombreux produits de qualité Auto Ventshade™ fabriqués par Lund International, Inc. Nous sommes extrême-
ment fiers de nos produits et souhaitons que vous tiriez des années de satisfaction de votre investissement. Nous avons pris toutes les
mesures nécessaires pour assurer que ce produit est d’une qualité supérieure en ce qui concerne l’ajustement, la durabilité, la finition
et la facilité d’installation.
© 2015 Lund International, Inc. Tous droits réservés.
Auto Ventshade
TM
, le logo Auto Ventshade
TM
et le logo AVS
TM
sont des marques déposées de Lund International, Inc.
Lund International
800-241-7219 • Visitez notre site lundinternational.com
™
Retirer la protection d’adhésif en tirant sur les
extrémités libres.
72
50°F / 10°C Min.
Relevez la glace lentement et laissez-la dans cette position
pendant 72 heures pour bien fixer le pare-soleil au canal de
la glace. Remarque : Il peut être nécessaire d'imprimer un
mouvement de va-et-vient à la glace pour la fermer au départ.

Instrucciones de instalación
Hoja informativa N.° VV143 Rev. A
Para una instalación adecuada y el mejor ajuste posible, lea todas las instrucciones ANTES de comenzar.
Si desea recibir asistencia técnica u obtener piezas faltantes, llame al Servicio al cliente al 1-800-241-7219.
Información importante de seguridad
• PRECAUCIÓN - Antes de conducir, asegúrese de que la visera esté correctamente anclada al vehículo.
• No utilice servicios automáticos de limpieza de vehículos que utilizan cepillos.
• No utilice limpiadores al solvente de ningún tipo.
• Compruebe periódicamente que todos los componentes estén ajustados.
Contenido - Juego de dos piezas
NOTA: El producto real puede variar de la ilustración.
Visera delantera del
conductor
Visera delantera del
acompañante
Paños esterilizados x 2
Contenido - Juego de cuatro piezas
Visera delantera del
conductor
Visera delantera del
acompañante
Visera trasera
del conductor
Visera trasera
del acompañante
Paños
esterilizados
x 4
Equipo de limpieza de vehículos Toalla limpia
Herramientas necesarias
Preparación antes de pintar o instalar
• Se recomienda realizar un ajuste de prueba para asegurar el posicionamiento y ajuste correctos.
• Compruebe que las piezas se ajusten correctamente antes de pintarlas, ya que no aceptaremos la devolución de piezas modificadas
o pintadas.
• Lave los canales de la ventanilla del vehículo para quitar los desechos y la suciedad.
• Seque los canales de la ventanilla con una toalla limpia.
Pasos de instalación
AVISO: La colocación real puede variar con respecto a las ilustraciones.
Página 1 de 2
Cojín Escocés Del
Brite
Cojín
Escocés Del
Brite
1 2
Baje la ventanilla. Pula la superficie de fieltro
con un paño para restregar Scotch Brite.
Luego limpie con un paño esterilizado.
limpie
interior del vehículo
AVISO: las viseras se colocan en la parte interior
del canal de la ventanilla.
Ventvisor® Deflector
reborde superior
reborde trasero
extremo libre
reborde frontal
Retire la cinta protectora del reborde frontal.
Retire 2 pulgs. de cinta protectora de cada uno
de los extremos del reborde superior.

Pasos de instalación
AVISO: La colocación real puede variar con respecto a las ilustraciones.
Página 2 de 2
3
5
4
Inserte la visera en el canal de la
ventanilla comenzando con el reborde
trasero. El reborde trasero se introduce
entre la banda lateral y la superficie
exterior. El reborde superior frontal se
desliza por el canal de la ventanilla.
Instale la visera trasera con los mismos métodos de preparación e instalación
que utilizó para la visera frontal. Tenga en cuenta que los rebordes superior y
trasero se adhieren al canal de la ventanilla y el reborde frontal se inserta entre la
goma y el marco de la ventanilla.
Cuidado y limpieza
• Limpie solamente con agua jabonosa tibia y seque con un paño limpio.
Felicidades
7
6
Presione la cinta expuesta sobre la superficie y verifique
la posición.
Juego de cuatro piezas
Repita los pasos 1 a 7 en el lado del pasajero.
Usted ha comprado uno de los tantos artículos de calidad de Auto Ventshade™ ofrecidos por Lund International, Inc. Nuestros productos
son nuestro mayor orgullo. Deseamos que disfrute de años de satisfacción con su inversión. Hemos realizado todos los esfuerzos para
asegurarnos de que su producto sea de la mejor calidad en cuanto a ajuste, durabilidad, acabado y facilidad de instalación.
© 2015 Lund International, Inc. Todos los derechos reservados.
Auto Ventshade
TM
, el logo de Auto Ventshade
TM
y el logo de AVS
TM
son marcas comerciales de Lund International, Inc.
Lund International
800-241-7219 • Visite nuestro sitio Web: lundinternational.com
™
Retire la cinta protectora tirando de los extremos
libres.
72
50°F / 10°C Min.
Continúe aplicando presión para asegurarse de que
el visor encaje correctamente dentro del canal de la
ventana ya que la ventana se cierra lentamente. Suba
la ventana durante 72 horas para asegurar el visor en
el canal de la ventana.
/