Page is loading ...

Easy step-by-step wiring installation instructions
also available online in Microsoft
®
PowerPoint
format at: https://www.aredealer.com
Tools
Contents
E
as
y
step-
by
-step wirin
g
insta
ll
ation instructions
alsals
o a
o a
vai
va
lab
ab
le
l
l
onl
on
ine
ne
in
in
Mi
Mi
crocro
sof
sof
of
t
t
t
®
Po
Po
Po
o
werwer
e
PoiPoi
nt
nt
forfor
for
f
mat
t
mat
at
a
at
: h: h
h
ttpttp
p
p
ttp
s:/s:/
s
s:
/ww
/ww
w.a
w.a
red
red
eal
l
eal
er.
r
er.
r
com
com
om
T
o
o
o
l
s
C
onten
t
t
s
• Wire .125" (1/8") “T” Wrench
• .50" (1/2") Box Wrench
• 4mm Hex Driver
• .50" (1/2") Socket Wrench
• Box Knife
• 1 Tonneau Cover Assembly
• 1 Accessory Carton with a
model specific Clamp System
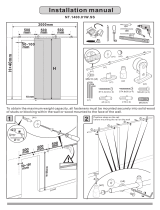
TONNEAU COVER
LSX Tonneau Cover
INSTALLATION INSTRUCTIONS

Step 1: Getting Started
Touch-up Paint
Warranty/Care Form
Keys/Instructions
Clamp Spacers
Covers
.125" (1/8") “T” Wrench
.50" (1/2") Box Wrench
4mm Hex Driver
.50” (1/2") Socket Wrench
Box Knife
1.5" Cap Tape
Grease
Spray Lube
Accessories Package
Contents
Tools RequiredSupplies Required
DO NOT
USE IMPACT
WRENCH
2
3 4
Aluminum Side Rail
Moveable “T” Nut
Position “T” nuts at desired
clamp locations.
1
p 1: Getting Started
Touch-u
p
Paint
LSX Tonneau Cover
Raise LSX above head level.
Locate and remove accessory package.
Accessory Package
5
6
Shipping WoodReturnable Dunnage
Remove screws from dunnage.
Remove dunnage by loosening clamp bolt.
4mm Hex Tool
Clamp Body
7
8
Remove clamp from aluminum rail.
4mm Hex Tool
9
Installation
Instructions

Dunnage
Return dunnage to A.R.E.
10
Remove clamps and retain for later use.
4mm Hex Tool
Clamp Bodies
11
12
Step 2: Positioning
13
Cut tape at end cap.
Rail End Cap
14
Place protective masking tape at both front corners.
(Will be removed later)
15
Masking Tape
Apply paper backed cap tape to hinge base toward the
outside edge.
Mylar
Backed
Cap Tape
Apply cap tape to both side rails. Tape should butt, not overlap.
Remove paper from cap tape.
Tie WrapProp Assist Arm
17
Once tonneau is set into place, cut prop assist arm tie wraps.
Unlock and unlatch palm handle. Raise tonneau, close Ttailgate
and position side rails on bed rails.
Palm Handle Lock/Latch
Side Rail
Tailgate
LSX Tonneau Cover
18
With tailgate open and using 4 individuals, place tonneau
cover onto truck bed rails.
16

TailgateTonneau Cover
Visually align tonneau cover to tailgate profile.
19
Secure the clamp bodies to the “T” nuts, in the aluminum rail,
at each clamp location.
M6x1x14mm Bolt and Lock Washer
Clamp Body
4mm Hex Tool
20
Step 3: Finish Work
Loosely assemble clamp jaw system.
M8 bolt and Stainless WasherClamp Jaw
21
Cover Plate
Clamp Body
After all installation adjustments are made, snap cover
plates in place.
24
Vice Grip
®
“C” Clamp Style
Apply downward pressure on the rail.
Do not use excessive force.
22
Clamp Body4mm Hex Tool
Secure clamps at front scissor hinge locations.
25
Mount Clamp Mid-Bed
26
Rear Rubber-Headed Bumper Bolt
Raise and jower the tonneau cover to verify fit. Adjust
rubber-headed bumper bolts as required in rear locations.
27
Mount clamp at mid-bed on long bed applications.
Downward ForceVise Grip
®
Clamp
Apply downward pressure on the rail. Then secure aluminum
rail to truck by tightening M8 bolt.
23
Recommended Optional (Hand Force)

After latch rod length is determined, secure latch rods
by tightening set screws
34
Latch RodStriker Block
35
.75"
(20mm)
In the closed position the latch rod should engage the
bottom surface of the striker block by 3/4".
Set Screw
Set Screw
Adjust latch rod system as necessary.
33
Striker Block
Latch Rod
Alternate Position #1
Alternate Position #2
Common Rod Guide Position
.75"
(20mm)
Rubber-Headed Bumper Bolt Locations
Adjust rubber-headed bumper bolts up or down to obtain
uniform gap between truck bed and tonneau cover.
28
Ideal Gap is 1/4" to 3/8"
A. Loosen M6x1 machine screw.
B. Reposition as many notches, up or down, as necessary.
C. Retighten M6x1 machine screw.
Scissor Hinge Adjustment Bracket/Screw
4mm Hex Tool
30
Installer Inside Truck Bed
29
2 installers work together to obtain uniform gap.
Flashlight
Recommended
Rubber-Headed Bumper BoltBulkhead
31
After desired gap is obtained, adjust bulkhead
rubber-headed bumper bolts to maintain vertical position.
Remove four screws in shroud to access locking mechanism. Once
adjustments are made reposition shroud using the same 4 screws.
32
Latch Rod Adjuster
36
Lube both batch rod adjustors with white lithium grease.

39
DO NOT
LUBE GAS
PROP RODS;
CLEAN ONLY
Place contents of owner’s manual package in the vehicle
glove box. Do not place the touch-up paint bottle in
the glove box. Place touch-up paint bottle in a cool dry
storage location.
40
41
Monthly lubrication locations, both sides.
Protective Tape
Remove protective tape when all adjustments are complete.
42
IMPORTANT! LUBRICATION
Instruction Tag
Remove instruction tags and place in the owner’s manual package.
37
38
Cycle palm handle latch and rod system to assure smooth
operation. Make adjustments if necessary.
Proper Opening Sequence
Proper Closing Sequence
1 2 3
1 2 3
43
WARNING
Never transport your pick-up truck with tonneau
with the rear of the truck facing forward.
!

Latch Rod Assembly
Spare Parts Section
Clamp and Spare Parts
14176 Set of 4
14175 Set of 6
14267 40mm (1.5") Screw
14155 50mm (2.0") Screw
14267 40mm (1.5") Screw
14155 50mm (2.0") Screw
1
2
Palm Handle — Exploded View
09466 Gas Prop-90 Lb. 19.7"
03725 Gas Prop-110 Lb. 19.7"
01840 Gas Prop-120 Lb. 19.7"
01823 Gas Prop-135 Lb. 19.7"
19-1/2"
17"
10615 Gas Prop-97 Lb. 17.0"
3-9/16
13771 Bulkhead Seal
Must Specify Length
Scissor Hinge Assembly
13813 Driver Side
13814 Passenger Side
11415 Passenger’s Side Support Arm
11416 Driver’s Side Support Arm
14813 Assist Arm Mounting Hardware
Exploded View
Assembled View
Palm Handle Spare Parts
13
12
11
9
8
7
6
4
10
07015
Attachment
Screw
5 per Side
1-5/8
11855 A.P. Seal Short
Must Specify
2-1/2
12957 A.P. Seal Tall
Must Specify
5
Rail System Spare Parts — Assembled View
3
Four Sizes: Please Specify
a) 11128 - 24.5"
b) 11129 - 29.0"
c) 14266 - 31.5"
d) 11130 - 34.0"
02504
2 Required
Latch Rod and
Cam Assembly
Rod Guides
Clamp Assembly
14179 Clamp Spacer Set
Cover Plates Clamp Assembly
See 4
See 6
See 5
See 10
See 12
11407 Assembly Bumper
40mm (1.58") Bolt
11725 Assembly Bumper
55mm (2.15") Bolt
13663 Assembly Bumper
Reversed 55mm
(2.15") Bolt
11409 Assembly Endcap
Driver’s Side
11408 Assembly Endcap
Passenger’s Side
11410 Assembly Striker
Block
11411 LSX Corner
Passenger’s Side
11412 LSX Corner
Driver’s Side
1135111353
Attachment
Machine Screw
and Washer
12652 Palm Handle Assembly
ITEM NO. PART NUMBER DESCRIPTION QTY.
11601601 Wire Pigtail
11575102 M18 Nut
21575203 M33 Nut
11575004 Backer
11574905 Gasket
11582806 Escutcheon Body Assembly
115830-01 thru 15830-2007 Lock and Key
11596708 Strap Pin
11592609 Strap
11569110 Handle
11570711 FHCS M5 x 20
10199112 ARE Logo

A.R.E.
P.O. Box 1100
Massillon Ohio 44648
1.800.649.4ARE • 1.330.830.7878
Fax: 1.330.830.7848
Web Site: www.4ARE.com
E-mail: [email protected]
The LSX is the ultimate in custom fitted hard tonneau
covers for today’s pickups. A.R.E. designed each model to
match the curvature and style lines of the pickup it is made
to fit. Compound curves add strength as well as style.
Form # 358_REV12/07
/