Page is loading ...

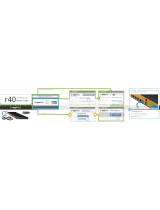
QUICK START GUIDE
QR ANALOG HD CAMERA & DVR BUNDLE
ENGLISH

2
WelcomeTable of Contents
Congratulations on your latest purchase and welcome
to the Q-See family. This guide includes everything
you will need to help get your smart security system
up and running. We are excited to have you on board
and thank you for choosing Q-See!
Sincerely,
Priti Sharma
President
Connect with us:
Welcome
What’s Included ............................................................. 3
Understanding Your DVR ..............................................4
Get Connected
Registration ...................................................................5
Connect Your Cameras .................................................5
Connect DVR to Display ................................................ 7
Connect Mouse .............................................................8
Connect to the Router ...................................................9
Powering Up the DVR & Cameras ................................9
Startup Wizard ............................................................. 10
Setting Up the QR View Mobile App ...........................14
Using the App .............................................................15
Get the Most Out of Your Q-See System
Tips on Camera Placement .........................................16
Troubleshooting ...........................................................18
Warranty and Support .................................................19

3
What’s Included
DVR
Mouse
Your system will include one of the options below
Not included with
every system
Cameras will vary by system
Number of splitters included
vary by system
Products shown in this section will vary by system
60 feet of BNC cable per camera
HDMI Cable Network (Ethernet)
Cable
SATA Cable
A B
DVR Cables Power Splitters
Power SupplyCameras Camera Cables

4
Understanding Your DVR: Rear Panel
NOTE: Connections on the back of your system may vary based on your model.
VGA MONITOR
VGA 19”
+
NETWORK
USB
BNC HD CAMERAS PTZ CAMERA
POWER SUPPLY
HD DISPLAY
HDTV
EXTERNAL
MICROPHONE
EXTERNAL
SPEAKER
IMPORTANT: Go through all of the steps to setup and test your system before mounting any cameras or hardware. Always
visit www.Q-See.com/support to find the most recent guides and up-to-date support for your Q-See products.

5
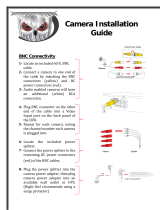
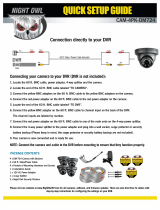
Step 2: Connect Your Cameras
2A. Plug the (camera only) BNC connector and power
cable into the camera. Twist and lock the end of the
BNC cable to secure the connection.
Step 1: Registration
Before installing, please register your device on the
Q-See Support Portal at www.Q-See.com/register to
receive critical updates and support for your system.
Registering will also help us to assist you with any
technical or warranty issues if ever necessary.
Please be sure to keep a record of your model
number(s) and to save this guide, as you will need
this information if you are ever in need of technical
or warranty support.
NOTE: Your username and password used to register your device are
not the same as those you use to log in to your system. Please write
down your username, password, and model number(s) in the spaces
provided below:
Username:
Password:
Model #:
Get Connected

6
2B. Connect the (DVR only) BNC connector into the
back of the DVR as shown in the image. Twist and
lock each end of the BNC cable to secure the
connections.
2C. Connect the (DVR only) power cable into one
of the available ends of the four way splitter as
shown below.

7
2D. Connect the female end of the power splitter into
the adapter as shown in the image below:
Step 3: Connect DVR to Display
There are two options to connect the DVR to a display.
Option A: HDMI
1. Plug the included HDMI cable into the DVR’s HDMI
port.
2. Connect the other end of the HDMI cable to the
monitor or TV.
3. Plug the monitor or TV into a surge protector.
NOTE: Repeat the Steps 2A through 2D for each camera.

8
Option B: VGA Monitor
1. Plug a VGA cable (not included) into the DVR’s
VGA port. VGA might not support full high
definition output.
2. Connect the other end of the VGA cable to the
monitor. A 19” monitor or larger with 1280 x 1024
resolution is highly recommended.
3. Plug the monitor into a surge protector.
Step 4: Connect Mouse
Plug the included mouse into the USB port on the
back of the DVR. If your model has two USB ports on
the back, either one will work.
19” Monitor
or Larger

9
5B. Connect the other end of the cable to an open port
on your router (not included). You will hear a click
when the cable is properly connected.
Step 5: Connect to the Router
5A. Plug the included Network (Ethernet) cable into the
Network (LAN) port on the back of the DVR.
Step 6: Powering Up the DVR & Cameras
6A. Plug the DVR power supply cord into the DC Port
on the back of the DVR.
6B. Plug the DVR power supply or power adapter into a
surge protector (not included).

10
6D. Turn on the DVR’s power switch (if present). The DVR
may beep as it powers up. The Startup Wizard will
appear on-screen after a few minutes.
6C. Plug the camera power supply into a surge
protector.
NOTE: The camera may make a faint clicking sound when the
power is activated. The cameras will take about one minute
after powering on to begin displaying on the monitor.
NOTE: Q-See recommends logging in to your system using
an Unlock Pattern. If enabled, the Unlock Pattern will be
used as the default login method.
Step 7: Startup Wizard
7A. Enter the New Admin Password you would like
to use for your system. Enter the password again
in the Confirm Password field. Write down your
password on page 12 of this guide. Click Draw.

11
NOTE: Security pattern shown
is just for reference. Any mem-
orable pattern can be used for
the security pattern.
7B. Click and hold to Draw the Pattern and release
when done. You will need to draw the pattern once
more to confirm.
7C. Once the Password
and Pattern have been
configured, you will need
to login. Draw the pattern
to login.
7D. Click Start Wizard.
7E. Q-See recommends leaving DHCP selected. This
will ensure your system will automatically receive an
IP address. Click Next.

12
7F. Configure the Date and Time. Click Next.
Please write down your new admin password:
Username: admin
Password:
NOTE: Password is case sensitive and cannot exceed eight
characters.
7G. Your Hard Drive information will be displayed. Click
Next to continue.

13
NOTE: Go to section 8 of this guide for more detailed steps on
setting up the Q-See QR View mobile app.
7I. Check Don’t show this window next time to prevent
the startup wizard from appearing after each
reboot. Click Finish.
7H. Download the Q-See QR View App for
your mobile device from the app store.
Scan the QR Code from the wizard
to add your DVR to the app. Do not
close this screen until you have
setup your mobile device. Once the mobile app is
configured, click Next.

14
Step 8: Setting Up the QR View
Mobile App
8A. Download our free Q-See QR View
mobile app to your mobile device,
available for both Android and iOS.
Ensure that your mobile device
is connected to the same Wi-Fi
connection as your DVR.
8B. QR View may require permissions to your device.
Select Allow.
8C. Select the
Device icon.
8D. Select the +
icon. Select
Import
Devices.

15
8E. Scan the QR Code
shown on your
DVR screen. The
QR Code can also
be found by going
to Information in
the tool bar.
Using the App
Select one of the Viewing
Modes to change the
number of cameras you
see at once and the
format.
Select the Camera icon
to take a snapshot of the
selected camera.
Select the Camcorder
icon to Start/Stop
recording the selected
camera to your mobile
device.
Select the Smoothness
icon to change the quality
of the video feed.
8F. Enter the
Password for
your DVR. Select
Save to complete
the setup. Retrun
to step 7I in the
previous section
of this guide to
finalize the DVR
setup.
NOTE: Changing the smoothness to MainStream requires a
fast upload speed (min 5 Mbps) at the DVR location, and a
fast download speed on your mobile device. (min 5 Mbps)

16
Get the Most Out of Your Q-See Cameras
Distance From Viewing/Recording Device
Walls & floors will affect signal strength, especially
concrete.
Mounting Surface Thickness
Mount your camera on a wall that is at least 2.5" thick.
Avoid direct exposure to weather
Mount your camera under an eave or awning if possible.
Follow these tips to maximize the life and performance of your cameras.

17
Legal Considerations
Always check state and local laws before installing
cameras. (2011 NEC 820.44)
Light levels should be approximately the same
between camera and target area
Consistent lighting conditions will provide optimal
camera performance.
Do not place near high-voltage wires or other
sources of electrical interference
Do not place camera behind a window

18
2. Keep the lens blocked for 10 seconds. You should
see a faint red glow from the infrared LEDs. This
indicates that your camera has power and is
working properly.
If you still do not have a video signal from the camera,
ensure that the video cable is properly connected to both
the camera and the DVR as shown in Step 2 on page 5.
Other Tests
• Connect the camera to a cable that has a working
camera attached. If the camera works, the cable will
need to be replaced through the RMA process and
you can visit www.Q-See.com/support for more info.
• Connect the cable to a different channel on
the DVR. If you see video, then the culprit is a
bad channel input and the DVR will need to be
replaced through RMA.
Troubleshooting
Testing for Power and Night Vision
After you connect your camera to the DVR and power,
if you do not see a video image on screen and your
DVR does not display a “video loss” message, you
should test your camera to ensure it is properly
connected.
1. With your camera(s) still connected to power, cover
the lens end of your camera with your hand or an
object to completely block it.
Advanced troubleshooting and information is
all available on our website at:
www.Q-See.com/support

19
Regulatory Information
The regulatory information herein might vary according to the model you purchased. Some information is
only applicable for the country or region where the product is sold.
FCC Information
CAUTION: Changes or modifications not expressly approved by the party responsible for the compliance
could void the user’s authority to operate the equipment.
FCC Conditions
This device complies with Part 15 of the FCC Rules. Operation is subject to the following two conditions:
(1) This device may not cause harmful interference, and
(2) This device must accept any interference received, including interference that may cause undesired
operation.
FCC Compliance
This equipment has been tested and found to comply with the limits or a digital device, pursuant to part 15 of
the FCC Rules. This equipment generates, uses, and can radiate radio frequency energy and, if not installed
and used in accordance with the instructions, may cause harmful interference to the radio communication.
For a class A device, these limits are designed to provide reasonable protection against harmful interference
in a residential area is likely to cause harmful interference in which case the user will be required to correct
the interference at his own expense.
For class B device, these limits are designed to provide reasonable protection against harmful interference
in a residential installation. However, there is no guarantee that interference will not occur in a particular
installation. If this equipment does cause harmful interference to radio or television reception, which can be
determined by turning the equipment off and on, the user is encouraged to try to correct the interference by
one or more of the following measures:
Reorient or relocate the receiving antenna.
Increase the separation between the equipment and receiver.
Connect the equipment into an outlet on a circuit different from that to which the receiver is connected.
Consult the dealer or an experience radio/TV technician for help.
SDOC Statement: www.Q-See.com/notices
Privacy Protection Notice
As the device user or data controller, you might collect personal data of others such as face, fingerprints,
car plate number, email address, phone number, GPS and so on. You need to be in compliance with the
local privacy protection laws and regulations to protect the legitimate rights and interests of other people by
implementing measures including but not limited to: providing clear and visible identification to inform data
subject the existence of surveillance area and providing related contact.
Warranty & Support
Q-See is always here to answer your questions and
take your valued suggestions. Please visit us at
www.q-see.com/support for 24/7 support and access
to our Support Portal.
DISCLAIMER: Although Q-See has made every effort to ensure that the infor-
mation in this guide was correct at the time of printing, Q-See does not assume
any liability to any party for any loss, damage, or disruption caused by any errors,
omissions, or typos that may occur.

GQRA-E-V1
Rev. 10/31/18, QR DVR’s: QR474
24/7 Online Support Portal & Knowledge Base
www.Q-See.com/support
Firmware Updates
How–To’s
Manuals and Guides
Repairs and Returns
Software
Support Videos
ADDITIONAL SUPPORT
24/7 ONLINE & EMAIL SUPPORT
Phone Support
Mon-Fri : 6AM–7:00PM PST
1-877-998-3440
Chat Support
Mon-Fri: 6AM–7PM PST
Sat-Sun 9AM–5PM PST
Languages
English, Spanish, French
/