Page is loading ...

PROMASTER PRM SERIES REMOTE MONOLIGHTS are full-featured high power studio monolights with a full
function remote control that offers you the ultimate convenience of controlling all of the flash functions from your
camera or worktable. The sixteen channel remote allows you to control flashes individually or in groups giving you the
ultimate control of your lighting creativity.
Features
+ 2.4GHZ full function remote control with LCD screen
+ 16 channel operation for individual or group control
+ Remote stores up to 16 different light configurations
+ Advanced IGBT flash circuitry for fast recycling and precise control of flash output
+ Remote operation up to 328’/100m
+ Fan cooled for longer component life
+ Dual receiver sensors for added sensitivity

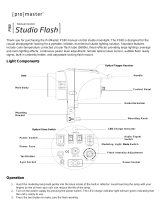
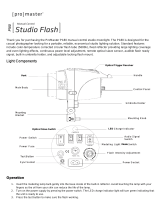
Light Parts Identification
A. Optical slave receiver
B. Flash test button
C. Channel selection button
D. Fuse compartment
E. Sync cord jack
F. AC input socket
G. Stand lock knob
H. Remote power button
I. Horizontal menu select button
J. Master power switch
K. Vertical select / power adjustment dial
L. Angle adjustment locking knob
M. Flash mode selection
N. Modeling lamp mode selection
O. Buzzer mode selection
P. Optical slave mode selection
Q. Flash counter
R. Flash output power display
S. Modeling light output display
T. Channel Display
U. Modeling light
V. Flash tube
W. Accessory mount release lever
X. Charging display bar
Y. Flash Indicator/Power Indicator (not shown)
NOTICE: Diagram above is shown with OPTIONAL standard reflector installed. Reflectors and other
accessories are available for separate purchase.

Remote Control Function Identification
A. Flash mode selection
B. Modeling lamp mode selection
C. Buzzer mode selection
D. Optical slave mode selection
E. Flash output power display
F. Modeling light output display
G. Signal Indicator
H. Vertical select / function adjustment dial
I. Power/Remote light power switch
J. Channel selection key
K. Test flash button
L. Horizontal menu select button (OK)
M. Battery cover
N. X synchronization line jack
O. Hot shoe contact
P. Shoe locking ring
Using the remote control
1. Open the battery cover (M) and install two AAA batteries. Be sure to insert them with the positive and negative
facing the direction of the diagram in the remote housing.
2. Power on the remote using the power button (I). Be sure that the remote is set to the same channel as the light
you wish to control. Note, if the remote is set to a different channel, after you have set the light to the matching
channel, pressing any remote key will wake the light you are controlling.
3. Insert the shoe of the remote control into the hot shoe on your camera. If the camera does not have a hot shoe,
you will need to connect the remote to the camera using the X-sync cord. Plug the cord into the X-sync jack (N)
of the remote and the other end into the camera's X-sync port. Press the shutter button to test the flash. Note:
The flash must be set to the CELL + FM, CELL +1, or CELL +2 setting.
4. To make flash settings, press the Mode Dial (H) until the setting you wish to change flashes. Use the OK button
to toggle through the options until the option you wish to choose flashes. Press the Mode Dial (H) to select and
store the setting. Note that you will have approximately 5 seconds to activate your choice. After that time, the
selection will return to the previous state.
5. After approximately 2 minutes of inactivity, the remote will go to sleep to conserve power. Pressing the power
button (I) will reactivate the remote.
Using the Monolight
1. Plug the power cord into the AC input socket (F) of the light. Turn on the main power switch (J). The power
indicator (Y) will blink indicating the light is in the standby mode. Pressing the remote power button (H) on the
light or the power button on the remote (I) will activate the lights operational mode.

2. Adjust flash power to the desired level using the Mode dial on the flash or remote. The flash output power
indicator has a range of 2.0 - 6.0 where 2.0 represents the minimum power and 6.0 represents the maximum
power. To increase the power, rotate the dial clockwise. To reduce the power, rotate the dial
counter clockwise.
3. To adjust the menu functions, press the dial until the function you wish to adjust is blinking. When the
light is in this mode you will not be able to adjust the power until the menu function key stops blinking.
4. The output of the modeling light can be set in 3 ways. A) Proportional to the output of the flash. (Mode Prop) In
this case, as you adjust the power of the flash, the output of the modeling light will be adjusted at the same time.
B) Independently from the output of the flash. (Mode Free). In the independent mode, the output of the
modeling lamp can be set separately from the output of the flash. To adjust the output of the modeling light
press the Enter (I) button on the light or the OK (L) button on the remote. Adjust output to the desired level
using the Mode dial on the light or remote. The output power indicator has a range of 2.0 - 6.0 where 2.0
represents the minimum power and 6.0 represents the maximum power. To increase the power, rotate the
dial clockwise. To reduce the power, rotate the dial counter clockwise.
Flash Mode Options
Flash On/Off: You can turn the operation of the flash tube on or off. Press the dial until the is
flashing. Press the Enter/OK key until the desired option is flashing. Press the dial to store the setting. In the
FLASH ON mode, the flash tube is active and all of the functions of the light are working. In the FLASH OFF mode, only
the modeling light is active.
Modeling Light: The Modeling Light has 3 options. A) Proportional to the output of the flash. (Mode Prop) In this case,
as you adjust the power of the flash, the output of the modeling light will be adjusted at the same time. Note, if the flash
tube is in the FLASH OFF mode, this option is not available. B) Independently from the output of the flash. (Mode Free).
In the independent mode, the output of the modeling lamp can be set separately from the output of the flash or C) OFF.
Press the dial until the is flashing. Press the Enter/OK key until the desired option is flashing. Press
the dial to store the setting. In the PROP mode, the modeling light output will be adjusted in sync with the flash
output. In the FREE mode, the modeling light can be adjusted independently of the flash output. In the OFF mode, the
modeling light is turned off.
Buzzer: The audible signals from the light may be turned off or on in the BUZZ mode. Press the dial until the
is flashing. Press the Enter/OK key until the desired option is flashing. Press the dial to store the
setting. In the BUZZ ON mode the light will give an audible signal any time a key on the light or remote is pressed or
when the flash is triggered. In the BUZZ OFF mode there will be no audible signals.
Optical Flash Sync, Anti Pre-Flash and Red-Eye Reduction function: In addition to the wireless remote, the flash
may be triggered by the light from another flash using the light’s built-in photosensitive sensor. This option has 4 modes.
In the mode, the optical sensor is disabled and the flash can be triggered by the wireless remote, test button or
sync cord. In the , the optical sensor is on and the flash can be triggered by either the wireless remote, another
flash, the test button, or a sync cord. Some cameras emit a pre-flash to aid in focusing and red-eye reduction which can
cause the flash to fire out of sync with the camera. It is always best to turn off the pre-flash function in your camera. If
this is not possible, setting the light to the mode will cause the optical sensor to ignore the pre-flash from the
camera and fire on the second flash. Be sure to note that different cameras use different pre-flash schemes so the
mode may not be effective for your camera. Selecting the mode activates the red-eye reduction
mode of this light. In this mode, the flash will fire 15 times in fast succession helping to reduce the red-eye effect in
certain situations. To select the mode of your choice, press the dial until the is flashing. Press the
Enter/OK key until the desired option is flashing. Press the dial to store the setting.

Specifications
+ Output Power: PRM-600 – 600ws / PRM-1000 – 1000ws
+ Output Adjustment: Continuous stepless adjustment with output scale of 2.0 – 6.0
+ Recycle Time: 1 – 2 seconds
+ Color Temperature: 5500º ± 200º K
+ Modeling Light: 150 watts
+ Flash Trigger Modes: 2.4GHZ wireless, photo cell, wired flash cord, test button
+ Built-in cooling fan
+ Operating Voltage: AC110V
+ Flash Duration: 1/800 – 1/1500 second
+ Maximum Remote Distance: 328’/100m
Optional Accessories
+ 7” 95º Standard Reflector, 9” 140º Wide Angle Reflector, 16” Beauty Dish, Barn Door Set, Snoot, Soft Boxes
Important Notes
1. Be sure to use the correct modeling lamp bulb. Using a lamp with greater than 150 watts may cause damage to
the light circuitry.
2. Storage for long periods may cause the capacitor in the light to deteriorate. It is recommended that the light be
fired several times each month to exercise the capacitor and keep the light in good working order.
3. Be sure the light is properly grounded. Using the light with an ungrounded power source or in wet or poorly
ventilated areas can cause damage or injury.
4. There are NO USER SERVICABLE PARTS inside of this light. Opening the housing can lead to serious injury
or damage.
5. Do not touch or look directly into the lamp. This could result in injury to your person or eyesight.
6. Your light may have several hundred of activations on the counter when you first open the package. This is
NORMAL and occurs during the testing and QC process. These activations have no impact on the useful life of
your unit but are needed to insure that all of the functions of your light work properly and reliably.
Made in China
Keep in Touch
For more information, tutorials, industry news and tips & tricks, make sure to visit us at promaster.com, follow our feeds
on Twitter @promasterphoto, and subscribe to our YouTube ProMasterChannel.
ONE YEAR UNCONDITIONAL GUARANTEE
If for any reason, this ProMaster product fails within ONE YEAR of the date of purchase, return this product to your
ProMaster dealer and it will be exchanged for you at no charge. ProMaster products are guaranteed for ONE FULL
YEAR against defects in workmanship and materials. If at any time after one year, your ProMaster product fails under
normal use, we invite you to return it to ProMaster for evaluation.
www.promaster.com | Fairfield, CT 06825
/