Page is loading ...

-1-
Instructions for SAITO FA-120R3
(
AAC
)
4-Stroke En
g
ine
We would like to express our sincere thanks for your purchase of the SAITO FA-120R3
engine. Please read our instructions carefully and treat your engine with care. If there’re
any manufacturing defects, SAITO Seisakusho co., ltd. will make necessary repairs free
of charge. You are requested to strictly avoid disassembling the engine since assembled
with the use of special tools and jigs to assure perfect construction.
In the case of breakage or trouble, if encountered due to crash or others, please send the
engine to our service station.
Please notice that our guarantee will not cover any breakage or trouble on the engine
caused by your disassembling or modification.
Please refer to the following data.
Bore 22.4mm×3 Weight Approx. 890g (with mufflers) Propeller Standard APC13"×8"-14"×6"
Stroke 16.2mm×3 Practical Speed 1,800-10,000rpm max range on the ground: 8,500-9,500rpm
Stroke volume 19.18cc Static thrust Approx. 3.5kgf (by APC14"×6"prop)
Fuel flow
24cc/min (At full throttle, Fuel of synthetic oil with 15% of nitro content,APC13"×6"prop at approx 9,400rpm)
*Fuel flow varies depends upon prop load. More fuel flow with larger load and less fuel flow with smaller load.
Unique features of SAITO FA-120R3
• Optimum for small-size scaled airplane
• Low vibration (assured by constant-interval explosion)
• Real sound of the exhaust.
• The engine is designed to equalize fuel mixture and minimize misfire due to insufficient distributing at idling by means of special port type intake manifold
originally developed by SAITO.
• Cylinder head: Improved semi-spherical combustion chamber assures better combustion efficiency and volumetric efficiency.
• Cylinder: The aluminum cylinder is directly hard-chrome plated on its inner surface without installing liners to reduce weight and increase durability. The monolithic
structure of cylinder head and cylinder prevents distortion and improves cooling efficiency.
• Piston: The piston is made of high silicon content aluminum and attached with a compression ring to heighten engine performance.
• Crankshaft: Has a forged solid construction made of chrome molybdenum steel, and supported by two ball bearings.
• Cam: Features high cam providing longer maximum lift time.
• Carburetor: High-performance of slow throttling type.
• Propeller nut: designed to have double nuts preventing loosening and fall-off for the safety.
Standard Accessories
1. Wrench for tappet adjusting screw 1 pc. 5. Glow plug [SA
I
-GP01,
P
-SS] 3 pcs.
2. Limit gauge (0.1t) for tappet adjusting 1 pc. (Attached to the engine)
3. Hexagonal wrench (1.5mm) 1 pc. 6. Plug heating connector set 1 set
4. Muffler complete 1 set (3pcs. of red cord, 1pc. of black, 2pcs. of fixture)
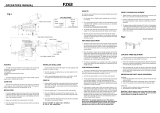
Mechanism of 4
-
Stroke En
g
in
e
s
The 4-Stroke engine provides 4 individual piston
movements as illustrated below. The “Stroke” means the
piston movement from the Top Dead Center to the Bottom
Dead Center. In the 4-Stroke engine, one cycle of operation
in change of gas state inside the cylinder and valve
movement are completed at every 4 strokes of piston that is
every 2 revolutions of the crankshaft. Formally the engine is
called the 4-stroke one-cycle engine.
Explosion order
(1-3-2)
1
23
Prop rotational direction
Cylin
d
er numbers viewed
from the rea
r
Principal outside dimension
s

-2-
A. Fuel
We recommend the use of synthetic oil fuel having good quality for glow engines with 5 to20% of nitro content.
Since exhaust temperature of 4-stroke engine is high, avoid using castor oil as it tends to accumulate the carbon.
Also installing a fuel filter is recommended.
B. Fuel tank
Select a suitable capacity of fuel tank for the model airplane available in the market referring to the data.
Set the tank as the liquid level to be the same height as the center of carburetor.
Also place the weight of the fuel inlet at a distance of approx. 3-5mm from the firewall.. Since SAITO engines use muffler pressure, careful attention is required for leakage.
Moreover regulate the silicon tube length of piping to the minimum necessary extent.
C. Plug
Since one explosion occurs in every two rotations in 4-stroke engines, selection of the plug is important. Use of improper plug causes engine trouble. Engine performance
varies according to the matching with the fuel or to the season. We recommend testing various types of plugs for the best performance.
(Some types of plug by other manufacturers exhibit good matching with SAITO engine. The plug deteriorates after many flight hours even if not broken. Hence frequent
replacement with new one would be necessary. Please recognize a plug as a consumable part.)
D. Propeller
Select the standard size prop ranges from APC13”x8”-14”x6” although it varies according to the body type of airplane. Select one with high reliability available in the
market.
The prop requires thorough balancing. Use a balancer to attain correct balancing. Unbalanced prop creates excessive vibration, lowers performance and invites danger. If
you find flaw or other defects, replace the prop with new one since dangerous.
For the characteristics of this engine, use a prop that matches to the airplane and turns smooth in 8,500-10,000rpm of the maximum speed range on the ground.
Prop speed varies by manufacturers and also in some instances, among props of the same size by the same manufacturer. We recommend testing various types of props.
E. Preparation for Engine starting
1. Mount the engine on the sturdy test bench with correct parallelism or on the fuselage. Fix the test bench or fuselage to prevent moving.
2. Use a fuel tank with a capacity of 300-400cc to test the engine on the bench, or use the adequate tank on the fuselage.
3. Use fuel with approx. 20% of oil and 15% of nitro content, other than low-oil fuel.
4. For test prepare APC14”x6” prop (Standard rotation at approx. 9,500rpm)
Securely tighten double nuts to fix the prop. Also attach the spinner nut for use of a starter.
5. Attach silicon tube to the breather nipple to check the exhaust from the breather.
6. Connect silicon tube from the muffler nipple to the fuel tank to use muffler pressure. (Be sure to check that there’re no leaks throughout the tube.)
7. Unlike 2-stroke engines it is difficult to judge clearly the peak condition on 4-stroke engines. Prepare a tachometer to prevent over-throttling or overheat.
8. Prepare starter, its battery, plug heat, and other necessary articles.
F. Engine starting
The following is the procedure with the engine mounted on the airplane.
(A) Starting method with a starter (Recommended)
1. After confirm that the throttle stick is located at the full-close position, turn on the transmitter switch. Then turn on the receiver switch to check throttle valve operation.
(After checking fully close the throttle valve.)
2. Open main needle by about 3turns. (It’s just for a guide. Further open the main needle if fuel mixture is lean or close if rich after starting the engine. Additionally note
that larger prop requires further opening and smaller prop closing.)
3. Open the throttle valve about 1/4 to 1/3 from the full close position by using the throttle stick. (Starting with excessively opened throttle is dangerous since the airplane
jumps forward.)
4. Turn the prop in reverse direction (CW) until it gets compression.
5. Heat the plugs. (Heat 3 pieces of plug separately if the battery has lower capacity.)
6. Apply the starter to the prop and activate for about 5 seconds to start the engine.
Fuel filter [F-1] Weight: 10g
SAITO fuel filter “F-1” exhibits the highest performance
Use of SAITO “SAIT GP01” SS Glow plug is recommended.
Note: Avoid operating the engine with a prop allowing over 10,000rpm on the ground or a large load prop lowering speed below 8,500rpm.
Crankshaft, bearings, master rod, cam or gear would be damaged otherwise.
Note: Please tighten regularly a t least once in ten flights. Especially for a wooden prop, it tends to compressed so that the nuts are rather easy to be loosen so please
confirm carefully that the nuts are tightened adequately.
If there’s anyone stands forward, be sure to have them move behind the airplane prior to start the engine. Also keep one of your arm holding the airplane away from the
prop. On starting the engine, move to the rear of the airplane. Make needle adjustment or other control from the rear. If the airplane cannot be fixed, ask your assistant
to hold the airplane for safety.
Caution: Do not activate the starter at the position which the engine is getting compression in the forward direction (CCW) since dangerous.

-3-
(B) Manual starting method (For safety, wear gloves and use a safety stick)
1. - 2. Same procedure as (A) describes.
3. Prime the engine. Open the throttle valve fully by using the throttle stick. Insert a proper
length of silicone tube into the priming nipple. Use an injector to fill a proper amount
(1-2cc) of fuel into the carburetor.
4. Manually crank the engine 2 to3 turns to supply fuel in cylinders. Then use the throttle stick
to fully close the throttle valve.
5. Open the throttle valve about 1/4 to1/3 from the full close position by using the throttle stick.
(Starting with excessively opened throttle is dangerous since the airplane jumps forward.)
6. Set the prop at the point of 30-45deg from the horizontal position, with the engine turned in
forward direction (CCW) to the position to be compressed.
Then heat the plugs.
7. Swiftly crank the engine in forward direction (CCW) to start the engine..
G. Break-in
As Break-in is an important procedure to pull out the maximum performance of the engine, it must be cautiously implemented.
1. After filling up the fuel tank, start the engine as described in the above section F. After starting the engine use the throttle stick to open the throttle valve to about half
open. Adjust the main needle while observing tachometer, exhaust oil concentration and exhaust concentration from the breather, to run the engine at 5,000rpm or
lower speed in rich condition for full tank fuel consumption. (Run the engine with plugs powered as required.)
2. Next adjust the main needle and throttle valve opening to run the engine in rich fuel condition at 7,000 – 8,000 rpm for full tank fuel consumption. (In this stage also
observe tachometer reading, exhaust oil concentration and exhaust concentration from the breather.)
3. Next fully open the throttle valve and adjust the main needle to run the engine at approximately 9,000 rpm for full tank fuel consumption.
4. Finally adjust the main needle to run the engine at peak speed and less speed (richer) alternately. When the engine comes to run at a peak speed stably, ground break-in
has been completed for the time being. Now adjust valve clearance by following procedure of maintenance described later. Then adjust carburetor according to the
next article and make test flights at less speed around ten times to complete break-in. (Thereafter make flights at less speed, to prolong engine life.)
H. Handling and Adjustment of Carburetor
The SAITO carburetor has been adjusted on its slow needle to our reference value at factory default. The slow needle requires some correction depending on various factors
including the installation position, types of prop/fuel/plug, or climate conditions. Readjust the slow needle referring to the figure shown below.
[Reference value (only for a guide)]
Main needle: Open the needle by 2 turns from the full close point.
Slow needle: Fully close the throttle valve and slow needle CW to the end. Then open the slow needle by about 3 turns from the full close point.
1. After filling up the fuel tank, start the engine as described in the previous section F.
2. Fully open the throttle valve. Adjust the main needle while observing tachometer, exhaust noise and exhaust smoke, to attain the speed peak.
3. Next control the throttle stick to gradually close the throttle valve to run the engine stably in the
range of around 2,000-2,500rpm. (Adjust the throttle stick while observing tachometer.
Exhaust smoke concentration, or exhaust/intake noise.)
a. Rich fuel mixture: Turn the slow needle CW to make fuel mixture leaner.
b. Lean fuel mixture: Turn the slow needle CCW to make fuel mixture richer.
4. Once idling speed is set, fully open the throttle valve slowly. If the speed becomes irregular or
suddenly increases on the way, carefully adjust the slow needle so that the engine speed
changes linearly from the idling to the peak speed.
5. When the above adjustment is completed, quickly change the speed from idling to the peak. If
the speed does not reach the peak on opening the throttle valve to full open point, return the
main needle by the amount single knurl notch gives. Then quickly change the speed again.
Repeat this procedure cautiously to attain the best response.
6. When all conditions are set, return the adjustment of main needle slightly to lower the
maximum speed by 200-300rpm (make fuel mixture richer).
Caution: The purpose of break-in is initial adjusting of the master rod, link rod, bearings, gears and other mobile parts under the condition with rich fuel mixture.
Never make the fuel mixture lean. Lean fuel mixture could cause seizure even if the engine drops to idling and runs at low speed.
Note: Rotary units and slide ways of the engine have been lubricated at assembly with black molybdenum oil to prevent wearing or seizure. Hence black exhaust oil
comes out of the breather nipple and muffler at break-in operation. This could not be a trouble and you can continue the operation.
Note: Strictly avoid changing the direction of carburetor installation. Failure to do this will cause engine malfunction.
Caution: Excessive closing of main needle could cause knocking and give damage onto the engine. In such occasion, immediately turn the main needle CCW to make
fuel mixture rich.
Suppose the peak speed with the tank filled full with fuel is at 9,500rpm, set the main needle to reduce the peak speed by 300 rpm at 9,200rpm. Run the engine at a
speed about 300rpm lower than the peak to prolong the service life of the engine and minimize rusting on bearings.
Priming Method
Needle adjustment

-4-
Tappet adjustment
I. Normal Operation and Maintenance
(a) Do not operate your engine too lean at full throttle since the engine might be overheated.
Adjust the main needle slightly open than the peak. (Too lean operation causes knocking,
stoppage or negative influence on the connecting rods and cam gear.)
(b) After completing ground break-in or operating the engine for one hour, adjust tappet gaps
(valve clearances) by following procedure to compensate initial wearing, while the engine is
cold.
1. Remove plugs and rocker arm covers of all cylinders.
2. For instance start adjusting from the No.1 cylinder. Turn the prop slowly forward by
hand, to stop the rocker arm of the No.1 cylinder.. Further turn the prop, to bring the
piston to the TDC (Top Dead Center) of compression stroke.
3. Use the attached wrench and hexagonal wrench to adjust the gaps indefinitely close to zero within the range compression exists.
4. On checking the gap, securely tighten (but not excessively) the lock nut.
* In the case of the engines for vehicle, small gap is given to tappets to absorb valve elongation. In the case of SAITO engines, gap becomes larger during operations
due to thermal expansion of the cylinder (made of aluminum). Therefore set the gap indefinitely close to zero while the engine is cold.
(c) Lubricate the rocker arm and valve area at inspection as required.
(d) When connecting the exhaust pipe to the cylinder or attaching the prop nut, apply thin coat of silicon rubber (not excessively) on the thread section before tightening.
This prevents leakage or loosening.
(e) Occasionally tighten the prop nut and exhaust nut (while it is hot).
(f) After a flight, lubricate the entire engine with spray type preserve lubricant through the carburetor or breather.
(g) If the engine in not operated for longer period of time, lubricate the entire engine before placing a plastic cover on.
J. Internal Lubrication of Engine and Waste Oil Disposal
Oil contained in fuel enters into the crankcase through the clearance between the piston and cylinder to lubricate the piston, connecting rod, bearings, cams and gears. Waste
oil is discharged from the breather nipple located at the lower part of crankcase. Connect a silicone tube to the breather nipple and clamp the other end of tube at the end of
exhaust pipe by using bands.
k. Supplementary Notes:
(a) Precautions for wiring of attached connector set to heat plugs:
To equalize current, bind cables without cutting them even if it’s long.
* The engine adjusted properly does not require plug heating at idling (2,000-2,500rpm) once it starts.
(b) Causes of reversing at starting:
• Priming amount is inadequate.
• Manual-cranking speed is insufficient.
• Voltage or current for plug heating is low.
(c) Please notice that our guarantee will not cover any breakage or trouble on the engine caused by your disassembling or modification.
If disassembling becomes necessary, observe the following precautions.
(d) Notes for purchasing parts:
Please give orders to the shop you purchased from with a sheet with engine name, part name or number, and marking (alphabet on the lower face of rear cover).
(e) Take an extreme care for safety when operating the engine or flying the model airplane not to bother others.
(f) An engine for a model airplane is not a toy. Handle it with an extreme care.
All specifications and models are subject to change without notice.
SAITO SEISAKUSHO, CO., LTD.
22-7, 3-chome, Tokagi, Ichikawa-shi, Chiba prefecture 272-0024, Japan
Phone: 047-378-4156 FAX: 047-378-4155
Occasionally check tappet gap by those procedure. When the attached gauge (limit gauge, t=0.1mm) comes to be inserted, gap has been enlarged beyond the allowable
limit. Make an adjustment to lessen the gap. Tappet gap is one of the most important factor in the maintenance of 4-stroke engines. Operating the engine with the tappet
gap enlarged excessively will cause poor performance or troubles.
/