Page is loading ...


CONGRATULATIONS… You’ve just taken the first step to a healthier and
stronger body. This Smith Cage System by Inspire Fitness offers the key to
unlocking your body’s potential. Regular strength training has been shown
to deliver a host of benefits including: increased muscle tone, decreased
body fat, improved energy levels, a reduction in stress, and improved
cardiac output. Once again, congratulations, you are on your way to
improving your self image, overall health, and quality of life.
BEFORE ASSEMBLING SMITH CAGE SYSTEM
CAUTION:
Two people are required to assemble the Smith Cage System to
ensure that parts do not fall that could result in injury to the persons
assembling the gym.
IMPORTANT: Read this entire manual before attempting to build or use
this equipment. This manual contains step by step instructions for proper
assembly.
Use the parts list included in this manual to verify that all parts are
accounted for before assembly. If any parts are missing, contact the retailer
of this Smith Cage System for replacement parts. Or, call Inspire Fitness
at 877-738-1729.
Make sure that adequate room has been cleared before attempting to build
your Smith Cage System. A rubber mat is recommended for use under
your Smith Cage System to protect wood flooring or carpeting from damage
during assembly and usage.
This Smith Cage System is intended for indoor use only. In addition,
garages and screened in porches are not recommended due to high
humidity or dust. Rust could form on certain parts, including guide rods, in
a humid environment resulting in impaired function.
Service of your Smith Cage System should only be performed by an
authorized Inspire Fitness retailer. Service performed by anyone else can
result in loss of warranty. If you need help finding an authorized retailer,
please contact us directly:
Inspire Fitness
4945 East Hunter Avenue
Anaheim, CA 92807
Ph: 877-738-1729
Fx: 714-738-1728
www.inspirefitness.net

TABLE OF CONTENTS
Section Description……………………………………………………. Page
Important Safety Instructions………………………………………. 1
Tools Required………………………………………………………………… 1
Parts & Hardware List……………………………………………………. 2
Cable Chart ……………………………………………………………………. 3
Assembly Instructions……………………………………………………. 4
Cable Adjustment ………………………………………………………….. 26
Exploded View ……………………………………………………………….. 27
Decal Reference …………………………………………………………….. 28
Decal Placement …………………………………………………………… 29
Accessories, Options, Training Tips………………….…………… 30
General Maintenance Information…….…………………………… 31
Maintenance Schedule…….……………………………………………… 32
Limited Warranty…………………………………………………………….. 33

IMPORTANT SAFETY INSTRUCTIONS
Please read this entire manual and familiarize yourself with all decals and
warnings before using this Smith Cage System.
• WARNING! It is necessary to inspect this Smith Cage System regularly
to maintain safety and proper function. Please use the maintenance
schedule included towards the back of this manual. Immediately replace
any and all defective or worn parts. Pay special attention to moving parts
and connections to accessories. See General Maintenance section for
complete details.
• Use this Smith Cage System for its intended purpose as described in this
Operation Manual or the exercise chart. Do not use attachments not
recommended by the manufacturer.
• Make sure bystanders are at least 5 feet away from the
Smith Cage System while it is in use.
• Keep children off the Smith Cage System at all times.
• Keep the Smith Cage System away from walls and clear of any
obstructions and furniture.
• Stop immediately if you experience shortness of breath, pain, or dizziness
during your workout. Inspire Fitness strongly recommends consulting your
doctor before starting an exercise program.
TOOLS REQUIRED FOR ASSEMBLY
• Metric socket set (including 13mm, 16mm, 17mm, 18mm, and 19mm
sockets)
• Metric Wrenches – 13mm, 16mm, 17mm, 18mm, 19mm
• Metric Tape Measure
• Rubber Mallet
• Adjustable Wrench
• 3mm, 4mm, 5mm, and 6mm Hex Wrenches
Page 1

PARTS AND HARDWARE
PAGE 2
Rev111514
Item
Parts Description SCS-002 Box Qty
Evs p/n
Item Hardware in SCS-002 Box Qty
Evs p/n
1 Main Upright 4 1 Bolt, M8 x 20 4
2 Base Beam, Left 1 2 Bolt, M10 x 25 (Blue dot) 2
3 Base Beam, Right 1 3 Bolt, M10 x 25 16
4 Weight Stack Mount 1 4 Bolt, M10 x 100 (Blue dot) 4
5 Base Beam Bracket 2 5 Bolt, M10 x 105 12
6 Top Beam, Right 1 6 Bolt, M10 x 110 8
7 Top Beam, Left 1 7 Bolt, M10 x 125 4
8 Pull-Up Cross Brace 1
9 Rear Cross Brace 1 7 M8 Washer 4
10 Weight Racks 4 8 M10 Washer 70
11 Plastic End Cap 8
12 Safety Bars 2 9 M10 Locknut 32
13 Touch-up Paint 1
Item
Parts Description SCS-202 Box
Qty
Evs p/n
Item
Hardware in SCS-202 Box
Qty
Evs p/n
1 Right Top Cable Column Mount 1 1 Bolt, M6 x 12 (Button Head) 6
2 Left Top Cable Column Mount 1 2 Bolt, M6 x 35 (Button Head) 6
3 Top Weight Stack Mount 1 3 Bolt, M8 x 25 2
4 Lat Attachment 1 4 Bolt, M10 x 25 2
5 Lat Attach Bracket, Upper 1 5 Bolt, M10 x 35 2
6 Lat Attach Bracket, Lower 1 6 Bolt, M10 x 45 5
7 Pull Up Bar 1 7 Bolt, M10 x50 2
8 Shroud Plate Spacer 2 8 Bolt, M10 x 55 (Blue dot) 2
9 Shroud Plate Assembly 2 9 Bolt, M10 x 60 (Button Head) 2
10 Shroud Mount Plate 2 10 Bolt, M10 x 60 (Blue dot) 4
11 Shroud Mount Bracket 4 11 Bolt, M10 x 60 4
12 Guide Rod 4 12 Bolt, M10 x 70 2
13 Rubber Donut 4 13 Bolt, M10 x 95 (Button Head) 1
14 Weight Stack Riser 4 14 Bolt, M10 x 95 4
15 Selector Stem / Top Weight 2 15 Bolt, M10 x 100 2
16 Top Weight Pulley Assy. 2 16 Bolt, M10 x 105 1
17 Weight Stack Shroud Mount 2 17 Bolt, M10 x 155 2
18 Row Pulley Mount 1 18 Bolt, M12 x 25 1
19 Lower Right Cable Column Mount 1 19 Bolt, M12 x 30 2
20 Lower Left Cable Column Mount 1
21 Pulley, 3 1/2" Diameter 8 20 M6 Flat Washer 6
22 Floating Pulley Assembly 2 21 M8 Flat Washer 4
23 Floating Pulley Assy w/ Guide Bushing 2 22 M10 Flat Washer 56
24 Cable Column 2 23 M12 Flat Washer 4
25 Cable Column Slider 2
26 Cable Anchor Plate 2 24 M6 Flat Head Nut 6
27 Upper Cable 2 25 M6 Locknut 6
28 Row Cable 2 26 M8 Locknut 2
29 Lower Cable (“U” End) 2 27 M10 Locknut 28
30 Guide Cable 2 28 M12 Locknut 2
31 Exercise Placard 1
32 D handle / Ab Strap 2 29 1/2” Step Spacer 6
33 Ankle Strap 1 30 Cable Ball 6
34 4 Ring “D” Handle 2 31 “U” Bracket Cable End 6
35 Pull-Up Assist Assy. 1 32 Spring Clip 6
36 Guide Rod Lube 2 33 Weight Pin 2
37 Touch-up Paint 2 34 Shroud Plate Connector Pin 12
35 4 mm Hex Key 1
36 5 mm Hex Key 2
37 6 mm Hex Key 1

Page 3
CABLE CHART
UPPER CABLE
GM698-500-002
LOWER CABLE
GM698-500-001
ROW CABLE
GM698-500-003
GUIDE CABLE
GM698-500-004
Qty: 2
Qty: 2
Qty: 2
Qty: 2

ASSEMBLY INSTRUCTIONS
Page 4

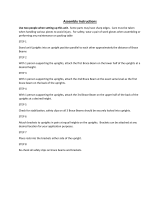
Step 1
2 – M10 x 25 Hex Bolts (Blue Dot)
4 - M10 x 125 Hex Bolts
10 – M10 Flat Washers
4 – M10 Locknuts
Right Base Beam
Weight Stack Mount
Cable Anchor Plate
Left Base Beam
Base Beam Bracket
Step 1: Attach the Right Base Beam, Left Base Beam,
Two (M10 x 25 Hex Bolts (Blue Dot)
Weight Stack Mount, two Cable Anchor Plates,
Four (M10 x 125 Hex Bolts)
And two Base Beam Brackets using:
Ten (M10 Flat Washers)
Four (M10 Locknuts)
Note: “(Blue Dot)” means there is a blue dot of thread locking compound on the bolt
thread.
(Finger Tighten Only)
Page 5

Weight Rack mounting tabs
Main Upright
Step 2
4 – M10 x 105 Hex Bolts
8 – M10 Flat Washers
4 – M10 Locknuts
Step 2: Attach two Main Uprights to the rear of the Left and Right Four (M10 x 105 Hex Bolts)
Right Base Beams (orient all Uprights with the four Weight
Eight (M10 Flat Washers)
Rack mounting tabs toward the middle of the machine
Four (M10 Locknuts)
and near the top) using:
(Finger Tighten Only)
Page 6

Main Upright
Weight Rack mounting tabs
Row Pulley Mount
Step 3
4 - M10 x 110Hex Bolts
8 - M10 Flat Washers
4 – M10 Locknuts
Lower Right Cable Column Mount
Step 4
2 – M10 x 100 Hex Bolts
4 – M10 Flat Washers
2 – M10 Locknuts
Lower Left Cable Column Mount
Step 3: Attach the two front Main Uprights, Lower Right Cable Four (M10 x 110 Hex Bolts)
Column Mount, and Lower Left Cable Column Mount to Eight (M10 Flat Washers)
the Left and Right Base Beams using: Four (M10 Locknuts)
(Orient all Uprights with the four Weight Rack mounting tabs
toward the middle of the machine and near the top as shown)
Note: Finger Tighten Only
Step 4: Attach the Row Pulley Mount to the Weight Stack Mount Two (M10 x 100 Hex Bolts)
using: Four (M10 Flat Washers)
Two (M10 Locknuts)
(Finger Tighten Only)
Page 7

Note: Two tabs to rear
Rear Cross Brace
Step 5
2 - M8 x 20 Hex Bolts
2 - M10 Flat Washers
Pull-Up Bar Cross Brace
Step 6
2 - M8 x 20 Hex Bolts
2 - M8 Flat Washers
Step 5: Attach the Pull-Up Cross Brace to top of front Two (M8 x 20 Hex Bolts)
Main Uprights using: Two (M8 Flat Washers)
(Finger Tighten Only)
Step 6: Attach the Rear Cross Brace to the top of Two (M8 x 20 Hex Bolts)
the rear Main Uprights using: Two (M8 Flat Washers)
Assure the two tabs in the center of the Rear Cross Brace are facing towards the back of the
machine.
(Finger Tighten Only)
Page 8

Right Top Beam
Top Right Cable Column Mount
Step 7
2 - M10 x 100 Hex Bolts (Blue Dot)
2 - M10 x 110 Hex Bolts
6 - M10 Flat Washers
2 - M10 Locknuts Top Left Cable Column Mount
Step 8
2 - M10 x 100 Hex Bolts (Blue Dot)
2 - M10 x 110 Hex Bolts
6 - M10 Flat Washers
2 - M10 Locknuts
Step 9
1 - M12 x 25 Hex Bolt
1 - M10 x 45 Hex Bolt
2 - M10 Flat Washers
1 - M10 Locknut
Step7: Attach the Left Top Beam and Top Left Cable Column Mount Two (M10 x 100 Hex Bolts
to the left Main Uprights AND the Right Top Beam and Top with Blue Dot)
Right Cable Column Mount to the Right Main Uprights using: Two (M10 x 110 Hex Bolts)
Six (M10 Flat Washers)
(Finger Tighten Only) Two (M10 Locknuts)
Step 8: Attach the Top Weight Stack Mount to the Rear Main Two (M10 x 100 Hex Bolts
Uprights using: with Blue Dot)
Two (M10 x 110 Hex Bolts)
Six (M10 Flat Washers)
(Finger Tighten Only) Two (M10 Locknuts)
Step 9: Install the M12 x 25 hex bolt in the top of the One (M12 x 25 Hex Bolt)
Row Pulley Mount and adjust it to it’s minimum height. One (M10 x 45 Hex Bolt)
Attach the Top Weight Stack Mount to the Row Pulley Two (M10 Flat Washers)
Mount with the M10 x 45 hex bolt. Insert this bolt from One (M10 Locknuts)
front to go out the back, using:
(Wrench Tighten Steps 1 - 9)
Page 9
Left Top Beam
Top Weight
Stack Mount

Lat Attach Bracket,
Upper and Lower
Lat Attachment
3 ½” Dia. Pulleys
Step 10
2 - M10 x 155 Hex Bolts
1 - M10 x 105 Hex Bolt
6 - M10 Flat Washers
3 - M10 Locknuts
Step 10: Assure the M12 Hex Bolt from STEP 9 is installed in the top of the Row Pulley Mount and
adjusted to the minimum height. Attach the Lat Attachment and two 3 ½” diameter pulleys to
the top of the Weight Stack Mount and Rear Cross Brace using:
Two (M10 x 155 Hex Bolts)
One (M10 x 105 Hex Bolt)
Six (M10 Flat Washers)
Three (M10 Locknuts)
2 - M10 x 60 Button Head Bolts
2 - M10 x 25 Hex Bolts
8 - M10 Flat Washers
4 – M10 Locknuts
Now install two Brackets supporting the Lat Attachment to Pull Up Cross Brace with the Button Head
Bolts, pointing up through the Pull Up Cross Brace. Use M10 x 60 Button Head Bolts with the locknut
on top of the Lat Attachment. Use the M10 x 25 Hex Bolts to secure the height adjustment of the
brackets together using: Two (M10 x 60 Button Head Bolts)
Two (M10 x 25 Hex Bolts)
Eight (M10 Flat Washers)
Four (M10 Locknuts)
(Wrench Tighten Now)
Note: Adjust the M12 x 25 Hex Bolt in the top of the Row Pulley Mount up
to support the load of the Lat Attachment.
Page 10
Rear Cross Brace

Step 10: Lat Attachment, Low Profile Option
For a lower profile machine, remove the two
Brackets and bolt the Lat Attachment directly One (M10 x 95 Button Head Bolt)
to the Pull-Up Cross Brace with one M10 x 95 Two (M10 Flat Washers)
Button Head Bolt, pointing up through it using: One (M10 Locknuts)
(Wrench Tighten Now)
Step 11
2 - M8 x 25 Hex Bolts
4 – M8 flat Washers
2 – M8 Locknuts
2 - M12 x 30 Hex Bolts
4 - M12 Flat Washers
2 - M12 Locknuts
Pull Up Bar
Step 11: Attach the Pull-Up Bar to the Lat Attachment using: Two (M12 x 30 Hex Bolts)
Four (M12 Flat Washers)
Two (M12 Locknuts)
Two (M8 x 25 Hex Bolts)
Four (M8 Flat Washers)
Two (M8 Locknuts)
(Wrench Tighten Now)
Page 11

Step 12
4 - M10 x 60 Hex Bolts, Blue Dot
4 - M10 x 95 Hex Bolts
12 - M10 Flat Washers
4 - M10 Locknuts
Step 12: Attach four Guide Rods to the Weight Stack Four (M10 x 95 Hex Bolts)
Mount using: Eight (M10 Flat Washers)
Four (M10 Locknuts)
(Wrench Tighten Now)
Attach two Shroud Plate Spacers and two Shroud Mount Four (M10 x 60 Hex Bolts
Plates to the Weight Stack Mount using: with Blue Dot)
Four (M10 Flat Washers)
NOTE: Be sure smooth flat side of plate is on top and
the single hole is to the back of the machine.
(Finger Tighten Only)
Page 12
Weight Stack
Mount
Guide Rods
Shroud Plate Spacers
Shroud Mount Plates
NOTE: The back side of the Shroud
Mount Plate has only one hole.

Step 13
Selector Stem/Top Weight Assembly
Front of Weight Plate has recessed area for
Weight Plate Number Stickers
Weight Plate
Bottom of weight plate has three feet
Top Weight Pulley and M12 Jam Nut
Rubber Donuts
Weight Stack Risers
Shroud Plates
NOTE: Before beginning Step 13: If optional 200 lb. heavy stack is being assembled, eliminate the
Weight Stack Risers. This space will be taken up by 5 extra Weight Plates.
Step 13: Slide Weight Stack Risers down the Guide Rods and onto the Shroud Plates. Next, slide the
Rubber Donuts down the Guide Rods until sitting on the Weight Stack Risers. Slide each Weight
Plate down the Guide Rods until all 15 Weight Plates (20 Plates for heavy stack) are resting on
the Rubber Donuts. Be sure that all Weight Plates are facing toward front of the machine. Front
Of Weight Plate is indicated by recessed area for weight stack numbers. Next, slide Selector
Stem/Top Weight Assembly down the Guide Rods and onto Weight Stack.
Repeat with the second Weight Stack.
Attach the Top Weight Pulley Assemblies and Jam Nuts on the Selector Stems, verifying that bolts
are threaded completely into the Selector Stems with Locknuts on the Pulleys bolts facing towards
front of the gym using:
Two (M12 Jam Nuts)
(Wrench Tighten Jam Nuts)
IMPORTANT! Top Weight Pulley Assemblies must be fully threaded into the Weight Stack
Selector Stems with the Jam Nuts tightened securely before use. Failure to do so may
cause the Pulley Assemblies to come loose from weights and can cause injury.
Page 13

Weight Stack Shroud Mounts
Step 14
4 - M10 x 45 Hex Bolts
8 - M10 Flat Washers
4 - M10 Locknuts
Step 14: Install the two Weight Stack Shroud Mounts. One at a time, Four (M10 x 45 Hex Bolts)
position the Weight Stack Shroud Mounts at the top of the Eight (M10 Flat Washers)
Guide Rod pairs. Slide these down the Guide Rods and Four (M10 Locknuts)
secure in position using:
(Wrench Tighten Steps 12 And 14 Now)
Page 14

Right Cable
Column Slider
Right Top Cable Column Mount Left Top Cable Column Mount
Step 15
4 - M10 x 60 Hex Bolts
8 - M10 Flat Washers
4 - M10 Locknuts
Left Cable Column Slider
Cable Column Tubes
Lower Right Cable Column Mount Lower Left Cable Column Mount
Step 15: Identify one of the Cable Column Tube’s upper end,
(the
end with the slotted holes). Assemble the Right Cable
Column Slider onto the Cable Column Tube. Make sure the
Pop-pin aligns with the holes in the tube. Attach the Right Two (M10 x 60 Hex Bolts)
Cable Column Tube Assembly to the Right Upper and Lower Four (M10 Flat Washers)
Cable Column Mounts using: Two (M10 Locknuts)
Repeat the procedure for the Left Cable Column Assembly Two (M10 x 60 Hex Bolts)
Using: Four (M10 Flat Washers)
Two (M10 Locknuts)
NOTE: Make sure all four bolts are installed from the front to the back as shown.
(Wrench Tighten All Previous Steps Now)
Page 15

Pulley #2
Pulley #1
Pulley #4
Pulley #7
Step 16
1 - Upper Cable
1 - 3 ½” Dia. Pulley
1 - M10 x 70 Hex Bolt
2 - 1/2” Step Spacers
Upper Cable inside tube
1 - M10 Locknut
Pulley #3
Start Upper Cable here
Floating Pulley Assy.
Cable End Detail
1 - Plastic Ball
1 - “U” Bracket
1 - Spring Clip
1 - M6 x 20 Button Head Bolt
1 - M6 Flat Head Nut
Step 16: Select one of the Upper Cables. Position the Left Cable Column Slider Assembly at a comfortable
working height. Slide the retainer “O” Ring up the cable about 3 inches from the cable end for
installation (this allows the cables to feed through their routings easier). Remove one Jam Nut from
the cable bolt and insert the cable bolt, threaded end down, through the bracket on the Cable Column
Slider Assembly. Return the Jam Nut to the cable bolt (below the bracket) to secure it on the Left
Cable Column Slider Assembly. Continue feeding the cable up around Pulley #1, into and through the
Left Top Beam, going out at the rear. Make sure you route the cable to the correct side of all cable
guides and pins. Failure to route the cable properly will result in damage to the cable. Now route the
cable over Pulley #3 and down through the Floating Pulley with Guide Bushing, Pulley #4. Make sure
the Guide Bushing is facing towards the rear of the machine. Route the cable up over Pulley #5 and
Pulley #6 and down to the Weight Stack Top Pulley #7. Route the cable up over Pulleys #8 and #9
and then down through the second Floating Pulley #10. Complete the cable routing going up over
Pulley #11 at the rear of the Lat Attachment and forward out through the Swivel Pulley Assembly at
the front of the Lat Attachment. Attach Cable End by placing one Plastic Ball on the end of the cable,
next slide the end of the cable into the slot of the Cable “U” Bracket. Attach the Spring Clip to the “U”
Bracket using a M6 x 20 Button Head Bolt and M6 Flat Head Nut. Slide the retainer “O” Ring tight
against the Plastic Ball. Finally, install Pulley #2 in the Top Beam per above detail using:
One (M10 x 70 Hex Bolt) One (Plastic Ball)
Two (1/2” Step Spacers) One (“U” Bracket)
One (M10 Locknut) One (Spring Clip)
One (M6 x 20 Button Head Bolt)
One (M6 Flat Head Nut)
(Wrench Tighten Now)
Page 16
Cable End
Floating Pulley Assy. with
Guide Bushing
Cable Column
Slider Assy.
Upper Cable inside Left Top
Beam tube
Pulleys #8 and #9
Floating Pulley Assy.
Pulley #10
Pulleys #5 and #6

Step 17
1 - Upper Cable
1 - 3 ½” Dia. Pulley
1 - M10 x 70 Hex Bolt
2 - 1/2” Step Spacers
1 - M10 Locknut
Cable End detail
1 - Plastic Ball
1 - “U” Bracket
1 - Spring Clip
1 - M6 x 20 Button Head Bolt
1 - M6 Flat Head Nut
Step 17: Install the Upper Cable on the right side of the machine. Repeat the installation sequence in
Step 16, but this time on the right side of the machine using:
One (Upper Cable) One (Plastic Ball)
One (3 ½” Dia. Pulley) One (“U” Bracket)
One (M10 x 70 Hex Bolt) One (Spring Clip)
Two (1/2” Step Spacers) One (M6 x 20 Button Head Bolt)
One (M10 Locknut) One (M6 Flat Head Nut)
(Wrench Tighten Now)
Page 17
Pulley #3
Pulley #2
Floating Pulley Assy. with
Guide Bushing
Start cable here
Cable Column
Slider Assy.
Pulley #4
Cable inside tube
Pulleys #5 and #6
Pulleys #8 and #9
Pulley #7
Floating Pulley Assy.
Pulley #10
Cable End
Pulley #1
Pulley #11
/