
Leica MZ16 F
User manual

Leica MZ16 F – User manual 22 Leica MZ16 F – User manual
Dear User,
We thank you for your faith in our product, and
hope it brings you both enjoyment and success.
With the new fully apochromatic Leica MZ16 F
from Leica Microsystems, you have purchased the
best-performing, manual fluorescence stereomi-
croscope on the market. The Leica MZ16 F and its
motorized counterpart, the Leica MZ16 FA, provide
the greatest zoom (16:1), the highest resolution (up
to 840 Lp/mm), the highest magnification (115× with
standard optics), the largest numerical aperture
(0.14), a patented illumination and filter system for
the most intense fluorescence, and the innovative
HL RC
TM
high-performance transmitted-light base
for excellent contrast.
The entire imaging system, including the 16:1
zoom, objective and ErgoTube
®
is apochromati-
cally corrected using with much technological
effort. Contrast, sharpness, richness in detail,
resolution, image and color fidelity are optimum.
In addition, the patented illumination beam path
guarantees at every zoom level that light utiliza-
tion is at a maximum and that fluorescence
images are intensely luminous on a jet black
background.
In developing our instruments, we place great
value on simple, self-explanatory operation. How-
ever, please take the time to read the user manual
and the operating safety information so that you
can become familiar with the advantages and fea-
tures of your Leica MZ16 F high-performance
stereomicroscope, so that you can use it optimally
and safely.
Should you ever have any questions, please con-
sult your local Leica representative. You will find
the address of your nearest local representative,
as well as valuable information about Leica
Microsystems products and services, from
Leica Microsystems on our web site at
www.leica-microsystems.com. We are gladly at
your service. Customer service is a big thing with
us. Not only before the sale, but afterwards as
well.
Leica Microsystems (Switzerland) Ltd.
Stereo & Macroscope Systems
www.stereomicroscopy.com

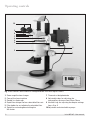
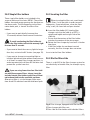
3 Leica MZ16 F – User manual
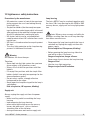
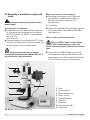
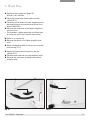
Operating controls
1 Zoom magnification changer
2 Coarse/fine focusing drive
3 Double iris diaphragm
4 Rapid filter changer for four selectable filter sets
5 Filter holder for an individually selectable filter
6 Switch for activating/deactivating the
UV shutter
7 Trinocular video/phototube
8 Adjustable tubes for adjusting the
interpupillary distance from 52mm–76mm
9 Knurled rings for adjusting the diopter settings
from +5 to –5
10 Adjustable and attachable eyecups
7
6
4
3
5
1
2
10
9
8
Fig. 1 Leica MZ16 F with trinocular video/phototube and Leica digital camera

Page
4. Operation . . . . . . . . . . . . . . . . . . . . . . . . . . . . . .18
4.1 Description . . . . . . . . . . . . . . . . . . . . . . . . . . . . 18
4.1.1 Fluorescence technology . . . . . . . . . . .18
4.1.2 Functional principle . . . . . . . . . . . . . . . .18
5. Functions . . . . . . . . . . . . . . . . . . . . . . . . . . . . . .18
5.1 Stereomicroscope settings
and adjustments . . . . . . . . . . . . . . . . . . . . . . . .18
5.1.1 Observation without fluorescence . . . .19
5.1.2 Double iris diaphragm . . . . . . . . . . . . . .19
5.2 Commissioning the fluorescence system . .20
5.3 Rapid filter changer . . . . . . . . . . . . . . . . . . . . .20
6. Work flow . . . . . . . . . . . . . . . . . . . . . . . . . . . . .21
7. Appendix . . . . . . . . . . . . . . . . . . . . . . . . . . . . . .22
7.1 Filter sets . . . . . . . . . . . . . . . . . . . . . . . . . . . . . .22
7.2 Technical data . . . . . . . . . . . . . . . . . . . . . . . . .23
7.3 Optical data . . . . . . . . . . . . . . . . . . . . . . . . . . .27
7.4 Dimensions . . . . . . . . . . . . . . . . . . . . . . . . . . . .28
Page
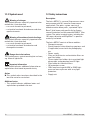
1. Safety concept . . . . . . . . . . . . . . . . . . . . . . . . . .5
1.1 The user manual . . . . . . . . . . . . . . . . . . . . . . . . .5
1.1.1 Diagrams . . . . . . . . . . . . . . . . . . . . . . . . . . .5
1.1.2 Symbols used . . . . . . . . . . . . . . . . . . . . . .6
1.2 Safety instructions . . . . . . . . . . . . . . . . . . . . . . .6
1.3 Light source . . . . . . . . . . . . . . . . . . . . . . . . . . . . .9
2. Overview of the instrument . . . . . . . . . . . . . .10
3. Assembly . . . . . . . . . . . . . . . . . . . . . . . . . . . . . .12
3.1 Assembly sequence . . . . . . . . . . . . . . . . . . . .12
3.1.1 Expansion diagram . . . . . . . . . . . . . . . . .13
3.2
Assembly of stereomicroscope with stand
. .14
3.3 Additional components . . . . . . . . . . . . . . . . . .15
3.3.1 Video/phototube . . . . . . . . . . . . . . . . . . .15
3.4 Light source . . . . . . . . . . . . . . . . . . . . . . . . . . . .15
3.4.1 Lamp housing 106 z . . . . . . . . . . . . . . . . .15
3.4.2 Supply units . . . . . . . . . . . . . . . . . . . . . . .15
3.5 UV protection screen . . . . . . . . . . . . . . . . . . . .16
3.6 Equipping the filter changer . . . . . . . . . . . . . .16
3.6.1 Filter sets for fluorescence . . . . . . . . . .16
3.6.2 Simple filter holders . . . . . . . . . . . . . . . .17
3.6.3 Inserting the filter . . . . . . . . . . . . . . . . . .17
3.6.4 Slot for filter slide . . . . . . . . . . . . . . . . . .17
4 Leica MZ16 F – User manual
Contents

Leica MZ16 F – User manual 5Leica MZ16 F – Safety concept
5
1. Safety concept
1.1 The user manual
Included with your Leica MZ16 F fluorescence
stereomicroscope is an interactive CD-ROM with
all pertinent user instructions in German, English,
French, Spanish, Italian, Portuguese, Dutch, Dan-
ish, Swedish, Finnish and Greek. Keep it in a safe
place, and readily accessible to the user. User
manuals and updates are also available for you to
download and print from our web site at
www.stereomicroscopy.com.
The Leica MZ16 F is the manual fluorescence
stereomicroscope of the Leica M stereomicro-
scope series. This operating manual describes
the special functions of the Leica MZ16 F and
important instructions for its operational safety,
maintenance, and accessories. Like all instru-
ments of the Leica M stereomicroscope series,
the Leica MZ16 F consists of modules, which
allow an almost unlimited variety of custom
equipment configurations. The identical modules,
such as stands, binocular tubes, accessories, etc.
are described in User Manual M2-105-0 for
Leica M stereomicroscopes, which also contains
additional safety instructions pertaining to the
stereomicroscope, accessories and electrical
accessories, as well as care instructions.
Special manuals are provided for a number of
accessories:
– User Manual M2-216-1 for lamp housing with
high-pressure mercury burner.
– User Manual for ebq 100 isolated
supply unit for 100W high-pressure
mercury burners.
– User Manual M2-267-1
for the motorized focus system.
– User Manual M2-166-2 for
FluoCombi III
TM
Before installing, operating or using the
instruments, read the user manuals listed above.
In particular, please follow all safety instructions.
To maintain the unit in its original condition and to
ensure safe operation, the user must follow the
instructions and warnings contained in these user
manuals.
1.1.1 Diagrams
(1.2) Numbers in parentheses within the descrip-
tions refer to diagrams and the items in these
diagrams. Example (1.2):
Figure 1 is located on page 3, and item 2 is the
focusing drive.

6 Leica MZ16 F – Safety concept
1.1.2 Symbols used
Warning of a danger
This symbol indicates especially important infor-
mation that, if not observed,
– can cause hazards to personnel,
– can lead to functional disturbances and dam-
aged instruments.
Warning of hazardous electrical voltage
This symbol indicates especially important infor-
mation that, if not observed,
– can cause hazards to personnel,
– can lead to functional disturbances and
damaged instruments.
Danger due to hot surface
This symbol warns against touching hot surfaces,
e.g. those of light bulbs.
Important information
This symbol indicates additional information or
explanations that intend to provide clarity.
Action
왘 This symbol refers to actions described in the
text that are to be carried out.
Additional notes
• This symbol indicates additional notes and
explanations provided in the text.
1.2 Safety instructions
Description
The Leica MZ16 F is a manual fluorescence stere-
omicroscope with 16:1 zoom for fluorescence
applications. The optics system consists of
two observation beam paths, a patented Triple-
Beam
®
third beam path specifically for fluores-
cence illumination and the patented FLUOIII
®
filter
system. The entire imaging system, including the
16:1 zoom, objective and ErgoTube
®
is apochro-
matically corrected.
The Leica MZ16 F consists of these modules:
– Stereomicroscope
– Stand, binocular tube, objective, eyepieces and
(if applicable) accessories for photography,
etc.
– Power supply
– Filter sets with barrier and excitation filters on
one filter holder
– Three simple filter holders for transmitted light
observation and protection from UV light
– Filter holder for individual filters
– UV protection screen
– 106 z lamp housing with 50W or 100W high-
pressure mercury burner with stray-light
protection
– Supply unit

Leica MZ16 F – User manual 7Leica MZ16 F – Safety concept
Permitted uses
With the Leica MZ16 F fluorescence stereomicro-
scope, entire fluorescent specimens can be
examined three-dimensionally and unprepared,
manipulated, sorted and documented. The sepa-
rate beam path for the fluorescence illumination
in the Leica MZ16 F as well as the very bright
high-pressure mercury burner and specially
selected filter sets enable you to distinguish the
finest structures and enhance the quantity of
information for incident light fluorescence. Spe-
cial filter holders also enable observation without
fluorescence in transmitted light or incident light.
Non-intended use
If the Leica MZ16 F, its components and acces-
sories are used other than as described in the
user manual, injury or property damage may
occur.
Never:
– install other plugs or cables.
– change, rebuild or take apart parts, if not
specifically instructed to in this manual.
– allow unauthorized persons to open parts.
– use the MZ16 F for examining, or operating on
the human eye.
The devices and accessories described in this
User manual have been tested for safety and
potential hazards. The responsible Leica affiliate
or the main plant in Wetzlar must be consulted
whenever the device is altered, modified or used
in conjunction with non-Leica components that
are outside of the scope of this manual.
Unauthorized alterations to the device or noncom-
pliant use shall void all rights to any warranty
claims!
Place of use
– The Leica MZ16 F may only be operated in a
closed, dust-free room, which is free of oil
vapors and other chemical vapors, as well as
extreme humidity, and within a temperature
range of +10 to +40.
– Electrical components must be assembled at
least 10 cm away from the wall and from flam-
mable substances.
– Large temperature fluctuations, direct sunlight
and vibrations should be avoided. These condi-
tions can distort measurements and micro-
graphic images.
– Stereomicroscopes in warm and warm-damp
climatic zones require special care in order to
prevent the build up of fungus.
Responsibilities of the person(s) in charge of
instrument
Ensure that
– the Leica MZ16 F and accessories are oper-
ated, maintained and repaired only by autho-
rized and trained personnel.
– the operating personnel has read, understands,
and is observing these instructions as well as
those listed on page 5, and, in particular, the
safety instructions.
Transport
– Use the original packaging for shipping or
transporting the stereomicroscope and its
accessory components.
– In order to prevent damage from vibrations,
disassemble all moving parts that (according to
the user manual) can be assembled by the cus-
tomer and pack them separately. These include
the objective, binocular tube, eyepieces, lamp
housing, burner in the 106 z lamp housing, etc.

8 Leica MZ16 F – Safety concept
Repairs and servicing
– Only Leica Microsystems-trained service tech-
nicians, or technical specialists assigned by
the person in charge of the instrument, are
permitted to carry out repairs.
– Only original Leica Microsystems spare parts
may be used.
– Disconnect the power cable before opening
voltage-carrying parts such as the power
supply or the supply unit.
Touching the live circuit can cause injury.
Installation in third-party products
When installing Leica products into third-party
products, note the following:
The manufacturer of the complete system or its
dealer is responsible for following all applicable
safety instructions, laws and guidelines.
Disposal
– The product must be disposed of in accordance
with locally applicable laws and regulations.
– Dispose of used high-pressure mercury burn-
ers as hazardous waste.
Legal requirements
Adhere to general and local regulations relating to
accident prevention and environmental protec-
tion.
Conformity with European Community directive
The Leica MZ16 F and its accessories are con-
structed in accordance with the latest technolo-
gies and are provided with a statement of confor-
mity with EC requirements.
Health risks
Workplaces with stereomicroscopes both
improve and make visual tasks easier, but they
also place high demands on the human visual
apparatus and the muscular "holding apparatus"
of the user. Depending on the duration of uninter-
rupted work, asthenopia and musculoskeletal
problems may occur. For this reason, appropriate
measures for reduction of the workload must be
taken:
– optimal arrangement of workplace, work
assignments and work flow (changing tasks
frequently).
– thorough training of the personnel, giving
consideration to ergonomic and organization
aspects.
The ergonomic design and construction of
Leica M series stereomicroscopes are intended
to reduce the exertion of the user to a minimum.
Direct contact with eyepieces is a potential
transmission method for bacterial and viral infec-
tions of the eye.
The risk can be kept to a minimum by using per-
sonal eyepieces for each individual or detachable
eyecups.

Leica MZ16 F – Safety concept 9
1.3 Light source: safety instructions
Precautions by the manufacturer
– UV protection screen in front of the specimen
plane prevents the user from looking directly
into the UV rays.
–
Simple filter holders (that have only two open-
ings for the observation beam paths) in the avail-
able positions of the rapid filter changer prevent
direct UV radiation from reaching the eyes.
– UV shutter (which can be activated/deacti-
vated) prevents direct UV radiation from reach-
ing the eyes.
– UV filters in the observation beam path protect
the eyes.
– The stray-light protection on the lamp housing
prevents irradiation of the hands.
Warning
UV radiation can harm the eyes.
Therefore:
– Never look into the light spot on the specimen
plane without a UV protection screen.
– Always fill all of the filter positions with filter
holders.
– Fill empty filter positions with the simple filter
holders (which have only two openings for the
observation beam paths).
– Do not select a white, strongly reflective
background for the stage.
– Never open the lamp housing while the lamp is
switched on.
Risk of explosion, UV exposure, blinding!
Supply unit
Always unplug the supply unit from the power
supply:
– when installing and disassembling the lamp
housing
– before opening the lamp housing
– when replacing the high-pressure mercury
burner and other parts, such as the heat-
absorbing filter or the collector
– during maintenance work on the supply unit.
Lamp housing
The Leica MZ16 F may be used only together with
the Leica 106 z lamp housing for the 100W or 50W
mercury burner, supply unit and stray-light protec-
tion.
Leica Microsystems accepts no liability for
damages resulting from the use of lamp housings
from other manufacturers.
– Never open the lamp housing while the lamp is
switched on. Unplug the supply unit from the
power supply:
Risk of explosion, UV exposure, blinding!
– Before opening the lamp housing, allow it to
cool off for at least 15 minutes.
Danger of explosion, danger of burns.
– Never cover the air duct on the lamp housing.
Danger of fire!
– Use the stray-light protection.
Danger to eyes from UV radiation.

10 Leica MZ16 F – Overview of the instrument
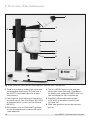
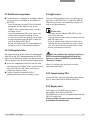
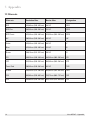
2. Overview of the instrument
1 Stand (transmitted or incident light stand with
corresponding illumination). Pictured here is
the HL RC™ transmitted-light base for best
relief contrast.
2 Focusing drive: (pictured) manual coarse/fine
drive with column (see User Manual M1-105-0)
or motorized focus system (see User Manual
M2-267-1)
3 Microscope carrier or FluoCombi™ (changer
for one planapochromatic and one HR micro-
scope objective)
Fig. 2 Left side of the Leica MZ16 F with ErgoTube
®
from the user’s perspective
4 The Leica MZ16 F optics carrier with two
observation beam paths and a TripleBeam
®
third beam path, motorized FLUOIII
®
filter sys-
tem and adapter for 106 z lamp housing
5 ErgoTube
®
with variable viewing angle
of 10° to 50° (pictured) or trinocular tube
(in Figure 3.5)
6 Wide-field eyepieces for persons wearing
glasses
2
12
5
4
3
9
10
13
11
1
6

Leica MZ16 F – Overview of the instrument 11
7 Filter sets: the scope of delivery includes three
simple filter holders (which have only two
openings for the observation beam paths) for
empty filter positions and transmitted or inci-
dent light observation without fluorescence.
Additionally, various filter sets of your choice
for fluorescence (excitation and barrier filter on
one filter holder) are available.
Fig. 3 Right side of the Leica MZ16 F from the user’s perspective with trinocular tube, video objective
and Leica DFC300 FX digital camera for fluorescence
8 Filter holder for an individually selectable filter,
such as a gray filter
9 Interchangeable objective planachromatic or
planapochromatic
10 UV protection screen with arm
11 Gliding stage (optional)
12 Leica 106 z lamp housing for 50W or 100W mer-
cury burner with stray-light protection (not pic-
tured)
13 Supply unit for lamp housing 106 z
13
11
9
10
3
4
7
8
5
6
1
2
12

12 Leica MZ16 F – Assembly
3. Assembly
Basic components such as the stand, column,
microscope carrier, binocular tubes and optical
accessories are, thanks to their modular design,
identical for all Leica M series stereomicro-
scopes. Therefore, for assembly instructions,
please refer to the User Manual for Leica M
stereomicroscopes, M2-105-0. The assembly of
the UV aperture protection is described in this
User Manual. The lamp housing, supply unit and
adjustment of the high-pressure mercury burner
are described in User Manual M2-216-1.
3.1 Assembly sequence
The microscope components are best assembled
in this order:
– Stand: base and column with focusing drive
(manual or motorized) and focusing stop (for
motorized focus and FluoCombi III™)
– Microscope carrier or FluoCombi III™
– Leica MZ16 F optics carrier
– Binocular or trinocular tube
– Eyepieces and eyecups
– Stage plate or special stage (gliding stage,
heating stage)
– Objective
– UV protection screen with arm
– Lamps: high-pressure mercury burner in lamp
housing; for the HL RC™ transmitted-light
stand, fiber-optic light guide with light source
– Supply unit for lamp housing
– Electrical connections (for motorized focus and
illuminators)
– Equipment of filter changer
– Equipment of the filter insert with an individual
filter, where applicable
Either the integrated clamping screws or an Allen
key is necessary for assembly; these are included
in delivery.

Leica MZ16 F – Assembly 13
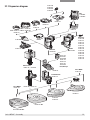
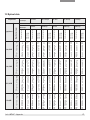
10 445 631
10 445 367 HL
10 445 363
10 445 387
10 445 822
10 446 229
Filter Sets
10 447 220
10 447 221
10 447 217
10 447 222
10 447 218
10 447 223
10 447 219
10 447 224
10 447 225
10 447 226
10 447 227
10 447 215
10 447 216
10 446 271
10 447 106 / 10 447 185
Motor focus
10 446 176 / 10 447 041
MZ16 FA
10 447 063
10 447 157
10 447 051
10 447 050
10 446 157
10 445 819
10 447 101
10 447 075
Plan/Planapo
10 446 359 HL-RC
TM
ICA 10 446 237
10 446 238
HD-50
10 446 197
10 447 080
10 446 182
10 447 160
10 445 301
10 445 302
10 445 303
10 446 301
10 446 260
RS 232
HD F 10 446 308
HD V 10 446 309
MZ16 F
10 447 064
Leica MATS
10 447 164
Leica MATS
10 447 165
106z
11 504 066
11 504 069
10 446 227
FluoCombi III
TM
10 447 324
3.1.1 Expansion diagram

14 Leica MZ16 F – Assembly
3.2 Assembly of stereomicroscope with
stand
Do not yet connect the peripherals to the
power supply!
Focusing drive ➔ stand base
왘 Fasten the manual or motorized focusing drive
(4.2) to the column according to User Manual
M2-105-0 (manual) or M2-267-1 (motorized) on
the base (4.1).
Tool: Allen key.
왘 For motorized focus and FluoCombi III™, fasten
the focusing stop to the stand column under the
focusing drive using a clamping screw.
When using the motorized focus, be certain
to read the corresponding User Manual M2 -267-1,
in particular the safety instructions.
3
1
7
4
5
6
2
8
9
Microscope carrier ➔ focusing drive
왘 Fasten the microscope carrier (4.3) to the
Leica MZ16 F according to User Manual
M2-105-0 on the focusing drive (4.2).
Tool: Allen key.
Or, if available:
왘 Fasten the FluoCombi III™ to the focusing drive
(4.2) as described in User Manual M2-166-2.
Tool: Allen key.
Optics carrier ➔ microscope carrier
The Leica MZ16 F optics carrier and the
FLUOIII
®
filter system make up a single unit,
which is factory-adjusted. They may not be taken
apart.
왘 Insert the Leica MZ16 F optics carrier (4.4)
according to User Manual M2-105-0 into the
microscope carrier (4.3) or into the FluoCombi
III™ and fasten it using a clamping screw.
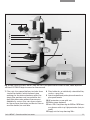
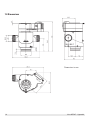
Fig. 4 Right side of the Leica MZ16 F
1 Base
2 Focusing drive
3 Microscope carrier
4 Optics carrier
5 Video/photo tube
6 Eyepiece
7 Objective
8 Lamp housing 106 z
9 Supply unit

Leica MZ16 F – Assembly 15
3.3 Additional components
왘 Fasten the other components and other individ-
ual accessories according to User Manual
M2-105-0:
– Insert the binocular tube (2.5) or the video/
phototube into the dovetail ring on the
FLUOIII
®
filter system and fasten it using a
clamping screw.
– Insert the eyepieces (4.6) in the tubes and
fasten them using the clamping screws.
– If necessary, place soft eyecups for prevent-
ing eye infections over the built-in eyecups
(see User Manual M2-105-0).
– Screw the objective (4.7) into the bottom of
the optics carrier (4.4) counterclockwise.
3.3.1 Video/photo tube
We recommend using the trinocular video/photo-
tube (4.5) or the HD-V video/phototube with 100%
light in the video/photo output, in order to achieve
shorter exposure times at low fluorescence levels.
왘 Insert the video/photo tube (4.5) into the ring
connector on the FLUOIII
®
filter system accord-
ing to User Manual M2-105-0 and fasten it
using the clamping screw.
왘 Fasten a binocular tube to the HD-V
video/photo tube using a clamping screw.
3.4 Light source
The Leica 106 z lamp housing is the light source
for the Leica MZ16 FA and is used with 100W or
50W mercury lamps, corresponding supply units
and stray-light protection.
Please read
– the separate User Manual M2-216-1 for the
Leica lamp housing
– the user manual and safety instructions for the
ebq 100 supply unit
– the user manual and safety instructions pro-
vided by the lamp manufacturer, and, in partic-
ular, the section on how to proceed if a lamp
breaks and releases mercury.
Do not switch on the supply unit until you
have read and familiarized yourself with the
functions of the Leica MZ16 F, provided in the
"Operation" chapter.
After it is switched on, the burner must be
adjusted immediately.
3.4.1 Lamp housing 106 z
Fasten the 106 z lamp housing (4.8) to the adapter
part as described in User Manual M2-216-1.
3.4.2 Supply units
The supply unit for 50W mercury lamps is
described in User Manual M2-216-1.
The 100W mercury lamps are powered by the ebq
100 (4.9) supply unit.
Please read the separate instruction manual
provided by the manufacturer.

16 Leica MZ16 F – User manualLeica MZ16 F – Assembly
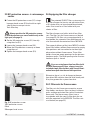
3.5 UV protection screen ➔ microscope
carrier
왘 Fasten the UV protection screen (5.1) using a
hexagon-head screw (5.3) to the left or right
side of the microscope carrier.
Tool: Allen key.
Always position the UV protection screen
so that the operator can never look directly at the
light spot (see page 9):
왘 Set the UV protection screen (5.1) laterally
using the arm (5.2).
왘 Loosen the hexagon-head screw (5.3).
왘 Move the UV protection screen up or down
using the arm.
왘 Tighten the hexagon-head screw (5.3).
3.6 Equipping the filter changer
The patented FLUOIII
®
filter system consists
of a filter changer for barrier and excitation filters,
a UV shutter that can be activated/deactivated,
and a filter insert for a filter holder with your
choice of filter.
The filter changer can hold a total of four filter
sets. The filter sets for fluorescence are labeled
(see page 22). All filter sets are equipped with a
transponder for automatic filter detection and can
also be used with the motorized Leica MZ16 FA.
The scope of delivery of the Leica MZ16 F includes
three filter holders without fluorescence for empty
filter positions and transmitted or incident light
observation without fluorescence. These filter
holders have two empty openings for the observa-
tion beam paths. The third opening to the illumina-
tion beam path is closed.
If you are using fewer than four filter hold-
ers with fluorescence filters, always insert the
included simple filter holders with closed illumi-
nation beam path into the available positions.
Otherwise, there is a risk of danger to the eyes
from direct UV radiation from the third beam path.
Also, they protect the system from dust.
3.6.1 Filter sets for fluorescence
The filter sets for fluorescence contain, on one
filter holder, two barrier filters to the visual beam
paths and one excitation filter to the illumination
beam path. The fluorescence filters have a
transponder with the specific filter data for use
with the motorized Leica MZ16 FA. The filter sets
are labeled (see page 22).
3
2
1
Fig. 5 UV protection screen
1 UV protection screen
2 Arm
3 Hexagon-head screw

Leica MZ16 F – User manual 17Leica MZ16 F – Assembly
1
2
3.6.2 Simple filter holders
Three simple filter holders are included in the
scope of delivery of the Leica MZ16 F. These filter
holders have two empty openings for the observa-
tion beam paths. The third opening, to the illumi-
nation beam path, is closed. Use these filter
holders
– if you want to work briefly (no more than
15 seconds) without fluorescence illumination.
To avoid overheating the filter holder, do
not use the filter holder to block the mercury light
for more than 15 seconds.
– If you want to block the mercury light for longer
than that, activate the UV shutter (see page 19).
– if you want to change to transmitted light or
incident light observation without fluorescence.
– at all times in empty filter changer positions, in
order to protect yourself from UV radiation and
protect the system from dust.
If you are using fewer than four filter hold-
ers with fluorescence filters, always insert the
included simple filter holders with closed illumi-
nation beam path into the available positions.
Otherwise, there is a risk of danger to the eyes
from direct UV radiation from the third beam path.
3.6.3 Inserting the filter
When inserting the filter sets, avoid touch-
ing the filters if at all possible in order to avoid
fingerprints. If you touch them, clean the filters
using a soft, lint-free cloth and pure alcohol.
왘 Insert the filter holder (6.1) into the filter
changer such that the label (e.g. GFP1) is
upright and legible on the right side of the
slide slot.
• Ensure that the contour of the filter holder
matches the contour of the microscope.
왘 Rotate the filter changer by hand until it latches
into place.
• If the filter holder has not been inserted
correctly, the filter changer does not rotate.
Insert a total of four filter holders.
3.6.4 Slot for filter slide
There is a slot (6.2) in the filter changer system for
an individually selectable filter, for example a gray
filter.
Fig. 6 Filter changer, equipped with filter holders
1 Filter changer with filter sets
2 Filter slide for filter holder with individual filters

18 Leica MZ16 F – Operation
4. Operation
4.1 Description
4.1.1 Fluorescence technology
Fluorescent substances light up (fluoresce) when
irradiated with short-wave excitation light. Fluo-
rescence technology makes use of this property
by coloring or marking certain object structures
and details that do not have their own fluores-
cence with a fluorescent dye. One such dye is
green fluorescent protein (GFP), which is used in
molecular biology.
4.1.2 Functional principle
With the Leica MZ16 F fluorescence stereomicro-
scope, entire fluorescent specimens can be
examined three-dimensionally and unprepared,
manipulated, sorted and documented. With a fully
apochromatic optics system, manual 16:1 zoom
and built-in double iris aperture, the Leica MZ16 F
is the high-performance stereomicroscope for
fluorescence applications. The patented, separate
TripleBeam
®
light path* for fluorescence illumina-
tion and the patented FLUOIII
®
filter system* pro-
vide highest-quality fluorescence images. The very
bright high-pressure mercury burner and specially
selected filter sets enable you to distinguish the
finest structures and enhance the quantity of infor-
mation for incident light fluorescence.
The FLUOIII
®
filter system consists of a rapid filter
changer for barrier and excitation filters and a fil-
ter insert for a filter holder with your choice of fil-
ter. A total of four filter sets can be used in the
rapid filter changer. The filter sets are labeled (see
table 22). An empty filter cartridge is also available
for individual filter combinations. Each filter set
includes two barrier filters to the visual beam
paths and an excitation filter to the illumination
beam path.
5. Functions
5.1 Stereomicroscope settings and
adjustments
We recommend that you first familiarize
yourself with the controls of the Leica MZ16 F in
transmitted light without the presence of fluores-
cence illumination.
After switching on the high-pressure
mercury lamp, you need to adjust the burner
immediately see User Manual M2-216-1).
Familiarize yourself with the functional elements
of the Leica MZ16 F such as the binocular tube,
eyepieces, zoom magnification changer, focusing
drive, stands etc. by referring to User Manual
M2-105-0 for Leica M stereomicroscopes. This
manual describes all settings of the stereomicro-
scope in detail. The following describes only the
functions that are specific to the Leica MZ16 F
with fluorescence system.
* Patented in EP (CH, DE, FR, GB),
other patents applied for.

Leica MZ16 F – Functions 19
5.1.1 Observation without fluorescence
The FLUOIII
®
filter system includes a UV shutter
that can be used to close the illumination beam
path. This feature protects the mercury lamp,
which should not be switched on and off too fre-
quently. If, for instance, you need to interrupt your
work, you do not have to switch off the high-pres-
sure mercury burner to preserve sensitive speci-
mens from being burned out or bleached out.
Switching the high-pressure mercury burner on
and off frequently decreases its life and causes
delays, as the lamp can only be switched back on
after it has cooled. Instead, you can close the
UV shutter and reopen it when you return to your
workplace.
Close the UV shutter:
– if you do not want to view the specimen with
fluorescence illumination, but with transmitted
light only.
– if you are taking a short break from work.
왘 Close the illumination beam path using the
switch (7.1).
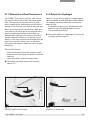
Fig. 7
1 On/off switch for UV shutter
Fig. 8
1 Double iris diaphragm
1
1
5.1.2 Double iris diaphragm
You can use the built-in double iris diaphragm to
adjust the depth of field individually. When doing
so, however, note that when you increase the
depth of field,
– the brightness decreases, and therefore the
exposure times for photography increase,
– the resolution decreases.
왘 Adjust the double iris diaphragm as necessary
using the knurled ring (8.1).

20 Leica MZ16 F – Functions
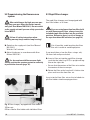
5.3 Rapid filter changer
The rapid filter changer must be equipped with
four filter holders at all times.
If you are using fewer than four filter hold-
ers with fluorescence filters, always insert the
included simple filter holders into the available
positions. Otherwise there is a risk of danger to
the eyes from direct UV radiation (see page 16).
If at all possible, avoid touching the filters
in the filter sets in order to avoid fingerprints.
If you touch them, clean the filters using a soft,
lint-free cloth and pure alcohol.
왘 Insert a filter set into the rapid filter changer
such that the label (e.g. GFP) is upright and leg-
ible on the right side.
• Ensure that the contour of the filter set matches
the contour of the microscope.
왘 Rotate the filter set by hand until it latches into
place and insert the next filter set.
Insert a total of four filter sets or the included sim-
ple filter holders into the empty positions.
5.2 Commissioning the fluorescence
system
After switching on the high-pressure mer-
cury lamp, you must adjust the burner immedi-
ately (see User Manual M2-216-1). Do not switch
on the supply unit until you can safely operate the
Leica MZ16 F.
Follow all safety instructions when
handling mercury lamps and the lamp housing!
왘 Switch on the supply unit (see User Manual
M2-216-1).
Wait for 2 to 3 minutes.
왘 Adjust the burner in accordance with User
Manual M2-216-1.
For observation with fluorescence light,
always position the aperture protection correctly
to protect the observer (page 16).
1
2
Fig. 9 Filter changer, equipped with filter holders
1 Filter sets
2 Filter slide for filter holder with individual filters
Page is loading ...
Page is loading ...
Page is loading ...
Page is loading ...
Page is loading ...
Page is loading ...
Page is loading ...
Page is loading ...
Page is loading ...
Page is loading ...
-
 1
1
-
 2
2
-
 3
3
-
 4
4
-
 5
5
-
 6
6
-
 7
7
-
 8
8
-
 9
9
-
 10
10
-
 11
11
-
 12
12
-
 13
13
-
 14
14
-
 15
15
-
 16
16
-
 17
17
-
 18
18
-
 19
19
-
 20
20
-
 21
21
-
 22
22
-
 23
23
-
 24
24
-
 25
25
-
 26
26
-
 27
27
-
 28
28
-
 29
29
-
 30
30


Ask a question and I''ll find the answer in the document
Finding information in a document is now easier with AI
Related papers
-
Leica MZ16 FA User manual
-
-
-
-
-
-
Leica Microsystems A60 S User manual
-
-
Leica Microsystems Swingarm Stands User manual
-
Other documents
-
Novus 2.8 TSS 445mm Datasheet
-
Ken A Vision SC12MH User manual
-
-
Leica Microsystems S9 E User manual
-
-
Leica Microsystems M80 User manual
-
Motic K series User manual
-
-
-