Page is loading ...

CLI-8, PGI-5 Cartridges
.
This is the refill procedure for OEM Canon CLI-8 and PGI-5 cartridges. We used the
yellow one to illustrate the instructions. They all fill the same way. Each CLI-8 refill uses
about 15 cc of ink and each PGI-5 refill used about 30 cc.
Here is what you will need to do this refill...
•
MIS Refill Kit which includes; syringe, needle, ink, yellow drill tool, rubber balls
•
Empty OEM Canon Cartridge
•
Small hammer
•
Black electrical tape
•
Newspaper and some paper towels
•
A bench to work on where no damage will be done if you spill some ink
Rubber gloves are optional (bleach and water will take ink off your hands)
Refilling Statement
The method for refilling cartridges that is outlined in this instruction set has been tested
and found to work without issue on OEM Canon CLI-8 and PGI-5 printer cartridges.
While we have had no problems refilling these cartridges please note that the ink level
monitor in the printer will need to be disabled in order to continue to print with refilled
cartridges. Each color cartridge’s ink counter will need to be disabled as it is reported
empty, and the message will not reappear for every refill there after.
It is the user's responsibility to monitor the actual ink levels and refill the cartridge when
necessary. This can be done by stopping the printer when it actually runs out of ink (no
ink is printed on the paper), refilling before every large print job to ensure no interruption
during the job, or visually inspecting the cartridge to determine the ink level. Running
this type of cartridge without ink may damage the print head in the printer.

The Troubleshooting section of your Canon manual discusses printer operation with
refilled cartridges. Canon advises that "Canon shall not be liable for any printer
malfunction or damage caused by refilled ink tanks. If you want to continue printing with
the refilled ink tank installed, press and hold the RESUME/CANCEL button for at least 5
seconds, and then release it. Using refilled ink tanks are memorized. * This operation
will release the function of detecting the remaining ink level."
*Our iP4200 has been refilled 5 times with no stoppages.
*Installing a new OEM cartridge will reactivate the ink counter for use with the new
cartridge.
Refill Instructions Canon CLI-8 and PGI-5 Inkjet Cartridges
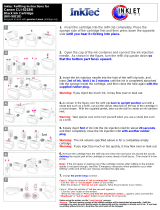
1. Scrape away the thin plastic on top of the cartridge to reveal the ball in the
reservoir section.
2. Use our black tool and a small hammer or equivalent device to push the ball into
the reservoir. It does not take much, just one sharp blow right on the plastic ball.
(See step 9 for alternative.)

3. Using our Yellow Drill Tool, make a hole in the top of the cartridge into the
sponge area.
4. Use some black electrical tape and tape over the exit port on the bottom of the
cartridge. This is so ink will not leak out when you fill the sponge section or the
reservoir section.
5. Using the syringe, inject ink into the sponge area until full. Move the needle
around into different spots in the sponge to get it totally saturated. Leave the hole
into the sponge compartment open, do not cover or block.
Next, inject ink into the reservoir area until almost full. Leave just a little air
space, so it does not overflow. This is just to keep everything from getting messy.
6. Make sure the area where the ball was, is clean and free of any chips or plastic
film. Press the black rubber replacement ball (MIS-HPBALL) into the hole where
the original ball was located. Just use your finger nail to seat the ball so it is flush
with the surface of the cartridge. Don't go too far or it will get pushed inside the

cartridge. Do not cover or plug the hole you drilled in the sponge compartment.
This is the air vent and it must be left open. Remove tape from bottom exit port.
Note: If the ball does not make a perfect air tight seal, then ink will drip out of the
cartridge at the exit port until empty. If this happens, see step 7.
7. If the cartridge is dripping, let it drip into a cup or dish until it stops. Don't keep
the exit area, where the ink comes out in contact with any paper or cloth because
it will wick all of the ink out. If it has stopped dripping, put it back in the printer
and run a cleaning cycle. If it continues to drip for a long time, you may have an
air leak around the rubber ball. Make sure the ball is not damaged or gouged. Put
a new one in if it is damaged. If you damaged the ball seat when pushing it in or
cut it somehow, it will leak air. If you can't get a good seal with the ball, add some
hot melt glue around it to help the sealing process. If you need more of the rubber
balls (MIS-HPBALL), you can order them from the
accessory page.
8. The next time you are ready to refill you can reuse the rubber ball if you carefully
spear it from the side and remove it with a bulletin board stick pin. Don't push
down on the ball or it will pop into the reservoir area. This is not a problem, it just
means you will have to have another ball to seal the hole. If you are careful you
can reuse the rubber ball 3 or 4 times.
9. As an alternate procedure you can drill into the reservoir area, inject the ink and
then use hot melt glue to seal the hole AIR TIGHT. If you don't like drilling, then
try a heated paper clip to melt a hole in the reservoir. Hold it with pliers and heat
with a lighter or torch.
If your cartridge drips for a long time after refilling, this means there is an air leak
in the reservoir section.
/