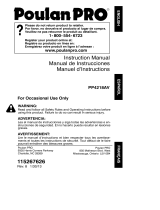
W ARNING:
Read and follow all Safety Rules and Operating Instructions before
using this product. Failure to do so can result in serious injury .
ADVERTENCIA:
Lea el manual de instrucciones y siga todas las advertencias e
instrucciones de seguridad. El no hacerlo puede resultar en lesiones
graves.
AVERTISSEMENT:
Lire le manuel d’instructions et bien respecter tous les avertisse-
ments et toutes les instructions de sécurité. Tout défaut de le faire
pourrait entraîner des blessures graves.
ENGLISH ESPAÑOL
FRANÇAIS
ES400
Poulan
7349 Statesville Road
Charlotte, NC 28269
Poulan
850 Matheson Blvd. West
Mississauga, Ontario L5V 0B4
115259926 Rev. 2 4/15/10 BRW
Instruction Manual
Manual de Ins trucciones
Manuel d’Instructions
R
Please do not return product to retailer.
Por favor, no devuelva el producto al lugar de compra.
Veuillez ne pas retourner le produit au détaillant.
1--800--554--6723
www.poulan.com
Register your product online at:
Registre su producto en línea en:
Enregistrez votre produit en ligne à l’adresse :

2
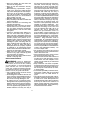
SAFETY RULES
WARNING: When using electric
gardening appliances, basic safety pre-
cautions must always be followed to re-
duce the risk of fire, electric s hock , and
serious injury. Read and follow all
instructions.
WARNING: Always disconnect
power source when making repairs, ad-
justments, and when changi ng accesso-
ries and atta chm e nts such as saw bar,
chain or guards.
Because a chain saw is a high-speed
woodcutti ng tool, special precauti ons
must be observed to reduce ri sk of acci-
dents. Car eless or improper use of this
tool can cause serious injur y.
PLAN AHEAD
S Rest r ict the use of your saw to adult us-
ers who understand and can follow the
saf ety rules, precautions, and operat ing
instr uct i ons found in this manual.
S Dress properly. Wear protective gear.
Always us e steel-toed safety footwear
with non-slip so les; snug-fitting cloth-
ing; heavy -duty, non-slip gloves; eye
protection such as non-fogging,
vented goggles or face screen; an ap-
proved safety hard hat; and sound
barriers (ear plugs or mufflers) to pro-
tect your hearing. Regular users
should have hearing checked regular-
ly as chain saw noise can damage
hearing.
Snug
Fitting
Clothing
Safety
Shoes
Safety Chaps
Heavy Duty
Gloves
Eye
Protection
Hearing
Protection
Safety Hat
S Secure hair above shoulder length. Do
not wear loose clothing or jewelr y; they
can get caught in moving parts.
S Keep all parts of your body away from
the chain when saw is running.
S Keep child r en away. Do not let visit or s
cont act chain saw or extension cord . All
visit ors should be kept at least 30 feet
(10 meters) away from work area.
S Do not handle or oper ate a chain saw
when you are fatigued, ill, upset, or if you
have taken alcohol, drugs, or medica-
tion. You must be in good physical con-
diti on and mentall y aler t . I f you have any
condition that might be aggravated by
strenuous work, check with doctor be-
fore operating. Wat ch what you are do-
ing. Use common sense.
S Do not st ar t cutting unt il you have a clear
work area, secure footi ng, and especial-
ly if you are felling a tree, a retreat path.
Keep work area clean.
OPERATE YOUR SAW SAFELY
S Do not operat e with one hand. Serious
injury to the operator , helpers, or by-
standers may result from one-handed
operati on. A chain saw is intended for
two-handed use.
S Do not operate saw from a ladder or i n a
tree.
S Make sure the chain will not make con-
tact wit h any object while star t i ng the
saw. Never start the saw when the
guide bar is in a cut.
S Do not force chain saw . It will do the job
better and safer at the rate for which it
was intended.
S Do not put pressure on the saw, espe-
cially at the end of the cut. Doing so can
cause you to l ose contr ol when the cut is
completed.
S Stop the saw before setti ng it down.
S Hand carry saw only when motor is
stopped. Carry t he chain saw by the
front handle wit h t he saw stopped, finger
of f the swit ch, the guide bar and saw
chain to the rear.
S Use the rig ht tool, cut wood only. Don’t
use chain saw for purpose not intended;
for example, don’t use chain saw for cut-
ting plastic, masonry, non-wood buil ding
materi als.
S Do not operate a chain saw that is dam-
aged, improperly adjusted, or not com-
pletel y and securely assembled. Al-
ways replace bar , chain, hand guard, or
othe r part s im m ediatel y if they become
damaged, broken, or are otherwi se re-
moved.
S Insp ect chain saw cor ds perio dical ly
and if damaged, have repai red by an
authori zed service dealer.
MAINTAIN YOUR SAW IN GOOD
WORKING ORDER
S Have all chain saw service per f ormed
by an author ized servi ce deal er except
the items listed in the
MAI NT ENA NCE
section of this manual.
S Make cert ain saw chain stops moving
when tr i g ger swit c h is rel ease d.

3
S Keep the handles dry and clean and
fr ee from oil and grease.
S Keep oil cap and fasteners securely
tightened.
S Nonconformi ng r eplacement compo-
nents or the removal of safety devices
may cause damage to the unit and pos-
sible injur y to the operator or bystand-
ers. Use only Poulan accessor ies and
repl acement part s as recommended.
Never modif y your saw.
S Maintain chain saw with care.
S Keep unit sharp and clean for better and
saf er perfo rmance.
S Follow instructions for lubricating and
changing accessories.
S Unplug the chain saw from the power
source when not in use, before servic-
ing, and when changing accessories
and att achments, such as saw chain
and guard.
S Check for damaged parts. Before fur-
ther use of the chain saw, a guard or
other part that i s damaged should be
carefully checked to determine that it will
operate properl y and perform its in-
tended functi on. Check for alignment of
moving parts, binding of moving parts,
bre aka ge of part s, mount ing and any
other conditi ons that may aff ect its op-
erati on. A guard or ot her part that is
damaged should be properly repair ed
or replaced by an authorized ser vice
dealer unless otherwise indicated else-
where in the instruct i on manual.
S When not in use, chain saws should be
stor ed in a dry, high or locked-up place
out of the reach of childr en.
S When stori ng saw, unplug and use a bar
sheath or carrying case.
ELECTRICAL SAFETY
WARNING: Avoid a dangerous
environment. To reduce the risk of elec-
trical shock, do not use in rain, in damp
or wet locations, or around swimming
pools, hot tubs, etc. Do not exp ose to
snow, rain, or water to avo id the possibil-
ity of electrical shoc k. Do not handle ex-
tension cord or plug with wet hands.
S Use a voltage supply as shown on the
nameplate of the unit.
S A void dangerous situ ati ons. Do not use
in the presence of flammable liquids or
gases to avoid creati ng a fire or explo-
sion and/ or causing damage to unit .
S To reduce the risk of electri cal shock,
this appliance has a polar ized plug (one
blade is wider than the other) and will re-
quir e the use of a polar i zed extension
cord. The appliance plug will fit into a po-
lari zed extension cord only one way. If
the plug does not fit fully into the exten-
sion cord, re verse the plug. If the plug
stil l does not fit , obtain a correct polar-
ized extension cord. A polarized exten-
sion cord wil l re quir e the use of a polar-
ized wall outlet. This plug will fit into the
polari zed wall outl et only one way. If
plug does not fit full y into the wall outl et,
reverse the plug. If the plug still does not
fit, contact a qualified electrician to install
the proper wall outlet . Do not change the
equipment plug, extension cord recep-
tacle, or extension cord plug in any way.
S To reduce risk of electri cal shock, use
extension cords specifi cal l y marked as
suitable for outdoor appli ances. The
electr i cal rating of the cord must not be
less than the rating of unit. The cord
must be marked with suf fi x “ W--A” (in
Canada, “ W”). Use a polar ized cord.
Make sure your extension cord is in
good condit ion. Inspect ext ension cord
before use and replace if damaged. Do
not use a damaged cord. Cord insula-
tion must be intact with no cracks or de-
teri or at i on. Pl ug connectors must be
undamaged. An undersized extension
cord will cause a drop in line voltage re-
sulti ng in lo ss of power and over heati n g.
If in doubt, use the next heavier gauge.
The lower the gauge number, the heavi-
er th e cor d (se e
SELECT AN EXTENSION
CORD
in the OPERA TION sect i o n). Do
not use multiple cords.
S Do not abuse cord. Never carr y the unit
by the extension cord or yank extensio n
cord to disconnect unit .
S Secure extension cord to power cord to
prevent disconnection from unit.
S Do not use t he unit i f the switch does not
turn the unit on and off properl y, or if the
lockout does not work. Repairs to the
switch must be made by an authorized
serv i c e dealer.
S Keep extension cord clear of operat or
and obstacles at all ti me s. Position cord
so that i t will not be caught on branches.
Do not expose cords to heat, oil, water,
or sharp edges.
S To avoid the possibility of electric shock,
avoid body conta ct with any grounded
conductor, such as metal fences or
pipes.
S Ground Fault Circuit Interr upter (GFCI )
protect i on should be provided on circuit
or outlet to be used. Receptacles are
available having built-in GFCI protection
and may be used for this measure of
safety. Inspect chain saw cords periodi-
cally and if damaged, have repair ed by
an authorized service dealer.

4
GUARD AGAINST KICKBACK
Follow all safety rules to help avoid kick-
back and other forces which can result in
serious injury.
Kickback Path
A
v
oid Obstructions
Clear The Working Area
WARNING: Avoid kickback which
can result in serious injury. Kickback is
the backward, upward or sudden for-
ward motion of the guide bar occurring
when the s aw chain near the upper tip of
the guide bar c ontacts any object such
as a log or branch, or when the wood
closes in and pinches the saw chain in
the c ut. Contacting a foreign object in
the wood ca n also result in loss of chain
saw control.
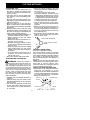
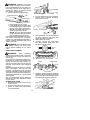
S Rot ationa l Kickb ack can occur when
the moving chain contacts an object at
the upper tip of the guide bar. This con-
tactcancausethechaintodigintothe
object, which stops the chain for an
instant. The result is a lightning fast, re-
verse r eacti on which kicks t he gui de bar
up and back toward the operator.
S Pinch- Kickback can occur when the
the wood closes in and pinches the
movi n g saw chain in the cut along the
top of the guide bar and the saw chai n is
suddenly stopped. This sudden stop-
ping of the chain results in a reversal of
the chain force used t o cut wood and
causes the saw to move in the opposite
dir ecti on of the chain rotati on. The saw
is driven str ai ght back towar d the opera-
tor.
S Pull- I n can occur when the moving
chain contacts a foreign object in the
wood in the cut along the bottom of the
guide bar and the saw chain is suddenly
stopped. This sudden stopping pull s the
saw forwar d and away from the opera-
tor and could easil y cause the operator
to lose contr ol of the saw.
REDUCE THE CHANCE OF
KICKBACK
The followi ng precautions should be fol-
lowed to minimize kickback:
S Recognize that kickback can happen.
Wit h a basic understandi ng of kickback,
you can reduce the eleme nt of surpri se
which contri but es to accidents.
S Never let the moving chain contact any
object at the tip of the guide bar.
S Keep working area free from obstruc-
tions such as other tr ees, branches,
rocks, fences, stumps, etc. Eli minat e or
avoid any obstruct ion that your saw
chain could hit while cutt i ng.
S When cutting a branch, do not let the
guide bar contact another branch or oth-
er objects around it.
S Keep saw chain sharp and pr operl y
tensioned. A loose or dull chain can in-
crease the chance of kickback. Follow
manufacturer’s chain sharpening and
mai ntenance inst ruct i on s. Check ten-
sion at regular interval s, but never with
engi ne running. Make sure bar clamp
nuts are securely tightened.
S Begin and continue cutting at full speed.
If the chain is moving at a slower speed,
there is greater chance of kickback oc-
curri ng .
S Use extr eme caution when re-enter i ng
acut.
S Do not att empt cuts star ti ng with the tip
of the bar (plunge cuts).
S W atch for shift i ng logs or other objects
that could close a cut and pinch or fall
onto chain .
S Use the specified Reduced-Kickback
Guide Bar and Low Kickback Chain.
Avoid Pinch- Ki ckback:
S Be extremely aware of situati ons or ob-
str u cti ons that can cause material to
pinch the top of or otherwi se stop th e
chain.
S Do not cut more than one log at a time.
S
Do not twist the saw as the bar is with-
drawn from an undercut when bucking.
A voi d Pull-In:
S Always begin cutting wit h the saw at full
speed and the saw housing against
wood.
S Use wedges made of plastic or wood.
Never use meta l to hold the cut open.
MAINTAIN CONTROL
S A good, fir m grip on the saw with both
hands will help you maint ain contr ol .
Don’ t let go. Gri p the re ar handle with
your right hand whether you are right or
left hand ed. Wr a p the fi ngers of your lef t
hand over and around the front handle-
bar, and your left thumb under the front
handlebar. Keep your left arm straight
with the elbow locked.

5
Right Hand
Left Hand
S Positi on your left hand on the front han-
dlebar so it is in a straight line with your
ri ght hand on t he rear handle when
making bucking cuts. Stand slightl y to
the left side of t he saw to ke ep your
body from being in a direct line with the
cutti ng chain.
S Stan d wi th your wei gh t evenly balanced
on both feet.
S Do not overr each . You could be drawn
or thrown off balance and lose control .
S Do not cut above shoulder height. It is
difficult to maintain control of saw above
shoulder height.
KICKBACK SAFETY FEATUR ES
WARNING: The following features
are included on your saw to help reduce
hazard of kickback; however, such fea-
tures will not totally eliminate this dan-
ger. Do not rely only on s afety dev ices.
Follow all safety rules to help avoid kick-
back and other forces which can result
in serious injury.
S Hand Guard: designed t o reduce the
chance of your left hand contacting the
chain if your hand slips of f the front han-
dlebar.
S Positi on of fr ont and rear handlebars:
designed with distance between han-
dles and “in- l i ne” with each other. The
spre ad and “in- li ne” posit i o n of the
hands provided by this design work to-
gether to give balance and resistance i n
controlling the pivot of the saw back to-
war d the operator if kickback occurs.
S Reduced-Kickback Guide Bar : de-
signed wit h a small radius ti p which re-
duces the size of the kickback danger
zone. This type bar has been demon-
str ated to signif i cantl y reduce the num-
ber and seriousness of kickbacks when
tested in accordance with ANSI B175.1.
Large Radius
Tip Guide Bar
Small Radius
Tip Guide Bar
S Low Kickback Chain has met kickback
perfor mance requir ement s when tested
on the representat i ve sample of these
chain saws specifi ed in ANSI B175.1.
Low
K
ickback Chain
Contoured Depth Gauge
Elongated Guard Link
Deflects Kickback Force
And Allows Wood To
Gradually Ride Into Cutter
CHAIN BRAKE AND CKA AN GLE
S Chain Brake: designed to stop the
chain in the event of kickback.
WARNING: WE DO NOT REP-
RESENT AND YOU SHOULD NOT ASSUME
THA T THE CHAIN BRAKE WILL PROTECT
YOU IN THE EVENT OF A KICKBACK.
Kick-
back is a li ght ning f ast action which throws
the bar and rotat ing chain back and up to-
ward the operator. Kickback can be
caused by all ow ing contact of the bar ti p in
the danger zone with any hard object.
Kickback can also be caused by pinching
the saw chain along the top of the guide
bar. This action may push the guide bar
rapi dly back toward the operator. Eit her of
the se events may cause you to lose con-
tr ol of the saw which could result in seri ous
injur y or even death.
DO NOT RELY UPON
ANY OF THE SAFETY DEVICES BUILT INT O
YOUR SAW. YOU SHOULD USE THE SAW
PROPERL Y AND CAREFULLY TO A VOID
KICKBACK.
Reduced--kickback guide
bars and low--kickback saw chains re-
duce the chance and magnitude of kick-
back and are recommended. Your saw
has a low kickback chain and bar as ori gi-
nal equipment. Repairs on a chain brake
should be made by an authorized service
dealer. Take your unit to the place of pur-
chase or to your nearest authori zed ser-
vice dealer.
WARNING: Computed Ki ckb ack
Angle(CKA)listedonyoursawandlisted
in the following CKA Table represents the
angle of kickback your bar and chain
combinations will have when tested in ac-
cordance with CSA and ANSI standards.
Compu ted angles repr e sen ted in the CKA
column indicate total energy and angle

6
associa t ed without a chain brake. When
purchasing replacements, considerations
shoul d be given to the low er CKA values.
In al l cases, lower CKA values repr esent a
safer operating environment for the user.
S Tip contact in some cas es may cause
a lightning fast
REACTION, kicking the
guide ba r up and back toward the op-
erator.
S Pinching the saw chain along the tip of
the guide bar may push the guide bar
ra pidl y back towar ds the oper ator.
S Either of these reacti ons may cause you
to lose cont rol of t h e saw which could re-
sult in serious inj ury. Do not rely exclu-
sively upon safety devices built into your
saw.
The foll ow ing guide bar and chain com-
binati ons meet kickback requir ement s of
CSA Z62.1 & Z62.3 and ANSI B175.1
when used on saws list ed in this manual.
Use of bar and chain combinations other
than those l i sted is not recommended and
may not meet the CKA requirements per
standard.
Computed kickback angle (CKA) Table
BAR
P/N Length
CHAIN P/N
18″
MODEL
ES400
30_
CKA without
chain brake
952044418 952051338
SAFETY NOTICE: Exposure to vibra-
tions through prolonged use of hand
tools could cause blood vessel or nerve
damage in the fingers, ha nds, a nd joints
of people prone to circulation disorders
or abnormal swelling. Prolonged use in
cold weather has been linked to blood
vessel damage in otherwise healthy
people. If symptoms occur such as
numbness, pain, loss of s trength,
change in skin color or texture, or loss of
feeling in the fingers, hands, or joints,
discontinue the use of this tool and seek
medical attention. An anti-vibration sys-
tem does not guarantee the avoidance
of these problems. Users who operate
power tools on a continual and regular
basis must closely monitortheirphysical
condition and the condition of this tool.
DOUBLE INSULATION
CONSTRUCTIO N
This unit is double insulated to help pro-
tect against electric shock. Double in-
sulation construction c onsists of two
separate “layers” of electrical insulation
instead of grounding.
Tools built with thisinsulation system are
not intended to be grounded. No
grounding means is provided on this
unit, nor should a means of grounding
be added to this unit.
Safety precautions must be observed
when operating any electrical tool. The
double insulation system only provides
added protection ag ainst injury resulting
from an internal electrical insulation
failure.
WARNING: All electri cal repair s to
this unit, including housing, swit ch, motor,
etc., must be diagnosed and repaired by
qualif i ed service personnel. Replacement
parts for a double insulated appliance
must be id enti cal to t he part s the y repla ce.
A double insulated appliance i s marked
wit h the words “ double insulati on” or
“double insulated” . The symbol
(square withi n a square) may also be
marked on the appliance. Failure to have
the unit r epair ed by authorized service
personnel can cause the double insula-
tion construction to become ineffective
and result in serious injury.
STANDARDS: This product is listed by
Underwriters Laboratories, Inc. inaccor-
dance with UL Standard 1662 and CSA
Standards Z6 2.1 and Z62.3 and ANSI
B175.1.
ANSI B175.1--2000 “American National
St an da rd for Power ed Tools -- Safety Re-
quir ements”
CSA Z62.3 “Chain Saw Kickback Occu-
pational Health and Safety”
CSA Z62.1 “Chain Saws -- Occupational
Health and Safety”
SAVE THESE INSTRUCTIONS

7
ASSEMBLY
WARNING: Before using chain
saw, ensure all fasteners are sec ure.
CARTON CONTENTS
S Chain Saw (ful l y assembled)
S Bar Sheath
Examine part s for damage. Do not use
damaged parts.
NOTE: If you need assista nce or find t hat
parts are missing or damaged, please call
1-800-554- 6723.
ASSEMBLY
Your unit is fully assembled; no assembly
is required.
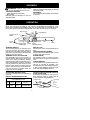
OPERATION
KNOW YOUR SAW
READ THIS INSTRUCTION MANUAL AND SAFETY RULES BEFORE OPERA TING YOUR
CHAIN SAW.
Compare the illustrations with your unit to familiarize yourself with the loca-
tion of the various controls and adjustment s. Save this manual for futur e reference.
Bar Oil Cap
Trigger
Switch
Power
Cord
Chain
Bar
Trigger Lockout
Button
Handguard
Bar
Clamp
Chain
Adjusting Wheel
Bar Knob
TRIGGER SWITCH
The
TRIGGER SWITCH is used to turn on
the unit. Squeeze the trigger switch to
operate the unit after lock--out button
has been push ed forward. Release the
trigger to turn the unit off.
TRIGGER LOCK--OUT BUTTON
The
TRIGGER LOCK--OUT BUTTON is a
control feature designed to prevent the
motor from being accidently started.
When the rear handle is gripped in a nor-
mal cutting position, the lock--out button
can be pus hed in by the thumb, permit-
ting the index finger to squeeze the trig-
ger. It is not necessa ry to maintain pres-
sure on the lock--out button once the
trigger has been engaged.
BAR OIL CAP
The
BAR OIL CAP is used to fill the bar oil
tank.
CHAIN ADJUSTING WHEEL
The
CHAIN ADJUSTMENT WHEEL is us ed
to adjust the chain tension.
POWER CORD
The
POWER CORD is used to connect
the chain saw to an approved extension
cord.
CHAIN TENSION
It is normal for a new chain to stretch dur-
ing fi r st 15 minutes of operation. You
should check your chain tension fr equent-
ly. See
CHAIN TENSION under t he SER-
VICE AND ADJUST M ENT S
section.
OPERA TING INSTRUCTIONS
Use only a voltage supply as specif i ed on
your unit.
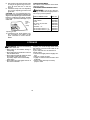
SELECT AN EXTENSION CORD
MINIMUM WIRE GAUGE
RECOMMENDATIONS
Volts
120
14
A.W.G.*
*American Wire Gauge
25 ft.
(7.67 m)
12
A.W.G.*
50 ft.
(15.24 m)
100 ft.
(30.48 m)
NOT
RECOMMENDED
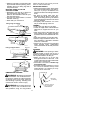
ATTACH THE EXTENSION CORD TO
YOUR CHAIN SAW
To prevent disconnection fr om unit, se-
cure extension cord to power cord as
shown in the following illustration.
Power Cord
Extension Cord

8
BEFORE STAR TING SAW
WARNING: Be sure to read the
electrical safety information in the safety
rules section of this manual be fore you
begin. If you do not understand the elec-
trical safety information do not attemptto
use your unit. Seek help from s omeone
that does understand the information or
call the customer assistance help line at
1-800-554-6723.
GUIDE BAR AND CHAIN OIL
The bar and chain require lubr i cat i on. The
chain oile r provides lubrica ti on to the
chainandguidebar.Besuretofillthebar
oil tank befor e each cutt ing session. Lack
of oil wi ll quickly ruin the bar and chain.
Too little oil will cause overheating shown
by smoke coming from the chain and/or
discolorat i on of the bar. For maximum
guide bar and chain lif e, we recommend
you use Poulan chain saw bar oil. If Pou-
lan bar oil is not available, you may use a
good grade SAE 30 oil until you are able
to obtain Poulan brand. Use a funnel to fil l
the tank. Replace oil cap secure l y. Check
oil level after every 15 minutes of opera-
tion.
CHAIN BRAKE
Ensure chain brake i s disengaged by pull-
ing the front hand guard back toward the
front handle as far as possible. The chain
brake must be disengaged before cutt i ng
with the saw.
STOPPING YOUR SAW
S Release the trigger switch.
S If motor does not stop, disconnect the
extension cord. Discontinue use of the
unit until it has been repaired by an au-
thorized service dealer.
STARTING YOUR SAW
1. Connect the saw to a power source
using the proper size extension
cord
; see SELECT AN EXTENSION
CORD
).
2. Grip both handles firmly.
3. Push and hold the trigger lock--out
button with your right hand thumb.
4. Squeeze and hold the trigger switch.
CHAIN BRAKE
WARNING: If the brake band is
wor n too thin it may break when the chain
brake is triggered. With a broken brake
band, the chain brake will not stop the
chain. The chain brake must be replaced
if any part is worn to less than 0.020″ (0.5
mm) t hick. Repai rs on a chain brake
should be made by your authorized ser-
vice dealer. Take your unit to the place of
purchase or t o the nearest authori zed ser-
vice dealer.
S This saw i s equipped wi t h a chain
brake. The br ake i s designed t o stop the
chain if kickbac k occurs.
S The inert i a--acti vated chain brake is ac-
ti va ted if the fr ont hand guard is pushed
forwar d, either manually (by hand) or
automati call y (by sudden movement).
S If the brake is already activat ed, it is dis-
engaged by pulling the front hand guard
back toward the front handle as far as
possib le.
S When cutting wit h the saw , the chain
brake must be disengaged.
Disengaged
Engaged
Braking function control
CAUTIO N: The chain brake must be
checked several times daily. The motor
must be running when perf or mi ng this
pr oced ure. This i s th e only inst an ce when
the saw should be placed on the ground
wit h the motor running.
Place the saw on fir m ground. Grip the
rear handle with your right hand and the
front handle with your left hand.
Squeeze trigger s witch and allow motor
to reach full speed. Activate the chain
brake by turning your left wrist against the
hand guard wit hout releasing your gr i p
around the front handle. The chain should
stop immediately.
Iner t i a activat i ng functi on contr ol
WARNING: When performing the
following procedure, the motor must not
be running and the saw must be un-
plugged from the power source.
Grip the rear handle with your right hand
and the front handle with your left hand.
Hold t he chain saw appr oximat el y 14″ (35
cm) above a stump or other wooden sur-
face. Release your grip on the front han-
dle and use the weight of t he saw to let t he
ti p of the guide bar fall forwar d and contact
the stump. When the tip of the bar hits the
stu mp , the brake should activat e.

9
CUTTING METHODS
OPERATING TIPS
S Check ch ain tension before first use
and after 1 minute of op eration. See
CHECK CHAIN TENSION in the MAINTE-
NANCE
section.
S Cut wood onl y. Do not cut meta l, plas-
ti cs, masonry, non-wood building mate-
rial s, etc.
S Stop the saw if the chain strike s a for-
eign object. Inspect the saw and repair
parts as necessary.
S Keep the chain out of dir t and sand.
Even a small amount of dirt will quickly
dull a chain and increase the possibility
of kickback.
S Pra ct ice cutt ing a f ew small logs using
the following steps. This will help you get
the “feel ” of using your saw bef ore you
begin a major sawing operation.
S Squeeze trigger switch and allow unit
to reach full speed before cutting.
S Begin cutting with the saw frame
against the log.
S Keep the motor at full speed the en-
tire time you are cutting.
S Release the trigger switch as soon
as the cut is completed, allowing the
motor to stop.
S Keep the cord away from the cutting
area . Posit ion cor d so it wil l not be
caught on branches and the like dur-
ing cutting.
S To avoid losing c ontrol when cut is
complete, do not put pressure on
saw at end of cut.
S St op moto r before setting saw down.
TREE FELLING TECHNIQUES
WARNING: Check for broken or
dead branches which can fall while cut-
ting causing serious injury. Do not cut
near buildings or electrical wires if you
do not k now the direction of tree fall, nor
cut at night since you will not be able to
see well, nor during bad weather such
as rain, snow, or strong winds, etc. If the
tree does make contact with any utility
line, the utility company should be noti-
fied immediately.
S Careful l y plan your sawing operation in
advance.
S Clear the work area. You need a clear
area al l around the tr ee so you can have
secur e footing .
S The chain saw o perator s hould keep
on the uphill side of the terrain as the
tree is likely to roll or slide downhill af-
ter it is felled.
S Study t he natur al conditions that can
cause the tree to fall in a particular direc-
tion, such as:
S The wind direction and speed.
S The lean of the t ree. The l ean of a tree
mi gh t not be apparent due to uneven
or sloping terrain. Use a plumb or level
to deter mine the directio n of tr ee le an.
S Weight and branches on one side.
S Surrounding trees and ob stacles.
S Look for decay and rot. If the trunk is
rotted, it can snap and fall toward the
operator.
S Make sure there is enough room for
the tree to fall. Maintain a distance of
2-1/2 tree lengths from the nea rest per-
son or o ther objects. Noise can drown
out a warning call.
S Remove dirt, stones, loose bark, nails,
staples, and wire from the tree where
cuts are to be made.
Direction of Fall
45_
Plan a clear retreat path
FELLING LARGE TREES
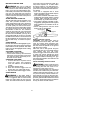
(6 inches in diameter or larger )
The notch met hod is used to f ell large
trees. A not ch is cut on the side of the tree
in the desired direction of fall. After a felling
cutismadeontheoppositesideoftree,
the tree will tend to fall in the direction of
the notch.
NOTE: If tree has large buttress roots,
remove them before making the notch. If
using saw to remove buttress roots,
keep saw chain from contacting ground
to prevent du lling of the chain.
NOTCH CUT AND FELLING T REE
S Make notch cut by cutti ng the top of the
notc h fi rst. Cut through
1/3 of the
diameter of the tree. Next complete the
notch by cutting the bottom. See illustra-
tion. Once the notch is cut, remove the
wedgeofwoodfromtree.
Notch
First cut
Second cut
Final cut here
Hinge

10
S After r emoving the wood from the not ch,
make the felling cut on the opposite side
of the notch. This is done by making a
cut about two i nches higher t han the
center of the notch. This wil l leave
enough uncut wood between the felling
cut and the notch to for m a hinge. This
hinge wil l help prevent the tree from fal-
ling in the wrong direction.
Opening
of felling
cut
Closing of
notch
Hing e holds tree on stump and
helps control fall.
NOTE: Before felling cut is complete,
use wedges to open the cut when
necessary to co ntrol the direction of fall.
To avoid kickback an d c hain da mage,
use wood or plastic wedges, but never
steel or iron wedges.
S Be alert to signs that the tree is ready to
fall : crackin g sounds, wideni ng of t he
felling cut, or movement in the upper
branches.
S As tree starts to fall, stop saw, put it
down, and get away quickly on your
planned retr eat path.
S
DO NOT use your saw to cut down a par-
ti all y fallen tree. Be extremely cautious
with partially fallen trees that may be
poorly supported. When a tree doesn’t
fall completely, set saw aside and pull
down tree with a cable winch, block and
tackle, or tractor .
CUTTING A FALLEN TREE
(BUCKING)
Buckin g is the term used for cutt i ng a fall-
en tree to the desired log size.
WARNING: Do not stand on the
log being cut. Any portion can roll caus-
ing loss of footing and co ntrol. Do not
stand d ownhill of the log being cut.
IMPORTANT POINTS
S Cut only one log at a time.
S Cut shattered wood very car ef ul ly;
sharp pieces of wood could be flung to-
ward operator.
S Use a sawhorse to cut small l ogs. Never
allow another person to hold the l og
while cutting and never hold the log with
your leg or foot.
S Do not cut in an are a where logs, lim bs ,
and roots are tangled. Drag logs into a
clear area before cutting them by pulling
out exposed and cleared logs fir st.
BUCKING TECHNIQUES
WARNING: If saw becomes
pinched or hung i n a l og, don’t tr y to for ce it
out . You can lose cont rol of the saw result-
ing in injury and/or damage t o the saw.
St op the saw, dri ve a wedge of plast ic or
wood into the cut until the saw can be re-
movedeasily.Restartthesawandcare-
full y reent er the cut. Do not use a metal
wedge. Do not attempt to restar t your saw
when it is pinched or hung in a log.
Use a wedge to remove pinched saw
Turn saw OFF and use a plastic or
wooden wedge to force cut open.
Overcutting begins on the top side of the
log wit h the bottom of the saw against the
log. When overcutti ng use light downward
pressure.
Overcutting Undercutting
Undercutt i ng involves cutting on the un-
derside of the log with top of saw against
the log. When under c utt ing use light up-
ward pressure. Hold saw fir ml y and main-
tain contr ol . The saw wi ll tend to push
back toward you.
WARNING: Never turn saw upside
down to und ercut. The saw cannot be
controlled in this position.
Alwa ys make your fi rst cut on the com-
pressions side of the log. The compres-
sion side of the log is where the pressure
of the log’ s weight is concentrat ed.
First cut on compression side of log
Second cut
First cut on compression side of log
Second cut
BUCKING WITHOUT A SUPPORT
S Over cu t through
1/3 of the diameter of
the log.
S Roll the log over and finish with a sec-
ond overcut .

11
S W atch for logs with a compressi o n side
to pr e vent the saw from pinchi n g. See il-
lustration above for cutting logs with a
compr e ssion side.
BUCKING USING A LOG OR
SUPPORT STAND
S Remember your first cut is al ways on
the compression side of the log.
(Refer to the illustration below for your
fir st and second cut)
S Your fi rst cut shoul d extend
1/3 of the
diameter of the log.
S Finish with your second cut.
1
st
Cu
t
2
nd
Cut
Using a log for support
2
nd
Cut
1
st
Cut
1
st
Cut
2
nd
Cut
Using a support stand
1
st
Cut
2
nd
Cut
LIMBING AND PRUNING
WARNING: Be alert for and guard
against kickback. Do not allow the mov-
ing chain to contact any other branches
or objects at the nose of the guide bar
when limbing or pruning. Allowing such
contact can result in serious injury.
WARNING: Never climb into a tree
to limb or prune. Do not stand on lad-
ders, platforms, a log, or in any position
which can cause you to lose your bal-
ance or control of the saw.
IMPORTANT POINT S
S W atch out for spring poles. Spring poles
are small size limbs which can whip to-
war d you or pull you of f bala n ce. Use
extreme caution when cutt i ng small size
limbs.
S Be alert for spring back f r om any
branches that are bent or under pres-
sure. Avoid bei ng stru ck by the branch
or t he saw when the tension in the wood
fiber s is released.
S Frequentl y clear branches out of the
way to avoid tri ppi ng over them.
LIMBING
S Lim b a tree only after it is cut down.
S Leave the larger limbs underneath the
fell ed tr ee to support t he tree as you
work.
S Star t at the base of the felled tree and
work toward the top, cut t ing branches
and l imbs. Remo ve small limbs wit h one
cut.
S Keep tree between you and the chain.
S Remove larger branches wit h the cut-
ting techniques described
BUCKING
WITHOUT A SUPPORT.
S Alw ays use an overcut to cut small and
freel y hanging l imbs. Undercutt ing
could cause limbs to fall and pinch the
saw.
PRUNING
WARNING: Limit pruning to limbs
shoulder height o r below. Do not cut if
branches are higher than your shoulder.
Get a professional to do the job.
S Make you r first c ut
1/3 of the way
through the bottom of the limb. This
cut will make the limb sag so that it falls
easily on the second cut.
S Next make a seco nd cut all the way
through the limb.
S Finish the pruning operation by using
an overcut so that the stump of the
limb protrudes 1 to 2 inches (3--5 c m)
from the trunk of the tree.
First cut
1/3 of way
Second cut
3rd cut 1 to 2 in.
(3--5 cm) from
trunk of tree

12
MAINTENANCE
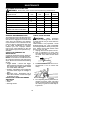
CUSTOMER RESPONSIBILITIES
Fillindatesasyoucomplete
regular s ervice
Check for damaged/worn parts
Check for loose fasteners/parts
Check chain tension
Check chain sharpness
Check guide bar
Inspect and c lean unit & labels
Before
Use
After
Use
Every
15 min.
Service
Dates
n
n
n
n
n
nCheck bar and chain oil level
Clean guide bar groove
n
n
n
WARNING: Disconnect power s ource before performing maintenance.
GENERAL RECOMMENDATIONS
The warranty on this unit does not cover
items that have been subjected to oper-
ator abuse or negligence. To receive full
value from the warranty, the operator
must maintain unit as instructed in this
manual. Various adjustments will need
to be made periodically to properly
maintain y our unit. Improper mainte-
nance may c ause d amage to the unit
and possible injury to the operator or by-
standers.
CHECK F OR DAMAGED OR
WORN PARTS
Contact an authori zed service dealer for
replacement of worn or damaged parts.
NOTE: It is normal for a small amount of
oil to appear under the saw after motor
stops. Do not confuse this with a leaking
oil tank.
S Tr i gger Switch -- Ensure the trigger
switch functions properly by squeezing
and holding the trigger switch. Make
sure motor starts and stops.
S Oil Tank -- Discont inue use of chain saw
if oil tank shows signs of damage or
lea ks.
S Extension Cord -- Discontinue use if
chai n saw extensi on cord shows signs
of damage or wear.
CHECK FOR LOOSE FASTENERS
AND PARTS
S Bar knob
S Chain
S Housing screws
CHECK CHAIN TENS ION
WARNING: Wear protective
gloves when handling c hain. The c hain
issharpandcancutyouevenwhenitis
not moving.
Chain tension is very i mpor tant . Chain
stretches during use. This is especially
tr ue duri ng the fir st few times you use your
saw. Al ways check chain tension each
time you use your saw.
1. Unplug unit from the power source.
2. Use a screwdriver to move chain
around guide bar to ensu re kinks do
not exist. The chain should rotate
freely.
3. Lift lever on bar knob a nd turn c oun-
terclockwise 1 turn to loosen bar
clamp.
LOOSEN
4. Turn adjusting wheel (downward di-
rection) to tension chain until chain
solidly contacts bottom of guide bar
rail. Lift tip of guide bar while a djust-
ing tension.

13
Tighten
chain
Adjusting Wheel
Loosen
chain
5. Using screwdriver, move cha in
around guide bar to ensure all links
are in bar groove.
6. While lifting tip of guide bar, tighten
bar knob securely (clockwise).
Hand tighten only!
TIGHTEN
Bar
Knob
7. Push lever on bar knob down to re-
turn lever to closed/locked position.
WARNING: Failure to pus h lever
on bar kn ob down to closed/locked posi-
tion could result in serious personalinju-
ry or damage to your chain saw.
8. Use a screwdriver to move chain
around guide bar.
9. If chain does not rotate, it is too tight.
Loosen bar knob 1 tur n (count ercl ock-
wise); then, loosen chain by turning
the adjusting wheel
1
/
4
turn ( upward
direct i on). Retighten bar knob.
10. If chain is too loose, it will sag below
the guide bar.
DO NOT ope rate the
saw if the chain is loose.
WARNING: If the saw is operated
with a loose chain, the chain c ould jump
off the guide bar and result in serious in-
jury.
CHECK CHAIN SHARPNESS
A sharp c hain makes wood chips. A dull
chain makes a sawdust powder and cuts
slowly. See
CHAIN SHARPENING in the
SERVICE AND ADJUSTMENTS section.
CHECK GUIDE BAR
Conditi ons which requir e guide bar main-
tenance:
S Saw cuts to one side or at an angle.
S Saw has to be forced through the cut.
S Inadequate supply of oil to the bar and
chain.
Check the condition of the guide bar each
ti me the chain is sharpened. A worn guide
bar will damage the chain and make cut-
ti ng diff i cul t .
Aft er each use, wit h unit disconnected
fr om power source, clean all sawdust fr om
the guid e bar and sprocke t hole.
To maintain guide bar:
S Disconnect t he chain saw f r om the pow-
er source.
S Loosen and remove bar clamp nuts.
Remove bar and chain from saw.
S Clean the oil holes and bar groove aft er
each 5 hours of operation.
Remove Sawdust From
Guide Bar Groove
Oil Holes
S Burri ng of guide bar rai l s is a normal
process of rai l wear . Remove these
burrs with a flat file.
S When rail top is uneven, use a fl at file to
restor e square edges and sides.
Correct GrooveWorn Groove
File Rail Edges
and Sides
Square
Replace the guide bar when the groove is
worn, the guide bar is bent or crack--ed, or
when excess heating or bur r i ng of the rail s
occur s. If replacem en t is necessary, use
only the guide bar specified for your saw in
the repai r part s list or on the decal locat ed
on the chain saw .
LUBRICATION
Bar Oil Fill Cap

14
S Check bar and chain oil before use and
every 15 minutes while oper ati ng the
saw. See
GUIDE BAR AND CHAIN OIL un-
der the
OPERATION sectio n.
INSPECT AND CLEAN UNIT AND
LABELS
S After each use, inspect complete unit
for loose or damaged parts. Clean the
unit and labels using a damp cloth with a
mild detergent.
S Wipe of f the unit and labels with a clean
dry cloth.
SERVICE AND ADJUSTMENTS
CHAIN SHARPENING
WARNING: Improper chain sharp-
ening techniques and/or depth gauge
maintenance will increase the chance of
kickback which can result in serious in-
jury.
WARNING: Wear protective
gloves when handling chain. The chain
is sharp and can c ut y ou even when it is
not moving.
Conditi ons which indicat e the need for
chain shar pen ing:
S Reduction in s ize of wood chips. The
size of the wood chip will decrease as
the chain gets duller until it becomes
more like a powder than a ch ip. Note
that dead or rotted wood will not pro-
duce a good chip.
S Saw cuts to one side or at an ang le.
S Saw has to be forced through the cut.
Tools required:
S 5/32 inch (4 mm) diameter round file
and file holder
S Flat file
S Depth gauge tool
TO SHARPEN CHAIN:
1. Move
ON/STOP switch to the STOP
position.
2. Check chain for proper tension. Ad-
just chain tension if necessary. See
CHECK CHAIN TENSION section.
3. Sharpen cutters.
S To sharpen the cutters, position
the file holder level (90˚) so that it
rests on the top edges of the cut-
ter and depth gauge.
NOTE: The c hain has both left
and right han d cutters.
Depth Gauge
File
File Holder
Cutter
90˚
S Align the 30˚ file holder marks
parallel w ith the bar and to the
center of the chain.
Cutter
Cutter
30˚
File Holder Line
S Sharpen cutters on one side of the
chain first. File from the inside of
each cutter to the outside. Then,
turn the chain saw around and re-
peat the process for the other side
of the chain.
S File on the forward stroke only.
Use 2 or 3 strokes per c utting
edge.
S Keep all cutters the same length
when filing.
S File enough to remove any dam-
age to cutting ed ges (side plate
and top plate of c utter).
All Cutters
Same Length
Remove Damage
Top Plate
Side Plate
S File chain to meet the specifica-
tions as s hown.
30˚
80˚
60˚
Rounded
Corner
0.025 inch
(0.65 mm)
Right
Hook Angle
Wrong
Squared O
f
f
Corner
TooMuchHook
A
ngle

15
WARNING: Maintain the proper
hook angle a ccording to the manufac-
turer’s spec ifications for the chain you
are using. Improper hook angle will in-
crease the chance o f kickback which
can result in s erious injury.
4. Check and lower de pth gauges.
Depth Gauge Tool
Depth Gauge
File
S Place gauge tool on cutter.
S If the de pth gauge is higher than
the depth gauge tool, file it level to
the top of the depth gauge tool.
S Maintain rounded front corner of
depth gauge with a flat file.
NOTE: The very top of the depth
gauge should be flat with the front
half rounded off with a flat file.
If you require furt her assistance or are un-
sure about perfor m ing this procedure,
contact your authorized service dealer or
call our customer assist an ce help li ne at
1--800--554--6723.
WARNING: Avoid accidental start-
ing. Always unplug saw from power
source before installing a bar and/or
chain.
CHAIN REPLACEMENT
WARNING: Wear protective
gloves when handling chain. The chain
is sharp and can c ut y ou even when it is
not moving.
It is normalfor a new chainto stretchdur-
ing the first 15 minutes of operation. You
should recheck your chain tension fre-
quently and adjust the chain tension as
required. See
CHECK CHAIN TENSION
section.
Replace the old c hain when it becomes
worn or damaged. Use only the Low
Kickback replacement chain specified
in the list of available replacement parts.
The chain must comply with kickback re-
quirements of ANSI B175.1 when tested
with this saw.
See your authorized service dealer to
replace and sharpen individual cutters
on your chain.
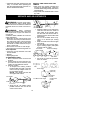
TO REPLACE CHAIN:
1. Disconnect the chain saw from the
power source.
2. Loosen and remove bar k nob com-
pletely by lifting lever and turning
counterclockwise.
LOOSEN
3. Loosen chain tension by turning ad-
justing wheel (upward direction).
Remove bar c lamp.
Bar
Clamp
Drive Sprocket
Bar
Knob
4. Slide guide b ar on bar bolts toward
the drive sprocket until guide bar
stops against the sprocket.
5. Remove the old chain.
6. Carefully remove the new chain
from the pac kage. Hold cha in with
the drive links as s hown.
CUTTERS MUST FACE IN
DIRECTION OF ROTATION
Tip of
Bar
Cutters
Depth Gauge
Drive Links
7. Place the chain around the sprocket
and fit the drive links into the guide bar
groove and then into the teeth of the
sproc ket in the tip of the guide bar.

16
8. Pull guide bar forward until the chain
is snug in the guide bar groove. En-
sure all drive links are in the bar
groove.
9. Install bar clamp. Be s ure adjusting
pin is in the adjusting pin hole in the
guide bar.
CAUTION : It is very impor tant when ins-
talling the bar clamp that the adjusting pin
aligns i nt o t he adjusti ng pin hole in the bar.
Failure to install the bar clamp correctly
may result in permanent damage to your
chain saw.
Back
view of
bar
clamp
Adjusting pin
10. Install bar knob; finger tighten only.
Do not tighten any further at this
point. Proceed to
CHAIN ADJUST-
MENT.
CHAIN ADJUSTMENT
See
CHECK CHAIN TENSION in the MAIN-
TENA NCE
section.
CUSTOMER SERVICEABLE PARTS
WARNING: Use of any other ac-
cessory or attachment might present a
risk of injury to the operator.
REPLACEMENT PART PART NO.
Oil Cap 530053072
Chain Catcher 530029850
Screw 530016269
File (5/32″ dia.) T win Pak 952055085
Chain --18″ 952051338
Guide Bar -- 18″ 952044418
Bar & Chain Lubricant --1 qt. 952030203
Bar & Chain Lubricant --1 gal. 952030204
STORAGE
WARNING: Perform the following
steps after each use:
S Allow motor to cool before storing or
transporting.
S St ore chain saw and ext e nsion cord in a
well ventilated area
S St ore chai n saw wit h all guards in place
and position chain saw so that
any sharp object cannot accidentall y
cause injury.
S Store chain saw unplugged, well out of
the reach of children.
SEASONAL STORAGE
Prepare your unit for storage at the end of
the season or if it will not be used for 30
days or more.
If your chain saw is to be stored for a
peri od of time:
S Clean it thoroughl y befor e lengthy stor-
age.
S Stor e in a clean dry area.
S Lig htl y oil exter na l met al sur faces and
guid e bar.
S Oil the chain and wrap it in heavy
paperorcloth.

17
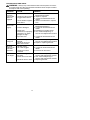
TROUBLE CAUSE REMEDY
Chain does
not move
when trigger
switch is
engaged
.
1. Chain tension incorrect.
2. Guide bar rails pinched.
3. Trigger switch failure.
4. Circuit breaker tripped/
fuse failure.
1. See “Check Chain Tension” in
Maintenance section.
2. Repair or replace.
3. Contact an authorized service
dealer.
4. Reset circuit breaker or replace
fuse.
Chain clat-
ters or cuts
roughly.
1. Chain tension incorrect.
2. Cutters damaged.
3. Chain worn.
4. Cutters dull, improperly
sharpened, or d epth
gauges too high.
5. Sprocket worn.
1. See “Check Chain Tension” in
Maintenance Section.
2. Contact an authorized service
dealer.
3. Resharpen or replace chain.
4. See “Chain Sharpening” in
Service and Adjustments section.
5. Contact an authorized service
dealer.
1. Chain cutter tops not
filed flat.
2. Guide bar burred or
bent; rails uneven.
Chain stops
during cut.
1. See “Chain Sharpening” in
Service and Adjustments section.
2. Repair o r replace guide bar.
Oil inade-
quate for bar
and chain
lubrication.
1. Oil tank empty.
2. Oil ou tlet clogged.
3. Guide bar oil hole
blocked.
1. Fill oil tank.
2. Contact an authorized service
dealer.
3. Remove bar and clean.
Chain cuts
at an angle.
WARNING: Always stop unit and disconnect from the power source be-
fore performing all of the recommended remedies below except remedies
that require u nit to be operating.
1. Cutters damaged on
one side.
2. Chain dull on on e s ide.
3. Guide bar bent or worn.
1. See “Chain Sharpening” in
Service and Adjustments section.
2. See “Chain Sharpening” in
Service and Adjustments section.
3. Replace guide bar.
TROUBLESHOOTING TABLE

18
WARRANTY STATEMENT
Poulan, a division of Husqv arna Con-
sumer Outdoor Products N.A., Inc., war-
rants to the original consumer purchas-
er that eac h new Poulan brand e lectric
or cordless product is free from defects
in material and workmanship and
agrees to repair or replace under this
warranty any defective Poulan brand
electric product within one (1) year from
the original date of purchase.
If your Poulan brand electric or cordless
product should failwithin the limited war-
ranty period, you may return it in com-
plete condition, prepaid, with proof of
purchase to the dealer from whom itwas
purchased for repair or replacement at
the option of Poulan.
This warranty is not transferable and
does not cover damage or liability
caused by improper handling, improper
maintenance or alteration, or the use of
accessories and/or attachments not
specifically recommended by Poulan
for this product. This warranty does not
cover parts that will wear and require re-
placement with reasonable us e during
the warranty period. This warranty does
not cover pre--delivery setup or normal
adjustments explained in the instruction
manual.
Should you h ave any unanswered
questions regarding this warranty,
please c ontact:
Poul an, a divisi o n of Husqvarna
Consume r Outdoor Products N.A., Inc.
7349 Statesville Road
Charlotte, NC 28269
1--800--554--6723
In Canada, contact:
Poulan
850 Matheson Blvd. West
Mi ssissauga, Ontar io L5V 0B4
Giving the model number , serial number
and dat e of purch as e of your product and
the name and address of the authori zed
dealer from whom it was purchased.
THIS W ARRANTY GIVES YOU SPECIFIC LE-
GAL RIGHTS, AND YOU MA Y HAVE OTHER
RIGHTS WHICH VARY FROM ST ATE TO
STAT E.
NO CLAIMS FOR CONSEQUENTIAL OR
OTHER DAMAGES WILL BE ALLOWED, AND
THERE ARE NO OTHER EXPRESS W AR-
RANTIES EXCEPT THOSE EXPRESSL Y
STI PUL ATED HEREIN.
SOME STA TES DO NOT ALLOW LIMITA-
TIONS ON HOW LONG AN IMPL IE D WA R-
RANTY LASTS OR THE EXCLUSION OR
LI M I TATIONS OF INCI DE NTAL OR CONSE-
QUENTIAL DAMAGES, SO T HE ABOVE LI MI-
TAT IONS OR EXCLUSION MAY NOT APPL Y
TO YOU.
This is a limited warranty within the
meaning of that term as defined in the
Magnuson--Moss Act of 1975.
The policy of Poul an is to continuously
impr ove its products. Therefore, Poulan
rese rves the right to chan ge, modify, or
disconti nue models, designs, specifi ca-
tions, and accessori e s of all product s at
any time without noti ce or obligat i on t o any
purchaser.
-
 1
1
-
 2
2
-
 3
3
-
 4
4
-
 5
5
-
 6
6
-
 7
7
-
 8
8
-
 9
9
-
 10
10
-
 11
11
-
 12
12
-
 13
13
-
 14
14
-
 15
15
-
 16
16
-
 17
17
-
 18
18


Poulan 115259926 User manual
- Category
- Power chainsaws
- Type
- User manual
Ask a question and I''ll find the answer in the document
Finding information in a document is now easier with AI