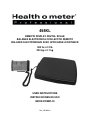
Health O Meter Professional 498KL User manual
- Category
- Kitchen scales
- Type
- User manual
This manual is also suitable for
Page is loading ...

2
Thank you for your purchase of this Health o meter® Professional scale.
Please read this manual carefully and keep it for easy reference or training.
Gracias por su compra de ésta balanza Health o meter® Profesional. Lea éstas
instrucciónes con cuidado, y mantenga el manual disponible para futuras consultas y
también para su uso a la hora de orientar o formar al nuevo personal que la utilizará.
Merci d’avoir acheté cette balance Health o meter® Professionnelle. Veuillez lire
attentivement ce manuel et le garder à portée de main pour pouvoir le consulter à tout
moment.
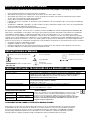
TABLE OF CONTENTS
ENGLISH ............................................................................................................................2
ESPAÑOL...........................................................................................................................8
FRANÇAIS..........................................................................................................................14
CAUTION AND WARNING..................................................................................................3
SYMBOLS AND SPECIFICATIONS FOR THIS SCALE......................................................3
CONNECTIVITY INFORMATION ........................................................................................3
SET UP / BATTERIES.........................................................................................................4
QUICK START INSTRUCTIONS.........................................................................................4
OPERATION OF THIS SCALE............................................................................................5
MAINTENANCE ..................................................................................................................5
TROUBLESHOOTING ........................................................................................................6
CALIBRATION ....................................................................................................................6
WARRANTY........................................................................................................................7
PLEASE REGISTER YOUR SCALE FOR WARRANTY COVERAGE AT:
http://www.homscales.com/customers/registration.aspx
POR FAVOR REGISTRE SU BÁLANZA PARA OBTENER COBERTURA DE LA GARANTÍA EN:
http://www.homscales.com/customers/registration.aspx
MERCI D'ENREGISTRER LA BALANCE AFIN DE LA GARANTIR SUR LE:
http://www.homscales.com/customers/registration.aspx
498KL

3
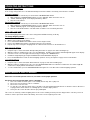
CAUTION AND WARNING
To prevent injury and damage to your scale, please follow these instructions very carefully:
• Do not transport the scale while platform is loaded.
• For accurate weighing the scale must be placed on a flat, stable surface.
• For accurate weighing, verify proper operation according to the procedure described in this manual before each use.
• Do not use in the presence of flammable materials.
• Operating at other voltages and frequencies than specified could damage the equipment.
• If the “LOW BAT” indicator activates, for accurate weighing replace the batteries or connect the scale to an AC power source
as soon as possible.
• Only manufacturer’s qualified personnel shall service the scale.
This equipment has been tested and found to comply with the EMC limits for the Medical Device Directive 93/42/EEC (EN
55011 Class A and EN 60601-1-2). These limits are designed to provide reasonable protection against harmful interference in
a typical medical installation. The equipment generates, uses and may radiate radio frequency energy and, if not installed and
used in accordance with these instructions, may cause harmful interference to other devices in the vicinity. However, there is
no guarantee that interference will not occur in a particular installation. If this equipment does cause harmful interference with
other devices, which can be determined by turning the equipment off and on, the user is encouraged to try to eliminate the
interference by one or more of the following measures:
• Reorient or relocate the receiving device.
• Increase the separation between the equipment.
• Connect the equipment into an outlet on a circuit different from that to which the other device(s) is connected.
• Consult the manufacturer or field service technician for help.
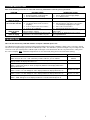
DEFINITION OF SYMBOLS
498KL SCALE SPECIFICATIONS
Capacity and Resolution: 500lb x 0.2lb / 220kg x 0.1kg
Power Requirements: 6-AA cell 1.5V batteries (INCLUDED) or optional Adapter Model RHD090020 / ADPT31 (USA -
CSA only) 120v AC – 9V DC 60 Hz or with Adaptor Model UE 15WCP-090050SPA / ADPT30
(IEC only) 120-240V AC – 9V DC 50-60Hz. OPTIONAL ADAPTERS NOT INCLUDED.
Environmental: Operating temperatures: 50°F to 104°F / 10°C to 50°C
Atmospheric Pressure: 500hPa to 1060hPa
Humidity: 10% to 95% RH
Platform Dimensions: 17 ¾” x 14” x 2 ¼” / 43cm x 35.6 cm x 5.8 cm
Remote Indicator Dimensions: 8” x 4 ½” x 2” / 20.4cm x 11.7cm x 4.9cm with 1” / 2.54cm LCD
STORAGE SPECIFICATIONS
Storage Temperatures: 32°F to 122°F / 0°C to 50°C
Humidity: 10% to 95% RH
Atmospheric Pressure: 500hPa – 1060hPa
498KL SCALE CONNECTIVITY INFORMATION:
This scale is designed to connect to other devices via a USB port, to allow acquisition of weight, height and BMI from the
scale, to help close a source of potential medical errors caused by incorrectly copying and then recording a weight taken.
This scale is EMR-EHR compatible. For more information regarding how to connect this scale to your computer, a
monitor, printer or other device please contact Health o meter® Professional Technical Support at 800-638-3722.
*WARNING:
For use with AC Adaptor Model RHD090020 (USA - CSA only) or with Adaptor
Model UE 15WCP-090050SPA/ADPT30 (IEC only). Complies with C22.2
No. 601.1-M90 and UL Std No. 60601-1. Type BF applied parts. Internally powered.
Equipment is not suitable for use in the presence of flammable anesthetic mixture
with air
n
or with oxygen or nitrous oxide.
AC to DC power supply
(9V DC, 200mA)
DC Connector Polarity
Temperature range
(50°F to 104°F / 10°C to 50°C)
Humidity range
(10% - 95% RH)
Atmospheric pressure range
(500hPa – 1060hPa)
Attention, Consult Accompanying Documents
Type BF Applied Parts
AC to DC power supply

4
SET UP / BATTERIES 498KL
INSTALLING BATTERIES
1. Locate the battery compartment on the bottom of the remote display head.
2. With a Phillips screwdriver remove the screw from the battery compartment cover and remove cover.
3. Place 6 new AA batteries into battery compartment. Make sure the ‘+’ and ‘-‘ are positioned correctly, as shown on the bottom of
the battery compartment. Replace the batteries when the display reads ‘LobAt’ (Use only AA alkaline batteries).
4. Replace the battery compartment cover.
NOTE: Dispose used batteries in accordance to your country’s national, state or local requirements.
OPERATION WITH ADAPTER POWER
Plug the optional adapter (NOT INCLUDED) into the base of the scale and then into the outlet for power. Please refer to page 3 for
information regarding the adapters available for use with this scale.
PREPARING THE SCALE FOR USE
1. Plug the coiled “phone” cord into the base of the scale.
2. Remove the protective plastic film from the display.
3. Turn the scale on by pressing the ON/OFF button. The display will show “Start” and then “0.0”.
NOTE: If set up instructions failed, refer to the troubleshooting instructions. If troubleshooting does not resolve the problem,
please contact Health o Meter® Professional Technical Support at 1-800-638-3722.
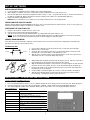
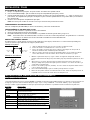
REMOTE HEAD MOUNTING
The remote head can be mounted to a wall up to 6 feet from the base or it can be mounted on the display bracket (included) for
placement on a table up to 6 feet from the base.
To Mount on Wall
1. Use the above diagram to locate the position of the screws at the desired height.
2. Drill two holes 1 13/16” apart.
3. Screw the two screws into the wall, let the screw heads protrude 1/8” from the wall.
Extending the screw heads further could damage the scale.
4. Align the holes on the back of the remote display with the screws. The remote head
should slide onto the screw heads firmly and securely.
To Mount on Display Bracket
1. While holding Part A (Stand) as illustrated in the figure to the left, slide the center tab of
Part B (Support) up and under the tab on the back of the Stand.
2. Align the Stand and the Support so the tab on the rear of the Support can slide beneath
the tab on the rear of the Stand. The holes on the Stand and Support should line up.
3. Insert the two small screws (included) into the two holes in the front of the Stand and
through the holes in the Support.
4. Using a Phillips screwdriver, tighten the screws to secure the Stand to the Support.
5. Slide the two protruding knobs on the bracket into the two holes in the back of the
remote display. The display bracket is now ready for use.
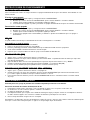
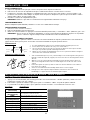
QUICK START / OPERATING INSTRUCTIONS
QUICK START INSTRUCTIONS
QUICK START INSTRUCTIONSQUICK START INSTRUCTIONS
QUICK START INSTRUCTIONS
1. Press the ON/OFF button to turn the scale on. “START” will appear on the display for 4-5 seconds, then “0.0” will be displayed.
2. Have the patient step on the scale. After the weight has stabilized, “LOCK” and the patient’s weight will be displayed.
3. The stable weight will continue to be displayed until the patient steps off the scale. The display will again show “0.0”.
DESCRIPTION FUNCTION
DESCRIPTION FUNCTIONDESCRIPTION FUNCTION
DESCRIPTION FUNCTION
ON/OFF
Turns the scale ON and OFF.
HOLD/RELEASE
Holds the value of the weighed object on the display until
the button is pressed again.
ZERO
Zeros the display prior to weighing; enables the
cancellation of weight if some object was placed on the
scale.
LB/KG
Toggles between pounds and kilograms.
CLEAR
Clears the incorrect height input when in BMI mode.
BMI
Prompts entry of data to calculate the patients Body Mass
Index (BMI)
ENTER
Used to accept height in BMI mode.
UP▲
Increases height input (0.5 in / 0.5 cm increments)
DOWN▼
Decreases height input (0.5 in/ 0.5cm increments)
Drill Hole Drill Hole
1 13/16”

5
OPERATING INSTRUCTIONS 498KL
AUTO OFF FUNCTION
AUTO OFF FUNCTIONAUTO OFF FUNCTION
AUTO OFF FUNCTION
As an energy saving feature, the scale will automatically turn off after 2 minutes of inactivity, if this function is enabled.
Activating auto-off
1. While the scale is turned off, press and hold the “HOLD/RELEASE” button.
2. While holding the “HOLD/RELEASE” button, press the “ON/OFF” button to turn the scale on.
3. “START” will briefly appear on the display followed by “AOF=1”.
4. Auto off is now enabled.
De-activating auto-off
1. While the scale is turned off, press and hold the “HOLD/RELEASE” button.
2. While holding the “HOLD/RELEASE” button, press the “ON/OFF” button to turn the scale on.
3. “START” will briefly appear on the display followed by “AOF=0”.
4. Auto off is now disabled and the scale will remain on until the scale is manually turned off.
KG & LB LOCK OUT
KG & LB LOCK OUTKG & LB LOCK OUT
KG & LB LOCK OUT
The default weighing mode for this scale can be changed from LB/KG to KG only or LB only.
To change weighing mode:
1. Press the ON/OFF button to turn the scale on.
2. Wait for “0.0” to appear on the display.
3. Press and hold the LB/KG button until the unit of measure begins to flash.
4. Release the LB/KG button and the scale will operate in the selected mode.
5. Repeat steps 3-4 to change the weighing mode to a different unit of measure as the default for use.
BMI CALCULATION
BMI CALCULATION BMI CALCULATION
BMI CALCULATION
1. Complete steps 1 and 2 of the Quick Start Operating Instructions on page 4, then do the following steps.
2. While the patient is standing on the scale, press the BMI button. A number representing a default height will appear on the display.
3. Select the correct or closest height measurement by pressing the UP or DOWN buttons.
4. Confirm the height input by pressing the ENTER button and the BMI will be displayed.
5. Press the CLEAR button to return to normal weighing operation. See key descriptions on page 4 for more information.
HOLD FUNCTION
HOLD FUNCTIONHOLD FUNCTION
HOLD FUNCTION
1. Complete steps 1 and 2 of the Quick Start Instructions on page 4, then do the following steps.
2. While the patient is standing on the scale, press the HOLD/RELEASE button to activate the hold function. The stable weight will
continue to be display until the hold function is cancelled.
3. To cancel hold function, press the HOLD/RELEASE button again. The scale will return to normal weighing operation.
MAINTENANCE AND CLEANING
Before first use and after periods of non-use, check the scale for proper operation.
Disconnect the scale from the power source, if plugged in.
1. This scale contains electronic parts. Use it carefully. Do not drop, kick or jump on it.
2. Do not store near chemicals, heaters or radiators.
3. Do not store scale on its side.
4. To clean the scale, wipe the outside of the scale with a soft cloth and mild detergent. Do not use abrasive cleaners. Do not use
isopropyl alcohol, other solutions or sanitizing wipes to clean the display surface.
5. Never place the scale in the water. Do not spray it with liquid.
This scale is an extremely sensitive weighing device. Items such as clothing or towels placed or dropped on the scale may cause it to
activate. In order to prevent run down of the battery, do not store or leave anything on the scale.

6
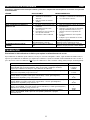
TROUBLESHOOTING 498KL
Refer to the following instructions to check and correct any failure before contacting service personnel.
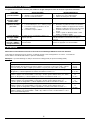
SYMPTOM POSSIBLE CAUSE CORRECTIVE ACTION
Scale does not turn on 1. Battery problem
2. Bad Power Supply or Not Plugged In
3. Electrical Outlet not functioning
1. Check / Replace the batteries
2. Check / Replace Power Supply Adapter
3. Use a different outlet
“LobAt”
shows in display
The batteries are low Replace batteries according to instructions
Questionable weight or
the scale does not zero
1. External object interfering with the scale
2. The display did not show “0.0” before
weighing
3. Scale is not placed on a level surface
4. Scale is out of calibration
1. Remove interfering object from the scale
2. Ask the patient to step off the scale. Zero the
scale and begin weighing process again.
3. Place scale on level surface
4. Check weight with know weight value
“OVER”
shows in display
Overload. The load on the scale exceeds scale
capacity (500 lbs / 220 kg)
Remove weight, turn scale off, turn scale on again
and try again
“UNDER”
shows in display
Negative weight, indicating a tare was present.
Load on the scale is below initial zero point
Clear scale of any weight and re-zero scale by
pressing ZERO button
CALIBRATION
This scale has been factory calibrated and does not require calibration prior to use.
The calibration procedure may be performed using a known weight in either pounds or kilograms. Simply set the scale for the desired
unit of measure using the lb/kg key and start the calibration procedure. The calibration is performed using lb or kg, according to the unit
of measure used upon entering into the calibration path, meaning the scale will default to either lb or kg, if that was the setting left on
the scale for weighing. Note: Calibration weight must be no less than 100 lb (40 kg) and no more than 500 lb (200 kg).
ACTION DISPLAY SHOWS
Press and hold the LB/KG and ZERO buttons at the same time, then press the ON/OFF
button to turn on the scale. “CAL” followed by a number indicates you can calibrate.
“CAL” then
“XXXXX”
Press the ZERO button. “C-100” (for lb mode) or “C-40” (for kg mode) will flash on the
display and then the display will return to “0”.
“C-100” or “C-40”
Place 100 lbs or 40 kg on the scale and when calibration number stabilizes, press the ZERO
button. “C-200” (for lb mode) or “C-80” (for kg mode) will flash on the display and then the
display will return to “0”.
“C-200” or “C-80”
Place 200 lbs or 80 kg on the scale and when calibration number stabilizes, press the ZERO
button. “C-300” or “C-120” will appear on the display and then the display will return to “0”.
“C-300” or “C-120”
Place 300 lbs or 120 kg on the scale and when calibration number stabilizes, press the ZERO
button. “C-500” or “C-200” will appear on the display and then the display will return to “0”.
“C-500” or “C-200”
Place 500 lbs or 200 kg on the scale and when calibration number stabilizes, press the ZERO
button. “ END ” will appear on the display and then the scale will automatically turn off.
“END”

7
2-YEAR LIMITED WARRANTY 498KL
What does the Warranty Cover?
This Health o meter® Professional scale is warranted from date of purchase against defects of materials or
in workmanship for a period of two (2) years. If product fails to function properly, return the product, freight
prepaid and properly packed to Pelstar, LLC (see “To Get Warranty Service”, below, for instructions). If the
manufacturer determines that a defect of material or in workmanship exists, the customer’s sole remedy will
be repair or replacement of the scale at no charge. Replacement will be made with a new or
remanufactured product or component. If the product is no longer available, replacement may be made with
a similar product of equal or greater value. All parts including repaired and replaced parts are covered only
for the original warranty period.
Who is Covered?
The original purchaser of the product must have proof of purchase to receive warranty service. Please save
your invoice or receipt. Authorized dealers selling Pelstar products do not have
the right to alter, or modify or any way change the terms and conditions of this warranty.
What is Excluded?
Your warranty does not cover normal wear of parts or damage resulting from any of the following:
negligent use or misuse of the product, use on improper voltage or current, use contrary to the operating
instructions, abuse including tampering, damage in transit, or unauthorized repair or alternations. Further,
the warranty does not cover Acts of God, such as fire, flood, hurricanes and tornadoes. This warranty
gives you specific legal rights, and you may also have other rights that vary from country to country, state
to state, province to province or jurisdiction to jurisdiction.
To get Warranty Service make sure you keep your sales receipt or document showing
proof of purchase. Call 800-638-3722 to receive a return authorization (RA) number, which
must be included on the return label. Attach your proof of purchase to your defective product
along with your name, address, daytime telephone number and description of the problem.
Carefully package the product and send with shipping and insurance prepaid to:
Pelstar, LLC
Attention R/A#_____________
Repair Department
11800 South Austin Avenue, Unit B
Alsip, IL 60803
If your scale is not covered by warranty, or has been damaged, an estimate of repair costs or
replacement costs will be provided to you for approval, prior to servicing or replacing.
Pelstar, LLC
11800 South Austin Avenue - Unit B • Alsip, IL 60803 • USA
1-800-638-3722 or 1-708-377-0600
PLEASE REGISTER YOUR SCALE FOR WARRANTY COVERAGE AT:
http://www.homscales.com/customers/registration.aspx
Health o meter® Professional products are manufactured, designed and owned by Pelstar, LLC.
Health o meter® is a registered trademark of Sunbeam Products, Inc. used under license. We reserve the right to
improve, enhance or modify Health o meter® Professional product features or specifications without notice.
© Pelstar, LLC 2009

8
Gracias por su compra de éste producto Health o meter® Profesional. Lea éstas instrucciónes con
cuidado, y mantenga el manual disponible para futuras consultas y también para su uso a la hora de
orientar o formar al nuevo personal que la utilizará.
ÍNDICE DE MATERIAS
ENGLISH ............................................................................................................................2
ESPAÑOL...........................................................................................................................8
FRANÇAIS..........................................................................................................................14
ADVERTENCIAS Y PRECAUCIONES................................................................................9
SÍMBOLOS Y ESPECIFICACIONES...................................................................................9
INFORMACIÓN DE LA CONECTIVIDAD ............................................................................9
INSTRUCCIÓNES DE MONTAJE / PILAS..........................................................................10
INSTRUCCIÓNES BÁSICAS ..............................................................................................10
INSTRUCCIÓNES DE FUNCIONAMIENTO........................................................................11
MANTENIMIENTO ..............................................................................................................11
RESOLUCIÓN DE PROBLEMAS........................................................................................12
CALIBRACIÓN....................................................................................................................12
GARANTÍA..........................................................................................................................13
POR FAVOR REGISTRE SU BÁLANZA PARA OBTENER COBERTURA
DE LA GARANTÍA EN:
http://www.homscales.com/customers/registration.aspx
498KL
Page is loading ...
Page is loading ...
Page is loading ...
Page is loading ...
Page is loading ...

14
Merci d’avoir acheté ce produit Health o meter® Professionnelle. Veuillez lire attentivement ce
manuel et le garder à portée de main pour pouvoir le consulter à tout moment.
TABLE DES MATIÈRES
ENGLISH ............................................................................................................................3
ESPAÑOL...........................................................................................................................8
FRANÇAIS..........................................................................................................................14
MISE EN GARDE ET AVERTISSEMENT ............................................................. 15
SYMBOLES ET SPÉCIFICATIONS D' CETTE BALANCE .................................... 15
L'INFORMATION DE CONNECTIVITÉ ................................................................. 15
CONSIGNES D'INSTALLATION / PILES .............................................................. 16
INSTRUCTIONS DE DÉMARRAGE RAPIDE........................................................ 16
MODE D'EMPLOI.................................................................................................. 17
ENTRETIEN ET NETTOYAGE.............................................................................. 17
DÉPANNAGE........................................................................................................ 18
CALIBRAGE.......................................................................................................... 18
GARANTIE............................................................................................................ 19
MERCI D'ENREGISTRER LA BALANCE AFIN DE LA GARANTIR SUR LE:
http://www.homscales.com/customers/registration.aspx
498KL
Page is loading ...
Page is loading ...
Page is loading ...
Page is loading ...
Page is loading ...

20
LEADING THE WEIGH
™
IN:
ACUTE CARE • BARIATRIC • DIALYSIS
FITNESS • LONG TERM CARE • PEDIATRIC / NEONATAL
PRIMARY CARE • PROFESSIONAL HOME HEALTH • VETERINARY
Visit our web site to learn more about
our full line of professional scales.
Pelstar, LLC
11800 South Austin Avenue - Unit B
Alsip, IL 60803 • USA
www.homscales.com
1-800-638-3722 or 1-708-377-0600
-
 1
1
-
 2
2
-
 3
3
-
 4
4
-
 5
5
-
 6
6
-
 7
7
-
 8
8
-
 9
9
-
 10
10
-
 11
11
-
 12
12
-
 13
13
-
 14
14
-
 15
15
-
 16
16
-
 17
17
-
 18
18
-
 19
19
-
 20
20


Health O Meter Professional 498KL User manual
- Category
- Kitchen scales
- Type
- User manual
- This manual is also suitable for
Ask a question and I''ll find the answer in the document
Finding information in a document is now easier with AI
in other languages
Related papers
-
Health O Meter UM800KL User manual
-
Health O Meter Scale HDL977 User manual
-
-
-
-
Health O Meter 160KL User manual
-
-
-
-
