Page is loading ...

ELECTRIC
MOBILITY
World Leader in Personal Independent Mobility
1 Mobility Plaza, Sewell, NJ 08080
Owner’s Manual
Model R6 300
EMC Part: 19271200
Rev. 01 • Date 02/28/03

Rascal R6 300 Scooter Owner’s Manual
EMC Part: 19277200 • Rev.06 • 09/04/2007
i
Please read this entire manual before
operating the vehicle. Failure to do so may
result in damage to the vehicle or serious
injury.
Electric Mobility wishes to thank you for choosing the ConvertAble
®
Rascal
®
Scooter
to improve your freedom and independence. As the World’s leader in the design and
manufacture of personal mobility vehicles, we take great pride in our ability to improve
the quality of life for those people experiencing limitations in movement. Only the
patented ConvertAble Rascal can be easily changed into a 3-wheeled or 4-wheeled
scooter, or indoor PowerChair vehicle. Your ConvertAble Rascal Scooter has been
thoroughly tested and will give you years of good service and pleasure, providing you
follow the instructions and precautions in this manual. Please review this manual in its
entirety prior to first using your Scooter and direct any questions you might have to
Customer Service by calling the toll-free numbers in the following.
Please Record Your Vehicle Information for Future
Reference
Model:
Serial Number:
Date of Purchase:
CUSTOMER SERVICE TOLL FREE NUMBERS
USA For service and parts, our toll-free number is: 1 (800) 257-7955
Canada For service and parts, our toll-free number is: 1 (877) 877-0215
United Kingdom For service and parts, our toll-free number is: 0-800-252614
Other Countries Please call 1-856-468-1000 for the name and address of distributors in
other countries.
To help us serve you as quickly as possible, please have your serial number and your order
number ready when you call. When ordering parts, please have your method of payment
chosen (credit card number and expiration date, check, or COD, etc.). All parts are shipped
UPS Ground. You may request alternate shipping arrangements for an additional charge
based on weight and destination (e.g., UPS Next Day or 2nd Day).

Rascal R6 300 Scooter Owner’s Manual
EMC Part: 19277200 • Rev.06 • 09/04/2007
ii
Contents
Title Page
Safety Information .......................................................................................................................1
Important Information Regarding Electromagnetic Interference (EMI) ...............................2
Getting to Know Your Rascal Scooter .....................................................................................3
Model Designation ..................................................................................................................3
Components ............................................................................................................................ 4
Illustration 1 — Major Components ................................................................................4
Controls ...................................................................................................................................6
Illustration 2 — Operating Controls.................................................................................6
Initial Setup and Adjustments ..............................................................................................10
Charging Batteries ..........................................................................................................10
Illustration 3 — Ammeter .........................................................................................11
Adjustments ....................................................................................................................12
Adjusting Armrest Width..........................................................................................12
Illustration 4 — Armrest Adjustments ..............................................................12
Adjusting Armrest Angle ..........................................................................................12
Adjusting Backrest Angle ........................................................................................13
Illustration 5 — Backrest Adjustments .............................................................13
Adjusting Seat Swivel Position ...............................................................................13
Illustration 6 — Seat Swivel Locking Lever .....................................................13
Adjusting the Handlebar Assembly and Dash Position.........................................14
Illustration 7 — Dash Adjustment .....................................................................14
Illustration 8 — Handlebar Assembly Adjustment...........................................14
Dashboard Clock......................................................................................................15
Setting the Clock ...............................................................................................15
Installing the Clock ............................................................................................15
Illustration 9 — Clock Installation .....................................................................15
Seat Post Height Adjustment ..................................................................................16
Illustration 10 — Seat Post Height Adjustment ...............................................16
Using the Scooter......................................................................................................................17
Transferring Onto the Vehicle ...............................................................................................17
Driving ....................................................................................................................................18
Braking System .....................................................................................................................18
Speed Settings ......................................................................................................................18
Freewheel Operation.............................................................................................................18
Illustration 11 — Brake Release Lever ..........................................................................19
Vehicle Disassembly & Re-Assembly ..................................................................................20
Removing the Front Basket ...........................................................................................20
Removing the Dash ........................................................................................................20
Removing the Handlebar Assembly ..............................................................................20
Removing the Seat .........................................................................................................20
Removing Batteries ........................................................................................................20
Quick Disconnect Drive Train (QDDT) Removal ...........................................................21
Illustration 12 — Drivetrain Removal ......................................................................21
Transporting your Scooter ....................................................................................................22

Rascal R6 300 Scooter Owner’s Manual
EMC Part: 19277200 • Rev.06 • 09/04/2007
iii
Maintenance and Servicing .....................................................................................................23
Preventative Maintenance ....................................................................................................23
Battery Connections.......................................................................................................23
Rear Wheel Removal ......................................................................................................23
Front Wheel Removal .....................................................................................................23
Tire Tread Wear ...............................................................................................................24
Seat Post Lubrication.....................................................................................................24
Caster Wheels.................................................................................................................24
Clock Battery ..................................................................................................................24
Electrical Connections ...................................................................................................24
Hardware Inspection ......................................................................................................24
Cleaning Instructions .....................................................................................................24
Polishing ..........................................................................................................................25
Vehicle Storage ...............................................................................................................25
Troubleshooting.....................................................................................................................26
Controller Troubleshooting ...................................................................................................27
Factory Return Procedures ..................................................................................................27
Limited Warranty Information..................................................................................................28
Application Certification Standards .......................................................................................30
Specifications.............................................................................................................................31
Index ............................................................................................................................................32

Rascal R6 300 Scooter Owner’s Manual
EMC Part: 19277200 • Rev.06 • 09/04/2007
iv
Illustrations
Number Title Page
1Major Components .................................................................................4
2Operating Controls .................................................................................6
3 Ammeter ................................................................................................11
4Armrest Adjustments ............................................................................12
5 Backrest Adjustments ..........................................................................13
6 Seat Swivel Locking Lever ...................................................................13
7Dash Adjustment ..................................................................................14
8Handlebar Assembly Adjustment ........................................................14
9Clock Installation ..................................................................................15
10 Seat Post Height Adjustment ..............................................................16
11 Brake Release Lever.............................................................................19
12 Drivetrain Removal ...............................................................................21
© 2004 Electric Mobilty Corp.
Electric Mobility ® Rascal® and ConvertAble® are registered trademarks of Electric Mobilty Corp.
No liability is assumed with respect to the use of any information contained in this publication. While every precaution has been taken in the
preparation of this publication, Electric Mobilty Corp., assumes no responsibility for errors or omissions nor is any liability assumed for
damages resulting from the use of information contained in this publication. This publication, as well as operational details described herein,
are subject to change without notice.

Rascal R6 300 Scooter Owner’s Manual
EMC Part: 19277200 • Rev. 06 • 09/04/2007
1
Safety Information
Read and understand these Warnings and the entire manual before using your Scooter.
WARNING!
Failure to follow these instructions may result in serious or fatal injury to
the user or damage to the vehicle.
1. DO NOT exceed the specifications of this unit, modify in
anyway, or use for a purpose other than a powered
scooter.
2. DO NOT operate this unit if your health or medications
you are taking cause you to feel dizzy, affect your vision,
or in any way impact your thought process,
coordination, or ability to safely operate the unit. Check
with your physician if you experience any of these
symptoms.
3. DO NOT operate this unit after consuming any alcoholic
beverages.
4. DO NOT transfer on or off the unit until it is turned OFF,
completely stopped, and on a stable and level surface.
5. DO NOT ride over curbs or other obstruction higher
than 3 inches.
6. DO NOT stop when going up an incline. If you must do
so, always lean forward when you start to move. This
will shift the center of gravity to prevent the unit from
tipping over backwards.
7. DO NOT climb inclines that pose a concern for stability.
8. DO NOT drive across an incline or attempt to turn while
on an incline.
9. DO NOT back down an incline or allow the unit to be
backed down an incline.
10. DO NOT turn the Key Switch off while the unit is
moving. This will cause the brake to activate, stopping
the vehicle abruptly.
11. DO NOT attempt to get off the vehicle while it is
moving.
12. ALWAYS remember vehicle capacity is limited to one
person only. This unit is not approved for towing, or for
weights in excess of the published maximum.
13. ALWAYS drive straight up and down inclines.
14. REDUCE SPEED when traveling on (up or down)
inclines. Select the slowest speed setting that will still
allow the vehicle to climb the incline.
15. NEVER try to turn around on an incline!
16. If vehicle stops on an incline, DO NOT attempt to
continue.
17. DO NOT start and stop when stopped on an incline,
back down with the speed set at “slow” and back down
in one continuous movement.
18. ALWAYS lean forward when traveling on inclines
(up or down) for greater stability.
19. ALWAYS reduce to a safe speed when making a turn or
going around a corner.
20. ALWAYS allow ample time to come to a complete stop
when driving down aisle or making turns, especially in
crowded store conditions.
21. ALWAYS turn the power off when the unit is not in use.
This will keep the unit from being accidentally moved.
22. ALWAYS use a grounded receptacle. Use of a non-
grounded receptacle could result in an electrical shock.
23. ALWAYS reduce speed when making a turn.
24. ALWAYS keep arms and legs within the confines of the
unit.
25. USE EXTRA CAUTION when climbing inclines (ramps,
hills, driveways, etc.). Always lean forward in the seat
when traveling up an incline. Do not climb inclines
greater than 25% (1' rise over 4' distance).
26. USE CAUTION when braking on an incline or wet or
slippery surfaces as the unit will take longer to come to
a complete stop.
27. USE CAUTION when operating the unit in bad weather
or driving through water as moisture could affect the
control system or other parts of the unit either
temporarily or permanently.
28. MAINTAIN tire pressure as shown on the tire sidewall to
insure proper performance of your Scooter.
29. OPERATOR MUST REMAIN SEATED with the seat
locked in the forward position when the unit is moving.
30. NEVER hose off your Scooter. To clean, use a soapy
water solution.
31. NEVER use your Scooter in a shower or steam room.
32. NEVER charge batteries that may be frozen.

Rascal R6 300 Scooter Owner’s Manual
EMC Part: 19277200 • Rev. 06 • 09/04/2007
2
Important Information Regarding Electromagnetic Interference
(EMI)
It is very important that you read this information regarding the possible effects of electromagnetic interference
(EMI) on your scooter. Electromagnetic interference (EMI) refers to the effects that outside sources of
electromagnetic energy (radio and television broadcasts, CB radios, garage door openers, cellular telephones,
etc.) might have on the control systems of your scooter. The interference from these sources could cause the
scooter to release its brakes, move by itself, or to move in an unintended direction. EMI could also result in
permanent damage to the control system.
The sources of electromagnetic energy can be broadly classified into three types:
• Hand held, short range portable transceivers. These are transmitter/receivers with the antenna mounted
directly on the unit. Examples include: citizen band (CB) radios, “walkie-talkies”, security, fire and police
transceivers, and devices that transmit signals even when not in use.
• Medium range mobile transceivers. These usually have the antenna mounted outside of a vehicle or
building. Examples include police, fire, ambulance and taxi transceivers.
• Long-range transmitters and receivers. These usually have the antenna mounted on a tower. Examples
include commercial radio and television broadcasts and amateur (HAM) radios. Other types of hand-held
devices like cordless/cellular phones, laptop computers, AM/FM radios, and small appliances like hair
dryers or electric shavers may also generate electromagnetic energy, but it is such a small amount that no
EMI problems should occur with these devices.
The intensity of interference from electromagnetic energy is measured in volts per meter (v/m), which refers to the
strength of the electrical source (voltage) as it relates to the distance away from the object being considered (in
meters). Resistance of a Scooter to certain EMI intensity is commonly called its “immunity level”. An immunity
level of 10 volts/meter is a generally achievable and useful immunity level against interference from radio wave
sources (the higher the immunity level, the greater the protection).
Your Scooter has been tested and found to meet the required immunity level from Electromagnetic Interference of
20 v/m.
WARNING!
Even with an immunity level of 20 volts/meter, certain precautions
must be followed to ensure that your Scooter will not be affected by
outside electromagnetic sources:
• Do not operate hand-held transceivers such as citizen band (CB) radios or turn on powered communication
devices such while the Scooter is turned on.
• Be aware of nearby transmitters, such as radio and television stations, and avoid coming close to them.
• If an unintended movement should occur while operating the Scooter, turn the Scooter OFF as soon as it is
safe to do so.
• Be aware that if you do operate any electrically powered accessories, radios, or other devices, that your
scooter may become more susceptible to interference from outside electromagnetic source.
• Report all incidents of unintended movement or unexpected brake releases to the Service department of
Electric Mobility Corp.

Rascal R6 300 Scooter Owner’s Manual
EMC Part: 19277200 • Rev. 06 • 09/04/2007
3
Getting to Know Your Rascal Scooter
Congratulations on your purchase of a Rascal 600 Series scooter, the latest in easy, convenient
personal mobility from Electric Mobility Corp. Before attempting to use your scooter, we recommend
you read this section first to learn about your new scooter. Included in this section are:
Model Designation Used to correctly identify the model and type of scooter.
Components So that you can identify the important parts of your scooter.
Controls So that you can learn how to operate your scooter properly and
effectively.
Initial Setup & Adjustments So that you can adapt your new scooter for greatest comfort and ease
of use.
Subsequent sections of this manual can then be used to learn how to drive and use your scooter, and
how to take care of it for a long and useful life.
Model Designation
This manual provides instructions and owners information for the following models:
•Model R6 300 — Four Wheeled Rascal 600 Scooter
You can identify your particular model by means of a model number decal on the front plastic. Be sure
to record your model number in the front of this manual (on page i) should you have to contact Electric
Mobility Corp.

Rascal R6 300 Scooter Owner’s Manual
EMC Part: 19277200 • Rev. 06 • 09/04/2007
4
Components
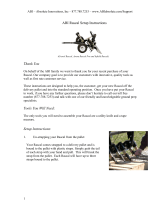
Rascal R6 300 Series Scooters consists of the following major components, as shown in Illustration 1. You
should familiarize yourself with the location and general functioning before proceeding.
Illustration 1 — Major Components
MODEL R6 300
4-WHEEL
FRONT END
REAR
SECTION
SEAT
COVERS
DASH CONTROLS
DRIVETRAIN
WHEELS
&
TIRES
HANDLEBAR
ASSEMBLY

Rascal R6 300 Scooter Owner’s Manual
EMC Part: 19277200 • Rev. 06 • 09/04/2007
5
4-Wheel Front End The Model R6 300 uses a 4-wheel front end to provide the maximum in
stability over a variety of outdoor terrains. Sturdy, independent front
suspension provides greater comfort and a smoother ride.
Controls An internal, on-board, digital controller provides all major driving and
operating functions directly from the dash of the handlebar or tiller. Self-
Diagnostics provide troubleshooting information to detect electrical
problems or faults. Additionally, the controller includes a power save
feature and will shut down automatically in order to conserve battery
power when not operated for a set period of time. The scooter can be
turned on again by turning the ON/OFF keyswitch from on to off and
then on again.
Rear Section A common rear section provides a central, easily accessible location for
controls, charger, wiring components, while serving as the mounting
point for the removable quick disconnect drivetrain.
Covers Internal components are protected by a plastic rear cover of the scooter.
The rear cover can be removed for access to charger, controller, etc.
Charger, controller, and batteries are also protected by an internal cover
inside the rear plastic cover.
Seat For super comfort, all Rascals include a padded, removable, swivel seat
with adjustable back angle and “flip-up” armrests. As an option, the seat
is mounted to an electrically operated seat lift to raise and lower the
seat 5” using controls mounted in the dash/tiller. A manually adjustable
seat post can also be supplied. A spring-loaded lever mounted on the
base of the seat allows it to be rotated and locked in position at each
45° increments.
Dash/Handlebar Assembly The Model R6 300 is steered and operated by a removable handlebar
and dash assembly. Operation of the individual control components are
described in the “Controls” section of this manual (see page 6).
Drivetrain The scooter is propelled by a motorized differential drivetrain mounted
at the rear of the scooter. It drives the two rear wheels for forward/
reverse motion. An integral parking brake mounted on the motor
maintains the vehicle’s stopped position when the engager is released.
The brake includes a manual release lever to disengage it to allow the
vehicle to be pushed by hand. The drivetrain assembly also includes the
rear suspension and serves as the mounting location for the rear bumper
and rear casters. The gearbox is a sealed unit. No maintenance or
servicing is necessary.
Wheels & Tires The R6 300 model scooters include, as standard, foam tires.

Rascal R6 300 Scooter Owner’s Manual
EMC Part: 19277200 • Rev. 06 • 09/04/2007
6
Accessories Your Rascal scooter can include several useful accessories to make
your riding experience more enjoyable, convenient, and easier. These
accessories can include:
•Trunk Lift
• Storage Bags
•Beverage Holder
•Cable Lock
• Safety Flag
These accessories are available separately and come with complete
instructions for installation and use with your vehicle. Contact your
Customer Service representative for further information.
Controls
The Rascal Scooter includes the following controls used for its operation. These controls are shown in
Illustration 2.
FUEL
GAUGE
CLOCK
DIAL-A-SPEED
SEAT LIFT
SWITCH
HAZARD
SWITCH
TURN
SIGNALS
LIGHT
SWITCH
KEYSWITCH
HORN
ENGAGER
LEVERS
STATUS
LAMP
Illustration 2 — Operating Controls

Rascal R6 300 Scooter Owner’s Manual
EMC Part: 19277200 • Rev. 06 • 09/04/2007
7
Fuel Gauge
Indicates the charge level of your batteries. If the
needle goes into the red area, the batteries need to
be charged as soon as possible. If the needle is all
the way to the right side of the green area, the
batteries are fully charged. As the needle moves to
the red area it indicates the level of charge
remaining in the batteries.
Status Lamp
A green LED lamp indicates that power is available
and serves as a troubleshooting indicator when
faults or errors are detected (see “Controller
Troubleshooting” on page 27).
Clock
For convenience, the dash includes an analog clock
displaying the current time of day. The clock may be
set or adjusted by removing the casing from the
dash and using the stem to change time settings.
The clock is powered by a separate battery and
does not require the vehicle to be turned on to
operate.
Speed Control
The Dial-A-Speed knob regulates the maximum
speed of the scooter. Start at the slowest speed
(settings: 0, 1) until you feel confident with
controlling your scooter. Turning the speed dial
counter-clockwise (towards “1”) decreases speed.
Turning it clockwise (towards “10”) increases speed.
Use slower speeds when first driving your scooter to
avoid accidents.
Engager Lever
The operating speed of your vehicle is proportional
to the amount you squeeze the engager lever.
Smooth starts and stops can be accomplished by
gradually moving the engager lever (similar to a gas
pedal in an automobile). Squeeze the engager lever
on the right side to move forward. Or squeeze the
engager lever on the left side to move in reverse.
FUEL GAUGE
18
26
20
22
24
+-
STATUS LAMP
12
3
9
6
1
2
3
4
5
6
7
8
9
1
0
FORWARD
REVERSE

Rascal R6 300 Scooter Owner’s Manual
EMC Part: 19277200 • Rev. 06 • 09/04/2007
8
Hazard Switch
The Rascal includes Hazard Indicators to alert others that
you’ve stopped or require assistance. Pressing the
Hazard Switch flashes front and rear amber lamps.
Pressing again turns lamps off.
Seat Lift Switch (Optional)
If your scooter is equipped with optional seatlift, you can
use this switch to raise and lower the seat automatically.
Operating this switch and using the right side Engager
Lever raises the seat. Using the left side Engager lever
lowers the seat.
The keyswitch on the dash must be in the “On” position
for the Seat Lift to operate.
If the scooter does not include the Seat Lift, this switch
will not function.
Always check switch position before using the scooter
(driving or raising/lowering the seat).
Note: For your safety the scooter will not operate if it
is in seat lift mode. Please ensure that seat lift switch
is in the “down” position before attempting to drive,
even if the scooter does not have a seat lift installed.
Turn Signals
As an added safety precaution, your scooter is equipped
with turn signals. You can activate the right turn signal by
pressing down on the right side of the toggle switch. To
activate the left turn signal, press down on the left side of
the toggle switch. To deactivate the turn signals place
toggle switch in the centered position.

Rascal R6 300 Scooter Owner’s Manual
EMC Part: 19277200 • Rev. 06 • 09/04/2007
9
IMPORTANT!
Always turn scooter “Off” and remove key if you are leaving it
unattended for any period of time. This will prevent unauthorized or
accidental use.
Light Switch
The Rascal includes a complete complement of
Headlight, Taillights, and Running Lights for increased
visibility and safety. The 3-position switch on the dash
controls light operation.
•When in the upper position, the Headlight and
Taillights are illuminated.
•When in the lower position, only the lower front
Running Lights and Taillights are illuminated
•When in the center position, all lights are turned off.
The keyswitch on the dash must be in the “On” position
for the headlight to operate. Hazard and turn signal lights
will operate with the key in the “Off” position.
Horn
Pressing either horn button on the control panel sounds
the horn. Releasing the button deactivates the horn. The
horn is useful to warn people that you are coming
towards them. You may also find it helpful to use it when
rounding blind corners or going in reverse.
Keyswitch
Electrical power to the scooter is controlled by a 2-
position keyswitch on the dash. Inserting the key and
turning it to the right turns power “On.” Turning it to the
left (key upright) turns power “Off.”
A set of 2 keys are supplied with each Rascal Scooter.
We recommend that you put one away in a secure place
in case you lose your operating key.

Rascal R6 300 Scooter Owner’s Manual
EMC Part: 19277200 • Rev. 06 • 09/04/2007
10
The tiller used on the 4-Wheel Chair model is available in left hand or right hand configurations and
includes the following controls:
Right Hand Operation FORWARD Pulling the Speed Engager Lever on the right towards
you moves the vehicle forward.
REVERSE Pulling the Speed Engager Lever on the left towards you
moves the vehicle in reverse.
Left Hand Operation FORWARD Pulling the Speed Engager Lever on the left towards you
moves the vehicle forward.
REVERSE Pulling the Speed Engager Lever on the right towards
you moves the vehicle in reverse.
Other controls mounted on the tiller operate exactly as controls on the dash.
Initial Setup and Adjustments
Before using your Rascal scooter, you should perform the following initial setup and adjustments to
ensure that you are as comfortable as possible. The setup and adjustments include:
•Charging the Battery
• Adjusting the Seat
• Adjusting the Handlebar Assembly and Dash Position
• Setting the Dashboard Clock
Charging Batteries
Because your batteries may only have a partial charge when you first receive your scooter, you may not
experience full riding time until you have fully charged them. Your scooter is equipped with an on-
board battery charger. Charging your batteries as specified will ensure maximum life, power, and range.
It is recommended that you charge your batteries as follows:
•Upon initial receipt of your R6 300.
• For 8-10 hours (overnight) after daily use, regardless of battery level.
• If the fuel gauge indicator should go into the red area while operating your vehicle, the batteries
need to be recharged as soon as possible.
• The battery’s life expectancy may be shortened if they are left fully discharged for more than 24
hours.

Rascal R6 300 Scooter Owner’s Manual
EMC Part: 19277200 • Rev. 06 • 09/04/2007
11
Use the following to charge batteries of your Rascal scooter.
1. Park the vehicle near a 3-Prong Grounded Electrical Receptacle.
2. Lift the trunk lid and remove the power cord from
the trunk area. Plug power cord into a 3-Prong
Grounded Electrical Receptacle.
3. Check that the needle of the ammeter in the trunk
area registers greater than 1 to ensure that vehicle is
in charge mode. If batteries are fully charged and
have not discharged sufficiently (approx. 2.5% to
5%), the needle on the ammeter will remain at 0, as
shown in Illustration 3 and the needle on the Battery
Level Indicator on the dash will be located to the
extreme right of the green area indicating a full
charge on the battery (and no charging is required).
4. Normal charging time is generally 8-10 hours for
fully discharged batteries. The batteries are fully
charged when the needle of the ammeter is at 0. We
do not recommend that you leave your vehicle in
charge mode. There is no added benefit after
batteries have been fully charged.
5. Disconnect the power plug of the charger from the
wall outlet and return it to the trunk area. Close
trunk lid before proceeding.
Note: Vehicle will not operate while in charge mode.
Illustration 3 — Ammeter
D.C. AMPERES
0
2468
19271200/3
WARNING!
Use of a non-grounded receptacle could result in an electrical shock.

Rascal R6 300 Scooter Owner’s Manual
EMC Part: 19277200 • Rev. 06 • 09/04/2007
12
Adjustments
Your scooter has been pre-adjusted to meet most customers’ needs, however your scooter includes
several adjustments to adapt it to specific height and width requirements. These adjustments include:
• Adjusting the Seat (armrest width and armrest/backrest angles)
• Adjusting the Handlebar and Dash Position
Instructions to perform these adjustments are presented in the following section:
Adjusting Armrest Width
The two armrests of the seat can be adjusted to different
widths. Armrest adjustments are shown in Illustration 4.
Illustration 4 — Armrest Adjustments
Follow these instructions to adjust armrest width:
• Loosen corresponding knob behind the seat
• Adjust width by pulling armrest out from seat to
desired position
• Re-tighten knob to secure armrest at selected
width
Be sure to repeat armrest adjustment on other side
before riding.
Adjusting Armrest Angle
In addition to width adjustments, the armrests of the
seat can be set at different angles for greater comfort.
Follow these instructions to adjust armrest angle.
• Lift armrest to full up position.
• Locate adjustment bolt within armrest joint. Turn
bolt to vary armrest angle (wrench may be
needed).
• Put armrest down into riding position and test for
comfort before riding.
LOOSEN
KNOBS
MOVE TO
ADJUST
19271200/4

Rascal R6 300 Scooter Owner’s Manual
EMC Part: 19277200 • Rev. 06 • 09/04/2007
13
Adjusting Backrest Angle
The seat is designed with five available backrest settings
(90°, 95°, 100°, 105° and 115°) to allow you to adjust the
angle of the back of your seat. The 90° setting provides
the most upright position and the 115° setting is the most
reclined. Adjustment locations are shown in Illustration 5.
The wrench and allen key that come with the scooter is
used in these adjustments.
Illustration 5 — Backrest Adjustments
To adjust the backrest angle:
1. Remove the nut and bolt on the hinge using the
supplied wrench and allen key.
2. Reinstall the hardware into the desired seat back
angle setting.
3. Choose the position that is most comfortable for
the user or as recommended by a seating
professional.
4. Be sure to set both sides in the same position.
Adjusting Seat Swivel Position
The seat locking lever (located on the side of the seat)
allows you to swivel your seat and lock it in at 45°
increments. This locking lever is shown in Illustration 6.
You may use this feature to make it easier to transfer in
and out of the seat. To change seat positions:
• Actuate the seat locking lever.
•Swivel the seat to the position you desire.
• Release the lever.
Caution: After releasing the lever, turn the seat back
and forth slightly to ensure the lever is locked into
position.
Illustration 6 — Seat Swivel Locking Lever
100°
105°
115°
90°
90
115
105
100
95
95°
19271200/5

Rascal R6 300 Scooter Owner’s Manual
EMC Part: 19277200 • Rev. 06 • 09/04/2007
14
Adjusting the Handlebar Assembly and Dash
Position
Both the handlebar assembly and dash include
adjustments to allow them to be positioned according to
your individual riding style. The angle of the dash can be
adjusted up or down for maximum comfort and easier
use of dash controls. The entire handlebar assembly can
also be adjusted through a movable handle at the base of
the lower handlebar assembly. Dash and handlebar
assembly adjustments are shown in Illustrations 7 and 8.
Adjust dash angles so that your elbows can rest on the
armpads while you operate your Rascal and you can see
the dash controls.
• Sit in seat facing forward.
• Lift dash to upright position to access adjustment
screw.
• Locate adjustment screw. Use allen key (supplied)
to turn screw clockwise to lower the angle or
counterclockwise to raise dash angle.
Illustration 7 — Dash Adjustment
Adjust handlebar assembly positions so that the
handgrips are within comfortable reach.
• Sit in seat facing forward.
•While holding the handlebar, reach down to the
base and loosen the locking adjustment handle by
turning handle counter-clockwise.
•When at desired angle, tighten locking handle by
turning clockwise.
Note: Lever can be positioned out of the way by pulling
lever out and moving it away from rider. Release lever
and it will lock in place.
Illustration 8 — Handlebar Assembly
Adjustment
19271200/7
ADJUSTMENT
SCREW
LOCATION

Rascal R6 300 Scooter Owner’s Manual
EMC Part: 19277200 • Rev. 06 • 09/04/2007
15
Dashboard Clock
Your Rascal R6 300 Series Scooter comes with a removable,
battery-powered, quartz clock that mounts directly in the
dashboard of the scooter. This clock is shipped
separately to allow you to set it to your local time before
installing in the dashboard. Instructions are provided
below to set the correct time and install it in the dash.
Instructions to replace the clock battery are provided in
the Maintenance section of this manual (see “Clock
Battery” on page 24).
Setting the Clock
Locate the bag containing keys, clock, and other items
shipped separately with the scooter. Unwrap the clock
from its protective packing. If clock includes a small,
plastic collar around stem, remove collar and push stem
“in” to start clock.
Set clock to your local time by pulling stem out and
turning to adjust hour/minute hands. Push stem in to
start clock.
Installing the Clock
When you have set the clock to your correct, local time,
you can install it in the dashboard of your Rascal scooter.
Install the clock into the location adjacent to the Speed
Control. The rubber gasket around the clock face is
sufficient to secure the clock in place. Make sure the
“12” faces “up.”
Illustration 9 — Clock Installation
12
3
9
6
19271200/9
/