Page is loading ...


2
WARNING
002c
• Do not open (or modify in any way) the unit or its AC
adaptor.
003
• Do not attempt to repair the unit, or replace parts
within it (except when this manual provides specic
instructions directing you to do so). Refer all servicing
to your retailer, the nearest Roland Service Center,
or an authorized Roland distributor, as listed on the
“Information” page.
004
• Never install the unit in any of the following locations.
• Subject to temperature extremes (e.g., direct
sunlight in an enclosed vehicle, near a heating duct,
on top of heat-generating equipment); or are
• Damp (e.g., baths, washrooms, on wet oors); or are
• Exposed to steam or smoke; or are
• Subject to salt exposure; or are
• Humid; or are
• Exposed to rain; or are
• Dusty or sandy; or are
• Subject to high levels of vibration and shakiness.
005
• If you wish to use a stand when setting up the VP-7,
please use the PDS-10 and BKT-S, which are recom-
mended by Roland (p. 10).
006
• When using the unit with a rack or stand recommended
by Roland, the rack or stand must be carefully placed so
it is level and sure to remain stable. If not using a rack
or stand, you still need to make sure that any location
you choose for placing the unit provides a level surface
that will properly support the unit, and keep it from
wobbling.
WARNING
008c
• Be sure to use only the AC adaptor supplied with the
unit. Also, make sure the line voltage at the installation
matches the input voltage specied on the AC adaptor’s
body. Other AC adaptors may use a dierent polarity, or
be designed for a dierent voltage, so their use could
result in damage, malfunction, or electric shock.
008e
• Use only the attached power-supply cord. Also, the
supplied power cord must not be used with any other
device.
009
• Do not excessively twist or bend the power cord, nor
place heavy objects on it. Doing so can damage the
cord, producing severed elements and short circuits.
Damaged cords are re and shock hazards!
010
• This unit, either alone or in combination with an
amplier and headphones or speakers, may be capable
of producing sound levels that could cause permanent
hearing loss. Do not operate for a long period of time at
a high volume level, or at a level that is uncomfortable.
If you experience any hearing loss or ringing in the ears,
you should immediately stop using the unit, and consult
an audiologist.
011
• Do not allow any objects (e.g., ammable material,
coins, pins); or liquids of any kind (water, soft drinks, etc.)
to penetrate the unit.
201a
Before using this unit, carefully read the sections entitled: “USING THE UNIT SAFELY” and “IMPORTANT NOTES” (p. 2; p. 4).
These sections provide important information concerning the proper operation of the unit. Additionally, in order to feel
assured that you have gained a good grasp of every feature provided by your new unit, Owner’s manual should be read in
its entirety. The manual should be saved and kept on hand as a convenient reference.
Used for instructions intended to alert the
user to the risk of injury or material
damage should the unit be used
improperly.
* Material damage refers to damage or
other adverse effects caused with
respect to the home and all its
furnishings, as well to domestic animals
or pets.
Used for instructions intended to alert the
user to the risk of death or severe injury
should the unit be used improperly.
The symbol alerts the user to things that must be
carried out. The specific thing that must be done is
indicated by the design contained within the circle. In the
case of the symbol at left, it means that the power-cord
plug must be unplugged from the outlet.
The symbol alerts the user to important instructions or
warnings.The specific meaning of the symbol is
determined by the design contained within the triangle. In
the case of the symbol at left, it is used for general
cautions, warnings, or alerts to danger.
The symbol alerts the user to items that must never be
carried out (are forbidden). The specific thing that must
not be done is indicated by the design contained within
the circle. In the case of the symbol at left, it means that
the unit must never be disassembled.
About WARNING and CAUTION Notices
About the Symbols
ALWAYS OBSERVE THE FOLLOWING

3
CAUTION
101b
• The unit and the AC adaptor should be located so their
location or position does not interfere with their proper
ventilation.
101c
• This (VP-7) for use only with Roland stand PDS-10 and
BKT-S. Use with other stands is capable of resulting in
instability causing possible injury.
101f
• Even though you’ve observed all the precautions listed
in the owner’s manual, the stand (PDS-10, BKT-S) could
overturn depending on the way you perform. For this
reason, you should address all issues concerning safety
before using this product.
102c
• Always grasp only the plug on the AC adaptor cord
when plugging into, or unplugging from, an outlet or
this unit.
103b
• At regular intervals, you should unplug the AC adaptor
and clean it by using a dry cloth to wipe all dust and
other accumulations away from its prongs. Also, discon-
nect the power plug from the power outlet whenever
the unit is to remain unused for an extended period of
time. Any accumulation of dust between the power plug
and the power outlet can result in poor insulation and
lead to re.
104
• Try to prevent cords and cables from becoming
entangled. Also, all cords and cables should be placed so
they are out of the reach of children.
106
• Never climb on top of, nor place heavy objects on the
unit.
CAUTION
107c
• Never handle the AC adaptor or its plugs with wet hands
when plugging into, or unplugging from, an outlet or
this unit.
108b
• Before moving the unit, disconnect the AC adaptor and
all cords coming from external devices.
109b
• Before cleaning the unit, turn o the power and unplug
the AC adaptor from the outlet (p. 10).
110b
• Whenever you suspect the possibility of lightning in
your area, disconnect the AC adaptor from the outlet.
118a
• Should you remove screw, keep them in a safe place out
of children’s reach, so there is no chance of them being
swallowed accidentally.
120
• Always turn the phantom power o when connecting
any device other than condenser microphones that
require phantom power. You risk causing damage if
you mistakenly supply phantom power to dynamic
microphones, audio playback devices, or other devices
that don’t require such power. Be sure to check the
specications of any microphone you intend to use by
referring to the manual that came with it.
(This instrument’s phantom power: 48 V DC, 10 mA Max)
WARNING
012b
• Immediately turn the power o, remove the AC adaptor
from the outlet, and request servicing by your retailer,
the nearest Roland Service Center, or an authorized
Roland distributor, as listed on the “Information” page
when:
• The AC adaptor, the power-supply cord, or the plug
has been damaged; or
• If smoke or unusual odor occurs
• Objects have fallen into, or liquid has been spilled
onto the unit; or
• The unit has been exposed to rain (or otherwise has
become wet); or
• The unit does not appear to operate normally or
exhibits a marked change in performance.
013
• In households with small children, an adult should
provide supervision until the child is capable of
following all the rules essential for the safe operation of
the unit.
WARNING
014
• Protect the unit from strong impact.
(Do not drop it!)
015
• Do not force the unit’s power-supply cord to share an
outlet with an unreasonable number of other devices.
Be especially careful when using extension cords—the
total power used by all devices you have connected
to the extension cord’s outlet must never exceed the
power rating (watts/amperes) for the extension cord.
Excessive loads can cause the insulation on the cord to
heat up and eventually melt through.
016
• Before using the unit in a foreign country, consult
with your retailer, the nearest Roland Service Center,
or an authorized Roland distributor, as listed on the
“Information” page.

4
Power Supply
301
• Do not connect this unit to same electrical outlet that is being used
by an electrical appliance that is controlled by an inverter (such as a
refrigerator, washing machine, microwave oven, or air conditioner),
or that contains a motor. Depending on the way in which the
electrical appliance is used, power supply noise may cause this unit
to malfunction or may produce audible noise. If it is not practical to
use a separate electrical outlet, connect a power supply noise lter
between this unit and the electrical outlet.
302
• The AC adaptor will begin to generate heat after long hours of
consecutive use. This is normal, and is not a cause for concern.
307
• Before connecting this unit to other devices, turn o the power
to all units. This will help prevent malfunctions and/or damage to
speakers or other devices.
Placement
351
• Using the unit near power ampliers (or other equipment
containing large power transformers) may induce hum. To alleviate
the problem, change the orientation of this unit; or move it farther
away from the source of interference.
352a
• This device may interfere with radio and television reception. Do not
use this device in the vicinity of such receivers.
352b
• Noise may be produced if wireless communications devices, such
as cell phones, are operated in the vicinity of this unit. Such noise
could occur when receiving or initiating a call, or while conversing.
Should you experience such problems, you should relocate such
wireless devices so they are at a greater distance from this unit, or
switch them o.
354a
• Do not expose the unit to direct sunlight, place it near devices that
radiate heat, leave it inside an enclosed vehicle, or otherwise subject
it to temperature extremes. Excessive heat can deform or discolor
the unit.
355b
• When moved from one location to another where the temperature
and/or humidity is very dierent, water droplets (condensation)
may form inside the unit. Damage or malfunction may result if you
attempt to use the unit in this condition. Therefore, before using
the unit, you must allow it to stand for several hours, until the
condensation has completely evaporated.
360
• Depending on the material and temperature of the surface on which
you place the unit, its rubber feet may discolor or mar the surface.
You can place a piece of felt or cloth under the rubber feet to
prevent this from happening. If you do so, please make sure that the
unit will not slip or move accidentally.
Maintenance
401a
• For everyday cleaning wipe the unit with a soft, dry cloth or one
that has been slightly dampened with water. To remove stubborn
dirt, use a cloth impregnated with a mild, non-abrasive detergent.
Afterwards, be sure to wipe the unit thoroughly with a soft, dry
cloth.
402
• Never use benzine, thinners, alcohol or solvents of any kind, to avoid
the possibility of discoloration and/or deformation.
Additional Precautions
552
• Unfortunately, it may be impossible to restore the contents of data
that was stored in the unit’s memory once it has been lost. Roland
Corporation assumes no liability concerning such loss of data.
553
• Use a reasonable amount of care when using the unit’s buttons,
sliders, or other controls; and when using its jacks and connectors.
Rough handling can lead to malfunctions.
556
• When connecting / disconnecting all cables, grasp the connector
itself—never pull on the cable. This way you will avoid causing
shorts, or damage to the cable’s internal elements.
558a
• To avoid disturbing your neighbors, try to keep the unit’s volume at
reasonable levels. You may prefer to use headphones, so you do not
need to be concerned about those around you (especially when it is
late at night).
559a
• When you need to transport the unit, package it in the box (includ-
ing padding) that it came in, if possible. Otherwise, you will need to
use equivalent packaging materials.
562
• Some connection cables contain resistors. Do not use cables that
incorporate resistors for connecting to this unit. The use of such
cables can cause the sound level to be extremely low, or impossible
to hear. For information on cable specications, contact the
manufacturer of the cable.
IMPORTANT NOTES
202
Copyright © 2010 ROLAND CORPORATION
All rights reserved. No part of this publication may be reproduced in any form without the written permission of ROLAND
CORPORATION.
Roland and Vocal Designer are registered trademarks of Roland Corporation in the United States and/or other countries.
220
• All product names mentioned in this document are trademarks or
registered trademarks of their respective owners.
ADD
• MMP (Moore Microprocessor Portfolio) refers to a patent portfolio
concerned with microprocessor architecture, which was developed
by Technology Properties Limited (TPL). Roland has licensed this
technology from the TPL Group.

5
CONTENTS
Look What You Can Do with the VP-7 . . . . . . . .6
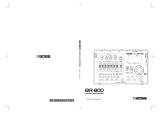
Names of Things and What They Do . . . . . . . . .8
Top Panel . . . . . . . . . . . . . . . . . . . . . . . . . . . . . . . . . . . . . . . . . . . . 8
Rear Panel . . . . . . . . . . . . . . . . . . . . . . . . . . . . . . . . . . . . . . . . . . . 9
Bottom Panel . . . . . . . . . . . . . . . . . . . . . . . . . . . . . . . . . . . . . . . . 9
Getting Ready . . . . . . . . . . . . . . . . . . . . . . . . . . . .10
Connecting the AC Adaptor . . . . . . . . . . . . . . . . . . . . . . . . . 10
Connecting a Keyboard . . . . . . . . . . . . . . . . . . . . . . . . . . . . . 11
Connecting Headphones or Speakers . . . . . . . . . . . . . . . . 12
Connecting a Microphone . . . . . . . . . . . . . . . . . . . . . . . . . . . 13
Connecting a Foot Pedal . . . . . . . . . . . . . . . . . . . . . . . . . . . . 14
Turning the Power On/O . . . . . . . . . . . . . . . . . . . . . . . . . . . 15
Turning the Power On . . . . . . . . . . . . . . . . . . . . . . . . . . . . 15
Turning the Power O . . . . . . . . . . . . . . . . . . . . . . . . . . . . 15
Adjusting the Volume . . . . . . . . . . . . . . . . . . . . . . . . . . . . . . . 16
Mic Input Level (Mic) . . . . . . . . . . . . . . . . . . . . . . . . . . . . . . . . 17
Performing with a Human Voice . . . . . . . . . . .18
Selecting a Human Voice . . . . . . . . . . . . . . . . . . . . . . . . . . . . 18
Performing with Vocal Designer . . . . . . . . . . .19
Selecting a Vocal Designer Sound. . . . . . . . . . . . . . . . . . . . 19
Performing with the Vocoder . . . . . . . . . . . . . .20
Selecting a Vocoder Sound . . . . . . . . . . . . . . . . . . . . . . . . . . 20
Selecting a Variation Sound . . . . . . . . . . . . . . . . . . . . . . . 21
Using Controllers . . . . . . . . . . . . . . . . . . . . . . . . .22
Performing with a Keyboard . . . . . . . . . . . . . . . . . . . . . . . . . 22
Adjusting the Volume Balance (Harmony) . . . . . . . . . . . . 23
Outputting Only the Direct Sound from
the Microphone (Bypass) . . . . . . . . . . . . . . . . . . . . . . . . . . . . 24
Adjusting the Dynamics (Dynamics) . . . . . . . . . . . . . . . . . 25
Applying Ambience (Ambience) . . . . . . . . . . . . . . . . . . . . . 25
Tuning (Tune) . . . . . . . . . . . . . . . . . . . . . . . . . . . . . . . . . . . . . . . 26
Using the VP-7 in Combination with a Sequencer . . . . . 27
Performing along with
Your Portable Audio Player . . . . . . . . . . . . . . . .28
Changing the Settings . . . . . . . . . . . . . . . . . . . .29
Changing the Function of the Output L/R Jacks
(Output Mode) . . . . . . . . . . . . . . . . . . . . . . . . . . . . . . . . . . . . . . 29
Changing the Pitch Bend Range (Bend Range) . . . . . . . 29
Reset to Default Factory Setting (Factory Reset) . . . . . . 30
Sound List . . . . . . . . . . . . . . . . . . . . . . . . . . . . . . . .30
Troubleshooting . . . . . . . . . . . . . . . . . . . . . . . . . .31
MIDI Implementation Chart . . . . . . . . . . . . . . .32
Specications . . . . . . . . . . . . . . . . . . . . . . . . . . . .33
Index . . . . . . . . . . . . . . . . . . . . . . . . . . . . . . . . . . . .34

6
Look What You Can Do with the VP-7
“Connecting a
Microphone” (p. 13)
Microphone
“Connecting a Keyboard”
(p. 11)
Keyboard
“Performing along with
Your Portable Audio
Player” (p. 28)
Portable
audio player
“Connecting a Foot
Pedal” (p. 14)
Foot pedal
Human Voice Perform realistic human vocals
You can perform realistic human vocals simply by playing a connected keyboard.
Choose from Female Choir, Kids Choir, Gregorian Choir, or Jazz Scat sounds (p. 18).

7
Vocoder Transform your voice to a robot voice
Sing into a microphone while playing a keyboard, and your voice will morph into a robot voice.
Press the [Vocoder] button, and use the keyboard to play sounds ranging from vintage vocoder sounds to
the latest electro-styles (p. 20).
Vocal Designer Add harmony to your voice
By singing into the microphone while you press chords on the keyboard, you can play harmonies using
your voice.
You can perform richly expressive harmonies that reect the dynamics of your voice and the lyrics you’re
singing (p. 19).
A superb choir at your side
Easy setup, and simple operation.
Now it’s easy for anyone to create the nest choral harmonies.

8
1
[Volume] Knob (p. 16)
This adjusts the overall volume of the VP-7.
2
MIDI Indicator
This will light when messages are received from the MIDI IN con-
nector.
3
Level (Tune) Indicator (p. 26)
This indicates the microphone input level (index markings at the
right).
When you turn the [TUNE] knob on the rear panel, this will indicate
the current tuning for several seconds (index markings at the left).
4
[Mic] Knob (p. 17)
This adjusts the microphone input level.
5
[Harmony] Knob (p. 23)
This adjusts the balance between the unprocessed vocal from the
microphone input (the direct sound) and the Human Voice/Vocal
Designer/Vocoder sound.
6
[Ambience] Knob (p. 25)
This adjusts the depth of Ambience.
7
[Vocoder] Button (p. 20)
Press this to select Vocoder sounds.
By pressing the [Vocoder] button you can cycle through the vocoder
sounds (three types).
While holding down the [Vocoder] button, you can press one of the
Human Voice buttons or Vocal Designer buttons to select variations
(seven types).
8
[Bypass] Button (p. 24)
This mutes (silences) the Human Voice/Vocal Designer/Vocoder
sound, so that only the direct sound from the microphone will be
output.
9
Human Voice Sound Buttons (p. 18)
Use these buttons to select a Human Voice.
10
Vocal Designer Sound Buttons (p. 19)
Use these buttons to select a Vocal Designer sound.
11
Headphone Jack (p. 12)
Connect headphones to this jack.
Top Panel
72 31
8
654
911 10
Names of Things and What They Do

9
23 23
USB FOR UPDATE Connector
This is used to update the VP-7’s internal program.
NOTE
For normal use, do not connect anything to this connec-
tor.
12
[POWER] Switch (p. 15)
This turns the power of the VP-7 on/o.
13
DC IN Jack (p. 10)
Connect the AC adaptor here.
14
MIDI IN Connector (p. 11)
Connect your MIDI device here.
15
FOOT PEDAL Jack (p. 14, p. 24)
Connect a foot pedal here.
This lets you use a foot pedal to control the function of the [Bypass]
button.
16
[TUNE] Knob (p. 26)
This knob adjusts the tuning.
You can adjust the tuning over a range of 438–442 Hz in 1 Hz steps.
17
[PHANTOM] Switch (p. 13)
Turn this on if you’ve connected a condenser microphone that
requires phantom power.
* Turn this o if you’re using the included microphone (DR-HS5).
* Supplying phantom power to a dynamic microphone or audio
playback device will cause malfunctions.
18
MIC IN Jack (both XLR and 1/4” phone) (p. 13)
Connect your microphone here.
The Mic input connector supports either XLR type or phone type
plugs.
The XLR type connector supports 48V phantom power, allowing you
to connect a condenser microphone that requires a phantom power
supply.
19
LINE INPUT Jack (STEREO) (p. 28)
Here you can connect your portable audio player or the audio
output of your MIDI-connected keyboard.
* The VP-7’s [Volume] knob does not aect the LINE INPUT. Use the
volume control of the connected keyboard to adjust the volume.
20
OUTPUT Jacks (p. 12)
These jacks output the VP-7’s sound in stereo (L/R).
927
21
Ground Terminal
Depending on the circumstances of a particular setup, you may
experience a discomforting sensation, or perceive that the surface
feels gritty to the touch when you touch this device, microphones
connected to it, or the metal portions of other objects, such as
guitars. This is due to an innitesimal electrical charge, which is
absolutely harmless. However, if you are concerned about this, con-
nect the ground terminal (see gure) with an external ground. When
the unit is grounded, a slight hum may occur, depending on the
particulars of your installation. If you are unsure of the connection
method, contact the nearest Roland Service Center, or an authorized
Roland distributor, as listed on the “Information” page.
Unsuitable places for connection
• Water pipes (may result in shock or electrocution)
• Gas pipes (may result in re or explosion)
• Telephone-line ground or lightning rod (may be dangerous in
the event of lightning)
988
22
Security Slot (
)
• http://www.kensington.com/
Bottom Panel
Rear Panel
22
15 16 17 18 19 20
21
141312

10
Connecting the AC Adaptor
Connect the included AC adaptor to the DC IN connector on the rear panel of the VP-7.
Power Cord
Indicator
NOTE
932
• Place the AC adaptor so the side with the indicator (see illustration) faces upwards and the side with textual information
faces downwards.
The indicator will light when you plug the AC adaptor into an AC outlet.
• Securely insert the AC adaptor plug all the way into the connector.
• Use only the supplied AC adaptor.
Getting Ready
Attaching the VP-7 to a stand
By using the separately sold PDS-10 and BKT-S, you can attach the VP-7 to a stand as shown in the
illustration.
* Use only the screws provided with the BKT-S. Other screws may damage the unit.
* When using the PDS-10, extend the legs to their maximum spread. Do not allow the overall
height including the VP-7 to exceed 1 meter.
928
* When turning the unit upside-down, get a bunch of newspapers or magazines, and place them
under the four corners or at both ends to prevent damage to the buttons and controls. Also,
you should try to orient the unit so no buttons or controls get damaged.
929
* When turning the unit upside-down, handle with care to avoid dropping it, or allowing it to
fall or tip over.

11
Connecting a Keyboard
By using the VP-7 in conjunction with a keyboard, you’ll be able to control your performance expression in greater detail.
You can play the keyboard to specify the harmony notes or vocal pitches.
MIDI
Cable
MIDI IN
Keyboard
MIDI OUT
If you run a cable from the output of
your keyboard (which you’ve con-
nected to the MIDI IN connector) to the
LINE IN jack, you’ll be able to carry out
performances that use Human Voice
or Vocal Designer in combination with
what you play on the keyboard.
* The VP-7’s [Volume] knob does not
aect the LINE INPUT. Use the volume
control of the connected keyboard to
adjust the volume.
MEMO
If a keyboard is not connected, the pitch from the microphone input will be detected, and the pitch of the sounds produced
will be based on this detected pitch.
Changing the MIDI receive mode
At the factory settings, the VP-7 is set to MIDI channel 1.
If you want to receive multiple channels, you can change the MIDI reception mode so that all channels 1–16 will be received
(OMNI).
If you set the VP-7’s MIDI reception mode so that only channel 1 is received, you must also set the transmitting MIDI device
to channel 1.
To check the current MIDI reception mode
The button illumination when the VP-7 is powered up will
indicate the current MIDI reception mode.
Reception mode Button illumination
Ch1
When you turn on the power, the selected
sound button will light.
OMNI
When you turn on the power, all of the
sound buttons will simultaneously blink
twice, and then the selected sound button
will light.
To change the MIDI reception mode
While holding down the [Bypass] button, turn on the power.
Each time you do this, the setting will alternate between
Ch1/OMNI.
Reception mode Explanation
Ch1 Only the data of channel 1 will be
received
OMNI All channels will be received
When you change the MIDI reception mode, the setting is
automatically stored in the unit; it will still be in eect the
next time power is turned on.
* Even if you set the MIDI reception mode to OMNI, you still won’t be able to use the unit as a multitimbral sound
generator.

12
Connecting Headphones or Speakers
The VP-7 does not contain speakers. In order to hear sound, you’ll need to connect it to an audio device, such as monitor speakers
or a stereo system, or connect headphones.
NOTE
921
To prevent malfunction and/or damage to speakers or other devices, always turn down the volume, and turn o the power
on all devices before making any connections.
Connecting monitor speakers
or a stereo system
Use cables to connect the VP-7’s rear panel
OUTPUT jacks to your monitor speaker or
stereo set.
* In order to take full advantage of the VP-
7’s capabilities, we recommend that you
use it in stereo.
* To use it in mono, connect to the OUTPUT
L/MONO jack.
Monitor speakers (with built-in amp)
INPUT
Audio
Cable
OUTPUT
Using headphones
Connect commercially available head-
phones to the Headphone jack.
* Sound will be output from the OUTPUT
jacks even if headphones are connected.
Headphones
Headphone Jack
(Stereo miniature phone type)

13
Connecting a Microphone
A microphone is indispensable when performing with the VP-7.
The VP-7 models vocal sounds by using your voice that is input via the microphone.
922
* This instrument is equipped with balanced (XLR/TRS) type
jacks. Wiring diagrams for these jacks are shown below.
Make connections after rst checking the wiring diagrams
of other equipment you intend to connect.
1: GND 2: HOT
3: COLD
TIP: HOT
RING: COLD
SLEEVE: GND
983
* Howling could be produced depending on the location of
microphones relative to speakers. This can be remedied by:
1. Changing the orientation of the microphone(s).
2. Relocating microphone(s) at a greater distance from speakers.
3. Lowering volume levels.
If using a phantom-powered microphone
The VP-7’s MIC IN jack can provide phantom power.
* Turn this o if you’re using the included microphone.
* You must turn the phantom power o unless you’ve connected a condenser microphone that requires phantom
power.
Supplying phantom power to a dynamic microphone or audio playback device will cause malfunctions. For details
on the specications of your microphone, refer to the owner’s manual that came with your microphone.
(The VP-7’s phantom power supply: DC 48 V, 10 mA Max)
1. Turn on the [PHANTOM] switch.
Phantom power will be supplied.
* Note that if you don’t have a MIDI keyboard connected,
the Human Voice sound could continue sounding without
end if the input from the microphone is at too high a level.
Should you encounter this problem, turn the [Mic] knob
counterclockwise to lower the level of the input.
* For information on how to wear the microphone, refer to the
owner’s manual that came with the supplied microphone.

14
Connecting a Foot Pedal
The VP-7 allows you to connect a foot pedal (DP series; sold separately).
If you connect a foot pedal (DP series; sold separately) to the FOOT PEDAL jack on the rear panel, you’ll be able to use your foot
to operate the function of the [Bypass] button (p. 24).
When you press the foot pedal, the Human Voice/Vocal Designer/Vocoder sound will be muted (silenced), and only the direct
sound from the microphone will be output.
When you press the foot pedal once again, muting will be cancelled, and you’ll hear the sound again.
Foot Pedal
(DP series; sold separately)
NOTE
Use only the specied foot pedal (DP series; sold separately). Connecting a product made by another manufacturer might
cause the VP-7 to malfunction.

15
Turning the Power On/O
Here’s how to turn the VP-7’s power on/o.
Turning the Power On
941
* Once the connections have been completed (p. 10–p. 14), turn on power to your various devices in the order specied. By turn-
ing on devices in the wrong order, you risk causing malfunction and/or damage to speakers and other devices.
1. Before you turn on the power, check the following points.
Is the VP-7 correctly connected with your other equipment?
Have you minimized the volume settings of the VP-7 and of the connected audio equipment?
2. Turn on the [POWER] switch located on the VP-7’s rear panel.
943
* Always make sure to have the volume level turned down before switching on power. Even with the volume all the way down,
you may still hear some sound when the power is switched on, but this is normal, and does not indicate a malfunction.
Turning the Power O
1. Before you turn o the power, minimize the volume settings of the VP-7 and of the connected audio equip-
ment.
2. Turn o the [POWER] switch located on the VP-7’s rear panel.

16
Adjusting the Volume
1. Turn the [Volume] knob to adjust the VP-7’s overall volume.
MEMO
For best results, adjust the controls of your amp and speaker so that the volume is appropriate when the [Volume] knob is in
the range between 12 o’clock and 2 o’clock, as shown in the illustration.
Turn the knob toward the right when you want to increase the sound further, or toward the left when you want to decrease
the sound.
* The [Volume] knob does not aect the LINE INPUT. Use the controls of the connected device to adjust the volume.

17
Mic Input Level (Mic)
Here’s how to adjust the level of the input from the microphone connected to the MIC IN jack on the rear panel.
Your voice will be distorted if the microphone input level is too high. Noise will be heard if the microphone input level is too low.
If your voice is distorted, or if there is too much noise, the VP-7 will have diculty detecting the pitch, and it won’t be possible
to add harmonies cleanly.
To ensure that the harmonies are added as cleanly as possible, it’s important to adjust the microphone input level until it is as
high as you can get it without causing distortion to occur.
NOTE
If the input from the microphone is at too high a level, acoustic feedback could be produced, or the sound might continue
sounding endlessly. Adjust the level of the microphone’s input by following the procedure below.
1. Vocalize into the microphone.
You should try to maintain a xed distance between the microphone and your mouth.
2. Note how the level (Tune) indicator is illuminated.
Level Signicance of the indicator
Red Lights when the level of the signal from the microphone input is
too high.
Yellow Lights when the optimal signal level is being input via the micro-
phone input.
Green Lights when a signal is input via the microphone input.
3. Turn the [Mic] knob to adjust the input level.
Adjust the level so that the yellow indicator lights when you sing loudly.
MEMO
Once you’ve set the microphone input level, you should normally leave it untouched. Use the [Volume] knob to raise or lower
the volume.

18
The Human Voice section lets you perform with realistic choir sounds simply by playing the keyboard.
Selecting a Human Voice
Press one of the Human Voice buttons so it’s lit (green); now you can play the Human Voice section.
If one of the Human Voice sounds is selected, the indicator of that sound button will light green.
Try out the sound as you adjust the [Harmony] knob and [Ambience] knob (p. 23, p. 25).
Sound Explanation
Female Choir This is the sound of a female choir. The tone will change according to your keyboard playing dynamics.
Kids Choir This is a children’s choir with a beautiful transparent sound.
Gregorian Choir This is the sound of a large choir typical of singing in a church. It is suitable for majestic classical songs.
Jazz Scat This sound samples a jazz scat vocalist. It is suitable for songs with rapid passages, or scat solos.
NOTE
You can’t use the Human Voice section and Vocal Designer section at the same time.
Performing with a Human Voice
If you don’t hear sound, check the following
• Is the VP-7 correctly connected to your amp, speaker, or
headphones? (p. 12)
• Is the volume of the VP-7 raised? (p. 16)
• Is Bypass turned o ([Bypass] button unlit)? (p. 24)
• Is your microphone’s switch turned on?
• Is your microphone connected correctly ? (p. 13)
• Is the microphone input level raised? (p. 17)
• Is the [Harmony] knob set to the right of the center
position? (p. 23)

19
By singing into the microphone while you press chords on the keyboard, you can add harmonies to the sound of your voice.
Selecting a Vocal Designer Sound
To play the Vocal Designer section, press one of the Vocal Designer sound buttons so its indicator is lit (red).
When a Vocal Designer sound is selected, that sound button’s indicator will light red.
A backing chorus will automatically be added to your vocal.
Harmony is automatically produced according to the melody you sing (the pitch detected from the microphone) and the chord
that is detected from the keyboard.
In addition, the harmony will proceed according to the melody you sing.
Try out the sound as you adjust the [Harmony] knob and [Ambience] knob (p. 23, p. 25).
Sound Explanation
Duet
This produces two-part harmony, as though two people were singing.
(When a keyboard is not connected via MIDI, pitches a fourth lower will be generated to create the harmony.)
Trio 1
This produces three-part harmony, as though three people were singing.
One voice at a higher pitch and one voice at a lower pitch will be created, relative to the pitch of the direct sound from the
microphone.
(When a keyboard is not connected via MIDI, pitches a fourth lower and an octave lower will be generated to create the harmony.)
Trio 2
This produces three-part harmony, as though three people were singing.
Two voices at a higher pitch will be created, relative to the pitch of the direct sound from the microphone.
(When a keyboard is not connected via MIDI, pitches a fourth lower and a fth higher will be generated to create the harmony.)
If the higher-pitched harmony sounds are higher than a certain pitch, they will exceed the range that the VP-7 is able to produce;
if this occurs, the sound will be produced in a lower range.
Performing with Vocal Designer
In order for the VP-7 to recognize the chord
automatically, you must play at least three
notes.
For example, to specify a C Major chord, play
C, E, and G.
Example: C-Major scale
Duet
Trio 1
Trio 2
• The solid black note symbols indicate the pitches
detected from the microphone (these notes will
not be produced *1).
• The hollow note symbols indicate the generated
harmony (Vocal Designer generates these notes).
*1
If the [Harmony] knob is turned to the right of
center, the solid black notes in the example (the
same pitch as your voice) will be overlaid onto the
direct sound and output.

20
Performing with the Vocoder
By playing the keyboard while you sing into the microphone, you can perform a variety of vocoder sounds, ranging from vintage
vocoders to the latest electro-types.
Selecting a Vocoder Sound
To play vocoder sounds, press the [Vocoder] button so its indicator is lit.
The vocoder sounds use the volume and rhythm of the sound from the microphone. The pitch is controlled by the notes you play
on the connected keyboard.
If no keyboard is connected, the pitch will also be detected from the microphone input, meaning that all aspects of the vocoder
sound will be controlled from the microphone.
There are three types of vocoder sound.
Each time you press the button, the [Vocoder] button’s indicator will change color in the order of red
green orange red ...,
and the vocoder sound will be switched.
Try out the sound as you adjust the [Harmony] knob and [Ambience] knob (p. 23, p. 25).
Sound Indicator Explanation
Vocoder 1 Lit red
This is a metallic talkbox-type sound. It is a more modern sound than “Vocoder 2,” and is suitable
for styles with a beat, such as R&B.
Vocoder 2 Lit green
This is the sound of a vintage vocoder. It can be used broadly for songs with rapid passages,
such as the pop music of the 1980s. This is suitable for chordal playing.
Vocoder 3 Lit orange
This is a newer type of sound than “Vocoder 1” or “Vocoder 2.” It is suitable for electro or hiphop
styles. (Since this is a mono sound, you won’t be able to play chords.)
/