Ultra Start Stylus Photo R280 User guide
- Category
- Inkjet printers
- Type
- User guide
This manual is also suitable for

Quick Guide
spr280_qg.book Page 1 Monday, June 4, 2007 2:20 PM

2 Contents
Contents
Introduction . . . . . . . . . . . . . . . . . . . . . . . . . . . . . . . . . . . . . . . . . . . 3
Loading Paper . . . . . . . . . . . . . . . . . . . . . . . . . . . . . . . . . . . . . . . . . 4
Using Special Papers . . . . . . . . . . . . . . . . . . . . . . . . . . . . . . . . . . . . . . . . 5
Basic Printing . . . . . . . . . . . . . . . . . . . . . . . . . . . . . . . . . . . . . . . . . . 7
Printing in Windows . . . . . . . . . . . . . . . . . . . . . . . . . . . . . . . . . . . . . . . 7
Printing with a Macintosh . . . . . . . . . . . . . . . . . . . . . . . . . . . . . . . . . . . . 9
Selecting the Correct Paper Type . . . . . . . . . . . . . . . . . . . . . . . . . . . . . . 11
Printing Borderless Photos . . . . . . . . . . . . . . . . . . . . . . . . . . . . . . . . . . . 12
Printing on CDs and DVDs . . . . . . . . . . . . . . . . . . . . . . . . . . . . . . . . . 13
Maintaining Your Printer . . . . . . . . . . . . . . . . . . . . . . . . . . . . . . 15
Checking the Print Head Nozzles . . . . . . . . . . . . . . . . . . . . . . . . . . . . . . 15
Cleaning the Print Head . . . . . . . . . . . . . . . . . . . . . . . . . . . . . . . . . . . . 16
Checking the Ink Cartridge Status . . . . . . . . . . . . . . . . . . . . . . . . . . . . . 17
Purchasing Epson Ink Cartridges . . . . . . . . . . . . . . . . . . . . . . . . . . . . . . 17
Replacing Ink Cartridges . . . . . . . . . . . . . . . . . . . . . . . . . . . . . . . . . . . . 18
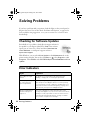
Solving Problems . . . . . . . . . . . . . . . . . . . . . . . . . . . . . . . . . . . . . 22
Checking for Software Updates . . . . . . . . . . . . . . . . . . . . . . . . . . . . . . . 22
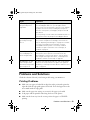
Error Indicators . . . . . . . . . . . . . . . . . . . . . . . . . . . . . . . . . . . . . . . . . . 22
Problems and Solutions . . . . . . . . . . . . . . . . . . . . . . . . . . . . . . . . . . . . . 23
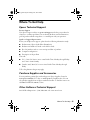
Where To Get Help . . . . . . . . . . . . . . . . . . . . . . . . . . . . . . . . . . . . . . . 25
Notices. . . . . . . . . . . . . . . . . . . . . . . . . . . . . . . . . . . . . . . . . . . . . . . 26
spr280_qg.book Page 2 Monday, June 4, 2007 2:20 PM

Introduction 3
Introduction
After you have set up your Epson Stylus
®
Photo R280 Series as described on the
Start Here sheet, turn here to:
■ Load paper
■ Get the basic steps for printing from your computer
■ Print true BorderFree
®
frame-ready prints on select 4 × 6, 5 × 7, 8 × 10, and
letter-size papers
■ Print on ink jet-printable CDs and DVDs
■ Perform routine maintenance
■ Solve simple problems
For additional instructions, see the on-screen User’s Guide by selecting the icon for
it on your desktop.
Please follow these guidelines as you read your R280 Series instructions:
Warning:
Warnings must be followed carefully to avoid bodily injury.
Caution:
Cautions must be observed to avoid damage to your equipment.
Note:
Notes contain important information about your R280 Series.
Tip:
Tips contain hints for better printing.
spr280_qg.book Page 3 Monday, June 4, 2007 2:20 PM

4 Loading Paper
Loading Paper
You can load up to 120 sheets of plain paper, 100 sheets of matte paper, and 20
sheets of most other photo papers (see page 5 for a list). Load transfer paper and
adhesive sheets one sheet at a time.
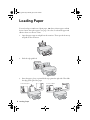
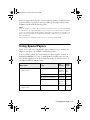
1. Open the paper support and pull out the extension. Then open the front tray
and pull out the extensions.
2. Slide the edge guide left.
3. Insert the paper, glossy or printable side up, against the right side. Then slide
the edge guide against the paper.
4
5
Letter-size paper
4 × 6-inch paper
spr280_qg.book Page 4 Monday, June 4, 2007 2:20 PM

Using Special Papers 5
Always load paper short edge first, even for landscape printing. Load letterhead or
pre-printed paper top edge first, facing up. Make sure the paper stack fits under
the r arrow mark inside the left edge guide.
Note:
The type of paper you choose affects the way your printout looks. If you are just printing
a rough draft of an image, plain paper is fine. However, for the best results, you’ll want
to use one of Epson’s special ink jet papers designed for your printer. For example, your
photos will look great printed on Epson Premium Photo Paper Glossy (see below for
more information).
For instructions on loading envelopes, see your on-screen User’s Guide.
Using Special Papers
Epson offers a wide array of high quality papers, making it easy to maximize the
impact of your photos, presentations, and creative projects.
You can purchase genuine Epson ink and paper at Epson Supplies Central
SM
at
www.epson.com/ink3 (U.S. sales) or www.epson.ca (Canadian sales). You can
also purchase supplies from an Epson authorized reseller. To find the nearest one,
call 800-GO-EPSON (800-463-7766).
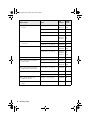
Paper name Size
Part
number
Sheet
count
Epson Ultra Premium Photo
Paper Glossy
Borderless 4 × 6 inches S041934
S042181
S042174
50
60
100
Borderless 5 × 7 inches S041945 20
Borderless 8 × 10 inches S041946 20
Letter (8.5 × 11 inches) S041935
S042182
S042175
20
25
50
Epson Ultra Premium Photo
Paper Luster
Letter (8.5 × 11 inches) S041405 50
spr280_qg.book Page 5 Monday, June 4, 2007 2:20 PM

6 Loading Paper
Epson Premium Photo Paper
Glossy
Borderless 4 × 6 inches S041808
S041727
40
100
Borderless 5 × 7 inches S041464 20
Borderless 8 × 10 inches S041465 20
Letter (8.5 × 11 inches) S041286
S042183
S041667
20
25
50
Epson Premium Photo Paper
Semi-gloss
Borderless 4 × 6 inches S041982 40
Letter (8.5 × 11 inches) S041331 20
Epson Photo Paper Glossy Borderless 4 × 6 inches S041809
S042038
50
100
Letter (8.5 × 11 inches) S041141
S041649
S041271
20
50
100
Epson Bright White Paper Letter (8.5 × 11 inches) S041586 500
Epson Premium Presentation
Paper Matte
Borderless 8 × 10 inches S041467 50
Letter (8.5 × 11 inches) S041257
S042180
50
100
Epson Premium Presentation
Paper Matte Double-sided
Letter (8.5 × 11 inches) S041568 50
Epson Presentation Paper Matte Letter (8.5 x 11 inches) S041062 100
Legal (8.5 x 14 inches) S041067 100
Epson Photo Quality Self-
Adhesive Sheets
A4 (8.3 × 11.7 inches) S041106 10
Epson Iron-On Cool Peel Transfer
Paper
Letter (8.5 x 11 inches) S041153 10
Paper name Size
Part
number
Sheet
count
spr280_qg.book Page 6 Monday, June 4, 2007 2:20 PM

Basic Printing 7
Basic Printing
This section describes the basic steps for printing a photo or document stored on
your Windows
®
or Macintosh
®
computer, and printing directly on an ink jet-
printable CD or DVD. For detailed instructions on printing, see the on-screen
User’s Guide.
Before you start, make sure you’ve installed your printer software and connected
the printer to your computer as described on the Start Here sheet.
Tip:
It’s a good idea to check for updates to your Epson Stylus Photo R280 Series software.
See “Checking for Software Updates” on page 22 for instructions.
Printing in Windows
1. Load paper (see page 4).
2. Open a photo or document in a printing program.
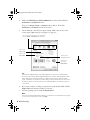
3. Open the File menu and select
Print. You see a window like this one:
Click here to open
your printer software
Select EPSON Stylus
Photo R280 Series
spr280_qg.book Page 7 Monday, June 4, 2007 2:20 PM

8 Basic Printing
4. Make sure EPSON Stylus Photo R280 Series is selected, then click the
Preferences or Properties button.
(If you see a
Setup, Printer, or Options button, click it. Then click
Preferences or Properties on the next screen.)
5. On the Main tab, select the basic print settings. Make sure you choose the
correct paper
Type setting for your paper (see page 11).
Tip:
For the best quality printing, select PhotoEnhance
™
(also known as Auto Photo
Correction). This automatically adjusts brightness, contrast, and saturation to best
effect and uses a sophisticated face recognition technology to optimize image
tones in portraits. If your photo includes a face with an intentional color cast, such
as a bronze statue, you may want to turn off PhotoEnhance to retain the special
color effects.
6. If you want to reduce or enlarge your printout or print double-sided, click the
Page Layout tab and select settings as necessary.
7. For more printing options, click the
Advanced tab.
Note:
For more information about print settings, or instructions on saving them as a group
so you can reuse them later, click ? or Help.
Select the type of document you’re printing
(choose Photo or Best Photo for pictures)
Select your
document
Orientation
Select your
paper Size
Select your
paper Type
Click here for
borderless photos
spr280_qg.book Page 8 Monday, June 4, 2007 2:20 PM

Printing with a Macintosh 9
8. Click
OK to save your settings, then click OK or Print to start printing. This
window appears and shows the progress of your print job.
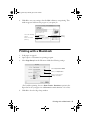
Printing with a Macintosh
1. Load paper (see page 4).
2. Open a photo or document in a printing program.
3. Select
Page Setup from the File menu. Make the following settings:
* For borderless printing, choose a
Sheet Feeder - Borderless option in the
Paper Size list for your paper size (
US Letter, 8 x 10 in, 4 x 6 in, or 5 x 7 in).
4. Click
OK to close the Page Setup window.
Cancel
printing
Pause or resume
printing
Check ink cartridge
status
Select Stylus Photo R280
Select your Paper Size*
Select your document
or image orientation
spr280_qg.book Page 9 Monday, June 4, 2007 2:20 PM

10 Basic Printing
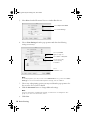
5. Select Print from the File menu. You see a window like this one:
6. Choose
Print Settings from the pop-up menu and select the following
settings as necessary:
Note:
In certain programs, you may need to select Advanced before you can select Print
Settings. For more information about printer settings, click the
? button.
7. Choose any other printing options you may need from the pop-up menu. See
the on-screen User’s Guide for details.
8. Click the
Advanced button to change additional settings.
Note:
For more information on advanced settings, or instructions on saving them as a
group so you can reuse them later, click
?.
9. Click Print.
Select Print Settings
Select Stylus Photo R280
Select your Media
Type (see page 11)
Select Color or Grayscale
Select higher quality
or faster printing
(if available)
Select
Automatic mode
spr280_qg.book Page 10 Monday, June 4, 2007 2:20 PM

Selecting the Correct Paper Type 11
10. To monitor the progress of your print job, click the printer icon when it
appears in the dock on the bottom of your desktop.
If you’re using OS X 10.2.x, click the Print Center icon instead, then
double-click
Stylus Photo R280 in the Printer List window.
11. When you’re finished, close the printer window or Print Center.
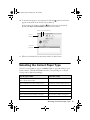
Selecting the Correct Paper Type
Select the correct Type (see page 8) or Media Type (see page 10) setting in your
printer software. This tells the R280 Series what you’re printing on, so the ink
coverage can be adjusted accordingly.
For this paper/media Select this setting
Plain paper
Epson Bright White Paper
Plain Paper/Bright White Paper
Epson Ultra Premium Photo Paper Glossy Ultra Premium Photo Paper Glossy
Epson Premium Photo Paper Glossy Premium Photo Paper Glossy
Epson Photo Paper Glossy Photo Paper Glossy
Epson Presentation Paper Matte Presentation Paper Matte
Epson Premium Photo Paper Semi-gloss Premium Photo Paper Semi-gloss
Epson Ultra Premium Photo Paper Luster Ultra Premium Photo Paper Luster
Cancel
printing
Select the
print job
Pause or resume printing
spr280_qg.book Page 11 Monday, June 4, 2007 2:20 PM

12 Basic Printing
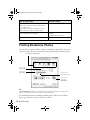
Printing Borderless Photos
You can print your photos with no margins, extending the image all the way to the
edges of the page. Be sure to select these settings when printing borderless photos:
Tip:
The PhotoEnhance option is automatically selected when printing on certain photo
papers. See page 8 for more information on PhotoEnhance.
For detailed instructions on printing borderless photos and a list of borderless
paper types and sizes, see the on-screen User’s Guide.
Epson Premium Presentation Paper Matte
Epson Premium Presentation Paper Matte
Double-sided
Epson Photo Quality Self-adhesive Sheets
Epson Iron-on Cool Peel Transfer Paper
Premium Presentation Paper Matte
Ink jet-printable CDs and DVDs CD/DVD
CD/DVD Premium Surface
Envelopes Envelope
For this paper/media Select this setting
Select Photo or Best Photo
Select your
document
Orientation
Select your
paper Size
Select your
paper Type
Click here for
borderless photos
spr280_qg.book Page 12 Monday, June 4, 2007 2:20 PM

Printing on CDs and DVDs 13
Printing on CDs and DVDs
Your printer includes a special tray that lets you print customized text, graphics,
and photos directly on an ink jet-printable CD or DVD. The Epson Print CD
software makes it easy to import your own photos, add text, and modify your
designs with a variety of special effects. For detailed instructions on printing, see
the on-screen User’s Guide. You can print on both regular 12-cm and
8-cm mini CDs and DVDs.
Caution:
Use only one ink jet-printable CD or DVD at a time. Thermal-printable and regular CDs
and DVDs should not be used with this printer; otherwise the ink may smear.
Do not turn the printer on or off with a CD or DVD inserted.
Make sure the data, music, or video is burned on your ink jet-printable CDs or
DVDs before you print. Otherwise, dirt or scratches on the surface may cause
errors when you burn the data.
Before you insert a CD or DVD, make sure the printer is turned on. Otherwise,
the disc may not be positioned correctly. Then follow these steps:
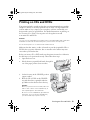
1. Open the front cover.
2. Lift the front tray up with both hands, then pull it
out of the paper position (lower notches).
3. Set the front tray in the CD/DVD position
(upper notches).
4. Place the CD or DVD on the CD/DVD
tray with the white or printable side face-
up. Make sure the disc lies flat in the tray.
Caution:
Before you position the CD or DVD, make sure
that no dust or dirt is on the CD/DVD tray, as
this may damage the disc’s data side.
Be sure to use the CD/DVD tray provided with
this printer. If you use another CD/DVD tray,
your CD or DVD may not print correctly.
spr280_qg.book Page 13 Monday, June 4, 2007 2:20 PM

14 Basic Printing
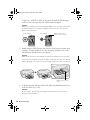
To print on a small CD or DVD (8-cm), place the small CD/DVD adapter
on the tray first, then place the CD or DVD inside the adapter.
Caution:
Make sure you always use the small CD/DVD adapter when you print on 8-cm CDs
or DVDs and that the CD or DVD and adapter lie flat on the tray; otherwise the
printer may be damaged.
5. Firmly insert the CD/DVD tray along the base of the front tray until it meets
resistance. Continue sliding the tray into the printer until the arrows on the
CD/DVD tray and the front tray are aligned.
Caution:
Make sure both sides of the CD/DVD tray slide into the brackets on the front tray.
Do not insert the CD/DVD tray while the printer is printing; otherwise, your printer
may be damaged or the surface of the CD or DVD may become dirty or scratched.
6. To design and print with Epson Print CD, follow the detailed instructions in
in the on-screen User’s Guide.
Caution:
Be sure to place the front tray in the paper (lower) position when you’re done
printing on CDs and DVDs.
Always use this piece
with 8-cm CDs or DVDs
12-cm CD/DVD
8-cm CD/DVD
Make sure the arrows
match
spr280_qg.book Page 14 Monday, June 4, 2007 2:20 PM

Maintaining Your Printer 15
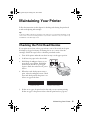
Maintaining Your Printer
Follow the instructions in this chapter for checking and cleaning the print head
nozzles and replacing ink cartridges.
Tip:
To keep your Epson product looking like new, make sure you don’t place anything on top
of the cover or use it as a writing surface. If you need to clean the cover, use only a soft,
nonabrasive microfiber-type cloth.
Checking the Print Head Nozzles
If your printouts are faint or have gaps in them, some of the nozzles in the print
head may be clogged or ink may be running low in one or more of the ink
cartridges. Follow the steps below to check the print head nozzles.
1. Turn off the printer and make sure the front tray is in the paper position.
2. Load letter-size paper in the sheet feeder.
3. Hold down the
I paper button as you
press the P power button. Hold down
both buttons until the P power light
begins to flash, then release the P power
button.
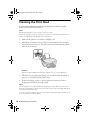
4. When the nozzle check pattern starts to
print, release the
I paper button. Check
the nozzle check pattern that prints to see
if there are gaps in the lines.
5. If there are no gaps, the print head is clean and you can continue printing.
If there are gaps or the pattern is faint, clean the print head (see page 16).
Nozzles are clean
Nozzles need cleaning
spr280_qg.book Page 15 Monday, June 4, 2007 2:20 PM

16 Maintaining Your Printer
Cleaning the Print Head
If print quality has declined and the nozzle check pattern indicates clogged
nozzles, you can clean the print head.
Note:
Print head cleaning uses ink, so clean it only if necessary.
If the red H ink light comes on or flashes, you cannot clean the print head. In this case,
replace the appropriate ink cartridge first (see page 18).
1. Make sure the printer is on and the H ink light is off.
2. Hold down the
H ink button for at least 3 seconds until the P power light
starts flashing, then release it. The printer runs a head cleaning cycle, which
takes about one minute.
Caution:
Never turn off the R280 Series during a cleaning cycle or you may damage it.
3. When the P power light stops flashing, run a nozzle check (as described on
page 15) to verify that the print head is clean.
4. If there are still gaps or lines, or the test patterns are faint, run another
cleaning cycle and check the nozzles again.
Note:
If print quality has not improved after repeating this procedure about four times, turn
the printer off and wait for at least six hours. Then run the nozzle check again and repeat
the head cleaning if necessary.
If you do not use your printer often, it is a good idea to print a few pages at least once a
month to maintain good print quality.
spr280_qg.book Page 16 Monday, June 4, 2007 2:20 PM

Checking the Ink Cartridge Status 17
Checking the Ink Cartridge Status
When the red H ink light starts flashing, one or more cartridges are low on ink and
will need to be replaced soon. When the red
H ink light stays on, you need to
replace the cartridge(s).
You can also check the ink level using Status Monitor (see the on-screen User’s
Guide).
Caution:
You cannot print when an ink cartridge is expended, even if other cartridges are not
expended. Leave the expended cartridge(s) installed until you have obtained a
replacement, or the ink remaining in the print head nozzle may dry out.
A window may appear on your computer screen if you try to print when ink is
low. On a Windows computer that is connected to the Internet, you may see a
screen asking if you want to receive ink offers and other updates from Epson.
Click
Accept or Decline to continue.
Note:
To disable checking for ink offers or updates from Epson, see the instructions in your
on-screen User’s Guide.
Purchasing Epson Ink Cartridges
You can purchase genuine Epson ink and paper at Epson Supplies Central at
www.epson.com/ink3 (U.S. sales) or www.epson.ca (Canadian sales). You can
also purchase supplies from an Epson authorized reseller. To find the nearest one,
call 800-GO-EPSON (800-463-7766).
Epson offers two different capacity cartridges for each color in your R280 Series.
Color
Standard capacity
part number
High capacity
part number
Black 78 77
Cyan 78 77
Magenta 78 77
Yellow 78 77
Light Cyan 78 77
Light Magenta 78 77
spr280_qg.book Page 17 Monday, June 4, 2007 2:20 PM

18 Maintaining Your Printer
Note:
Try the High Capacity 77 cartridges available at http://www.epson.com/highcapacity
(U.S. sales) or http://www.epson.ca (Canadian sales), or the 77 color multipack at your
local reseller.
You may use any combination of cartridge sizes. (If you’ve installed a 78 black cartridge,
you can still use a 77 magenta cartridge, for example.)
We recommend that you use genuine Epson cartridges and do not refill them. The use
of other products may affect your print quality and could result in printer damage.
For best printing results, use up a cartridge within six months of opening the package.
Cartridge yields vary considerably based on images printed, print settings, paper type,
frequency of use, and temperature. For print quality, a small amount of ink remains in
the cartridge after the “replace cartridge” indicator comes on. The printer ships with full
cartridges and part of the ink from the first cartridges is used for priming the printer.
Replacing Ink Cartridges
Make sure you have a new ink cartridge before you begin. You must install new
cartridges immediately after removing the old ones.
Caution:
Do not open ink cartridge packages until you are ready to install the ink. Cartridges are
vacuum packed to maintain reliability.
1. Make sure the CD/DVD tray is not inserted in the printer, and make sure the
front tray is in the paper (lower) position.
2. Make sure the printer is on and the
P power light is on but not flashing.
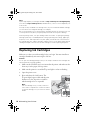
3. Open the printer cover.
4. Press and release the H ink button. The
P power light begins to flash and the print
head moves to the _ position to indicate
which cartridge is low or expended.
Note:
If an ink cartridge is low, you may continue to
use it until it is expended. To confirm the status
of each ink cartridge, see your on-screen User’s
Guide.
spr280_qg.book Page 18 Monday, June 4, 2007 2:20 PM

Replacing Ink Cartridges 19
Caution:
Do not move the print head by hand; this may damage your
printer. Always press and release the H ink button to move it.
Be careful not to touch the white flat cable inside the printer.
5. Press the H ink button again.
■ If another cartridge is low or expended, it moves to the _ position. Press
the H ink button again to see if any more cartridges are low or expended.
■ If no other cartridges are low or expended, the print head moves to the
replacement position.
6. Open the cartridge cover.
spr280_qg.book Page 19 Monday, June 4, 2007 2:20 PM

20 Maintaining Your Printer
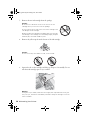
7. Remove the new ink cartridge from the package.
Caution:
Be careful not to break the hooks on the front of the ink
cartridge when you remove it from the package.
Do not touch the green chip on the front of the cartridge. This
can damage the ink cartridge.
Always install an ink cartridge immediately after removing the
old cartridge. If the cartridge is not installed promptly, the print
head may dry out and be unable to print.
8. Remove the yellow tape from the bottom of the ink cartridge.
Caution:
Do not remove any other labels or seals, or ink will leak.
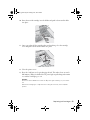
9. Squeeze the tab on the cartridge and lift it up. Dispose of it carefully. Do not
take the used cartridge apart or try to refill it.
Warning:
If ink gets on your hands, wash them thoroughly with soap and water. If ink gets
into your eyes, flush them immediately with water. Keep ink cartridges out of the
reach of children.
spr280_qg.book Page 20 Monday, June 4, 2007 2:20 PM
Page is loading ...
Page is loading ...
Page is loading ...
Page is loading ...
Page is loading ...
Page is loading ...
Page is loading ...
Page is loading ...
Page is loading ...
Page is loading ...
Page is loading ...
Page is loading ...
-
 1
1
-
 2
2
-
 3
3
-
 4
4
-
 5
5
-
 6
6
-
 7
7
-
 8
8
-
 9
9
-
 10
10
-
 11
11
-
 12
12
-
 13
13
-
 14
14
-
 15
15
-
 16
16
-
 17
17
-
 18
18
-
 19
19
-
 20
20
-
 21
21
-
 22
22
-
 23
23
-
 24
24
-
 25
25
-
 26
26
-
 27
27
-
 28
28
-
 29
29
-
 30
30
-
 31
31
-
 32
32


Ultra Start Stylus Photo R280 User guide
- Category
- Inkjet printers
- Type
- User guide
- This manual is also suitable for
Ask a question and I''ll find the answer in the document
Finding information in a document is now easier with AI