Ask Proxima C175 User manual

Category
Data projectors
Type
User manual

This manual is also suitable for

Users
Guide
> > > > > > >
C175 C185
1
Declaration of Conformity
Manufacturer: InFocus Corporation, 27700B SW Parkway Avenue, Wilsonville,
Oregon 97070 USA
European Office: Strawinskylaan 585, 1077 XX Amsterdam, The Netherlands
We declare under our sole responsibility that this projector conforms to the following
directives and norms:
EMC Directive 89/336/EEC, Amended by 93/68/EEC
EMC: EN 55022
EN 55024
EN 61000-3-2
EN 61000-3-3
Low Voltage Directive 73/23/EEC, Amended by 93/68/EEC
Safety: IEC 60950-1: 1
st
Edition
May, 2004
Trademarks
Microsoft, PowerPoint, Word, Excel and Windows are trademarks or registered trade-
marks of Microsoft Corporation. Adobe and Acrobat are trademarks or registered
trademarks of Adobe Systems Incorporated. Digital Light Processing is a trademark
or registered trademark of Texas Instruments. InFocus, In Focus, and INFOCUS (styl
-
ized) are either registered trademarks or trademarks of InFocus Corporation in the
United States and other countries.
FCC Warning
This equipment has been tested and found to comply with the limits for a Class A
digital device, pursuant to part 15 of the FCC Rules. These limits are designed to pro
-
vide reasonable protection against harmful interference when the equipment is oper-
ated in a commercial environment. This equipment generates, uses, and can radiate
radio frequency energy and, if not installed and used in accordance with the instruc
-
tion manual, may cause harmful interference to radio communications. Operation of
this equipment in a residential area is likely to cause harmful interference in which
case the user will be required to correct the interference at his own expense.
EN 55022 Warning
This is a Class A product. In a domestic environment it may cause radio interference,
in which case the user may be required to take adequate measures. The typical use is
in a conference room, meeting room or auditorium.
Canada
This Class A digital apparatus complies with Canadian ICES-003.
Cet appareil numérique de la classe A est conforme à la norme NMB-003 du Canada.
Agency Approvals
UL, CUL, TUV
Other specific Country Approvals may apply, please see product certification label.
This user’s guide applies to models IN32, C175, W320, IN34, C185, W340
InFocus reserves the right to alter product offerings and specifications at any time.
2
Table of Contents
Introduction 3
Connecting a computer 5
Required computer connections 5
Displaying a computer image 7
Adjusting the image 8
Connecting a video device 9
Displaying a video image 10
Shutting down the projector 12
Troubleshooting your setup 12
Using the keypad buttons 20
Using the remote control 21
Using the audio 22
Optimizing computer images 23
Presentation features 23
Optimizing video images 23
Customizing the projector 23
Using the menus 24
Picture menu 25
Settings menu 28
Maintenance 32
Cleaning the lens 32
Using the security lock 32
Replacing the projection lamp 33
Cleaning the lamp filter screens 35
Appendix 36
Projected image size 36
Important Operating Considerations for Safety
Place the projector in a horizontal position no greater than 15 degrees
off axis.
Locate the projector in a well-ventilated area without any obstructions
to intake or exhaust vents. Do not place the projector on a tablecloth or
other soft covering that may block the vents.
Locate the projector at least 4' (1.2 m) away from any heating or cooling
vents.
Use only InFocus-approved ceiling mounts.
Use only the power cord provided. A surge-protected power strip is
recommended.
Refer to this guide for proper startup and shutdown procedures.
This product has a lamp which contains a very small amount of mer-
cury. Wash hands after cleaning the area and handling the ruptured
lamp. Dispose of it as required by local, state or federal ordinances and
regulations. For more information see www.eiae.org.
In the unlikely event of a lamp rupture, particles may exit through the
projector side vents. When the projector is turned on, keep people,
food, and drinks out of the "keep out" area under and around the pro
-
jector, as indicated by the "X" areas below.
Follow these instructions to help ensure image quality and lamp life over
the life of the projector. Failure to follow these instructions may affect the
warranty. For complete details of the warranty, see the Warranty booklet.
2’ / 0.6 m
3’ / 1 m
5
/1.5m
8
/2.4m
3
Introduction
Your new digital projector provides computer and video inputs and has
XGA 1024x768 resolution. The projector is easy to connect, easy to use, and
easy to maintain.
Product specifications
To read the latest specifications on your multimedia projector, be sure to
visit our website at www.askproxima.com, as specifications are subject to
change.
Accessories
The standard accessories that came with your projector are listed in the
included user’s guide. Optional accessories can be found on our website at
www.infocus.com or at your retailer or dealer.
Online Registration
Register your projector on our website at www.infocus.com/register to acti-
vate your warranty and receive product updates, announcements, and reg-
istration incentives.
Projector components and features
keypad
speaker
zoom
focus
elevator foot release
remote
control
receiver (IR)
connectors
leveling
foot
heat vent
IR receiver
IR receiver
status indicators
4
Connector Panel
The projector provides computer and video connectors:
one M1-D/A (HD, DVI, and computer)
one VESA (HD, HD component, and computer)
one VESA (monitor out)
one S-video
one composite RCA video
one audio in/one audio out
It also has an RJ-45 connector for serial control. The Command Line Inter-
face (CLI) specifications and commands are on our website.
Connector panel
lock
power
connector
M1-D/A
s-video
composite
external
speaker
(audio out)
RJ-45 serial control
video
computer
audio in
VESA in
monitor out
5
Connecting a computer
Required computer connections
Connect the black end of the computer cable to the Computer 1 connector
on the projector. Connect the blue end to the video port on your computer. If
you are using a desktop computer, you first need to disconnect the monitor
cable from the computer’s video port.
Some Macintosh® computers do not have a standard VESA-out video port.
If the supplied computer cable will not connect to your computer, purchase
the appropriate adapter from your Apple® reseller.
Connect the black power cable to the connector on the back of the projector
and to your electrical outlet.
The Power light on the Status Indicator Panel (page 12) turns amber.
NOTE: Always use the power cable that shipped with the projector.
Optional computer connections
To advance slides in a PowerPoint™ presentation using the up and down
arrow buttons on the remote, plug the USB connector on the computer cable
into the USB mouse connector on your computer.
To have sound with your presentation, connect an audio cable (sold sepa-
rately) to your computer and to the Audio In connector on the projector.
connect computer cable
connect power cable
connect computer cable
connect audio cable
6
If you are using a desktop computer and want to see the image on your
computer screen as well as on the projection screen, plug the monitor cable
to the Monitor Out connector on the projector.
If you prefer connecting your projector to your computer with an optional
VESA cable, connect one end of the cable to the VESA port on your com
-
puter, and connect the other end of the cable to the blue Computer 2 con-
nector on the projector.
You can control the projector from an LCD control panel or computer by
connecting an RS-232 cable to the projector’s Serial Control connector. Spe
-
cific RS-232 commands can be found in the Service and Support section of
our website.
connect monitor cable
connect VESA cable
connect RS-232 cable
7
Displaying a computer image
Remove the lens cap.
Press the Power button on the top of the projector or the remote.
The Power light on the Status Indicator Panel (page 12) blinks green and the
fans start to run. When the lamp comes on, the start up screen displays and
the Power light is steady green. It can take a minute for the image to achieve
full brightness.
? No startup screen? Get help on page 13.
Turn on your computer.
The computer’s image should appear on the projection screen. If it doesn’t,
press the Source button on the projector’s keypad.
Make sure your laptop’s external video port is active.
Many laptops do not automatically turn on their external video port when a
projector is connected. Usually a key combination like FN + F8 or CRT/LCD
key turns the external display on and off. Locate a function key labeled
CRT/LCD or a function key with a monitor symbol. Press FN and the
labeled function key simultaneously. Refer to your laptop’s documenta
-
tion to learn your laptop’s key combination.
? No computer image? Try pressing the Auto Image
button on the keypad. Get help on page 13.
remove lens cap
press Power button
turn on computer
activate laptop’s external port
8
Adjusting the image
Adjust the height of the projector, if necessary, by pressing the release but-
ton to extend the elevator foot.
Rotate the leveling foot (located at the bottom back right corner), if neces-
sary.
Position the projector the desired distance from the screen, so that the lens is
perpendicular to the screen.
See page 36 for a table listing screen sizes and distances.
Adjust the zoom or focus rings by rotating them until the desired image size
and focus are produced.
If the image is not square, adjust the vertical digital keystone by using the
buttons on the keypad. Press the upper Keystone button to reduce the
upper part of the image, and press the lower Keystone button to reduce the
lower part.
You can also adjust the keystone via the menus. See page 25.
Adjust the Contrast or Brightness in the Picture menu.
See page 24 for help with the menus.
adjust height
rotate
leveling
foot
elevator
foot
re
l
ease
b
utton
adjust distance
adjust zoom and focus
focus
zoom
adjust keystone
adjust Contrast or Brightness
9
Connecting a video device
No video or audio cables are included with your projector.
If the video device uses a round, four-prong S-video connector, plug an
S-video cable into that connector on the video device and into the Video 2
connector on the projector. If the device uses a composite video connector,
plug a composite video cable into that connector on the video device and
into the Video 1 connector on the projector.
For audio, plug a mini-plug audio Y-cable into the Audio in connector on
the projector and into the video device’s left and right audio out connectors.
Connect the black power cable to the connector on the back of the projector
and to your electrical outlet.
NOTE: Always use the power cable that shipped with the projector.
To connect a progressive scan EDTV or HD source, use the Component to
M1 adapter (sold separately).
connect S-video and audio cables
connect video and audio cables
connect power cable
10
Displaying a video image
Remove the lens cap.
Press the Power button on the top of the projector or the remote.
The Power light on the Status Indicator Panel (page 12) blinks green and the
fans start to run. When the lamp comes on, the start up screen displays and
the Power light is steady green. It can take a minute for the image to achieve
full brightness.
.
? No startup screen? Get help on page 12.
Plug in and turn on the video device.
The video device’s image should appear on the projection screen. If it
doesn’t, press the Source button on the keypad.
Adjust the height of the projector by pressing the release button to extend
the elevator foot. Rotate the leveling foot, if necessary.
Position the projector the desired distance from the screen, so that the lens is
perpendicular to the screen. See page 36 for a table listing screen sizes and
distances to the screen.
remove lens cap
press Power button
turn on video device
adjust height
rotate
leveling
foot
elevator
foot
release button
adjust distance
11
Adjust the zoom or focus rings by rotating them until the desired image size
and focus are produced.
If the image is not square, adjust the vertical keystone using the buttons on
the keypad.
Press the upper Keystone button to reduce the upper part of the image, and
press the lower Keystone button to reduce the lower part.
You can also adjust the keystone via the menus. See page 25.
Adjust the volume on the keypad.
Adjust the Contrast, Brightness, Color, or Tint in the Picture menu.
See page 24 for help with the menus.
adjust zoom and focus
focus
zoom
adjust keystone
adjust volume
adjust Picture menu
12
Shutting down the projector
The projector automatically blanks the screen after no active source is
detected for 30 minutes. This blank screen helps preserve the life of the pro-
jector. The image returns when an active source is detected or a remote or
keypad button is pressed.
Screen Save
You can make the blank screen appear after five minutes by turning on
Screen Save in the Settings>System menu. See page 29. There are six time
options for the Screen Save feature. They range from five minutes to 30 min-
utes with five minute intervals.
Power Save
The projector also has a Power Save feature that automatically turns the
lamp off after no signal is detected for 20 minutes. After 10 additional min
-
utes with no signal, the projector powers down. If an active signal is
received before the projector powers down, the image is displayed. You
must press the Power button to display an image after 30 minutes have
passed. When Power Save is enabled, Screen Save is disabled. See
page 29.
Turning off the projector
To turn off the projector, press the Power button and verify that you want to
turn the projector off by pressing the Power button again within 3 seconds.
You can cancel the shutdown by not pressing the Power button a second
time. The lamp turns off and the LED blinks amber for 1 minute while the
fans continue to run to cool the lamp. When the lamp has cooled, the LED
lights amber and the fans stop. Unplug the power cable to completely
power off the projector.
Troubleshooting your setup
If your image appears correctly on the screen, skip to the next section
(
page 21). If it does not, troubleshoot the setup.
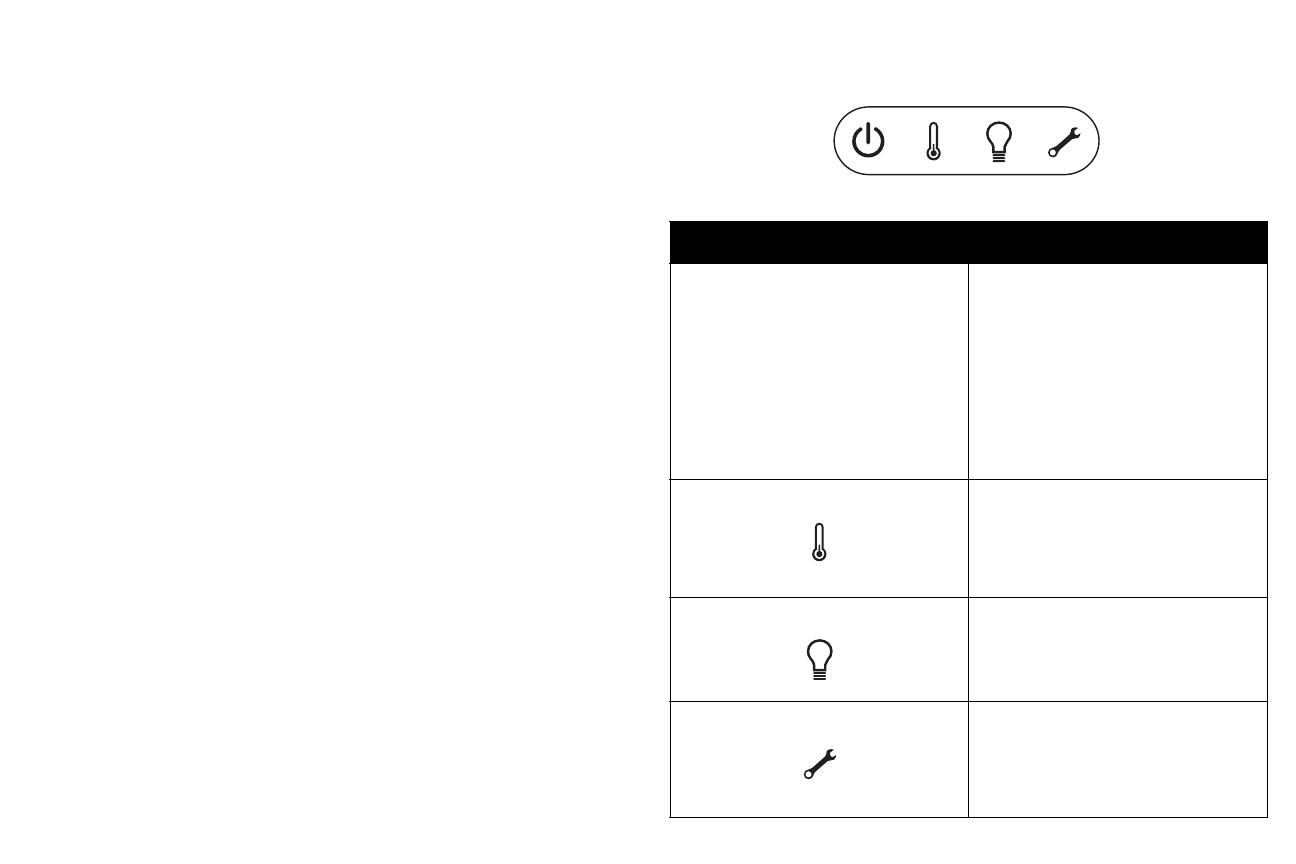
The Status Indicator Panel on top of the projector indicates the state of the
projector and can help you troubleshoot.
.
Table 1: Status indicator light behavior and meaning
Status Indicator Panel Symbols Meaning
Power, solid amber
Power, blinking green
Power, solid green
Power, blinking amber
The projector is plugged in.
The power button has been pressed and
the software is initializing.
The projector is on and initialized.
The power button has been pressed twice
to turn the projector off and the fans are
running to cool the projector.
Thermometer The projector is too hot. Make sure the
vents aren’t blocked (see
page 19). Turn
off the projector and wait one minute,
then turn the projector on again. Contact
Technical Support if the problem persists
.
Lamp Turn off the projector and wait one
minute, then turn the projector on again.
If the lamp light turns on again, replace the
lamp and reset the lamp timer.
Wrench/Service Turn off the projector and wait one
minute, then turn the projector on again.
If the service lamp turns on again, service
is required. Visit www.infocus.com/service
to contact Service.
13
Source Troubleshooting
Problem Solution Result
No startup screen
Plug power cable in, press Power button.
Remove lens cap.
Correct image
Only startup screen appears
Press the Source button
Activate laptop’s external port
Computer image projected
A
or restart
laptop
A
A
14
No computer image, just the words “Signal out of
range”
Adjust computer refresh rate in Control
Panel>Display>Settings>Advanced>
Adapter (location varies by operating
system)
Computer image projected
For PC: Image fuzzy or cropped
Set your computer’s display resolution to
the native resolution of the projector
(Start>Settings>Control
Panel>Display>Settings tab, select
1024x768)
Image clear and not cropped
A
Signal out of
range
You may also need to set a different
resolution on your computer, as shown
in the following problem, “Image fuzzy
or cropped”
A
A
A
A
For a laptop,
disable laptop
monitor
or turn-on dual-
display mode
A
15
For Macintosh: Image fuzzy or cropped
Set your computer’s display resolution to
the native resolution of the projector
(Apple menu>System
Preferences>Displays, choose 1024x768)
Image clear and not cropped
Only my laptop’s background appears, not the
Desktop icons
Disable “Extend my Windows Desktop” in
Control Panel>Display>Settings>Display 2
(location varies by operating system)
Background and Desktop projected
A
A
A
A
A
Uncheck this
option, then
click Apply
A
A
16
Projector troubleshooting
The video embedded in my PowerPoint
presentation does not play on the screen
Turn off the internal LCD display on your
laptop
Embedded video plays correctly
A
A
B
A
B
Problem Solution Result
Image not square Adjust keystone on keypad or Picture menu
Square image
Image not sharp
Adjust the focus lens or Sharpness in the
Picture>Advanced menu
Correct image
ABAB
AB
17
Image does not fit 16:9 screen
Change aspect ratio to 16:9 in
Picture>Aspect ratio menu
Correct image
Image upside down
Turn off Ceiling in Settings>System menu
Correct image
Image reversed left to right
Turn off Rear in Settings>System menu
Correct image
A
B
AB
A
AB
18
Projected colors don’t match source
Adjust color, tint, color temperature,
brightness, contrast in the menus
Correct image
Image not centered on screen
Move projector, adjust zoom, adjust height
Correct image
COLOR
COLOR
Adjust horizontal or vertical position in
Picture>Advanced menu
zoom
19
Still having problems?
If you need assistance, visit the Service and Support section of our website
or call us.
This product is backed by a limited warranty. An extended warranty plan
may be purchased from your dealer. When sending the projector in for
repair, we recommend shipping the unit in its original packing material, or
having a professional packaging company pack the unit. Please insure your
shipment for its full value.
Lamp won’t turn on, Temperature light is on
Make sure vents aren’t blocked; allow
projector to cool for one minute
Unplug projector; wait one minute; plug in
projector and turn it on: lamp lights
“Change lamp” message appears at startup, lamp
won’t turn on, Lamp light is turned on
Lamp must be replaced (page 33)
Lamp turns on
Temperature light
Lamp light
  • Page 1 1
  • Page 2 2
  • Page 3 3
  • Page 4 4
  • Page 5 5
  • Page 6 6
  • Page 7 7
  • Page 8 8
  • Page 9 9
  • Page 10 10
  • Page 11 11
  • Page 12 12
  • Page 13 13
  • Page 14 14
  • Page 15 15
  • Page 16 16
  • Page 17 17
  • Page 18 18
  • Page 19 19
  • Page 20 20
  • Page 21 21
  • Page 22 22
  • Page 23 23
  • Page 24 24
  • Page 25 25
  • Page 26 26
  • Page 27 27
  • Page 28 28
  • Page 29 29
  • Page 30 30
  • Page 31 31
  • Page 32 32
  • Page 33 33
  • Page 34 34
  • Page 35 35
  • Page 36 36
  • Page 37 37
  • Page 38 38
  • Page 39 39

Ask Proxima C175 User manual

Category
Data projectors
Type
User manual
This manual is also suitable for

Ask a question and I''ll find the answer in the document

Finding information in a document is now easier with AI