www.vtechphones.com
i
NEED HELP?
This manual has all the feature operations and troubleshooting you need to install
and operate your new VTech telephone. Please take the time to review thoroughly
to ensure proper installation of this VTech innovative and feature rich product.
You can also visit our website at www.vtechphones.com for support,
shopping, and everything new at VTech.
In Canada, please visit www.vtechcanada.com.
VTech toll free 1 (800) 595-9511. In Canada, dial 1 (800) 267-7377
Important! Before using this telephone, you
must read the Important safety
instructions on page 68 of this manual.
www.vtechphones.com
ii
Add new handsets to make your telephone more versatile (see page 63)
Your VTech i5871/i5873 telephone system can operate up to eight handsets. You can add new
handsets (model number i5808, sold separately) at any time, but each must be registered with the
base unit before use.
The handset provided with your telephone is automatically registered as Handset 1. Additional handsets
will be assigned numbers in the order they are registered (2, 3, 4, 5, 6, 7 and 8). A maximum of eight
handsets can be registered to each base unit.
To order additional handsets (model i5808), visit us on the web at www.vtechphones.com or call VTech
Customer Service at 1 (800) 595-9511. In Canada, call 1 (800) 267-7377.
www.vtechphones.com
1
Installation
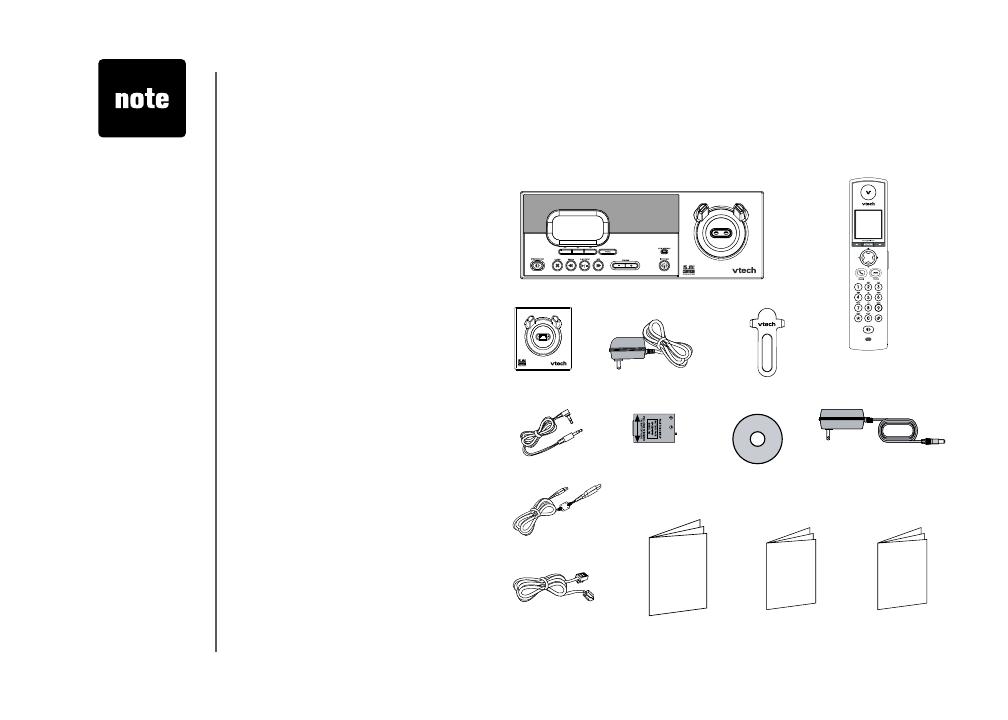
Parts checklist . . . . . . . . . . . . . . . . . . . . . . 3
Base unit installation . . . . . . . . . . . . . . . . . . . 6
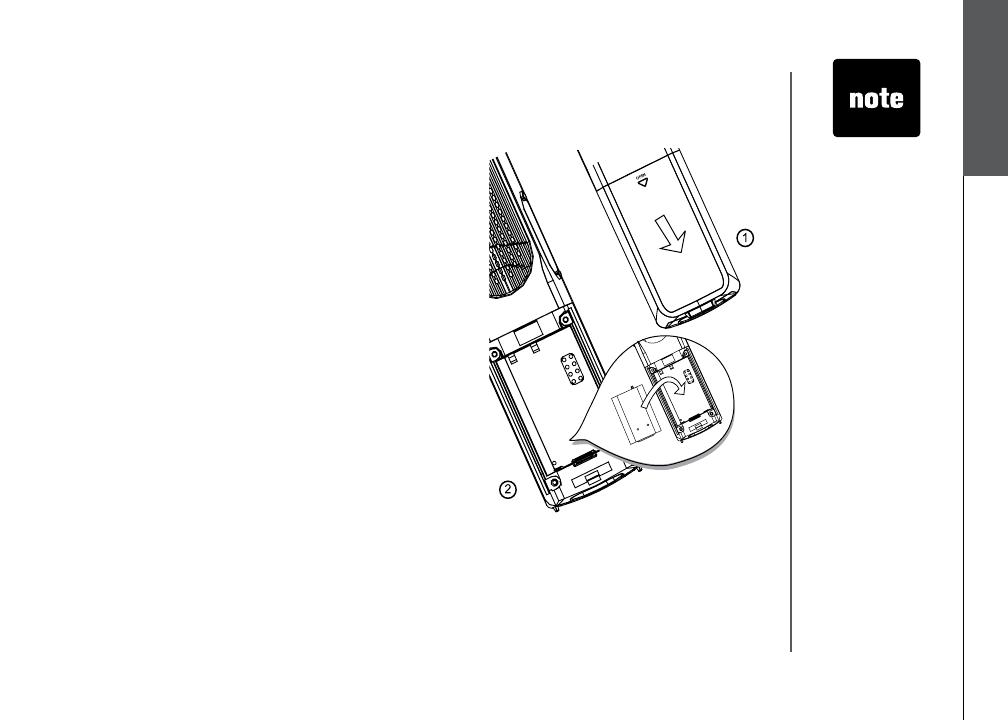
Install handset battery . . . . . . . . . . . . . . . . . . 7
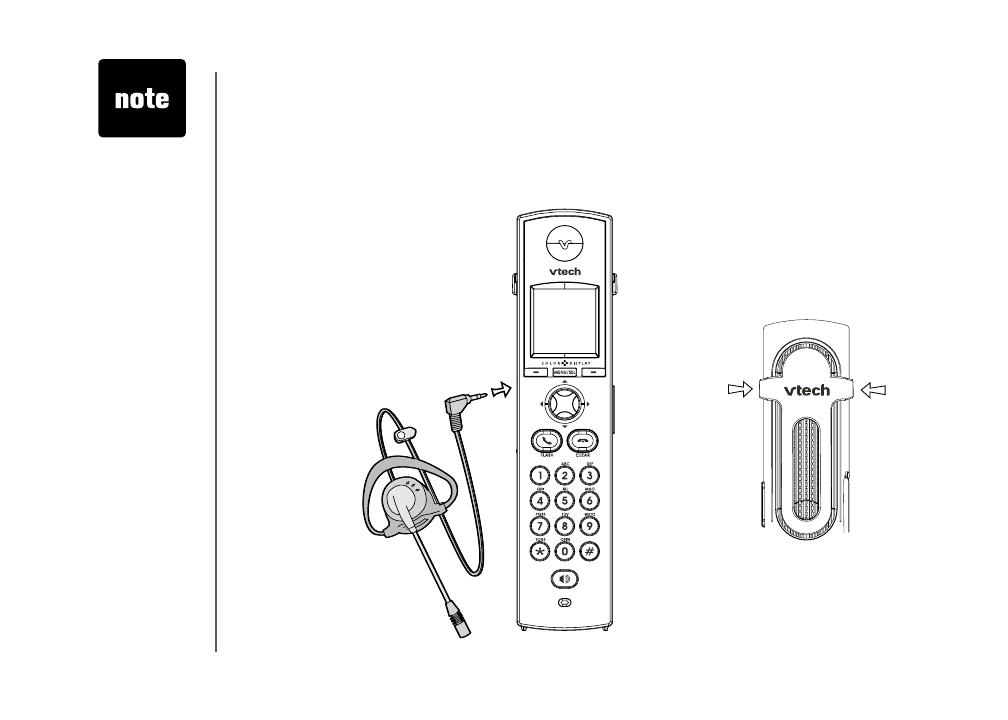
Belt clip & headset . . . . . . . . . . . . . . . . . . . . 8
Dial mode . . . . . . . . . . . . . . . . . . . . . . . . . 9
Caller ID information . . . . . . . . . . . . . . . . . . . 9
If you subscribe to DSL service . . . . . . . . . . . . 10
Telephone settings
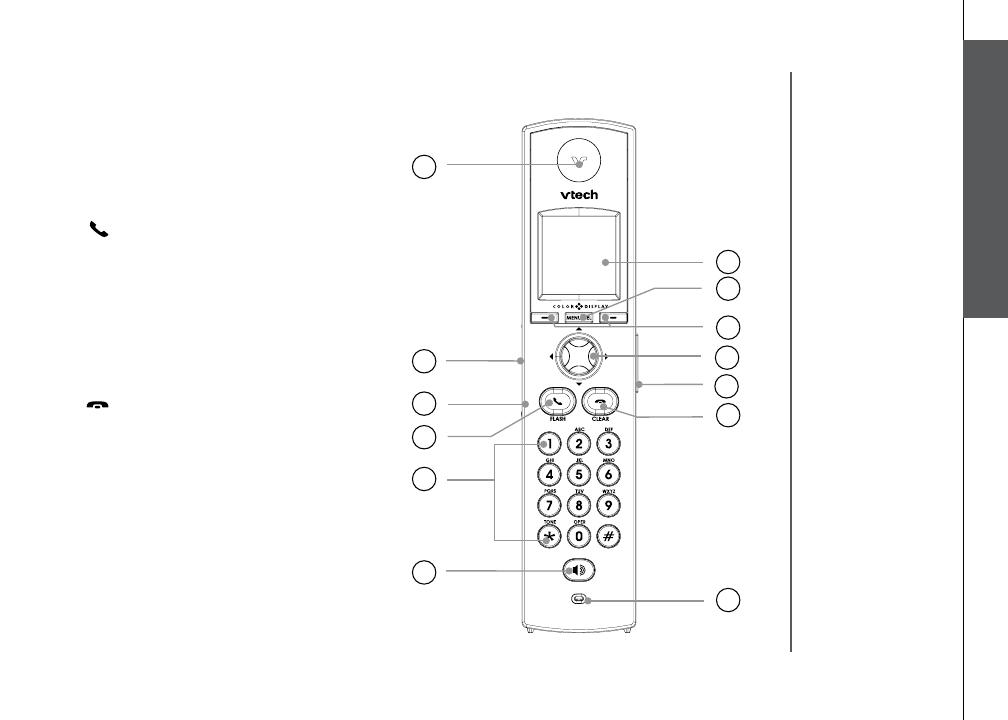
Handset layout . . . . . . . . . . . . . . . . . . . . . 11
Base unit layout. . . . . . . . . . . . . . . . . . . . . 12
Handset screen images . . . . . . . . . . . . . . . . 13
Handset sounds . . . . . . . . . . . . . . . . . . . . 14
Handset messages . . . . . . . . . . . . . . . . . . . 16
Handset settings . . . . . . . . . . . . . . . . . . . . 18
Base settings . . . . . . . . . . . . . . . . . . . . . . 22
Basic operation
Make, answer and end calls . . . . . . . . . . . . . . 25
Options while on calls . . . . . . . . . . . . . . . . . 26
Intercom call . . . . . . . . . . . . . . . . . . . . . . 27
Advanced operation
Phonebook . . . . . . . . . . . . . . . . . . . . . . . 32
Store an entry in the phonebook. . . . . . . . . . . 32
Chart of characters . . . . . . . . . . . . . . . . . 33
Customize entries . . . . . . . . . . . . . . . . . . 34
Search the phonebook. . . . . . . . . . . . . . . . 34
Dial a phonebook entry . . . . . . . . . . . . . . .
35
Edit a phonebook entry . . . . . . . . . . . . . . . 35
Delete a phonebook entry . . . . . . . . . . . . . . 35
Call log . . . . . . . . . . . . . . . . . . . . . . . . . 36
Review the call log . . . . . . . . . . . . . . . . . 37
Dial a call log entry . . . . . . . . . . . . . . . . . 37
Save an entry to the handset phonebook . . . . . . 38
Delete an entry . . . . . . . . . . . . . . . . . . . 38
Redial list . . . . . . . . . . . . . . . . . . . . . . . . 39
Dial an entry from the redial list . . . . . . . . . . . 39
Save a redial entry to the handset phonebook . . . 40
Delete a redial entry . . . . . . . . . . . . . . . . . 40
Answering system operation
About answering system operation . . . . . . . . . . . .41
Setting answering system . . . . . . . . . . . . . . . 42
Outgoing greeting . . . . . . . . . . . . . . . . . . . 45
Message playback . . . . . . . . . . . . . . . . . . . 47
Recording and playing memos . . . . . . . . . . . . . 48
Remote access . . . . . . . . . . . . . . . . . . . . . 49
Special features
Recordable ringer . . . . . . . . . . . . . . . . . . . 50
Picture download . . . . . . . . . . . . . . . . . . . . 52
Phonebook tab functions . . . . . . . . . . . . . . . . 55
Appendix
Handset and base indicators . . . . . . . . . . . . . . 60
Add additional handsets . . . . . . . . . . . . . . . . 63
Table of contents
www.vtechphones.com
2
Table of contents
Charge spare battery pack . . . . . . . . . . . . . . . 66
Batteries . . . . . . . . . . . . . . . . . . . . . . . . 67
Important safety instructions . . . . . . . . . . . . . . 68
Troubleshooting . . . . . . . . . . . . . . . . . . . . 69
Operating range . . . . . . . . . . . . . . . . . . . . 75
Maintenance . . . . . . . . . . . . . . . . . . . . . . 75
About cordless telephones . . . . . . . . . . . . . . . 76
Warranty . . . . . . . . . . . . . . . . . . . . . . . . 76
FCC, ACTA and IC regulations . . . . . . . . . . . . . 77
Technical specications . . . . . . . . . . . . . . . . 80
Index . . . . . . . . . . . . . . . . . . . . . . . . . . 81
www.vtechphones.com
3
Installation
Basic operation
Parts checklist for i5871:
Installation
1. Base unit
2. Handset
3. Base power adapter
4. Belt clip
5. Battery
6. VTech phonebook manager CD
7. USB cable
8. Audio patch cable
9. Telephone line cord
10. User’s manual
11. Quick start guide
12. Special features guide
Remember to save your sales receipt and original packaging in case it is necessary to ship your
telephone for warranty service. Check to make sure the telephone package includes the following:
To purchase
replacement
batteries,
visit us on the
web at www.
vtechphones.
com or
call VTech
Communications,
Inc. at 1 (800)
595-9511) in the
United States. In
Canada, call 1
(800) 267-7377.
1. Base unit
2. Handset
4. Belt clip
10. User’s manual 11. Quick start guide
5. Battery
8. Audio patch cable
6. VTech phonebook
manager CD
3. Base power adapter
12. Special
features guide
9. Telephone line
cord
7. USB cable
www.vtechphones.com
4
Installation
Parts checklist for i5873:
Remember to save your sales receipt and original packaging in case it is necessary to ship your
telephone for warranty service. Check to make sure the telephone package includes the following:
To purchase
replacement
batteries,
visit us on the
web at www.
vtechphones.
com or
call VTech
Communications,
Inc. at 1 (800)
595-9511) in the
United States. In
Canada, call 1
(800) 267-7377.
1. Base unit
2. Handsets (2)
11. Telephone
line cord
5. Belt clips (2)
12. User’s manual 13. Quick start guide
7. Batteries (2)
10. USB cable
6. Audio patch cable
8. VTech phonebook
manager CD
9. Base power adapter
14. Special
features guide
1. Base unit
2. Handsets (2)
3. Charger
4. Charger adapter
5. Belt clips (2)
6. Audio patch cable
7. Batteries (2)
8. VTech phonebook manager CD
9. Base power adapter
10. USB cable
11. Telephone line cord
12. User’s manual
13. Quick start guide
14. Special features guide
3. Charger
4. Charger adapter
www.vtechphones.com
5
Installation
Basic operation
Installation
Parts checklist for i5808:
To purchase
replacement
batteries,
visit us on the
web at www.
vtechphones.
com or
call VTech
Communications,
Inc. at 1 (800)
595-9511) in the
United States. In
Canada, call 1
(800) 267-7377.
1. Handset
2. Charger
3. Charger adapter
4. Belt clip
5. Battery
6. Audio patch cable
7. USB cable
8. VTech phonebook manager CD
9. User’s manual
10. Quick start guide
11. Special features guide
1. Handset
4. Belt clip
9. User’s manual
10. Quick start guide
5. Battery
7. USB cable6. Audio patch cable
8. VTech phonebook
manager CD
11. Special
features guide
2. Charger
3. Charger adapter
www.vtechphones.com
6
Installation
Base unit installation
Install the base unit and the charger as shown below. Choose a central location within the home, away
from any electronic equipment and appliances such as personal computers, computer routers, television
sets, microwave ovens, and refrigerators. Avoid excessive heat, cold, dust or moisture.
Use only the
VTech battery
and AC power
adaptor supplied
with this
telephone.
If the handset will
not be used for
a long period of
time, remove the
battery to prevent
possible leakage.
Plug power adapter into an electrical outlet not con-
trolled by a wall switch.
Plug the telephone line cord into a
telephone jack.
www.vtechphones.com
7
Installation
Basic operation
Installation
Install handset battery
Press the tab and slide cover away from the battery
compartment.
Place the battery in the compartment with the metal
contacts aligned, as shown in the diagram.
Position the battery compartment cover and slide it
towards the unit until it clicks into place.
Put the handset in the base unit to start charging the
new battery for at least 12 hours.
You can keep the battery charged by returning the
handset to the base unit after each use. When the
battery power is fully depleted, a full recharge takes
about 12 hours.
Use only the
VTech battery
and AC power
adapter supplied
with this
telephone.
If the handset will
not be used for
a long period of
time, remove the
battery to prevent
possible leakage.
To purchase
replacement
batteries,
visit us on the
web at www.
vtechphones.
com or
call VTech
Communications,
Inc. at 1 (800)
595-9511) in the
United States. In
Canada, call 1
(800) 267-7377.
www.vtechphones.com
8
Installation
Install belt clip and headset as shown below if desired.
For hands-free telephone conversations, use any industry standard 2.5 mm headset (purchased
separately). For best result, use a VTech 2.5 mm headset.
Belt clip & headset (optional)
To purchase
a headset,
visit us on the
web at www.
vtechphones.
com or call
VTech Customer
Service at 1
(800) 595-9511.
In Canada, call 1
(800) 267-7377.
Whenever a
compatible
headset is
connected to the
cordless handset,
the microphone
on the handset
will be muted.
This is done to
limit the effect
of background
noise.
Belt clip
Align the pins on the inside edge of the clip
with the notches on the sides of the handset.
Plug the 2.5 mm headset into the
jack on the side of the handset (be
-
neath the small rubber cap).
www.vtechphones.com
9
Installation
Basic operation
Installation
Dial mode
If you have touch-tone service, your telephone is ready to use as soon as the battery is charged. If
you have pulse (rotary) service, the dial mode must be changed. Press /FLASH and there should
be a dial tone. If not, refer to the Set dial mode section on page 20.
About caller ID information
The caller ID with call waiting features in this telephone let you see who is calling before answering
the call, even when on another call. These features require services provided by your local telephone
company.
Contact your telephone service provider if:
you have both caller ID and call waiting, but as separate services (you may need combined
service),
you have only caller ID service, or only call waiting service, or
you do not subscribe to any caller ID or call waiting services but wish to try them now.
You can use this telephone with regular caller ID service, and you can use its other features without
subscribing to either caller ID or combined caller ID with call waiting service. There may be fees for
these services, and these services may not be available in all areas.
The caller ID features will work only if both you and the caller are in areas offering caller ID service,
and if both telephone companies use compatible equipment.
www.vtechphones.com
10
Noise filter (for
DSL users)
To single telephone jack (RJ11C)
Telephone line cord
If you subscribe to DSL service
If there is interference during telephone conversations and/or your caller ID features are not functioning
properly, install a noise lter to the telephone line between the base unit and the telephone wall jack.
Contact your DSL provider for a noise lter.
Installation
www.vtechphones.com
11
Basic operation
Telephone settings
Telephone settings



1. Earpiece
2. USB cable jack
3. Headset jack/audio patch cable jack
(2.5mm)
4.
/FLASH
5. Dialing pad (0-9, *, #)
6. Speakerphone
7. LCD display
8. MENU/SEL
9. Softkeys
10. NavKeys (navigation keys)
11. Volume keys
12.
/CLEAR
13. Microphone
Handset layout
www.vtechphones.com
12
Telephone settings
Base unit layout
3
4
8
7
6
9
10
11
12 13
17
15
16
5
2
1
18
14
1. LCD display
2. Softkeys
3. SPEAKERPHONE
4. DELETE
5. REPEAT
6. PLAY/STOP
7. SKIP
8. CLEAR
9. VOLUME
10. INTERCOM
11. New message LED
12. Antenna
13. Charging LED
14. Speaker
15. Microphone
16. Telephone jack
17. DC connector jack
18. Spare battery
compartment
www.vtechphones.com
13
Basic operation
Telephone settings
Pictures & animations
The handset is preset with six animations and 23 pictures which can be used
as the background for your idle screen (wallpaper), or a specic animation or
picture can be assigned to a phonebook entry. You can also download your
own pictures for use as a wallpaper or with the phonebook entry (see Picture
download on page 52).
Set a wallpaper image
• Make sure the handset is in idle mode.
• Press MENU/SEL to display menu.
• Press the UP NavKey once to reach Animations or twice to reach Pictures,
and press MENU/SEL to select.
• Use the UP or DOWN NavKey or to view the available animations or
pictures.
• Press the softkey SET when finished setting the desired animation
picture.
• The screen will display Wallpaper set and there will be a conrmation
tone.
Telephone settings
Handset screen images
Screensaver
After 30 seconds of inactivity, the handset will go into screen saver mode and
will display a digital clock. To illuminate the screen and read the clock, press
any key on the dial pad.
Animations
Pictures
12:00 AM
SET
Animations
SET
Pictures
www.vtechphones.com
14
Ringer melody
This feature allows you to assign various ringer melodies for incoming calls.
You can choose from eight preset traditional ringers or 17 preset musical ring-
ers or the ring tones you have recorded. There will be a sample of each ringer
when you scroll through the choices.
When in Ringer Melody menu, use the UP or DOWN NavKey or to
scroll through the choices.
The current selection is highlighted and there will be a sample of each ringer
melody when scrolling through the choices.
Press the softkey
SET to conrm your setting. The screen displays Choice
saved and there will be a conrmation tone.
Ringer volume
There are options for ve levels of volume. There will be a sample of each
ringer volume when scrolling through the choices.
When in
Ringer Volume menu, use the LEFT or RIGHT NavKey or to
adjust the ringer volume. The current level is shaded in green and a sample
of the ringer will be played.
Telephone settings
Handset sounds
• Press MENU/SEL in idle mode to enter the main menu, and press the UP
NavKey three times to reach the Sound menu. Use the UP or DOWN
NavKey or to scroll through the menu, then press MENU/SEL to enter
the desired menu, i.e. Play Sound Clips, Record Sound Clip, Ringer
Melody, Ringer Volume, and Ringer Vibrate.
After selecting any option, press the softkey
SET to conrm your choice. The
screen will display Choice saved and there will be a conrmation tone.
Sounds
Play Sound Clips
Record Sound Clips
Ringer Melody
Ringer Volume
Ringer Vibrate
Sounds
Ringer Melody
Play Sound Clips
Record Sound Clips
Ringer Melody
Ringer Volume
Ringer Vibrate
Sounds
Ringer Volume
www.vtechphones.com
15
Basic operation
Telephone settings
Press the softkey SET to conrm your setting. The screen will display Choice
saved and there will be a conrmation tone.
Ringer vibrate
This feature allows you to set the handset to vibrate when there is an incoming
call.
When in
Ringer Vibrate menu, use the UP or DOWN NavKey or to
choose On or Off. The current choice is highlighted.
Press the softkey
SET to conrm. The screen will display Choice saved
and there will be a conrmation tone.
Telephone settings
Handset sounds
Play Sound Clips
Record Sound Clips
Ringer Melody
Ringer Volume
Ringer Vibrate
Sounds
Ringer Vibrate
www.vtechphones.com
16
Telephone settings
Handset messages
Play the message
From screensaver mode (if there are new messages):
Press
/CLEAR, and the screen will display New Message. Press MENU/
SEL and the screen displays the number of new and old messages.
Press the softkey
PLAY to play the message.
From idle mode (if there are new messages):
Press the softkey
MESSAGE to access the message menu. The screen
displays the number of new and old messages.
Press the softkey
PLAY to play the message (s).
From the main menu:
Press
MENU/SEL when in idle mode.
Press the
DOWN NavKey twice to reach Messages. Press MENU/SEL
This feature allows you to listen to messages on the answering system using
the handset.
When there are new messages on the answering system,
New Message will
be displayed on the handset screen, and the answering system icon will ash
on the handset screen in idle mode.
The day and time the message was recorded will be announced before
playback.
The screen on the handset will show the day and time the memo and
incoming messages are recorded, the length of the message, and a diagram
of the NavKey illustrating how to repeat or skip a message.
If it is a memo recorded at the answering machine, the screen displays
Memo.
Messages
Messages
PLAY
DELETE
3 New Messages
19 Old Messages
www.vtechphones.com
17
Basic operation
Telephone settings
Telephone settings
Handset messages
Options during playback
Press
/VOLUME to adjust the speaker volume.
Press the softkey
STOP to stop the message currently playing.
Press the
LEFT NavKey to skip to the next message.
Press the
LEFT NavKey to repeat the currently playing message.
Press the
LEFT NavKey twice (quickly) to go back to the previous
message.
Press the softkey
DELETE to delete the message currently playing.
Delete all messages
Press
MENU/SEL when in idle mode.
Press the
DOWN NavKey twice to reach Messages. Press MENU/SEL
to select.
The screen displays the number of new and old messages. Press the
softkey DELETE to delete all messages.
The screen displays
Delete all Messages Are you sure? Press the
softkey YES to conrm. Press the softkey NO if you decide to keep the
messages.
to select.
The screen displays number of new and old messages. Press the softkey
PLAY to play the message.
When the
telephone is
ringing, press
the softkey
SILENCE to
temporarily mute
the ringer.
Delete all
Messages
Are you sure?
Delete All Messages
YES
NO
Message 7
STOP
DELETE
VTech
1-800-595-9511
Jan 10 10:51AM
Duration 0:11
REPEAT SKIP
www.vtechphones.com
18
Tone settings
In this menu, you can set keypad tone, low battery tone, and set the out of
range tone on or off.
Make sure the handset is in idle mode.
Press the
UP NavKey four times to reach Settings. Press MENU/SEL to
select.
Press the
DOWN NavKey once to reach Tone Settings and press MENU/
SEL to select.
Use the
UP and DOWN NavKey or to choose Keypad Tone, Low
Battery Tone, or Out of Range Tone. Press MENU/SEL to select.
Telephone settings
Handset settings
Clock setting
Make sure the handset is in idle mode.
Press
MENU/SEL to display menu.
Press the
UP NavKey four times to reach Settings. Press MENU/SEL to
select.
Press
MENU/SEL to select Clock Setting.
Use the dial pad to enter the time digit by digit. Use the
LEFT or RIGHT
NavKey or to move to the digit you need to change.
Use the
UP or DOWN NavKey or to choose AM or PM.
Press the softkey
SET to conrm your selection. The screen will display
Choice saved and there will be a conrmation tone.
Use the
UP or DOWN NavKey or to choose On or Off.
Press the softkey
SET to conrm your selection. The screen will display
Choice saved and there will be a conrmation tone.
The time is
automatically
set and updated
with incoming
caller ID
information if
you subscribe
this service.
Tone settings
Phone Settings
Language
Rest Settings
Settings
Clock Setting
Low Battery Tone
Out of Range Tone
Tone Settings
Keypad Tone
Off
Keypad Tone
On
SET
12:00 AM
SET
Clock Setting
1
  • Page 1 1
  • Page 2 2
  • Page 3 3
  • Page 4 4
  • Page 5 5
  • Page 6 6
  • Page 7 7
  • Page 8 8
  • Page 9 9
  • Page 10 10
  • Page 11 11
  • Page 12 12
  • Page 13 13
  • Page 14 14
  • Page 15 15
  • Page 16 16
  • Page 17 17
  • Page 18 18
  • Page 19 19
  • Page 20 20
  • Page 21 21
  • Page 22 22
  • Page 23 23
  • Page 24 24
  • Page 25 25
  • Page 26 26
  • Page 27 27
  • Page 28 28
  • Page 29 29
  • Page 30 30
  • Page 31 31
  • Page 32 32
  • Page 33 33
  • Page 34 34
  • Page 35 35
  • Page 36 36
  • Page 37 37
  • Page 38 38
  • Page 39 39
  • Page 40 40
  • Page 41 41
  • Page 42 42
  • Page 43 43
  • Page 44 44
  • Page 45 45
  • Page 46 46
  • Page 47 47
  • Page 48 48
  • Page 49 49
  • Page 50 50
  • Page 51 51
  • Page 52 52
  • Page 53 53
  • Page 54 54
  • Page 55 55
  • Page 56 56
  • Page 57 57
  • Page 58 58
  • Page 59 59
  • Page 60 60
  • Page 61 61
  • Page 62 62
  • Page 63 63
  • Page 64 64
  • Page 65 65
  • Page 66 66
  • Page 67 67
  • Page 68 68
  • Page 69 69
  • Page 70 70
  • Page 71 71
  • Page 72 72
  • Page 73 73
  • Page 74 74
  • Page 75 75
  • Page 76 76
  • Page 77 77
  • Page 78 78
  • Page 79 79
  • Page 80 80
  • Page 81 81
  • Page 82 82
  • Page 83 83
  • Page 84 84
  • Page 85 85
  • Page 86 86
  • Page 87 87

Ask a question and I''ll find the answer in the document

Finding information in a document is now easier with AI