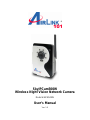
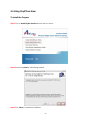
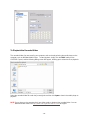
Airlink101 AICN500W User manual
- Category
- Security cameras
- Type
- User manual
This manual is also suitable for

SkyIPCam500W
Wireless Night Vision Network Camera
Model # AICN500W
User’s Manual
Ver. 1.0

-1-
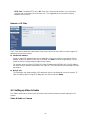
Table of Content
C
HAPTER 1 .................................................................................................................... 2
I
NTRODUCTION TO YOUR CAMERA.............................................................................. 2
1.1 Checking the Package Contents ........................................................................2
1.2 Getting to Know Your Camera............................................................................2
1.3 Features and Benefits ........................................................................................3
1.4 System Requirements........................................................................................4
CHAPTER 2 .................................................................................................................... 5
HARDWARE INSTALLATION...........................................................................................5
2.1 Installing the Camera Stand ...............................................................................5
2.2 Connecting the Camera to LAN/WLAN ..............................................................5
2.3 Applications of the Camera ................................................................................6
CHAPTER 3 .................................................................................................................... 7
SOFTWARE INSTALLATION ........................................................................................... 7
3.1 Installing SkyIPCam Utility..................................................................................7
3.2 Using SkyIPCam Utility.......................................................................................8
3.3 Viewing Images ...............................................................................................13
3.4 Using SkyIPCam View.....................................................................................17
Information...............................................................................................................30
CHAPTER 4 .................................................................................................................. 31
CONFIGURATION.......................................................................................................... 31
4.1 Using the Web Configuration............................................................................31
4.2 Basic Setup ......................................................................................................31
4.3 Network Settings ..............................................................................................33
4.4 Setting up Video & Audio..................................................................................35
4.5 Event Server Configuration ..............................................................................38
4.6 Motion Detect ...................................................................................................39
4.7 Event Configuration..........................................................................................40
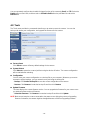
4.8 Tools.................................................................................................................42
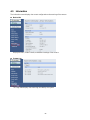
4.9 Information........................................................................................................43
C
HAPTER 5 .................................................................................................................. 44
APPENDIX..................................................................................................................... 44
A.1 Specification.....................................................................................................44
A.2 Glossary of Terms............................................................................................45
Technical Support.......................................................................................................50

-2-
CHAPTER 1
INTRODUCTION TO YOUR CAMERA
1.1 Checking the Package Contents
Check the items contained in the package carefully. You should have the following:
5 One SkyIPCam500W Wireless Night Vision Network Camera.
5 One Antenna.
5 One AC Power Adapter.
5 One Camera Stand.
5 One Ethernet Cable (Cat.5).
5 One Installation CD-ROM.
5 One Quick Installation Guide.
NOTE Once any item contained is damaged or missing, contact the store where you purchased the
product.
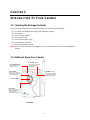
1.2 Getting to Know Your Camera
Front View
Lens Assembly
Power LED indicates
the camera is powered
on with the steady
yellow light.
Link LED indicates
the camera’s network
connectivity with the
flashing green light.
Internal Microphone
allows the camera to
capture audio.
Light Sensor
is used to trigger on and
off the Infrared LEDs
according to the
environmental light level.
Infrared LEDs
allows your camera to
capture clear images in a
dark environment.

-3-
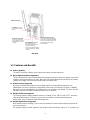
Rear View
1.3 Features and Benefits
Audio Capability
The built-in microphone allows you to capture and monitor sounds and voices.
Day & Night Surveillance Supported
The six Infrared LEDs around the standard lens assembly enable the camera to capture crystal clear
images in dark environments or at night. When the Light Sensor detects low light levels, the camera
captures the images in black & white mode using the infrared LEDs.
Remote Control Supported
By using a standard Web browser or the bundled SkyIPCam View software application, the
administrator can easily change the configuration of the camera via Intranet or Internet. In addition,
the camera can be upgraded over the network when a new firmware is available. The users are also
allowed to monitor the images and take snapshots via the network.
Multiple Platforms Supported
The camera supports multiple network protocols, including TCP/IP, SMTP e-mail, HTTP, and other
Internet related protocols. Therefore, you can use the camera in a mixed operating system
environment, such as Windows 2000 and Windows XP.
Multiple Applications Supported
With remote access technology, you can use the cameras to monitor various objects and places for
your own purposes.
For example, babies at home, patients in the hospital, offices and banks, and so on. The camera can
External Antenna
Screw Hole is used
to connect the camera
stand.
Reset Button will restart
the camera when it is
pressed quickly; when it is
long pressed for ten
seconds, the camera will be
reset to the factory’s default
settings.
DC Power Connector
is used to connect the
power adapter, in order
to supply power to the
camera.
Ethernet Cable Connector
is used to connect the network
cable, which supports the NWay
protocol so that the camera can
detect the network speed
automatically.

-4-
capture both still images and video clips, so that you can keep the archives and restore them at any
time.
1.4 System Requirements
Networking
LAN: 10Base-T Ethernet or 100Base-TX Fast Ethernet.
WLAN: 802.11b/g Wireless LAN
Accessing the Camera using Web Browser
Platform: Microsoft® Windows® 2000/XP/Vista
CPU: Intel Pentium III 350MHz or above
RAM: 128MB
Resolution: 800x600 or above
User Interface: Microsoft® Internet Explorer 6.0 or above
Apple Safari 2 or above*
Mozilla Firefox 2 or above*
*Some web features not available
Accessing the Camera using SkyIPCam View
Platform: Microsoft® Windows® 2000/XP/Vista.
Hardware Requirement:
1 camera connected: Intel Pentium III 800MHz; 512MB RAM
2 ~ 4 cameras connected: Intel Pentium 4 1.3GHz; 512MB RAM
5 ~ 8 cameras connected: Intel Pentium 4 2.4GHz; 1GB RAM
9 ~ 16 cameras connected: Intel Pentium 4 3.4GHz; 2GB RAM
Resolution: 1024x768 or above
NOTE If you connect multiple cameras and monitor them simultaneously, it is recommended that you use
a computer with higher performance.

-5-
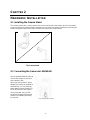
CHAPTER 2
HARDWARE INSTALLATION
2.1 Installing the Camera Stand
The camera comes with a camera stand, which uses a swivel ball screw head to lock to the camera’s
screw hole. When the camera stand is attached, you can place the camera anywhere by mounting the
camera through the three screw holes located in the base of the camera stand.
The Camera Stand
2.2 Connecting the Camera to LAN/WLAN
Use the provided Ethernet cable to
connect the camera to your local
area network (LAN).
When you connect the AC power
adapter, the camera is powered on
automatically. You can verify the
power status from the Power LED
on the front panel of the camera.
Once connected, the Link LED
starts flashing green light and the
camera is on standby and ready
for use now.
Connecting the Ethernet Cable

-6-
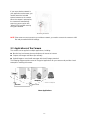
If you use a wireless network in
your application environment, you
need to attach the included
external antenna to the camera.
When the camera is powered on,
the camera will automatically
search any access point with
“default” SSID and with security
encryption disabled.
NOTE If the camera cannot connect to your wireless network, you need to connect the camera to LAN
first and proceed with WLAN settings.
2.3 Applications of the Camera
The camera can be applied in multiple applications, including:
Monitor local and remote places and objects via Internet or Intranet.
Capture still images and video clips remotely.
Upload images or send email messages with the still images attached.
The following diagram explains some of the typical applications for your camera and provides a basic
example for installing the camera.
Home Applications
*Camera is not waterproof
*
Connecting the Antenna

-7-
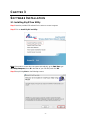
CHAPTER 3
SOFTWARE INSTALLATION
3.1 Installing SkyIPCam Utility
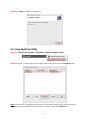
Step 1 Insert the provided CD and wait for the auto-run screen to appear.
Step 2 Click on Install SkyIPCam Utility.
Note
: If the autorun screen does not appear automatically, go to Start, Run, type
D:\ Utility\Setup.exe (where D is the letter of your CD drive) and click OK.
Step 3 Keep clicking Next on the following screens.

-8-
Step 4 Click Close to complete the installation.
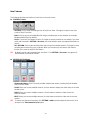
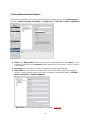
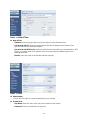
3.2 Using SkyIPCam Utility
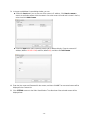
Step 1 Go to Start > (All) Programs > Airlink101 > Airlink101 SkyIPCam Utiliy
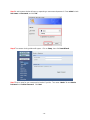
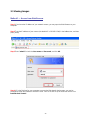
Step 2 Select the IP Camera you want to configure from the list and click on the Change IP button.
Note
: If the Camera’s IP address does not show up in the window, make sure the camera is properly
connected to the same network as your computer is, and then click on the Search button.

-9-
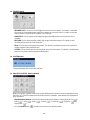
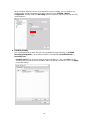
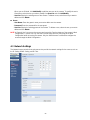
Step 3 You may simply accept the suggested Static IP, or you can manually change the last 3-digit
number of the IP Address, in case that the suggested one has already been used by another device in
the same network. Another option is that if your router’s DHCP server is enabled, you can select DCHP,
so the router will automatically assign a dynamic IP address to your camera.
Enter “admin” for both the ID and password, and click Change.
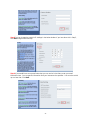
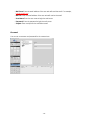
Step 4 Once the utility has saved changes, it will return to the original screen. Select your camera from
the list and click Link.

-10-
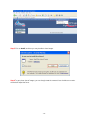
Step 5 A web browser window will open up requesting a username and password. Enter admin for both
User name and Password, and click OK.
Step 6 The camera viewing window will appear. Click on Setup, then click Smart Wizard.
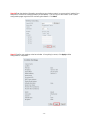
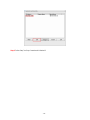
Step 7 Enter a name for your camera and a location if you like. Then enter “admin” for both Admin
Password and Confirm Password. Click Next.

-11-
Step 8 You can change the camera’s IP settings in the below window. If you have done this in Step 3,
click Next and go to the next step.
Step 9 If you would like to set up email alerts that you can receive in the future, enter your email
information here. You can get this information from your internet service provider. You can also set this
up at a later time. Click Next.

-12-
Step 10 Enter the wireless information according to your wireless router’s (or access point’s) setting if you
would like to connect the camera wirelessly to the network. You can log in to the router’s (or AP’s) web
configuration pages to get the SSID and encryption details. Click Next.
Step 11 Confirm your settings at the last window. If everything is correct, click Apply and the
configuration is completed.

-13-
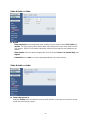
3.3 Viewing Images
Method 1 --- Access from Web Browser
Step 1 If you know the IP address of your network camera, you may open the Web Browser on your
computer.
Step 2 Type the IP address of your camera (the default IP is 192.168.1.240) in the Address bar, and then
press [Enter].
Step 3 Enter “admin” for both the User name and Password, and click OK.
Step 4 If it is the first time for your computer to access the Web based viewing page, you may be
prompted to install the software of ActiveX Control. Click on the bar on top of the screen and click on
Install ActiveX Control.

-14-
Step 5 Click on Install, and then you may be able to view images.
Step 6 To get a clear view of images, you can simply rotate the camera’s lens clockwise or counter-
clockwise to adjust the focus.

-15-
Method 2 --- Access from SkyIPCam Utility
Step 1 Go to Start > (All) Programs > AirLink101 > AirLink101 SkyIPCam Utiliy, and open the
Airlink101 SkyIPCam Utility.
Step 2 Select your camera from the list and click Link

-16-
Step 3 Follow Step 3 to Step 6 mentioned in Method 1.

-17-
3.4 Using SkyIPCam View
To Install the Program
Step 1 Click on Install SkyIPCam View from the auto-run screen.
Step 2 Keep clicking Next on the following windows
Step 3 Click Close to complete the installation

-18-
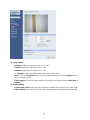
To Launch the Program
This section describes the user interface and operating instructions of SkyIPCam View. To launch the
program, click Start > Programs > AirLink101 > AirLink101 SkyIPCam View, and the main screen will
appear as below:
NOTE Please set the resolution to 1024x768 or above on your computer while using SkyIPCam View;
otherwise, the displayed main screen may be distorted.

-19-
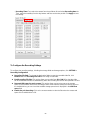
Item Features
The following describes the function of each item on the main screen:
CONTROLS Panel
- SETTING: Click to enter the Setting screen of SkyIPCam View. Click again to return to the main
screen of SkyIPCam View.
- PLAY: Click to play the recorded video file using the media player on the computer (for example,
Windows Media Player by default).
- LOCK: Click to lock the camera controls. Click again to resume controls for the camera. If you have
set ID and Password in SETTING > Account, you will be asked to enter the required information to
unlock.
- ALL RECORD: Click to start recording video clips using all connected cameras. Click again to stop
recording and save the files in the computer. When you connect only one camera, this button’s
function is the same as the RECORD button.
TIP By default, the ID and Password boxes are “blank.” Click SETTING > Account to change the ID
and password of lock/unlock function.
VIEW SELECTION Panel
- View mode buttons: SkyIPCam View provides multiple view modes, including 1/4/9/16 windows
and Full screen mode.
- SCAN: When you connect multiple cameras, click this button to display the video views as the main
window in turn.
- PREV: When you connect multiple cameras, click this button to switch the video view to the
previous camera.
- NEXT: When you connect multiple cameras, click this button to switch the video view to the next
camera.
TIP To set the time interval of scanning, click SETTING > Other and then adjust the time from 1 to 10
seconds in the Time interval of scan option.
Page is loading ...
Page is loading ...
Page is loading ...
Page is loading ...
Page is loading ...
Page is loading ...
Page is loading ...
Page is loading ...
Page is loading ...
Page is loading ...
Page is loading ...
Page is loading ...
Page is loading ...
Page is loading ...
Page is loading ...
Page is loading ...
Page is loading ...
Page is loading ...
Page is loading ...
Page is loading ...
Page is loading ...
Page is loading ...
Page is loading ...
Page is loading ...
Page is loading ...
Page is loading ...
Page is loading ...
Page is loading ...
Page is loading ...
Page is loading ...
Page is loading ...
Page is loading ...
-
 1
1
-
 2
2
-
 3
3
-
 4
4
-
 5
5
-
 6
6
-
 7
7
-
 8
8
-
 9
9
-
 10
10
-
 11
11
-
 12
12
-
 13
13
-
 14
14
-
 15
15
-
 16
16
-
 17
17
-
 18
18
-
 19
19
-
 20
20
-
 21
21
-
 22
22
-
 23
23
-
 24
24
-
 25
25
-
 26
26
-
 27
27
-
 28
28
-
 29
29
-
 30
30
-
 31
31
-
 32
32
-
 33
33
-
 34
34
-
 35
35
-
 36
36
-
 37
37
-
 38
38
-
 39
39
-
 40
40
-
 41
41
-
 42
42
-
 43
43
-
 44
44
-
 45
45
-
 46
46
-
 47
47
-
 48
48
-
 49
49
-
 50
50
-
 51
51
-
 52
52


Airlink101 AICN500W User manual
- Category
- Security cameras
- Type
- User manual
- This manual is also suitable for
Ask a question and I''ll find the answer in the document
Finding information in a document is now easier with AI
Related papers
-
Airlink101 SkyIPCam747 Quick Installation Manual
-
-
-
AirLink SkyIPCam1500W User manual
-
-
Airlink101 AICN1777W User manual
-
-
-
AirLink SkyIPCam 250 User manual
-
Airlink101 SkyIPCam 250W User manual
Other documents
-
Zonet ZVC7610 User manual
-
 Eusso UNC7500-IS Owner's manual
-
-
 Eusso UNC7500-ISW Owner's manual
-
 Eusso UNC7500-IR Owner's manual
-
Encore electronic M-JPEG User manual
-
-
Swann IP-3G ConnectCam 1000 User manual
-
-


