
March 2006 Revision: 1 16-600797 1
Avaya one-X™ Quick Edition
Telephone Quick Installation Guide
Installing a 4610SW/4621SW IP Telephone
This document contains a summarized (four-step) installation procedure. For
detailed step-by-step procedures, including variants of this procedure, refer to the
Avaya one-X Quick Edition Telephone User Guide.
1
Unpack the equipment from the shipping box. The package should contain
the following items:
• one telephone set (includes a telephone stand),
• one Category 5 (Cat5) modular line cord, and
• this quick installation guide.
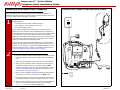
Power is typically supplied to the telephone by connecting the Cat5
modular line cord to a 802.3af PoE-enabled Ethernet LAN. Option A on
the facing page shows a wall jack, but you could connect the Cat5 modular
line cord directly to a PoE-enabled Ethernet switch. If your Ethernet
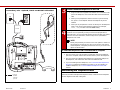
network does not provide 802.3af-compliant inline power, you must supply
a PoE inline power supply (see Option B on next page). The last step in
installing your telephone must be applying power.
You may optionally connect the telephone between a computer and the
Ethernet LAN—the telephone and the computer share the connection. In
this case, you must supply a second Cat5 (or better) modular line cord to
connect the telephone to the computer. For installation instructions, see
‘‘To share the telephone LAN connection with a computer’’.
2
Connect the first telephone to the LAN
1. Plug one end of the supplied Cat5 modular line cord into the LAN
port on the telephone and connect the other end to the Ethernet
LAN.
2. When you are prompted to create a site, press 1 on the dialpad.
3. When you are prompted to enter a site name, press the keys on
the dialpad to enter the site name, and then select the Next
softkey. For example, to type “R”, press the dialpad key “7” three
times. For more information about how to enter characters, see
‘‘Entering Text and Special Characters’’.
4. When you are prompted to change the default password (wait for
the prompt), enter 54321, and then select the Next softkey.
5. Follow the prompts to enter and confirm a different password. The
password must contain at least five numbers in the 0 to 9 range.
6. When you are prompted for a name, use the keys on the dialpad to
enter a user name for the telephone extension (for example,
Smith, Pat), and then select the Save softkey.
Connection Jacks - Option A, LAN is 802.3af PoE Enabled
optional
facultatif
optionale
opcional
=

March 2006 Revision: 1 16-600797 2
Connection Jacks - Option B, LAN is not 802.3af PoE Enabled
optional
facultatif
optionale
opcional
=
1151B
3
Connect additional telephones to the LAN
1. Plug one end of the supplied Cat5 modular line cord into the LAN
port on the telephone, and connect the other end to the Ethernet
LAN.
2. When you are prompted to create a new site or join an existing
site, press 2 on the dialpad. Wait for the telephone to join the
network.
3. When you are prompted for a name, use the keys on the dialpad to
enter a user name for the telephone extension (for example,
Jones, Rae), and then select the Save softkey.
4
The telephone is now ready to receive calls, make calls, and record
voicemail. You can optionally record your name to be played back to
Voicemail users, record a Voicemail greeting, and/or set other user options
if desired. For more information, see the Avaya one-X Quick Edition
Telephone User Guide.
NOTE:
Initially, the password you need to access user options is 12345. To
ensure that you are the only one who can access the user options
on the telephone, change this password as soon as you access user
options for the first time.
To share the telephone LAN connection with a computer
1. Plug one end of your Cat5 (or better) modular line cord into the Ethernet
jack on the computer, and the other end into the PC port on the telephone.
2. Plug one end of the supplied Cat5 modular line cord into the LAN port on
the telephone, and connect the other end to the Ethernet LAN.
3. If you are installing the first telephone, see ‘‘Connect the first telephone to
the LAN’’ to complete the installation procedure. If you are installing an
additional telephone, see ‘‘Connect additional telephones to the LAN’’
instead.
Assembling the Telephone Stand
Optionally assemble and adjust the telephone stand, or wall-mount the telephone.
See the diagrams at the end of this guide.

March 2006 Revision: 1 16-600797 3
Documentation
This Quick Installation Guide and related documentation is available by searching for “Quick
Edition” online at the following URL:
http://avaya.com/support
For safety information and a quick reference to installing a G10 PSTN Gateway, see the
Avaya one-X Quick Edition G10 PSTN Gateway Quick Installation Guide (Document Number
16-600796).
For complete information about installing a G10 PSTN Gateway, see the Avaya one-X Quick
Edition G10 PSTN Gateway Installation Guide (Document Number 16-600793).
For detailed information about how to install and use a 4610SW/4621SW IP telephone, see
the Avaya one-X Quick Edition Telephone User Guide (Document Number 16-600795).
For information about how to access and modify system-wide options including setting the
system date and time, configuring paging zones, administering user groups, and using the
web-based administration interface, see the Avaya one-X Quick Edition System Administrator
Guide (Document Number 16-600794). The Avaya one-X Quick Edition System Administrator
Guide also contains detailed troubleshooting procedures and procedures for configuring G10
PSTN Gateways.
Software License
USE OR INSTALLATION OF THE PRODUCT INDICATES YOUR ACCEPTANCE OF THE
TERMS SET FORTH HEREIN AND THE GENERAL LICENSE TERMS AVAILABLE ON THE
AVAYA WEBSITE AT
http://support.avaya.com/LicenseInfo/ (“GENERAL LICENSE
TERMS”). IF YOU OR THE END USER DO NOT WISH TO BE BOUND BY THESE TERMS,
YOU MUST RETURN THE PRODUCT(S) TO THE POINT OF PURCHASE WITHIN TEN (10)
DAYS OF DELIVERY FOR A REFUND OR CREDIT.
Avaya grants You (or the End User) a license within the scope of the license type described
below. The applicable number of licenses and units of capacity for which the license is granted
will be one (1), unless a different number of licenses or units of capacity is specified in the
Documentation or other materials available to You. “Designated Processor” means a single
stand-alone computing device. “Software” means the computer programs in object code,
originally licensed by Avaya and ultimately utilized by you and/or End User, whether as
stand-alone Products or pre-installed on Hardware. “Hardware” means the standard hardware
Products, originally sold by Avaya and ultimately utilized by you or the End User.
License Type: Designated System(s) License (DS). You and/or the End User may install
and use each copy of the Software on only one Designated Processor, unless a different
number of Designated Processors is indicated in the Documentation or other materials
available to you and/or the End User. Avaya may require the Designated Processor(s) to be
identified by type, serial number, feature key, location or other specific designation, or to be
provided by you and/or the End User to Avaya through electronic means established by Avaya
specifically for this purpose.
Copyright
Except where expressly stated otherwise, the Product is protected by copyright and other
laws respecting proprietary rights. Unauthorized reproduction, transfer, and or use can be a
criminal, as well as a civil, offense under the applicable law.
IMPORTANT USER SAFETY INSTRUCTIONS
The most careful attention has been devoted to quality standards in the manufacture of your new
telephone. Safety is a major factor in the design of every set. But, safety is your responsibility too.
Please read carefully the helpful tips listed below.
!
WARNING:
All powering over telecommunication wiring must be via UL listed power supplies with outputs of 42-56
Volts DC, ≤ 1.3 Amps DC.
!
WARNING:
The telephone should not leave the building premises unless connected to telecommunications devices
providing primary and secondary protection, as applicable.
Use
When using your telephone equipment, the following safety precautions should always be followed to
reduce the risk of fire, electric shock, and injury to persons.
• Read and understand all instructions.
• Follow all warnings and instructions marked on the telephone.
• This telephone can be hazardous if immersed in water. Do not use this product near water, for example,
near a bath tub, wash bowl, kitchen sink or laundry tub, in a wet basement or near a swimming pool. To
avoid the possibility of electric shock, do not use it while you are wet. If you accidentally drop the
telephone into water, do not retrieve it until you have first unplugged the modular line cord and
disconnected the power supply. Then, call Avaya service personnel to ask about a replacement.
• Avoid using the telephone during electrical storms in your immediate area. There is a risk of electric
shock from lightning. Urgent calls should be brief. Even though protective measures may have been
installed to limit electrical surges from entering your business, absolute protection from lightning is
impossible.
• If you suspect a natural gas leak, report it immediately, but use a telephone away from the area in
question. The telephone’s electrical contacts could generate a tiny spark. While unlikely, it is possible
that this spark could ignite heavy concentrations of gas.
• Never push objects of any kind into the equipment through housing slots since they may touch
hazardous voltage points or short out parts that could result in a risk of electric shock. Never spill liquid
of any kind on the telephone. If liquid is spilled, however, refer servicing to proper service personnel.
• To reduce the risk of electric shock, do not disassemble this telephone. There are no user serviceable
parts. Opening or removing covers may expose you to hazardous voltages. Incorrect reassembly can
cause electric shock when the telephone is subsequently used.
Service
• Before cleaning, unplug the telephone from the Ethernet LAN and the power supply. Do not use liquid
cleaners or aerosol cleaners. Use a damp cloth for cleaning.
• Be sure to refer servicing to qualified service personnel when any of these conditions exist:
— If liquid has been spilled onto the telephone.
— If the telephone has been exposed to rain or water.
— If the telephone has been dropped or the housing has been damaged.
— If you note a distinct change in the performance of the telephone.
Declaration of Conformity
To download the Declaration of Conformity (DoC) for this equipment, visit http://avaya.com/support.
SAVE THESE INSTRUCTIONS

March 2006 Revision: 1 16-600797 4
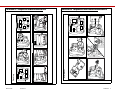
4621SW IP Telephone Stand Instructions
1
2
2
3
1
Desktop
4621SW IP Telephone Wall-mount Instructions
b
Wall Mount
12
4
a
b
b
65
3
a

March 2006 Revision: 1 16-600797 5
4610SW IP Telephone Stand Instructions
Desktop
2
3
2
3
D
D
E
Steps 5 Ð 8 Optional
4610SW IP Telephone Wall-mount Instructions
Wall Mount
2
1
3

March 2006 Revision: 1 16-600797 6
Technical Support
If you experience problems with your telephone, refer to the “Troubleshooting”
chapter of the Avaya one-X Quick Edition System Administrator Guide to resolve
the problem. If you are unable to resolve the problem yourself, contact Avaya
Technical Support by calling 800-242-2121. As an alternative, you may contact
Avaya Technical Support using one of the methods available through the Avaya
Technical Support web site:
http://avaya.com/support
IMPORTANT: If you have an Avaya support plan, call the number associated with
that plan to obtain service according to the terms of your agreement.
Entering Text and Special Characters
You can enter text and special characters as follows:
• Press a dialpad key once, twice, three times, or four times to enter the letter
printed on the key.
• To add a space to the end of a line, press the Page Right ( ) button.
• The special characters . , ’ & - and @ are entered by pressing the 1 dialpad
key.
Using Your Telephone
For a complete list of 4610SW/4621SW IP telephone features and information
about how to use your telephone, see the Avaya one-X Quick Edition Telephone
User Guide. For convenience, here are summaries of how to place and answer
calls, put an active call on hold, and retrieve and play Voicemail messages.
To make a call
1. Lift the handset, press the Speaker ( ) button, or select a Line/Feature
( ) button.
2. Press the keys on the dialpad to enter the extension number or telephone
number of the party that you want to call. You may optionally select an
extension number using the Dir softkey. If you are calling an outside (PSTN)
line, dial 9 first.
To disconnect, either:
a. Return the handset to its cradle.
b. If you are using the speaker, press the Speaker ( ) button.
c. If you are using a headset, press the Headset ( ) button.
To answer an incoming call
Perform either of the following actions:
a. For handset operation, pick up the handset.
b. For hands-free operation, press the Speaker ( ) button or select the
incoming call by selecting the associated Line/Feature ( ) button.
To disconnect, either:
a. Return the handset to its cradle.
b. If you are using the speaker, press the Speaker ( ) button.
c. If you are using a headset, press the Headset ( ) button.
To put the active call on hold
If you are handling one active call, press the Hold ( ) button.
The display area shows the HELD status of the call. You can replace the handset
without losing the call.
To take the call off hold, perform one of the following actions:
a. Pick up the handset and press the Hold ( ) button.
b. If you are using the speaker, select the Line/Feature ( ) button that
corresponds to the held line.
c. If you are using a headset, press the Hold ( ) button.
To retrieve and play a Voicemail message
1. Select the VMail softkey.
2. Using the keys on the dialpad, enter your Voicemail password (this
password is the same as your user options password), and then select the
Done softkey.
3. Select the Line/Feature ( ) button beside the entry that you want to play.
The entry at the top of the list (number 1) corresponds to the most recently
received message.
Information associated with the call is displayed.
4. Select the Play softkey.
The recorded message is played.
Tip: You can press the Volume ( ) buttons to adjust the volume
while the recording plays back.
5. If you want to pause play back, select the Pause softkey while the recording
plays back. If you pause the recording, select the Play softkey again to
resume playback.
-
 1
1
-
 2
2
-
 3
3
-
 4
4
-
 5
5
-
 6
6


Ask a question and I''ll find the answer in the document
Finding information in a document is now easier with AI
Related papers
-
Avaya 4610SW User manual
-
Avaya 555-233-784 User manual
-
-
-
-
-
-
-
-