Yamaha WX-030 Owner's manual
- Category
- Bluetooth music receivers
- Type
- Owner's manual
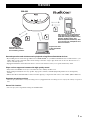
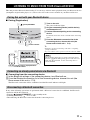
Yamaha WX-030 offers versatile music playback options, including streaming from smartphones via MusicCast, Airplay, and Bluetooth, accessing online streaming content and internet radio, and playing music from DLNA servers and PCs. Enjoy high-quality sound with its two-way speaker system and Yamaha's DSP technology, enhanced treble and bass even with compressed audio.
Yamaha WX-030 offers versatile music playback options, including streaming from smartphones via MusicCast, Airplay, and Bluetooth, accessing online streaming content and internet radio, and playing music from DLNA servers and PCs. Enjoy high-quality sound with its two-way speaker system and Yamaha's DSP technology, enhanced treble and bass even with compressed audio.


-
 1
1
-
 2
2
-
 3
3
-
 4
4
-
 5
5
-
 6
6
-
 7
7
-
 8
8
-
 9
9
-
 10
10
-
 11
11
-
 12
12
-
 13
13
-
 14
14
-
 15
15
-
 16
16
-
 17
17
-
 18
18
-
 19
19
-
 20
20
-
 21
21
-
 22
22
-
 23
23
-
 24
24
-
 25
25
-
 26
26
-
 27
27


Yamaha WX-030 Owner's manual
- Category
- Bluetooth music receivers
- Type
- Owner's manual
Yamaha WX-030 offers versatile music playback options, including streaming from smartphones via MusicCast, Airplay, and Bluetooth, accessing online streaming content and internet radio, and playing music from DLNA servers and PCs. Enjoy high-quality sound with its two-way speaker system and Yamaha's DSP technology, enhanced treble and bass even with compressed audio.
Ask a question and I''ll find the answer in the document
Finding information in a document is now easier with AI
Related papers
-
Yamaha WX-030 Owner's manual
-
Yamaha WX030B User manual
-
-
-
Yamaha 1999 Royal Star Venture Owner's manual
-
-
-
Yamaha WX-010 Owner's manual
-
-
Other documents
-
Sony CMT-G2NiP Quick start guide
-
Panasonic SCALL8EB Owner's manual
-
Sony CMT-MX750NI User manual
-
-
-
Control4 C4-WMB-B User guide
-
Panasonic SC-NE3 Operating Instructions Manual
-
NGS POP LIVE Datasheet
-
DigiTech XC-5230 User manual
-
 SOtM sMS-100 Operating Instructions Manual
