Motorola GP340 User manual

Category
Two-way radios
Type
User manual

This manual is also suitable for

Motorola GP340 is a professional-grade radio that offers reliable communication and a range of features to enhance your productivity. With 16 channel capacity, it allows for easy switching between different frequencies. The programmable buttons and customizable features, such as voice-activated transmission and emergency alerts, provide added convenience and safety. The built-in voice recorder lets you capture and playback important messages, while the selective calling feature ensures you only receive the calls you want.

Motorola GP340 is a professional-grade radio that offers reliable communication and a range of features to enhance your productivity. With 16 channel capacity, it allows for easy switching between different frequencies. The programmable buttons and customizable features, such as voice-activated transmission and emergency alerts, provide added convenience and safety. The built-in voice recorder lets you capture and playback important messages, while the selective calling feature ensures you only receive the calls you want.

Professional Radio
GP340
User Guide
68P64110B23A
Issue: July 1999
2
9
3
4
8
5
6
1
7
11
10
1
English
CONTENTS
CONTENTS
Radio Overview . . . . . . . . . . . . . . . . . . . . 3
Operation and Control Functions . . . . . . . . 3
Radio Controls . . . . . . . . . . . . . . . . . . . 3
Programmable Buttons . . . . . . . . . . . . 3
Audio Signal Tones. . . . . . . . . . . . . . . . 6
Getting Started . . . . . . . . . . . . . . . . . . . . . 7
Battery Information. . . . . . . . . . . . . . . . . . . 7
Battery Care and Tips . . . . . . . . . . . . . . 7
Recycling or Disposal of Batteries . . . . 8
Charging the Battery . . . . . . . . . . . . . . . 8
Accessory Information . . . . . . . . . . . . . . 9
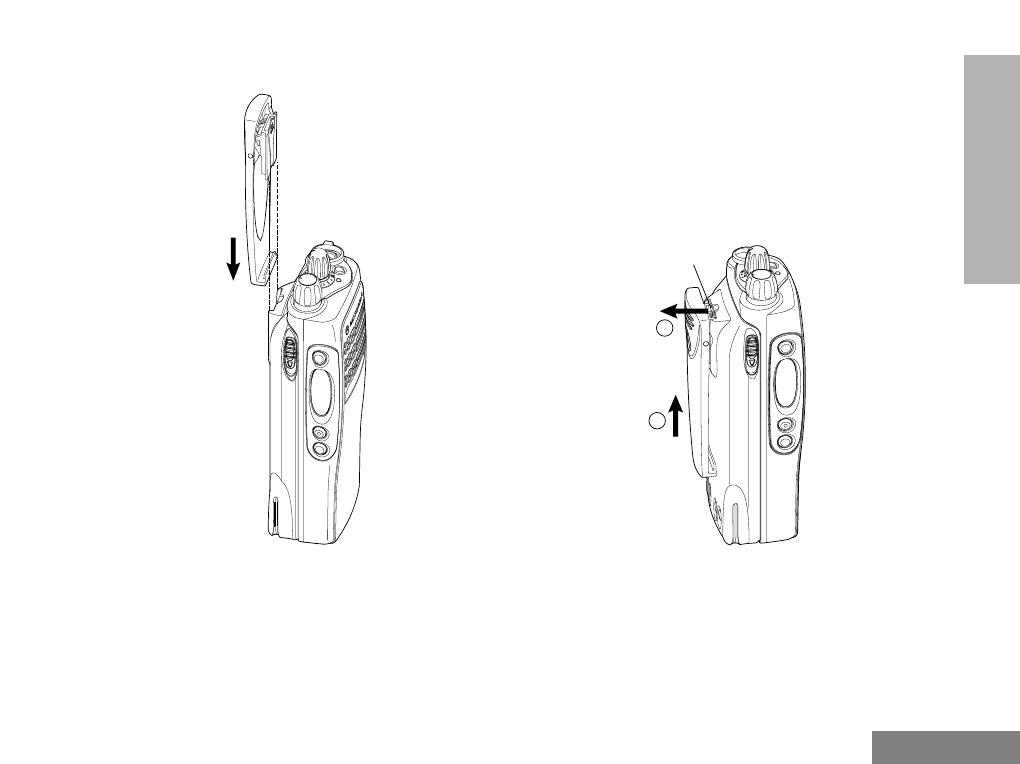
Attaching the Battery . . . . . . . . . . . . . . . . . 9
Removing the Battery. . . . . . . . . . . . . . . . . 9
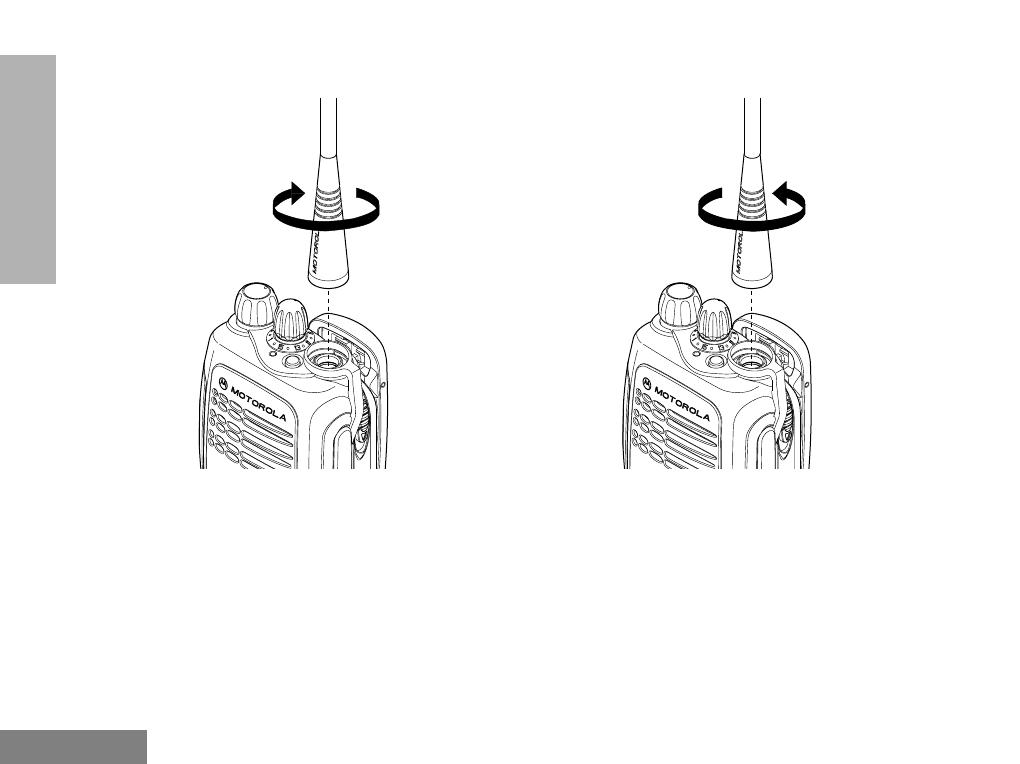
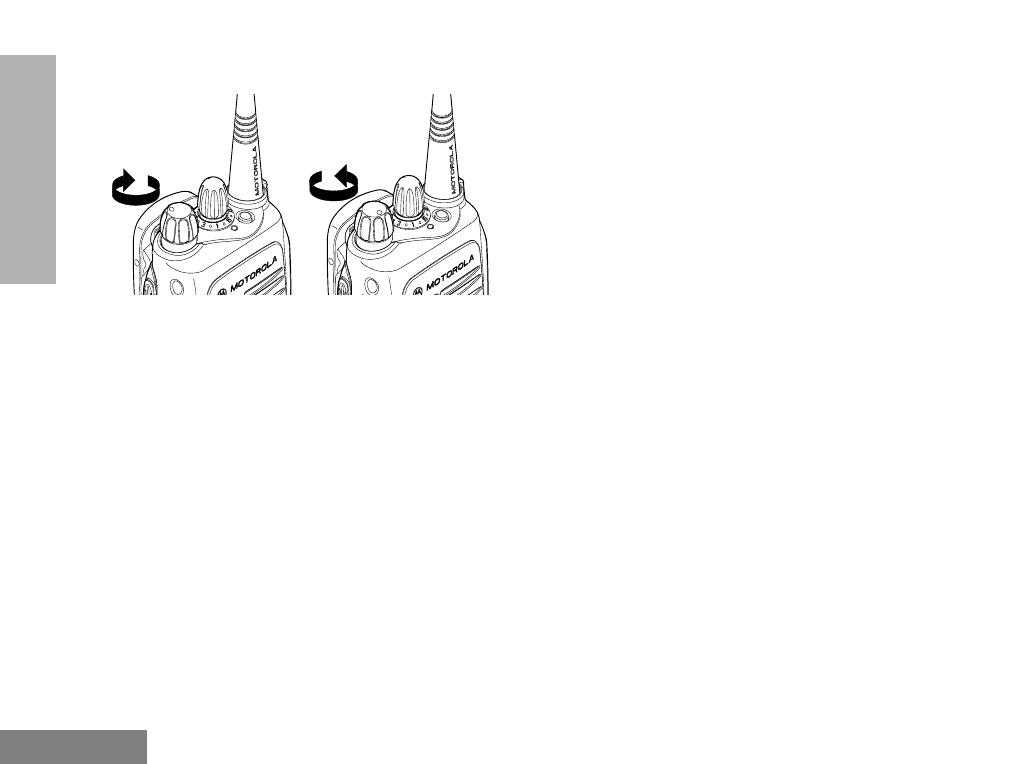
Attaching the Antenna . . . . . . . . . . . . . . . 10
Removing the Antenna. . . . . . . . . . . . . . . 10
Attaching the Belt Clip . . . . . . . . . . . . . . . 11
Removing the Belt Clip. . . . . . . . . . . . . . . 11
Radio Operation . . . . . . . . . . . . . . . . . . . 12
Turning the Radio On-Off. . . . . . . . . . . . . 12
Adjusting the RadioÕs Volume . . . . . . . . . 12
Selecting a Radio Channel . . . . . . . . . . . .12
Sending a Call . . . . . . . . . . . . . . . . . . . . . .12
Receiving a Call. . . . . . . . . . . . . . . . . . . . .12
Radio Calls . . . . . . . . . . . . . . . . . . . . . . . .13
Selective Call. . . . . . . . . . . . . . . . . . . . . . .13
Making a Selective Call . . . . . . . . . . . .13
Receiving a Selective Call . . . . . . . . . .13
Emergency Call . . . . . . . . . . . . . . . . . . . . .14
Lone Worker . . . . . . . . . . . . . . . . . . . . . . .15
Talkaround. . . . . . . . . . . . . . . . . . . . . . . . .16
Features . . . . . . . . . . . . . . . . . . . . . . . . . .17
Transmit Power . . . . . . . . . . . . . . . . . . . . .18
Whisper . . . . . . . . . . . . . . . . . . . . . . . . . . .19
Call Forward . . . . . . . . . . . . . . . . . . . . . . .20
Voice Operated Transmit (VOX) . . . . . . . .21
Voice Recorder . . . . . . . . . . . . . . . . . . . . .22
Scan . . . . . . . . . . . . . . . . . . . . . . . . . . . . .23
Starting or Stopping Scan . . . . . . . . . . . . .23
Talkback . . . . . . . . . . . . . . . . . . . . . . . . . .23
Deleting a Nuisance Channel . . . . . . . . . .24
Adding a Deleted Nuisance Channel. . . . .24
2
English
CONTENTS
Safety Information . . . . . . . . . . . . . . . . . 25
Safe and Efficient Operation . . . . . . . . . . 25
Exposure to Radio Frequency Energy . . . 25
Radio Operation and EME Exposure . . . . 26
Electromagnetic Interference/
Compatibility. . . . . . . . . . . . . . . . . . . . . . . 26
Operational Warnings . . . . . . . . . . . . . . . 26
Vehicles with an Air Bag . . . . . . . . . . . 26
Potentially Explosive Atmospheres. . . 26
Batteries . . . . . . . . . . . . . . . . . . . . . . . 26
Blasting Caps and Areas . . . . . . . . . . 27
Operational Cautions . . . . . . . . . . . . . . . . 27
Damaged Antennas . . . . . . . . . . . . . . 27
Batteries . . . . . . . . . . . . . . . . . . . . . . . 27
General Radio Care . . . . . . . . . . . . . . . . . 27
C
omputer
S
o
f
tware
C
opyr
i
g
h
t
The products described in this manual may include copyrighted computer
programmes stored in semiconductor memories or other media. Laws in the
United States of America and other countries preserve for Motorola Europe
and Motorola Inc. certain exclusive rights for copyrighted computer
programmes, including the right to copy or reproduce in any form the
copyrighted computer programme. Accordingly, any copyrighted computer
programmes contained in the products described in this manual may not be
copied or reproduced in any manner without the express written permission of
the holders of the rights. Furthermore, the purchase of these products shall not
be deemed to grant either directly or by implication, estoppel, or otherwise, any
licence under the copyrights, patents, or patent applications of the holders of
the rights, except for the normal non-exclusive royalty free licence to use that
arises by operation of the law in the sale of the product.
3
English
RADIO OVERVIEW
RADIO OVERVIEW
This user guide covers the operation of the GP340
Portable Radio.
Please read pages 25 to 27
before
using this radio
OPERATION AND CONTROL FUNCTIONS
Radio Controls
The numbers below refer to the illustrations on the
inside front cover.
1. Channel Selector Knob
Allow selection of up to 16 channels.
2. On-Off / Volume Knob
Used to turn the radio on or off, and to adjust
the radioÕs volume.
3. Side Button 1 (programmable)
4. Push to Talk Button (PTT)
Press and hold down this button to talk, release
it to listen.
5. Side Button 2 (programmable)
6. Side Button 3 (programmable)
7. Top Button (programmable)
Recommended for Emergency Button.
8. LED Indicator
Green
: Successful power up.
Green Flashing
: Radio scanning.
Red
: Radio transmitting.
Red Flashing
:
Channel busy - when receiving.
Yellow
: Radio called.
Yellow Flashing
:
Radio call reminder alert.
Red Flashing
: Low battery warning - when
transmitting.
9. Microphone
Speak clearly into the microphone when
sending a message.
10. Antenna
11. Accessory Connector
Connects headsets, remote speaker/micro-
phones and other accessories. Replace
attached dust cap when not in use.
Programmable Buttons
Several of your radio buttons can be
programmed, by the Customer Programming
Software (CPS), to activate the radio features.
The following table shows the features that can
be assigned to the Top button and the three
Side Buttons.
4
English
RADIO OVERVIEW
Feature Description
Monitor/Cancel
To monitor the selected channel for any activity
or
to cancel a current outgoing or incoming call.
Radio Call To make an individual or group selective call.
Scan On/Off To toggle between start and stop of the scan operation.
Nuisance Delete/
Cancel
To delete a nuisance channel while scanning
or
delete the message currently being played back from
voice storage.
Transmit Power To toggle your radioÕs transmit power level between High
and Low power.
Talkaround On/Off To talk directly with another radio without going through a
system or dispatcher.
Emergency To activate the Emergency alarm call.
Lone Worker
To identify yourself as a lone worker. Radio enters emer-
gency sequence unless you respond when prompted by
pressing any radio button.
Call Forward To transfer calls automatically to another radio if you are
unable to take the call.
5
English
RADIO OVERVIEW
Whisper To increase the microphone gain to allow you to speak
quietly.
Record/Play-back To record/play-back incoming calls or memo using
voice recorder feature.
Cancel Message Deletes the message currently being played back from
voice recorder (Voice storage).
Feature Description
6
English
RADIO OVERVIEW
Audio Signal Tones
High pitched tone Low pitched tone
Power Up - Radio self-test
OK
Power Up - Radio self-test
Fail
Button Error
Force Monitor(PTT pressed)
Feature Enable Side Buttons/
Top Button
Feature Disable Side Buttons/
Top Button
Channel Busy Tone/
Engaged
Individual Call Alert
Call Reminder
Group Call Alert
TOT Pre Alert
Monitor Alert
Call Failed
Scan Start
Scan Stop
Priority Channel
Priority Call detected
H/W error - tone continues
until valid operation.
Lone Worker Reminder
Low Battery
Cancel Message
Incoming Ringing Tone
Outgoing Ringing Tone
Voice Storage Record
Voice Storage Warning
Voice Storage Full
Channel Free Beep
Incoming Emergency Alert
7
English
GETTING STARTED
GETTING STARTED
BATTERY INFORMATION
Battery Care and Tips
This product is powered by a nickel-cadmium (Ni-Cd),
nickel-metal-hydride (NiMH), or lithium-ion
rechargeable battery.
The following battery tips will help you obtain the
highest performance and longest cycle life from your
Motorola rechargeable battery.
¥ Charge your new battery overnight (
14-16 hrs
)
before using it to obtain maximum battery
capacity and performance.
¥ Charging in non-Motorola equipment may lead
to battery damage and void the battery warranty.
¥ When charging a battery that is attached to the
radio, turn the radio off to ensure a full charge.
¥ The battery should be at about 25¡C (room
temperature) whenever possible. Charging a
cold battery (below 10¡C) may result in leakage
of electrolyte and ultimately, in failure of the
battery.
¥ Charging a hot battery (above 35¡C) results in
reduced discharge capacity, affecting the
performance of the radio. Motorola rapid-rate
battery chargers contain a temperature-sensing
circuit to ensure that the battery is charged
within these temperature limits.
¥ New batteries can be stored up to two years
without signiÞcant cycle loss. Store new/unused
batteries, at room temperature, in cool dry area.
¥ Batteries which have been in storage should be
charged overnight.
¥ Do not return fully charged batteries to the
charger for an Òextra boostÓ. This action will
signiÞcantly
reduce cycle life.
¥ Do not leave your radio and battery in the
charger when not charging. Continuous charging
will shorten battery life. (Do not use your charger
as a radio stand.)
¥ For optimum battery life and operation use only
Motorola brand chargers. They were designed to
operate as an integrated energy system.
8
English
GETTING STARTED
Recycling or Disposal of Batteries
At the end of its useful life, the NiCd battery can be
recycled. However, recycling facilities may not be
available in all areas.
Motorola endorses and encourages the recycling of all
re-chargeable batteries. Contact your local Motorola
dealer for further information.
Charging the Battery
If a battery is new, or its charge level is very low, you
will need to charge the battery before you can use it in
your radio.
Please contact your dealer for further information.
Note:
Batteries are shipped uncharged from the
factory. New batteries could prematurely
indicate full charge, charge a new battery for
14-16 hrs before initial use.
1.
Place the radio with the battery attached, or the
battery alone, in the charger.
2.
The chargerÕs LED indicates the charging
progress.
Battery chargers will charge only the Motorola
authorized batteries listed below; other batteries will
not charge.
FM - Factory Mutual
NiCd
Charger LED Status
Red Battery is charging
Green Battery is fully charged
Flashing Red * Battery is unchargeable
Flashing Yellow Charger is getting ready to charge
Flashing Green Battery is 90% charged
*
Battery is damaged. Please contact your dealer.
Part No. Description
HNN9008
HNN9009
HNN9010
HNN9011
HNN9012
HNN9013
High-Capacity NiMH
Ultra-High-Capacity NiMH
Ultra-High-Capacity FM NiMH
High-Capacity FM NiCd
High-Capacity NiCd
Lithium-Ion
9
English
GETTING STARTED
ACCESSORY INFORMATION
Attaching the Battery
1.
Fit the extensions at the bottom of the battery
into the slots at the bottom of the radioÕs body.
2.
Press the top part of the battery towards the
radio until you hear a click.
Removing the Battery
1.
Turn off the radio, if it is turned on.
2.
Slide the battery latches, on both sides of the
battery, downwards.
3.
Pull the top part of the battery away from the
radioÕs body, and remove the battery.
Slots
1
2
3
2
Battery
Latches
10
English
GETTING STARTED
Attaching the Antenna
1.
Align the threaded end of the antenna with the
radioÕs antenna connector.
2.
Turn the antenna clockwise to fasten it.
Removing the Antenna
1.
Turn the antenna counterclockwise until you
can remove it.
11
English
GETTING STARTED
Attaching the Belt Clip
1.
Align the grooves of the belt clip with those of
the battery.
2.
Press the belt clip downwards until a click is
heard.
Removing the Belt Clip
1.
Use a key to press the belt clip tab away from
the battery.
2.
Slide the belt clip upwards to remove it.
2
1
Belt Clip Tab
12
English
GETTING STARTED
TURNING THE RADIO ON OR OFF
¥ To turn the radio on, turn the
On-Off/Volume
Control
knob clockwise.
¥ To turn the radio off, turn the
On-Off/Volume
Control
knob counterclockwise until you hear a
click.
ADJUSTING THE RADIOÕS VOLUME
¥ Turn the
On-Off/Volume Control
knob to adjust
the volume level.
SELECTING A RADIO CHANNEL
Y
our radio offers 16 channels, however some may
not be programmed. Check with your dealer for
more information
.
¥ Turn the
Channel Selector
knob clockwise or
counterclockwise until you reach the desired
channel indicated on the selector graduation.
SENDING A CALL
1.
Use the
Channel Selector
knob to change to
the required channel.
2.
Press the
PTT
button and speak clearly into the
microphone. Your mouth should be about 2.5 -
5cm away from the microphone.
3.
Release the
PTT
button when you Þnish
speaking.
RECEIVING A CALL
1.
Turn your radio on and adjust the volume level.
2.
Switch to the desired channel.
3.
If, at any time, a call is received, you will hear
the call at the volume level you have set.
ON OFF
13
English
RADIO CALLS
RADIO CALLS
SELECTIVE CALL
Making a Selective Call
You can make a selective call to a particular
radio, known as an individual call, or to a selected
group of radios, known as a group call.
To make a Selective Call :
1.
Press the PTT or Call Button (depending
on the way your radio has been pro-
grammed by your dealer), to set up the
call.
2.
Wait until the conversation has been set
up, which means you are authorised to
use the system.
3.
Talk with your mouth 2.5 - 5cm from the
microphone. Release PTT to listen.
4.
When transmitting the red indicator will
light continuously.
Your radio may be conÞgured for ÔTransmit
InhibitÕ under certain conditions (e.g. when the
channel is in use by others) in which case, the
channel busy tone will sound when you press
the PTT or call button to indicate that
transmission is inhibited.
When the channel is free, the Channel Free
beep will sound, and you can
make a call.
If your radio is equipped with a transmit time
out timer (TOT), a warning tone
will sound a few seconds
before the transmission is cut off. Your radio
may be programmed to inhibit retransmission
within a preset time.
Receiving a Selective Call
When you receive a selective call, you will hear
either an individual call alert tone
, or a group call alert tone
and the LED Indicator will
light (yellow).
To answer the call:
1.
Press the PTT button or Call button.
2.
The call will terminate automatically when
the conversation has ended or press the
Monitor button.
14
English
RADIO CALLS
EMERGENCY CALL
Your radio can be programmed to give you a
one-button quick access to call a particular
radio or centre (predeÞned by your dealer) in
emergency situations. This is the
Emergency
Call
.
When you make an Emergency call, your radio
goes into an Emergency state, which can be
programmed to:
¥ continually give audio feedback,
¥ give no audio feedback; the radio can
receive and transmit.
1.
Press the
Emergency
button to initiate an
Emergency call.
2.
Emergency can be stopped by:
¥ Switching the radio
Off
and
On
again.
¥A
reset
message is received by your radio.
¥ The emergency time duration is reached.
Note:
The emergency time duration and reset
message are programmed into your radio by
your dealer.
Should you receive an Emergency call the
incoming emergency alert tone
will sound.
15
English
RADIO CALLS
LONE WORKER
The Lone Worker feature enables you to work
alone with added safety. To use this feature :
1.
Press the
Lone Worker
button.
2.
The feature enable alert
will sound.
You will be reminded at intervals that
Lone
Worker
is switched
on
by a high pitched alert
being sounded .
¥ Press
any button
to respond and cancel
the alert, if you do
not
the radio will enter
the Emergency state.
To switch off this feature:
1.
Press the
Lone Worker
button when the
feature disable alert will
sound
or,
2.
Change the channel
or,
3.
Switch radio
off
and
on
again.
16
English
RADIO CALLS
TALKAROUND
In your communications network, you may be using
a system to cover a larger area than is possible with
your radio. However, you can communicate with
another radio within your radioÕs range without
going through the system by using the
Talkaround
feature. This is especially useful when the system is
down. To use this feature:
1.
Press the
Talkaround
button to switch
on
talkaround when the feature enable alert
will sound.
2.
Press the
Talkaround
button again to
switch
off
talkaround when the feature
disable alert will sound.
17
English
FEATURES
FEATURES
The features described below are programmed
into your radio by your dealer and are
accessible via the radioÕs programmable
buttons.
18
English
FEATURES
TRANSMIT POWER
You can transmit your calls at different transmit
power levels. A higher level means you can
reach a radio that is farther away. A lower power
level conserves battery power. You are advised
to transmit as frequently as possible on low
power, and use high power only when needed.
To use this feature :
1.
Press the
Tx Power
button to switch to
high power
when the feature enable alert
will sound.
2.
Press the
Tx Power
button again to switch
to
low power
when the feature
disable alert will sound.
  • Page 1 1
  • Page 2 2
  • Page 3 3
  • Page 4 4
  • Page 5 5
  • Page 6 6
  • Page 7 7
  • Page 8 8
  • Page 9 9
  • Page 10 10
  • Page 11 11
  • Page 12 12
  • Page 13 13
  • Page 14 14
  • Page 15 15
  • Page 16 16
  • Page 17 17
  • Page 18 18
  • Page 19 19
  • Page 20 20
  • Page 21 21
  • Page 22 22
  • Page 23 23
  • Page 24 24
  • Page 25 25
  • Page 26 26
  • Page 27 27
  • Page 28 28
  • Page 29 29
  • Page 30 30

Motorola GP340 User manual

Category
Two-way radios
Type
User manual
This manual is also suitable for

Motorola GP340 is a professional-grade radio that offers reliable communication and a range of features to enhance your productivity. With 16 channel capacity, it allows for easy switching between different frequencies. The programmable buttons and customizable features, such as voice-activated transmission and emergency alerts, provide added convenience and safety. The built-in voice recorder lets you capture and playback important messages, while the selective calling feature ensures you only receive the calls you want.

Ask a question and I''ll find the answer in the document

Finding information in a document is now easier with AI