Page is loading ...

AirWaterLife.com
Read Carefully
Before Initial Use.
Retain Manual for
Future Reference.
9
AWL-9000

Table of Contents:
• Included with Your Water Ionizer/Parts & Supplies . . . . . . . . . . . . . 01
• Water Ionizer Assembly Overview . . . . . . . . . . . . . . . . . . . . . . . . . 02
• Safety Instructions & Symbols . . . . . . . . . . . . . . . . . . . . . . . . . . . . 03
• Technical Specifications . . . . . . . . . . . . . . . . . . . . . . . . . . . . . . . . . 10
• Installation Schematic & Instructions . . . . . . . . . . . . . . . . . . . . . . . 12
1. Identify Required Connector/Attach Faucet Diverter Valve. . . . . 13
2. Install the Inner Carbon Filter . . . . . . . . . . . . . . . . . . . . . . . . . . . 15
3. Connect Inlet & Outlet Hoses . . . . . . . . . . . . . . . . . . . . . . . . . . . 17
4. Attach Metal Spout . . . . . . . . . . . . . . . . . . . . . . . . . . . . . . . . . . . 17
5. Connect the Inlet Water Hose to the Faucet Diverter Valve . . . . 17
6. Check for Leaks . . . . . . . . . . . . . . . . . . . . . . . . . . . . . . . . . . . . . 18
7. (Optional) Wall Mount Your Water Ionizer. . . . . . . . . . . . . . . . . . 19
8. Plug In the Water Ionizer. . . . . . . . . . . . . . . . . . . . . . . . . . . . . . . 21
• (Optional) pH Testing . . . . . . . . . . . . . . . . . . . . . . . . . . . . . . . . . . . 21
1. Factory pH Value Presets . . . . . . . . . . . . . . . . . . . . . . . . . . . . . . 21
2. Impact of Environmental & Other Factors on pH . . . . . . . . . . . . 21
3. Conducting pH Testing . . . . . . . . . . . . . . . . . . . . . . . . . . . . . . . . 22
4. (Optional) pH Retesting . . . . . . . . . . . . . . . . . . . . . . . . . . . . . . . 23
• Understanding the LCD Display . . . . . . . . . . . . . . . . . . . . . . . . . . . 24
• Understanding Your pH Presets . . . . . . . . . . . . . . . . . . . . . . . . . . . 25
• Selecting Your pH Preset & Dispensing Water: . . . . . . . . . . . . . . . 26
• Automatic Cleaning Function . . . . . . . . . . . . . . . . . . . . . . . . . . . . . 26
• Enhanced Cleaning Function . . . . . . . . . . . . . . . . . . . . . . . . . . . . . 27
• Manual Cleaning & Descaling. . . . . . . . . . . . . . . . . . . . . . . . . . . . . 30
• Problems & Solutions . . . . . . . . . . . . . . . . . . . . . . . . . . . . . . . . . . . 31
• Warranty Information. . . . . . . . . . . . . . . . . . . . . . . . . . . . . . . . . . . . 33
Owner’s Manual: AirWaterLife.com Aqua-Ionizer Deluxe 9.0

01
Included with Your Water Ionizer/Parts & Supplies:
Stainless Steel
Screws
(2)
Inner Tread
Faucet Joint
(1)
Plastic Expansion
Screw Anchors
(2)
3-Bolt Faucet
Connector
(1)
Carbon
Water Filter
(1)
Quick-Connect Valves
Pre-Installed Bottom of Water Ionizer
(2)
Drill Mounting
Guide
(1)
Faucet Diverter
Valve
(1)
Flexible
Metal Spout
(1)
Dual-Tread
Faucet Connector
(1)
Water Hose: Cut to Form Inlet Water
Hose and Acidic Water Outlet Hose
(1, Cut to form 2)
Owner’s Manual: AirWaterLife.com Aqua-Ionizer Deluxe 9.0

02
Descaling Agent
(1)
Owners Manual
(1)
pH Color Chart
(1)
pH Value
Detection Bottle
(1)
Water Ionizer Assembly Overview:
Outer Filter Cover
Inner Filter Cover
Carbon Water Filter
Important Note: As a result of minor technical or aesthetic changes some ionizer
parts may appear slightly different in appearence or color than depicted on product
packaging or in this manual. Should this occur, the part(s) remain usable and should
be installed and used in accordance with this product manual.
Water Ionizer
Flexible
Metal Spout
Power Cord
Inlet Water Hose
Acidic Water Outlet Hose
pH Reagent
(1 bottle)
Owner’s Manual: AirWaterLife.com Aqua-Ionizer Deluxe 9.0

03
WARNING
CAUTION
IMPORTANT
Avoid the specified action as it may destroy the unit,
cause serious injury or even death.
Avoid the specified action as it may damage the unit
or cause serios injury.
Do NOT perform the specified action.
The specified action is very important and must be
completed for the unit to function properly.
Safety Instructions & Symbols:
Most City Water in the USA Works Great
Source Water Requirements - Please pay attention to the source
water requirements outlined below prior to installing and operating
your water ionizer...
• The source water entering water ionizer must meet applicable
local standards that make it suitable for drinking. Despite the
unit’s built-in water filter, it should NOT be attached to a water
source not intended for drinking. The purpose of the carbon filter
is to remove residual chlorine, other chemicals, and odors from
water already suitable for human consumption in order to
improve its taste. The filter is NOT intended as the sole
purification source for water that does not meet these standards.
Attempting to use the water ionizer in this manner will void the
warranty, reduce the unit’s performance, shorten its operational
life and could jeopardize the health and life of anyone drinking
water that could potentially still be harmful.
• The water flow entering the water ionizer from the source water
connection must be 0.8 liters per minute or faster for the water
ionizer to operate properly. If the water flow is too slow, the
water ionizer may not be able to induce water flow and therefore
cannot start normally. If your municipal or other water source
flows slower than 0.8 Liters per minute, you may need to install a
booster pump.
• The pressure of source water that goes into the unit must be
under 43.5 pounds per square inch (psi) / 0.3 megapascals
(Mpa) for your water ionizer to operate properly and to avoid
damaging the unit. If your water pressure is higher than this, you
should install a water pressure reducer to lower the source water
pressure before it’s fed into your water ionizer.
WARNING
DO NOT
Owner’s Manual: AirWaterLife.com Aqua-Ionizer Deluxe 9.0

04
If you have an RO System installed please call
888-601-5886
for help if your Water Ionizer does not work.
Do Not install your water ionizer in any of the following locations...
• Near an open flame, in direct sunlight or anywhere temperatures
could exceed 140° F (60° C);
• Near flammable liquids;
• Outdoors or any place where the unit could be directly exposed
to rain, snow, high winds or other weather elements;
• Saunas or other facilities with unusually high levels of humidity
levels; or
• Any spot where water or other liquids might drip on the unit's
exterior.
To avoid electrical shock and fire hazards:
• Be sure the electrical plug is seated fully in the power outlet.
• Do NOT bend, pinch, clamp, place heavy objects upon, modify,
or otherwise damage the unit's power cord or plug.
• Do NOT plug the unit in if the cord, plug or the outlet is damaged.
• Do NOT drag the unit by its power cord or plug.
• Contact a qualified electrician immediately if the cord or plug
becomes damaged.
CAUTION
DO NOT
IMPORTANT
IMPORTANT
WARNING
Owner’s Manual: AirWaterLife.com Aqua-Ionizer Deluxe 9.0

05
• Do NOT share the electrical outlet used for your ionizer with
other electrical appliances.
• Use only alternating current 110V power supply. Exceeding the
rated power range may damage the unit and/or cause a fire.
• Do NOT attempt to plug in, unplug, or otherwise operate your
water ionizer if your hands are wet.
• Do NOT submerse the unit in water nor use alcohol, flammable,
toxic or corossive chemicals when cleaning this unit. You should
clean the exterior of your water ionizer by using a slightly damp
cotton cloth with a small amount of dish washing liquid.
• If the unit falls into or is doused by water or any other liquid,
immediately pull its powerplug from the electrical outlet.
• This appliance is not intended for use by persons (including
children) with reduced physical, sensory or mental capabilities
nor by individuals with otherwise limited knowledge, skills and
abilities regarding the operation of electrical appliances in
general and water ionizers in speciifc unless they have received
supervised and/or written instruction (such as this manual) in
their safe operation.
• Young children should be supervised when attempting to operate
the unit.
• Do NOT place your water ionizer less than 3 feet from your oven,
furnace, space heater or any other active heat source or device.
• Do NOT disassemble, attempt to repair or modify your water
ionizer. This should only be done by a professional service
technician.
• If you have existing water hoses from a previously owned water
ionizer or other water dispensing, filtration or purification devices,
these hoses should be discarded and the new hoses provided
with your new water ionizer should be used instead.
DO NOT
IMPORTANT
WARNING
CAUTION
CAUTION
Owner’s Manual: AirWaterLife.com Aqua-Ionizer Deluxe 9.0

06
Health Issues: If any of the following apply to you, please consult
your physician before drinking or continuing to drink ionized
alkaline water:
• You have kidney disease, renal failure, and/or have difficulty
discharging/eliminating potassium in which case you should
generally NOT ingest alkaline water.
• You are receiving medical treatment for another disease or
illness;
• You are chronically ill or otherwise in very poor health;
• Your health appears to deteriorate after you’ve begun drinking
alkaline water;
• Previously existing health issues do not improve despite
continuously consuming alkaline water.
Beginning to Drink Alkaline Water: Your body may take a while to
get use to alkaline water:
• When drinking alkaline water for the first time, dispense the water
using your unit’s "Initial Drinking" setting and consume only small
amounts, 8 to 16 ounces (0.25 to 0.5 liters) per day.
• Continue this practice for at least 2 weeks prior to advancing to
your unit’s higher pH value "Daily Drinking" setting at which time
you should try to consume 32 to 64 ounces (1 to 2 liters) of
alkaline water per day.
• Attempting to drink higher pH value water before your body
becomes used to alkaline water can result in temporary
digestive, dermatological or other health related problems.
Alkaline Water & Medications: Do NOT drink alkaline water prior to,
with or immediately following taking pills or other medications.
Instead, use your unit's "Purifier Water," i.e., filtered but not ionized,
water setting. As a general rule, you should not consume alkaline
water within 45 mins. to one (1) hour either before or after taking
medication.
IMPORTANT
WARNING
IMPORTANT
CAUTION
DO NOTCAUTION
Owner’s Manual: AirWaterLife.com Aqua-Ionizer Deluxe 9.0

07
Storing Ionized Water: Under normal temperature conditions,
alkaline water stored properly in a sealed, insulated container will
retain its ionized properties for at least 24 hours and up to 48 hours
when refrigerated.
• Do NOT store ionized water in metal containers. It should only
be stored in plastic, glass or ceramic containers.
• Exposing the container to direct sunlight may shorten the period
that alkaline water is able to retain its ionized properties.
Cosmetic Water Use: When using mildly acidic water from your
water ionizer's "Cosmetic" setting for skin care, as an astringent or
for hair care, please discontinue use and consult your physician if
you develop a skin rash or other allergic reaction.
Pets & Ionized Water: Dogs, cats and other mammals may benefit
from drinking ionized water. However, there are a few simple rules:
• Especially if your animals have any preexisting health problems,
consult your local veterinarian before giving them alkaline water
and/or following any negative health reaction to the alkaline
water.
• Start them off slowly on "Initial Drinking" setting and keep them
there for at least 2 weeks prior to moving to the "Daily Drinking"
setting. As a general rule, it's probably best not to exceed 9 pH.
• Do NOT give your pet alkaline water within 45 mins. to an hour
before or after meals. Use the "Purified Water" setting instead.
The higher pH levels can neutralize their stomach acids making it
more difficult for them to absorb nutrients.
• As with humans, Do NOT give your pets ionized water within 45
mins to an hour prior to, with or after taking medication. Doing so
can alter the intended absorption rate of the drug.
• While the "Cosmetic" water setting can be used to treat your
pets’ minor wounds and improve its skins and coats, you should
check carefully for any allergic reactions or skin irritation.
IMPORTANT
CAUTION
IMPORTANT
CAUTION
Owner’s Manual: AirWaterLife.com Aqua-Ionizer Deluxe 9.0

08
Fish & Aquariums: Unless you are an experienced aquarium owner
or qualified aquatic life professional, Do NOT introduce ionized
water to your aquarium without knowing the precise alkaline or
acidic water settings applicable to your particular fish species. Fish
may become ill or die if their water's pH balance is changed or
changed too quickly.
Exotic Pets: Lizard, snake, turtle, frog and other reptile and
amphibian species vary dramatically in the pH levels to which they
are suited. Please contact your veterinarian or pet shop owner
prior to giving them ionized water.
Plants: Different plants thrive on water of varying pH levels. For
example, some plants prefer more alkaline environments while
others perform better in more acidic ones. Consequently, before
watering your plants with ionized water, you should determine
specifically the type of pH balance most conducive to the growth of
your specific plants.
Flushing Residual Water: Because a certain amount of water
remains trapped in your water ionizer's filters and tubing, you
should briefly drain this water off prior to each use.
• In order to remove any residual water left in your water ionizer,
you should generally dispense water from the unit for
approximately 1 second before each new period of use.
• If you have not used the unit for at least 2 weeks, you should
dispense water from the unit for at least 3 mins before using it.
Tainted & Leaking Water: If any of the following occurs, stop
drinking water from your ionizer immediately and contact an
authorized service technician. Not doing so could damage your
health...
• Taste or pH testing reveals that water dispensed from the unit
which should be alkaline is coming out acidic;
• Residual water appears to be dripping from the unit and/or is
discovered to be collecting around the electrodes during routine
cleaning and maintenance.
IMPORTANT
CAUTION
IMPORTANT
WARNING
Owner’s Manual: AirWaterLife.com Aqua-Ionizer Deluxe 9.0

09
Continuous Operation: Do NOT exceed the following maximum
continuous operational time frames for your water ionizer:
• Do NOT operate the unit in "Initial Drinking," "Daily Drinking" or
"Cosmetic" mode for more than 60 minutes continuously.
• Do NOT operate the unit in "Cleaning," "Cooking" or "Make
Teas/Neutralize Liquor" mode for more than 30 minutes
continuously.
Consumable Water Limits: Though extremely high or low pH water
can be used for purposes besides drinking, e.g., cooking food,
cosmetic purposes or household cleaning, etc., humans, unless
directed by their physician for some unusual medical reason,
should not generally drink water higher than 10 pH nor lower than
7 pH on a regular basis.
Grounding: Your water ionizer should only be connected to an
electrical circuit that is protected by a "ground-fault circuit
interrupter," (GFCI)...
• This appliance must be grounded. In the event of a malfunction
or breakdown, grounding will reduce the risk of electric shock by
providing a path of least resistance for electric current.
• This appliance is equipped with a cord having an appliance-
grounding conductor and a grounding plug.
• The plug must be plugged into an appropriate outlet that is
installed and grounded in accordance with all local codes and
ordinances.
• Improper connection of the appliance-grounding conductor can
result in a risk of electric shock.
• Check with a qualified electrician or service representative if you
are in doubt as to whether the appliance is properly grounded.
• Do not modify the plug provided with the appliance; if it will not fit
the outlet, have a proper outlet installed by a qualified electrician.
DO NOTCAUTION
IMPORTANT
WARNING
IMPORTANT
WARNING
Owner’s Manual: AirWaterLife.com Aqua-Ionizer Deluxe 9.0

10
Waste Disposal: In compliance with the "Waste Electrical and
Electronic Equipment Directive"...
• This marking indicates that this product should not
be disposed with other household waste through-
out the EU (European Union).
• To prevent possible harm to the environment or
human health from uncontrolled waste disposal
and to conserve material resources, this product
should be recycled responsibly.
• To dispose of your product, please use your local return and
collection systems or contact the retailer where the product was
purchased. They can take this product for safe environmental
recycling.
*Rated Power Consumption indicates the maximum power usage when the unit's "Cooking" setting is engaged,
ionized water pH output is constant and rated inflow, water temperature and total dissolved solids (TDS) are at their
default value. The actual power consumption varies to maintain a constant pH depending on the inflow rate, water
temperature and TDS breakdown of the source water at any given time.
Technical Specifications:
Model.....................................................................................AWL-9000
Installation ........................Countertop/Optional Undersink Kit Available
Number of Plates..................................................................................9
Plate Construction.........................................Platinum Coated Titanium
Plate Surface Area ....................................................163 square inches
Plate Technology ........Long-Life/Low Power Consumption RTI Distinct
Constant Electrolysis ....................................................Yes; 60 minutes
Power System.....................................................................Transformer
Voltage ........................................................................... AC 110V/60Hz
Wattage............................................................4W idle/200W operating
Rated Power................................................................................120W*
IMPORTANT
Owner’s Manual: AirWaterLife.com Aqua-Ionizer Deluxe 9.0

Technical Specifications: (continued)
Max. Operating Temp ........................................................60°C / 140°F
Source Water Temp...........................................5° - 40°C / 41° - 104° F
Operational Pressure .............................14.5 - 43.5 psa / 0.1 - 0.3 Mpa
Water Flow Rate .........................................4 liters per min (adjustable)
pH Levels ......................................7 total: 4 alkaline, 1 neutral, 2 acidic
Adjustable pH ..................Yes: 4.5 to 11.0, depending on intake source
ORP Range...........................................................-840mV to +1000mV
Measurements...................................8.25 (W) x 13 (H) x 4.3(D) inches
Weight ..................................................................................8.0 pounds
Filter System .......................................................... Active Carbon Filter
Filter Change Alert ......................................................Yes; LCD display
Filter Life.......................................................6000 Liters / 1585 Gallons
Approx. 1 Yr. with normal usage
Cleaning Cycles...............1. After each use, unit automatically cleans
itself for 10 seconds by reversing positive
and negative plate polarity;
2. Every 40 liters (10.6 gal.), the unit cleans
itself for 30 seconds by reversing positive
and negative plate polarity; and
3. After each year of use, the unit should be
cleaned manually following the cleaning and
descaling instructions in this manual.
LCD Size........................6.3 sq in: 3.5 in x 1.8 in: 7 colors,1 per setting
Control Panel......................................Ultra-Responsive Bio-Touch Pad
FDA Approved Plastics.....................................................................Yes
ETL Certified.....................................................................................Yes
Warranty.........................................................Life-time limited warranty
11
Owner’s Manual: AirWaterLife.com Aqua-Ionizer Deluxe 9.0

12
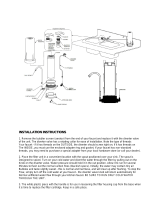
Installation Schematic: (Optional Wall Mont)
Flexible
Metal Spout
Power Cord
Inlet Water Hose
Acidic Water
Outlet Hose
Water Ionizer
Video Install Guide ONLINE
Installation Order: There are 8 simple steps to installing your
water ionizer each of which is described in detail beginning on the
next page. Please follow each of the following steps in order.
1. Identify Required Connector(s) & Attach Faucet Diverter Valve
2. Insert the Water Ionizer’s Inner Carbon Filter
3. Connect the Inlet and Outlet Water Hoses to the Water Ionizer
4. Install the Metal Spout
5. Connect the Inlet Water Hose to the Faucet Diverter Valve
6. Check Connections
7. (Optional) Wall Mount Your Water Ionizer
8. Plug In the Water Ionizer
Owner’s Manual: AirWaterLife.com Aqua-Ionizer Deluxe 9.0
www.AirWaterLife.com/install

3-Bolt Faucet
Connector
Dual-Thread
Faucet Connector
c. Unthreadeda. Threaded
on Outside
May appear identical to an
inside threaded fauce from
the outside.
22mm
over 3mm
b. Threaded
on Inside
Threads will not be visible from outside.
Feel inside faucet spout for threads.
Faucet Diverter
Valve
Inner Thread
Faucet Joint
13
www.AirWaterLife.com/install
Installation Step 1 - Identify Required Connectors/ Attach Faucet
Diverter Valve: Home faucets typically fall into 1 of 3 categories, a.)
threaded on the outside, b.) threaded on the inside, and c.)
unthreaded, i.e., those without screw on/in connectors.
The type of faucet you have will determine whether you can attached
the Faucet Diverter Valve directly to your faucet or which of the type of
faucet connector(s) you will use to attach the Faucet Diverter Valve to
your faucet. There are three connectors included with your water
ionizer, a 3-Bolt Faucet Connector, an Inner Thread Faucet Joint and
a Dual-Thread Faucet Connector.
a) Thread Outside Faucet: You will usually not need to use a
connector. Simply screw the Faucet Diverter Valve directly onto the
faucet.
Owner’s Manual: AirWaterLife.com Aqua-Ionizer Deluxe 9.0

www.AirWaterLife.com/install
b) Threaded Inside Faucet: Being sure to first insert the washer, screw
the Dual-Thread Faucet Connector into the faucet. Then screw the
Faucet Diverter Valve onto the Dual Tread Connector.
3-Bolt Faucet
Connector
Dual-Thread
Faucet Connector
24mm
Faucet Diverter
Valve
c) Unthreaded Faucet: If your faucet has neither inside nor outside
threads, loosen the bolts on the 3-Bolt Faucet Connector, slip it over
the end of the faucet pressing upward firmly then tighten bolts
securely locking it on to faucet. Next, screw the Inner Faucet Thread
Joint securely into the bottom of the 3-Bolt Faucet Connector. Then
screw the Faucet Diverter Valve onto Inner Thread Joint which you’ve
just attached to the 3-Bolt Faucet Connector.
22mm
Faucet Diverter
Valve
Inner Thread
Faucet Joint
14
IMPORTANT
In some instance, either because the threads are
damaged, too wide, or too narrow, you may need to
use the 3-Bolt Faucet Connector assembly method
even on Threaded Inside or Outside Faucets.
Owner’s Manual: AirWaterLife.com Aqua-Ionizer Deluxe 9.0

Installation Step 2 - Insert the Inner Carbon Filter:
Though your water ionizer's Inner Carbon Filter is shipped with your
water ionizer, it is NOT preinstalled in the unit. Simply remove the
filter from the box, remove any packing materials, and install it in the
following manner:
A. Remove the water ionizer's Outer Filter Cover by pressing on the
arrow with your thumb, squeezing gently with your finger and pulling
up.
B. Firmly grasp the water ionizer's Inner Filter Cover and twist it
counter clockwise to open and gain access to the filter chamber.
C. After unpacking the new Inner
Carbon Filter, hold the end with the
sealing ring on it under running tap
water for 3 minutes to flush away
any loose carbon particles, remove
excess air, and to prime the filter.
Fig. C
Fig. A Fig. B
Inner Filter Cover
Inner Carbon
Water Filter
15
Outer Filter Cover
Owner’s Manual: AirWaterLife.com Aqua-Ionizer Deluxe 9.0

D. Insert the newly flushed Inner Carbon Filter into the open filter
chamber as shown in Fig. D.
E. Reseat the Inner Filter Cover and twist it clockwise to close the
filter in filter chamber.
Fig. D Fig. E
Inner Filter Cover
Inner Carbon
Water Filter
Replacing Filters: The Inner Carbon Filter should be replaced after every 6000 liters / 1585
gallons of water being dispensed, which means it will last up to a year under normal use
conditions. However, regional, environmental, and other differences in water quality, such as
more polluted municipal water, may require the filter to be replaced more often. If you notice an
unusual odors or taste in your water replace the filter as necessary.
16
Owner’s Manual: AirWaterLife.com Aqua-Ionizer Deluxe 9.0
IMPORTANT
Remove the blue clips from quick-connect valves at bottom
of water ionizer. Next remove and SAVE the Horns on the
Acidic Outlet and Inlet Water valves by pushing in the
collets around opening of each valve with two fingers then
gently pull the Horn. You'll need these horns during the
Descaling process.
Collet
B. Firmly push both
hoses into the connectors.
one for the In and one for the
Acidic Water. “at least 1/2”
A. Remove the small blue clips.
Push in the collet with one hand and
pull the horn in the opposite
direction with your other hand.
Remove
AirWaterLife.com/install For Video Help
Installation Step 3 - Connect Inlet & Outlet Hoses:
Cut the length of water tubing in half if it is not already cut into two
hoses.

Installation Step 4 - Attach Metal Spout:
REMOVE THE PLASTIC Innner Cover
Screw the flexible Metal Spout clockwise into the outlet connector on top of
the water ionizer.
Installation Step 5 -
Connect the Inlet Water Hose to the Faucet
Diverter Valve:
Connect the Inlet Water Hose to the top faucet diverter valve
and the Acidic Water Outlet Hose into the bottom valve.
Inlet Water Hose
On Top
Acidic Water Outlet Tube
On the Bottom
17
Owner’s Manual: AirWaterLife.com Aqua-Ionizer Deluxe 9.0
Installation Step 5a (special) Connect the Inlet and Acid Water Hoses to the
Faucet Diverter Valve:
There are two (2) barbed post hose connectors for the hoses on the Faucet
Diverter Valve. The 'top' barbed post connector is for outgoing water which when
diverted with the control handle will flow into the water “in” port on the bottom right
side of the unit (control panel facing you). This is called your 'supply line'.
The 'bottom' connector is for the 'acidic' 'out-line' from the left bottom of the unit
(control panel facing you) this ‘out-line’ allows the acidic water to flow out of the
small spigot next to the larger spigot (normal water flow is from the larger spigot).
This diverter when attached to the faucet end provides alkaline water when the
diverter is activated or normal tap water if the diverter is set for tap water.
In order to attach either hose to the top or bottom connector the hose must be
'slid' onto the Diverter about 1/2 inch. You can also use a few drops of water
inside the hose to help “slide” the hose onto the barb connector.
For More Help Call 888-601-5886
CAUTION: Be sure that the Metal Spout, and the white ¼” hoses for the source
water ('IN') and the acidic ('OUT') are attached correctly to the bottom of the unit as
described in Steps 3 & 4.

Installation Step 6 - Check for Leaks: After completing all
prior installation steps and making sure all hoses are securely
attached, you should perform each of the following filter related tasks
when a) initially installing the unit, b) each time you replace the unit’s
Inner Carbon Filter and c) any time the unit has not been used for 2 or
more days...
A. If you have not already done so, insert the filter as described under
Step 2 - Insert the Inner Carbon Filter. Be certain you have placed the
filter under running tap water for at least 3 minutes to flush away
any loose carbon particles, remove excess air and to otherwise prime
the water filter. Also be sure the Inner Filter Cover is screwed firmly
over the Inner Filter Cartridge.
B. With the Faucet Diverter Valve
still switched on and source
water still flowing into the unit,
confirm that there are no leaks
from any of the hose connection
points, the Inner Filter Cover nor
from anywhere else on the water
ionizer. This process will also
flush any remaining air from the
water filter.
C. If there are no apparent leaks,
replace the Outer Filter Cover
and temporarily plug the unit into
the proper electrical outlet as
described in Step 8 – Plug In the
Water Ionizer.
D. Press and hold the "Set" button continuously on the unit’s front
for at least 10 seconds to fully flush the filtration system and to
clear any message prompts about replacing the filter.
E. After fully installing and priming the Carbon Water Filter, if this is the
first time you’ve installed your water ionizer, unplug the unit and
proceed to Step 7 - (Optional) Wall Mounting Your Water Ionizer. If
instead you are simply replacing an existing filter, your finished simply
return to using your water ionizer normally.
Inner Filter
Cover
18
IMPORTANT
Outer Filter
Cover
Owner’s Manual: AirWaterLife.com Aqua-Ionizer Deluxe 9.0
/