Page is loading ...

www.casperscreens.com 877-745-5525
CUSTOM-CUTTING INSTRUCTIONS FOR
SINGLE AND DOUBLE RETRACTABLE SCREENS
YOU WILL NEED:
Power Saw w/Non-Ferrous Metal Blade Tape Measure Crimping Tool
Included:
Housing w/ mesh
and pull bar
x1 for SINGLE door
x2 for DOUBLE doors
Optional
Slide Lock w/ clip for
DOUBLE doors
(separate instructions)
Top Track
Bottom Track
#2 Square Head
Self-Tapping
Screws
DRILLBIT
INCLUDED
Side Profile
SINGLE ONLY
CASPER
CASPER
Accessory Pack
x1 for SINGLE door
x2 for DOUBLE doors
Each Accessory Pack
includes the following:
A) Handles x2
B) Boots x2
C) Bearing x1
D
) End Cap x1
A
B
C
D

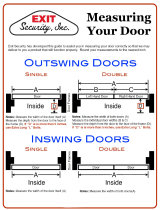
Custom Retractable Screen Measuring Instructions
www.casperscreens.com 877-745-5525
Door Jamb
Height
Width
Width
Diagram 1- Single Door
Height
Height
Width
Width
Door Jamb
Diagram 3- Double Door
Diagram 2- Threshold Side View
Height
Door Jamb
1” Mounting
Surface
1”
Threshold
STEP 1. Casper Disappearing Screens are custom cut and
recess-mounted directly into the door jamb. Select a
continuous flat surface around the entire door frame
inside the door jamb. The surface must have at least 1” of
clearance (depth) for the frame housing components to
be installed on the hinged side of the door(s). All other
sides of the door frame require at least 15/16” clearance
(depth) for a trouble-free installation.
STEP 2. Measure the height of door frame's mounting
surface to the nearest 1/16". The height should be
measured on the hinged side of the door frame. When
measuring the height for double doors, if the
measurements differ, note both dimensions. If the
bottom threshold is sloped, measure to the highest point
on the threshold where the screen will mount. (See
Diagram 2 where the arrows meet) In this case, you will
need wedge shims (not included) to shim the bottom
track on the threshold so that it is level.
STEP 3. Measure the width of the door at the TOP and
BOTTOM to the nearest 1/16". If these measurements
differ, use the SMALLER of the two measurements.
STEP 4. Double check your measurements for accuracy
and you are now ready to order your Casper Disappearing
Screen!

www.casperscreens.com 877-745-5525
Casper Screens Uncut Dealer Kits Allow You to Easily Custom-Cut the System to Fit Your
Single or Double Door Opening. The Kits Come in Several Sizes to Fit Virtually Any
Single or Double Door Opening with Custom Sizes Available as Well.
• BE SURE TO READ THE ENTIRE INSTRUCTIONS BEFORE BEGINNING
• DOUBLE CHECK YOUR MEASUREMENTS B
EFORE CUTTING TO AVOID ANY MISCUTS,
WHICH MAY COMPRIMISE THE FIT OF TH
E SCREEN FRAME
• SAFETY GOOGLES ARE ALWAYS REQUIRED WHEN CUTTING TO PREVENT EYE INJURY
• ALWAYS USE CAUTION WHEN OPERA
TING POWER TOOLS
STEP 1. Measure the Height of the Door Opening per our separate measuring instructions. Do not remove the cellophane
wrapping around the center of the housing ! Keeping this in place will secure the pull bar to the housing during the cutting
process. Place the housing lying flat with the magnet facing you. The end of the housing with the end cap already in place
should always be on your left, this is where the retracting mechanism is located. You will always make the cut on the open end
on the right side when facing the housing. The housings are universal, meaning they will fit in either side of the opening.
STEP 2. Using the measurement for the height of the door opening, measure the housing to the same measurement.
Now, subtract 3/8” from that measurement. This accounts for the 3/8 “width of the end cap which will be installed after
cutting. This is the length you will cut the housing. FOR EXAMPLE, If the height of your opening is 84”, after deducting 3/8”
the length the housing will be cut is 83 5/8”.
STEP 3. Make your cut using a non-ferrous metal blade through the housing, mesh and pull bar, at a smooth, moderate
speed; (Too fast can leave rough edges, too slow can melt the mesh.) Once the cut is made, tap the housing with the open end
facing downward to clear out any excess aluminum shavings.
End Cap
Open End
(Cutting End)
Door Height Measurement
Housing w/ mesh and pull bar
(Door Height – 3/8” = Cutting Point)
Actual
Cutting Point
-3/8”
Door Height
Measurement
Diagram 1
Diagram 2

www.casperscreens.com 877-745-5525
STEP 4. With the housing now cut, install the handles by sliding the tabs on each handle into the handle channel on both sides of
the pull bar, which is attached to the mesh, with the Casper logo facing you. (See Diagram 3) Slide the handles to the center of the
housing.
STEP 5. Next, use a crimping tool or pliers to crimp the end of the magnet channel on both ends of the pull bar to ensure the
magnet cannot slide out of the channel. (See Diagram 3)
STEP 6. Next, trim 3/16” from the mesh mate, the black rubber that connects the mesh to the pull bar, at each end of the pull bar
so that you can insert the boots (glides). Insert a boot into each end of the pull bar. You will want to use a crimping tool or pliers to
crimp the end of the pull bar slightly, BEFORE inserting the boot to ensure a snug fit to prevent them from coming loose during use.
(See Diagram 4)
STEP 7. Next, insert the bearing into the drive tube on the open end of the housing. Be sure that the tab on the bearing fits securely
into one of the grooves on the drive tube. IT IS ESPECIALLY IMPORTANT FOR THE TAB BE PROPERLY IN THE GROOVE FOR PROPER
OPERATION. (See Diagram 5)
CASPER
Handle
Handle Channel
Magnet
Channel
(Crimp Here)
Diagram 3 (Steps 4 & 5)
Mesh
Mesh Mate
Trim 3/16”
Boot
Diagram 4 (Step 6)
Bearing Side View
Bearing Top View
Housing
Open End View
Drive Tube Grooves
Bearing
Tab
Diagram 5 (Step 7)

www.casperscreens.com 877-745-5525
(Door Height – 1/8” = Cutting Point)
(Door Width – 2” = Single Cutting Point)
(Door Width – 4” = Double Cutting Point)
STEP 8. Next, insert the end cap through the bearing and secure the end cap into the drive tube by fitting the two prongs on
the end cap into the corresponding channels on the housing. (See Diagram 6) Lightly tap on the end cap to secure it
tightly. Now your housing is ready to be tested by extending the mesh out and ensuring that it properly retracts. If
you are
installing a double screen, you will have two housings, so repeat this process for the opposite side housing. You will not
need a side profile.
STEP 9. Next, if you are cutting a SINGLE DOOR you will have one housing and a side profile with magnet. Using the door
height measurement used in STEP 2, measure the side profile to same measurement. Now, subtract 1/8” from that
measurement. Your result will be the length of the side profile and where you will make your cut. FOR EXAMPLE, If the height
measurement is 84”, after deducting 1/8” the length the side profile will be cut is 83 7/8”.
STEP 10. Finally, Using the width of the opening per the measuring Instructions, measure the top and bottom tracks to this
measurement. If you are cutting for a single door, subtract 2 inches from the width. For
double doors, you will subtract four
inches off the width. This is to account for the width of the housings and allows the frame to fit nicely into the door
opening. For sliding doors you should make NO DEDUCTIONS on the tracks as the housing will mount flush to the stationary
panel. Use this measurement to make your cut. Once the
top and bottom tracks are cut, crimp both edges of the brush
channels on the newly cut end of the tracks to prevent the top and bottom track brushes from sliding out. Now your Casper
Disappearing Screen kit is ready to install per our Installation Instructions.
Housing
Open End View
End Cap Top View
Bearing
Diagram 6 (Step 8)
Side Profile
Actual
Cutting Point
Door Height
Measurement
-1/8”
Diagram 7 (Step 9)
Diagram 8 (Step 10)
Bottom Track
Top Track
Door Width
Measurement
Actual Cutting Point
-2” for Single Doors
Actual Cutting Point
-4” for Double Doors
-4”
-2”
/