GREE GJC08BS-A6NRNJ1B User manual
- Category
- Split-system air conditioners
- Type
- User manual
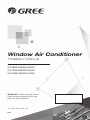
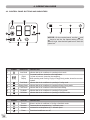
The GREE GJC08BS-A6NRNJ1B window air conditioner is a powerful and efficient cooling solution for your home. With its 8,000 BTU capacity, it can quickly cool rooms up to 350 square feet. The unit features a built-in Wi-Fi module, allowing you to control it from anywhere using your smartphone or tablet. You can also use the included remote control to adjust the temperature, fan speed, and other settings. The air conditioner comes with a washable and reusable air filter that helps to remove dust, pollen, and other allergens from the air.
The GREE GJC08BS-A6NRNJ1B window air conditioner is a powerful and efficient cooling solution for your home. With its 8,000 BTU capacity, it can quickly cool rooms up to 350 square feet. The unit features a built-in Wi-Fi module, allowing you to control it from anywhere using your smartphone or tablet. You can also use the included remote control to adjust the temperature, fan speed, and other settings. The air conditioner comes with a washable and reusable air filter that helps to remove dust, pollen, and other allergens from the air.


-
 1
1
-
 2
2
-
 3
3
-
 4
4
-
 5
5
-
 6
6
-
 7
7
-
 8
8
-
 9
9
-
 10
10
-
 11
11
-
 12
12
-
 13
13
-
 14
14
-
 15
15
-
 16
16
-
 17
17
-
 18
18
-
 19
19
-
 20
20
-
 21
21
-
 22
22


GREE GJC08BS-A6NRNJ1B User manual
- Category
- Split-system air conditioners
- Type
- User manual
The GREE GJC08BS-A6NRNJ1B window air conditioner is a powerful and efficient cooling solution for your home. With its 8,000 BTU capacity, it can quickly cool rooms up to 350 square feet. The unit features a built-in Wi-Fi module, allowing you to control it from anywhere using your smartphone or tablet. You can also use the included remote control to adjust the temperature, fan speed, and other settings. The air conditioner comes with a washable and reusable air filter that helps to remove dust, pollen, and other allergens from the air.
Ask a question and I''ll find the answer in the document
Finding information in a document is now easier with AI
Related papers
Other documents
-
Soleus Air SG-WAC-10ESE-F User manual
-
 Climette CA1216KR Owner's manual
-
-
Soleus Air WM1-06E-01 Operating Instructions Manual
-
-
-
-
-
-
SoleusAir SG-WAC-12ESE Owner's manual
