
© IC Intracom. All rights reserved. Manhattan is a trademark of IC Intracom, registered in the U.S. and other countries.
All trademarks and trade names are the property of their respective owners.
North & South America
IC Intracom Americas
550 Commerce Blvd.
Oldsmar, FL 34677 USA
Asia & Africa
IC Intracom Asia
4-F, No. 77, Sec. 1, Xintai 5th Rd.
Xizhi Dist., New Taipei City 221, Taiwan
Europe
IC Intracom Europe
Löhbacher Str. 7
D-58553 Halver, Germany
intellinetnetwork.com
Important: Read before use. • Importante: Leer antes de usar.
intellinetnetwork.com
2-Port USB Wall Outlet
with Faceplate
Ins tructions
Models 772181, 772198, 772204, 772211, 772228, 772235
Printed on recycled paper.
INT-772181-98-204-11-28-35_QiG-0618_REV-5.01
Waste Electrical & Electronic Equipment
Disposal of Electric and Electronic Equipment (applicable in the E.U. and other countries with separate collection systems)
ENGLISH: This symbol on the product or its packaging means that this product must
not be treated as unsorted household waste. In accordance with EU Directive
2012/19/EU on Waste Electrical and Electronic Equipment (WEEE), this
electrical product must be disposed of in accordance with the user’s local
regulations for electrical or electronic waste. Please dispose of this product
by returning it to your local point of sale or recycling pickup point in your municipality.
DEUTSCH: Dieses auf dem Produkt oder der Verpackung angebrachte Symbol
zeigt an, dass dieses Produkt nicht mit dem Hausmüll entsorgtwerden darf. In
Übereinstimmung mit der Richtlinie 2012/19/EU des Europäischen Parlaments und des
Rates über Elektro- und Elektronik-Altgeräte (WEEE) darf dieses Elektrogerät nicht im
normalen Hausmüll oder dem Gelben Sack entsorgt werden. Wenn Sie dieses Produkt
entsorgen möchten, bringen Sie es bitte zur Verkaufsstelle zurück oder zum Recycling-
Sammelpunkt Ihrer Gemeinde.
ESPAÑOL: Este símbolo en el producto o su embalaje indica que el producto no debe
tratarse como residuo doméstico. De conformidad con la Directiva 2012/19/EU de la UE
sobre residuos de aparatos eléctricos y electrónicos (RAEE), este producto eléctrico no
puede desecharse se con el resto de residuos no clasicados. Deshágase de este producto
devolviéndolo a su punto de venta o a un punto de recolección municipal para su reciclaje.
FRANÇAIS: Ce symbole sur Ie produit ou son emballage signie que ce produit ne doit
pas être traité comme un déchet ménager. Conformément à la Directive 2012/19/EU sur
les déchets d’équipements électriques et électroniques (DEEE), ce produit électrique ne
doit en aucun cas être mis au rebut sous forme de déchet municipal non trié. Veuillez vous
débarrasser de ce produit en Ie renvoyant à son point de vente ou au point de ramassage
local dans votre municipalité, à des ns de recyclage.
ITALIANO: Questo simbolo sui prodotto o sulla relativa confezione indica che il prodotto
non va trattato come un riuto domestico. In ottemperanza alla Direttiva UE 2012/19/EU
sui riuti di apparecchiature elettriche ed elettroniche (RAEE), questa prodotto elettrico
non deve essere smaltito come riuto municipale misto. Si prega di smaltire il prodotto
riportandolo al punto vendita o al punto di raccolta municipale locale per un opportuno
riciclaggio.
POLSKI: Jeśli na produkcie lub jego opakowaniu umieszczono ten symbol, wówczas
w czasie utylizacji nie wolno wyrzucać tego produktu wraz z odpadami komunalnymi.
Zgodnie z Dyrektywą Nr 2012/19/EU w sprawie zużytego sprzętu elektrycznego i
elektronicznego (WEEE), niniejszego produktu elektrycznego nie wolno usuwać jako nie
posortowanego odpadu komunalnego. Prosimy o usuniecie niniejszego produktu poprzez
jego zwrot do punktu zakupu lub oddanie do miejscowego komunalnego punktu zbiórki
odpadów przeznaczonych do recyklingu.
Warranty Information
ENGLISH: For warranty information, go to intellinetnetwork.com/warranty.
DEUTSCH: Garantieinformationen nden Sie unter intellinetnetwork.com/warranty.
ESPAÑOL: Si desea obtener información sobre la garantía, visite intellinetnetwork.com/warranty.
FRANÇAIS: Pour consulter les informations sur la garantie, visitez intellinetnetwork.com/warranty.
POLSKI: Informacje dotyczące gwarancji znajdują się na stronie intellinetnetwork.com/warranty.
ITALIANO: Per informazioni sulla garanzia, accedere a intellinetnetwork.com/warranty.
EN MÉXICO: Póliza de Garantía Manhattan — Datos del importador y responsable ante el consumidor IC Intracom México, S.A.P.I. de C.V. • Av. Interceptor Poniente # 73, Col. Parque
Industrial La Joya, Cuautitlán Izcalli, Estado de México, C.P. 54730, México. • Tel. (55)1500-4500 • La presente garantía cubre los siguientes productos contra cualquier defecto de
fabricación en sus materiales y mano de obra — A. Garantizamos los productos de limpieza, aire comprimido y consumibles, por 60 dias a partir de la fecha de entrega, o por el tiempo
en que se agote totalmente su contenido por su propia función de uso, lo que suceda primero. B. Garantizamos los productos con partes móviles por 3 años. C. Garantizamos los demás
productos por 5 años (productos sin partes móviles), bajo las siguientes condiciones: ) Todos los productos a que se reere esta garantía, ampara su cambio físico, sin ningún cargo
para el consumidor. ) El comercializador no tiene talleres de servicio, debido a que los productos que se garantizan no cuentan con reparaciones, ni refacciones, ya su garantía es de
cambio físico. ) La garantía cubre exclusivamente aquellas partes, equipos o sub-ensambles que hayan sido instaladas de fábrica y no incluye en ningún caso el equipo adicional o
cualesquiera que hayan sido adicionados al mismo por el usuario o distribuidor.
Para hacer efectiva esta garantía bastará con presentar el producto al distribuidor en el domicilio donde fue adquirido o en el domicilio de IC Intracom México, S.A.P.I. de C.V., junto
con los accesorios contenidos en su empaque, acompañado de su póliza debidamente llenada y sellada por la casa vendedora (indispensable el sello y fecha de compra) donde lo
adquirió, o bien, la factura o ticket de compra original donde se mencione claramente el modelo, número de serie (cuando aplique) y fecha de adquisición. Esta garantía no es válida
en los siguientes casos: Si el producto se hubiese utilizado en condiciones distintas a las normales; si el producto no ha sido operado conforme a los instructivos de uso; o si el producto
ha sido alterado o tratado de ser reparado por el consumidor o terceras personas.
Regulatory Statements
FCC Class B
This equipment has been tested and found to comply with the limits for a Class B digital device, pursuant to Part of Federal Communications Commission (FCC) Rules. These limits
are designed to provide reasonable protection against harmful interference in a residential installation. This equipment generates, uses and can radiate radio frequency energy, and
if not installed and used in accordance with the instructions may cause harmful interference to radio communications. However, there is no guarantee that interference will not occur
in a particular installation. If this equipment does cause harmful interference to radio or television reception, which can be determined by turning the equipment o and on, the user
is encouraged to try to correct the interference by one or more of the following measures: reorient or relocate the receiving antenna; increase the separation between the equipment
and the receiver; connect the equipment to an outlet on a circuit dierent from the receiver; or consult the dealer or an experienced radio/TV technician for help.
CE
ENGLISH: This device complies with the requirements of CE RED //EU, //EU and/or //EC. The Declaration of Conformity for is available at:
DEUTSCH: Dieses Gerät enspricht der CE RED //EU, //EU und / oder //EC. Die Konformitätserklärung für dieses Produkt nden Sie unter:
ESPAÑOL: Este dispositivo cumple con los requerimientos de CE RED //EU, //EU y / o //EC. La declaración de conformidad esta disponible en:
FRANÇAIS: Cet appareil satisfait aux exigences de CE RED //EU, //EU et/ou //EC. La Déclaration de Conformité est disponible à:
POLSKI: Urządzenie spełnia wymagania CE RED //EU, //EU I / lub //EC. Deklaracja zgodności dostępna jest na stronie internetowej producenta:
ITALIANO: Questo dispositivo è conforme alla CE RED //EU, //EU e / o //EC. La dichiarazione di conformità è disponibile al:
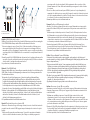
Model shown: 772204

English: USB Wall Outlet with Faceplate
Warning: To avoid the risk of electric shock, switch o the mains power before mounting the
2-Port USB Wall Outlet. Always switch o the circuit breaker in the fuse box.
1 Use a wire-stripper to remove 10 mm (0.4 in.) of the outer insulation of the two power
wires: neutral and phase (live). Ensure that each copper wire is not damaged. Only use
wires with a solid core of maximum 2.5 mm. Insert each copper core in the corresponding
cage clamp of the 2-Port USB Wall Outlet. Use a screw driver to securely fasten the wires to
the outlet.
2 Insert the wired 2-Port USB Wall Outlet into the junction box (a), pushing in the wires as far
as possible. Secure the outlet in the junction box using the screw(s). Place the cover frame
over the outlet (c), and turn the mains power back on.
For specications, visit intellinetnetwork.com.
Deutsch: 2-Port USB Wall Outlet
Warnung: Um das Risiko eines Stromschlags zu vermeiden schalten Sie vor der Montage der
2USB Schuko-Steckdose die Netzspannung aus.Immer auch den Sicherungsautomaten im
Schaltschrank ausschalten.
1 Verwenden Sie eine Abisolierzange um ca.10mm der jeweiligen Adernumhullung
(Isolierung) der Einzeldrahte (Neutral und Phase) zu entfernen. Bitte arbeiten Sie mit
Sorgfalt um sicherzustellen,dass die Kupferdrahte nicht beschadigt werden. Verwenden
Sie bitte nur kabel mit Einzeldrahten (keine litzendrahte) und maximum 2.5mm. Stecken
Sie die Kupferadern in die entsprechenden Federkraftklemmen der 2 USB Steckdose.
Verwenden Sie einen Schraubendreher, um die Drähte sicher an der Steckdose befestigen.
2 Stecken Sie die verdrahtete 2-Port-USB-Wandsteckdose in den Kabelkasten (a) und
schieben Sie die Kabel so weit wie möglich ein. Sichern Sie die Steckdose im Kabelkasten
mit der/den Schraube(n). Setzen Sie den Abdeckrahmen über die Steckdose (c) und
schalten Sie die Netzspannung wieder ein.
Die Spezikationen nden Sie auf intellinetnetwork.com.
Español: Placa frontal de pared con 2 puertos USB
Advertencia: Para evitar el riesgo de descarga electrica, desconecte la red electrica antes de
montar la toma de corriente 2 USB. Apague siempre el interruptor de circuito en la caja de
fusibles.
1 Utilice un cable separador para eliminar aprox. 10 mm de la capa exterior aislamiento
de los dos cables de alimentacion: neutro y fase. Trabaje con cuidadoy asegurese de
N: Neutral, Neutro, Neutre, Neutralny
L : Phase (live), Fase, Faza
LN
1 2
a
que ningun cable de cobre esta danado. Utilice unicamente cables con nucleo solido y
diametro maximo de 2.5 mm. Utilice un destornillador para asegurar los cables a la toma
de corriente.
2 Ya con los cables, inserte la toma de pared USB de 2 puertos en la caja de empalme (a)
empujando los cables tanto como sea posible. Asegure la conexión de la toma de corriente
a la caja de empalme utilizando los tornillos. Coloque el marco de cobertura sobre la toma
de corriente (c) y vuelva a activar la alimentación eléctrica.
Para más especicaciones, visite intellinetnetwork.com.
Français: Double port USB prise murale en façade
Attention : Pour éviter tout risque d’électrocution, coupez l’alimentation secteur avant de
monter la Prise Murale USB 2 ports. Coupez toujours le disjoncteur au niveau de la boîte à
fusibles.
1 Utilisez une pince à dénuder pour retirer 10 mm (0,4 in.) de l’isolant présent sur les deux
ls d’alimentation : neutre et phase. Vériez qu’aucun des ls de cuivre n’est endommagé.
Utilisez uniquement des ls avec une âme d’un diamètre de 2,5 mm maximum. Insérez
chaque âme en cuivre dans la cosse correspondante de la Prise Murale USB 2 Ports. Utilisez
un tournevis pour attacher solidement les ls à la prise.
2 Insérez la prise murale USB à 2 ports, désormais câblée, dans le boîtier mural (a), en
poussant les ls aussi loin que possible. Fixez la prise dans le boîtier mural à l’aide des vis.
Placez la façade sur la prise (c), et rallumez le compteur électrique du bâtiment.
Vous trouvez les spécications sur intellinetnetwork.com.
Polski: 2-Portowe Gniazdko Ścienne USB z Ramką
Ostrzeżenie: Aby uniknąć ryzyka porażenia prądem, należy wyłączyć całą elektryczność
przed montażem 2-portowego gniazdka USB. Bezwzględnie deaktywuj wyłącznik obwodu w
skrzynce bezpiecznikowej.
1 Użyj przecinacza kabli do zdjęcia 10 mm zewnętrznej powłoki z dwóch kabli: fazy i zero.
Upewnij się, że żaden z tych miedzianych kabli nie jest uszkodzony. Używaj tylko kabli o
objętości wewnętrznej równej lub mniejszej niż 2,5 mm. Włóż każdy z poszczególnych
kabli do odpowiedniego zatrzasku w gniazdku USB. Użyj śrubokrętu aby bezpiecznie
dopasować kable do gniazdka.
2 Podłącz 2-portowe gniazdko USB do skrzynki przełączeniowej (a), wsuwając kable najdalej
jak to możliwe. Zabezpiecz gniazdko w skrzynce używając śrub. Nałóż pokrywę na
gniazdko (c), i włącz z powrotem prąd.
Specykacja techniczna dostępna jest na stronie intellinetnetwork.com.
Italiano: Presa a muro 2 porte USB con sportellino
Avvertenza: per evitare il rischio di scosse elettriche, spegnere l’alimentazione di rete prima
di montare la presa a muro USB a 2 porte. Spegnere sempre l’interruttore automatico nella
scatola dei fusibili.
1 Utilizzare uno spelali per rimuovere 10 mm dell’isolante esterno dei due cavi di
alimentazione: neutro e fase. Assicurarsi che tutti i li di rame non siano danneggiati.
Utilizzare solo li con un nucleo solido di massimo 2,5 mm. Inserire ciascun nucleo di rame
nel corrispondente morsetto a gabbia della presa a muro USB a 2 porte. Usare un giravite
per ssare saldamente i cavi all’outlet.
2 Inserire la 2-Port USB outlet cablata nel box di congiunzione (a), facendo pressione sui cavi
il più possibile. Fissare l’outlet nel box di congiunzione utilizzando le viti. Porre il telaio di
copertura sull’outlet (c), e reimpostare l’alimentatore principale su on.
Per ulteriori speciche, visita il sito intellinetnetwork.com.
c
b
-
 1
1
-
 2
2


Intellinet 2-Port USB-A & USB-C Wall Outlet with Faceplate Quick Instruction Guide
- Type
- Quick Instruction Guide
- This manual is also suitable for
Ask a question and I''ll find the answer in the document
Finding information in a document is now easier with AI
in other languages
Related papers
-
Intellinet 2-Port USB-A Wall Outlet and CEE 7/3 Socket with Faceplate Quick Instruction Guide
-
-
-
-
Intellinet 507332 Operating instructions
-
Intellinet 510493 Quick Installation Guide
-
Intellinet Gigabit Ethernet Media Converter Operating instructions
-
Intellinet 10 Gigabit PCI Express Network Card Quick Instruction Guide
-
-
Intellinet 8-Port Gigabit Ethernet PoE Web-Managed Switch with 2 SFP Ports Quick Installation Guide
Other documents
-
Manhattan 102056 Operating instructions
-
Manhattan 102414 Quick Instruction Guide
-
-
-
Manhattan 151436 Operating instructions
-
-
Manhattan 151962 Operating instructions
-
-
Manhattan 152075-V2 Operating instructions
-
Manhattan 164900 Operating instructions