Page is loading ...

You should read this user manual carefully before
using the appliance.
Bevor Sie das Gerät in Betrieb nehmen, sollten
Sie diese Gebrauchsanweisung aufmerksam lesen.
Alvorens de apparatuur in gebruik te nemen dient
u deze gebruiksaanwijzing aandachtig te lezen.
Przed uruchomieniem urządzenia należy koniecznie
dokładnie przeczytać niniejszą instrukcję obsługi.
Lisez attentivement ce mode d’emploi avant d’utiliser
l’appareil .
Prima di utilizzare l’apparecchio in funzione leggere
attentamente le istruzioni per l’uso.
Citiţi cu atenţie prezentul manual de utilizare înainte de
folosirea aparatului.
Внимательно прочитайте руководство пользователя
перед использованием прибора.
Πρέπει να διαβάσετε αυτές τις οδηγίες χρήσης
προσεκτικά πριν χρησιμοποιήσετε τη συσκευή.
Chocolate fountain
274156, 274163

Dear Customer,
Thank you for purchasing this Hendi appliance. Before using the appliance for the first time, please read
this manual carefully, paying particular attention to the safety regulations outlined below.
Safety regulations
• This appliance is intended for buffet and household use.
• The appliance must only be used for the purpose for which it was intended and designed.
The manufacturer is not liable for any damage caused by incorrect operation and
improper use.
• Keep the appliance and electrical plug away from water and any other liquids. In the
event that the appliance should fall into water, immediately remove plug from the socket
and do not use until the appliance has been checked by a certified technician. Failure to
follow these instructions could cause a risk to lives.
• Never attempt to open the casing of the appliance yourself.
• Do not insert any objects in the casing of the appliance.
• Do not touch the plug with wet or damp hands.
•
Danger of electric shock! Do not attempt to repair the appliance yourself. In case of
malfunctions, repairs are to be conducted by qualified personnel only.
• Never use a damaged appliance! Disconnect the appliance from the electrical outlet and
contact the retailer if it is damaged.
• Warning! Do not immerse the electrical parts of the appliance in water or other liquids.
Never hold the appliance under running water.
• Regularly check the power plug and cord for any damage. If the power plug or power cord
is damaged, it must be replaced by a service agent or similarly qualified persons in order
to avoid danger or injury.
• Make sure the cord does not come in contact with sharp or hot objects and keep it away
from open fire. To pull the plug out of the socket, always pull on the plug and not on the
cord.
•
Ensure that the cord (or extension cord) is positioned so that it will not cause a trip hazard.
• Always keep an eye on the appliance when in use.
•
Warning! As long as the plug is in the socket the appliance is connected to the power
source.
• Turn off the appliance before pulling the plug out of the socket.
• Never carry the appliance by the cord.
• Do not use any extra devices that are not supplied along with the appliance.
• Only connect the appliance to an electrical outlet with the voltage and frequency
mentioned on the appliance label.
• Connect the power plug to an easily accessible electrical outlet so that in case of
emergency the appliance can be unplugged immediately. To completely switch off the
appliance pull the power plug out of the electrical outlet.
• Always turn the appliance off before disconnecting the plug.
3
NLEN

4
EN
• Never use accessories other than those recommended by the manufacturer. Failure to do
so could pose a safety risk to the user and could damage the appliance. Only use original
parts and accessories.
• This appliance is not intended for use by persons (including children) with reduced
physical, sensory or mental capabilities, or lack of experience and knowledge.
• This appliance must not be used by children under any circumstances.
• Keep the appliance and its cord out of reach of children.
• Always disconnect the appliance from the mains if it is left unattended or is not in use,
and before assembly, disassembly or cleaning.
• Never leave the appliance unattended during use.
Intended use
• This appliance is intended for buffet and house-
hold use.
•
The appliance is designed only for heating a varie-
ty of chocolate directly. Any other use may lead to
damage of the appliance or personal injury.
• Operating the appliance for any other purpose
shall be deemed a misuse of the device. The user
shall be solely liable for improper use of the de-
vice.
Grounding installation
This appliance is classified as protection class I
appliance and must be connected to a protective
ground. Grounding reduces the risk of electric
shock by providing an escape wire for the electric
current. This appliance is equipped with a cord
having a grounding wire with a grounding plug. The
plug must be plugged into an outlet that is properly
installed and grounded.
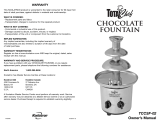
Main parts of the appliance
1. Pipe holder
2. Fountain pipe
3. Auger
4. Silica gel ring (Ø 24mm)
5. Air-proof ring (Ø 20mm)
6. Base unit
7. FUSE housing
8. Motor / Heater switch
9. Power connector
10. Temperature adjuster
11. Heat dissipation hole
12. Motor axle
13. Seal ring (Ø 220mm)
14. Chocolate pool
1
2
4
5
6
7
8
3
10
11
12
13
14
9

5
EN
Putting the appliance into use
• Check to make sure the appliance is undamaged.
In case of any damage, contact your supplier
immediately and do NOT use the appliance.
• Remove all the packing material and protection
film (if applicable).
• Place the appliance on a level and steady surface,
unless mentioned otherwise. Two of the three
feet of the base unit can be adjusted in height to
level the appliance.
• Do not place the chocolate fountain near an air-
conditioning duct, open door or window. Cool air
will solidify the chocolate and stop the evenly flow
of chocolate.
• Make sure there is enough clearance around the
appliance for ventilation purposes.
• Position the appliance in such a way that the plug
is accessible at all times.
• Unpack the chocolate fountain.
• The packaging contains a base unit, a chocolate
pool, a fountain pipe, a pipe holder, a auger, a seal
ring, five silicon seal rings. five air-proof rings
and two fuse(thermal cut-out).
• Clean the appliance before use (See ==> Cleaning
and Maintenance).
• Place the seal ring [13] on the top of round edge
of the base unit[6].
• Screw in the chocolate pool [14] on the base unit
by clockwise.
• Place the auger[3] on the motor axle[12] of the
base unit.
• Place the fountain pipe[2] over and cover the au-
ger[3] and screw in the fountain pipe[2] on the
base unit[6] by anti-clockwise.
• Place the pipe holder[1] on the top of fountain
pipe[2] and line up the center hole with the top
of auger[3].
• The chocolate fountain is now ready for use.
REPLACE the thermal cut-out
• Please note that a FUSE housing[7], which cov-
ered with a protective cap, is located on the right
side of heater / motor switch of the appliance(See
diagram).
• Unplug the appliance from the electrical outlet
first.
• Allow the appliance to completely cool down.
• Unscrew the black protective cap of the FUSE
housing[7] by anti-clockwise.
• Press and screw back the protective cap of FUSE
housing[7] by clockwise after thermal cut-out(in-
cluded) is replaced.
F
U
S
E
Instructions for use
• Switch position: Left is for the heater, Right is for
the motor.
• Turn on the heating element and switch to 80°C to
preheat the chocolate fountain around 3 - 5mins.
• Prepare 6000 grams (274156) / 8000 grams
(274163) of chocolate as follows:
- Put the chocolate in a heat-resistant bowl.
- Put the bowl in a pot with warm water (60°C).
NOTE! Don’t let the water boil.
- Stir the chocolate until is has melted complete-
ly. Do not add water to or spil water into the
chocolate.
- The chocolate has to be fluid (like yoghurt). If
that is not the case, add some tasteless vegeta-
ble oil (sun flower) to it.
• Turn on the motor and pour the chocolate into
the lower bowl.
• The auger moves the chocolate up.
• You can start now.
• Only use fruit that is sufficiently cooled and has
a dry surface. The low temperature of the fruit
helps the chocolate to solidify and the dry surface
helps the chocolate to attach easier to the fruit.
Too much moist/water will deteriorate the con-
sistancy of the chocolate.

6
EN
Note! Air bubbles in the fountain pipe disrupt the
evenly flow of chocolate. In which case you must
turn off the motor and wait for the air bubbles to
escape from the fountain pipe (this may take a
few minutes). It is normal for air to escape at the
bottom of the fountain pipe during this procedure.
Switch the motor on again if the fountain pipe is
free of air bubbles.
Note! Be careful of temperature adjuster. Too high
temperature will be turning chocolate into bad
quality quickly.
Cleaning and maintenance
• Always remove the plug from the socket before
cleaning.
• Remove the chocolate from the chocolate foun-
tain immediately after use. Don’t let the choco-
late solidify in the chocolate fountain. Don’t pour
the chocolate into the kitchen sink or toilet as it
will solidify and block the drain and sewer sys-
tem.
• Never submerge the base unit of the chocolate
fountain in water or other liquid cleaning prod-
ucts.
• Clean the base unit of the chocolate fountain
with a slightly moist cloth and warm water. Warm
water cleans the chocolate residue much better
than hot water.
• Never use aggressive cleaning agents or abra-
sives. Do not use any sharp or pointed objects.
Do not use petrol or solvents! Clean with a damp
cloth and detergent if necessary. Do not use
abrasive materials.
• Always ensure that the electrical connections
remain absolutely dry.
• The fountain pipe, pipe holder, chocolate pool and
auger can be cleaned in the dishwasher.
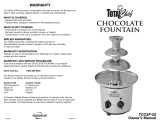
Replacement of silica gel ring & air-proof ring
•
When the silica gel ring[4] or air-proof ring[5] was
broken. Please follow below procedures to re-
place. They shall be replaced every sixth months
if the product is operating for 12h per day.
AA
BB
CC
DD

7
EN
1) Screw out chocolate pool[14] from the base
unit[6].
2) Take out and discard the used silica gel ring [4]
and air-proof ring[5] from the motor axle[12]
(see Picture A).
3) Take out the new air-proof ring[5] and add lu-
brication oil(high temperature resistance) into
the concave area(see Picture B).
4) Insert the new air-proof ring[5](lubrication oil
face down) back to the motor axle[12](Make
sure it is fully inserted)(see Picture C).
5) Clean the remaining lubrication oil with a damp
cloth and detergent.
6) Insert the new silica gel ring[4] back to the
motor axle[12] and fix it firmly(see Picture D).
7) Screw in chocolate pool[14] back to the base
unit[6]
NOTE: DON’T SCRATCH THE MOTOR AXLE[11]
WHEN TAKE OUT THE AIR-PROOF RING.
Troubleshooting
If the appliance does not function properly, please
check the below table for the solution. If you are
still unable to solve the problem, please contact the
supplier/service provider.
Problem Possible causes and solution
Chocolate drips and
doesn’t flow evenly down
the fountain pipe.
The chocolate is too thick. Add some vegetable oil to the chocolate. Do not
mix water into the chocolate!
The fountain is not level, but is slanted. Adjust the level of chocolate foun-
tain with the adjustable feet of the motor unit.
Not enough chocolate, add some melted chocolate.
The flow of chocolate is obstructed by pieces of food. Turn off the fountain
and remove the pieces of fruit.
The flow of chocolate is
interrupted
Blockages in the flow of chocolate might be caused by pieces of food. Turn
off the motor and clear the blockage.
Check if the motor is switched on and running.
Check the level of chocolate, add melted chocolate if necessary.
The flow of chocolate is
slow and doesn’t reach
the top of the fountain
pipe.
There is air in the column, as a result of which the chocolate cannot flow
constantly. Turn off the fountain and wait for a few minutes, until all the
chocolate in the basin flows back. You will see bubbles escaping from
beneath the fountan pipe.
Check chocolate level and add melted chocolate if necessary.
The chocolate is too
thick (viscous).
Check the temperature and consistancy of the chocolate, increase the
temperature and/or add some vegetable oil to the chocolate.
Check if the heating function of the chocolate fountain is switched on and
working.
Note: A low ambient temperature cools down the chocolate rapidly and
thereby increasing the viscosity of the chocolate; the chocolate will stop to
evenly flow over the fountain pipe.

8
EN
Technical specification
Item no. 274156 274163
Operating voltage and frequency 230V~ 50 / 60 Hz
Rated input power 265W 300W
Protection class Class I
Temperature setting 0°C ~ 100°C 0°C ~ 150°C
Maximum quantity of chocolate Max. 6000g Max. 8000g
Outer dimension Ø330x(H)700mm Ø370x(H)840mm
Remark: Technical specification is subjected to change without prior notification.
Warranty
Any defect affecting the functionality of the ap-
pliance which becomes apparent within one year
after purchase will be repaired by free repair or re-
placement provided the appliance has been used
and maintained in accordance with the instructions
and has not been abused or misused in any way.
Your statutory rights are not affected. If the appli-
ance is claimed under warranty, state where and
when it was purchased and include proof of pur-
chase (e.g. receipt).
In line with our policy of continuous product devel-
opment we reserve the right to change the product,
packaging and documentation specifications with-
out notice.
Discarding & Environment
When decommissioning the appliance, the prod-
uct must not be disposed of with other household
waste. Instead, it is your responsibility to dispose to
your waste equipment by handing it over to a des-
ignated collection point. Failure to follow this rule
may be penalized in accordance with applicable
regulations on waste disposal. The separate col-
lection and recycling of your waste equipment at
the time of disposal will help conserve natural re-
sources and ensure that it is recycled in a manner
that protects human health and the environment.
For more information about where you can drop off
your waste for recycling, please contact your local
waste collection company. The manufacturers and
importers do not take responsibility for recycling,
treatment and ecological disposal, either directly
or through a public system.

Hendi B.V.
Steenoven 21
3911 TX Rhenen, The Netherlands
Tel: +31 (0)317 681 040
Email: [email protected]
Hendi Polska Sp. z o.o.
ul. Magazynowa 5
62-023 Gądki, Poland
Tel: +48 61 6587000
Email: [email protected]
Hendi Food Service Equipment GmbH
Gewerbegebiet Ehring 15
5112 Lamprechtshausen, Austria
Tel: +43 (0) 6274 200 10 0
Email: offi[email protected]
Hendi Food Service Equipment Romania Srl
Str. 13 decembrie 94A, Hala 14
Brașov, 500164, Romania
Tel: +40 268 320330
Email: offi[email protected]o
PKS Hendi South East Europe SA
5 Metsovou Str.
18346 Moschato, Athens, Greece
Tel: +30 210 4839700
Email: office.gr[email protected]
Hendi HK Ltd.
1208, 12/F Exchange Tower
33 Wang Chiu Road, Kowloon Bay, Hong Kong
Tel: +852 2154 2618
Email: [email protected]
Find Hendi on internet:
www.hendi.eu
www.facebook.com/HendiToolsforChefs
www.linkedin.com/company/hendi-food-service-equipment-b.v.
www.youtube.com/HendiEquipment
- Changes, printing and typesetting errors reserved.
- Änderungen und Druckfehler vorbehalten.
- Wijzigingen en drukfouten voorbehouden.
- Producent zastrzega sobie prawo do zmian oraz
błędów drukarskich w instrukcji.
- Variations et fautes d’impression réservés.
- Errori di cambiamenti, di stampa e di impaginazione riservati.
- Drepturi rezervate cu privire la modificări şi greşeli de imprimare.
- Изменения, печати и верстки ошибки защищены.
- Με επιφύλαξη αλλαγών, λαθών εκτύπωσης και στοιχειοθεσίας.
© 2020 Hendi BV Rhenen - The Netherlands Ver: 05-05-2020
/