
You should read this user manual carefully before
using the appliance.
Bevor Sie das Gerät in Betrieb nehmen, sollten
Sie diese Gebrauchsanweisung aufmerksam lesen.
Alvorens de apparatuur in gebruik te nemen dient
u deze gebruiksaanwijzing aandachtig te lezen.
Przed uruchomieniem urządzenia należy koniecznie
dokładnie przeczytać niniejszą instrukcję obsługi.
Lisez attentivement ce mode d’emploi avant d’utiliser
l’appareil .
Prima di utilizzare l’apparecchio in funzione leggere
attentamente le istruzioni per l’uso.
Citiţi cu atenţie prezentul manual de utilizare înainte de
folosirea aparatului.
Внимательно прочитайте руководство пользователя
перед использованием прибора.
Πρέπει να διαβάσετε αυτές τις οδηγίες χρήσης
προσεκτικά πριν χρησιμοποιήσετε τη συσκευή.
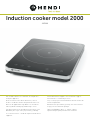
Induction cooker model 2000
239230

2
Keep these instructions with the appliance.
Diese Gebrauchsanweisung bitte beim Gerät aufbewahren.
Bewaar deze handleiding bij het apparaat.
Zachowaj instrukcję urządzenia
Gardez ces instructions avec cet appareil.
Conservate le istruzioni insieme all’apparecchio.
Păstraţi maualul de utilizare alături de aparat.
Хранить руководство вместе с устройством.
Φυλάξτε αυτές τις οδηγίες μαζί με τη συσκευή.
For indoor use only.
Nur zur Verwendung im Innenbereich.
Alleen voor gebruik binnenshuis.
Do użytku wewnątrz pomieszczeń.
Pour l’usage à l’intérieur seulement.
Destinato solo all’uso domestico.
Doar pentru uz la interior.
Использовать только в помещениях.
Για χρήση μόνο σε εσωτερικό χώρο.

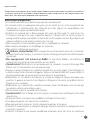
Dear Customer,
Thank you for purchasing this Hendi appliance. Before using the appliance for the first time, please read
this manual carefully, paying particular attention to the safety regulations outlined below.
Safety regulations
• This appliance is intended for buffet and household use.
• The appliance must only be used for the purpose for which it was intended and designed.
The manufacturer is not liable for any damage caused by incorrect operation and
improper use.
• Keep the appliance and electrical plug away from water and any other liquids. In the
event that the appliance should fall into water, immediately remove plug from the socket
and do not use until the appliance has been checked by a certified technician. Failure to
follow these instructions could cause a risk to lives.
• Never attempt to open the casing of the appliance yourself.
• Do not insert any objects in the casing of the appliance.
• Do not touch the plug with wet or damp hands.
•
Danger of electric shock! Do not attempt to repair the appliance yourself. In case of
malfunctions, repairs are to be conducted by qualified personnel only.
• Never use a damaged appliance! Disconnect the appliance from the electrical outlet and
contact the retailer if it is damaged.
• Warning! Do not immerse the electrical parts of the appliance in water or other liquids.
Never hold the appliance under running water.
• Regularly check the power plug and cord for any damage. If the power plug or power cord
is damaged, it must be replaced by a service agent or similarly qualified persons in order
to avoid danger or injury.
• Make sure the cord does not come in contact with sharp or hot objects and keep it away
from open fire. To pull the plug out of the socket, always pull on the plug and not on the
cord.
•
Ensure that the cord (or extension cord) is positioned so that it will not cause a trip hazard.
• Always keep an eye on the appliance when in use.
•
Warning! As long as the plug is in the socket the appliance is connected to the power
source.
• Turn off the appliance before pulling the plug out of the socket.
• Never carry the appliance by the cord.
• Do not use any extra devices that are not supplied along with the appliance.
• Only connect the appliance to an electrical outlet with the voltage and frequency
mentioned on the appliance label.
• Connect the power plug to an easily accessible electrical outlet so that in case of
emergency the appliance can be unplugged immediately. To completely switch off the
appliance pull the power plug out of the electrical outlet.
• Always turn the appliance off before disconnecting the plug.
3
NLEN

4
EN
• Never use accessories other than those recommended by the manufacturer. Failure to do
so could pose a safety risk to the user and could damage the appliance. Only use original
parts and accessories.
• This appliance is not intended for use by persons (including children) with reduced
physical, sensory or mental capabilities, or lack of experience and knowledge.
• This appliance must not be used by children under any circumstances.
• Keep the appliance and its cord out of reach of children.
• Always disconnect the appliance from the mains if it is left unattended or is not in use,
and before assembly, disassembly or cleaning.
• Never leave the appliance unattended during use.
Special safety regulations
• Caution! Make sure the cord does not come in contact with hot components while using
the appliance.
• Do not install the appliance near objects and appliances that may be affected by a mag
-
netic field, like, e.g., TVs, radios, bank cards and credit cards.
• Maintain a minimum clearance of 15 cm around the appliance for ventilation.
• Never leave any metal objects on the appliance.
• Never switch on the appliance with an empty pan on top of it, as this may result in serious
damage to the appliance.
• Make sure the appliance is not set up near water vapour or greasy vapours. The fan of the
appliance will take in these vapours and this will cause grease or moisture to accumulate
in the appliance which may result in a short-circuit in the appliance. Clean the grease
filter regularly.
•
This appliance is classified as protection class II.
Intended use
• This appliance is intended for buffet and house-
hold use.
• The appliance is designed only for cooking a vari-
ety of food via heating the suitable cookware. Any
other use may lead to damage to the appliance or
personal injury.
• Operating the appliance for any other purpose
shall be deemed as a misuse of the device. The
user shall be solely liable for improper use of the
device.
Preparations before using for the first time
• Check to make sure the appliance is undamaged.
In case of any damage, contact your supplier im-
mediately and do NOT use the appliance.
• Remove all the packing material.
• Clean the appliance with luke-warm water and
a soft cloth.
• Level the appliance.
• Make sure that a clearance of 15 cm is main-
tained around the appliance with respect to ven-
tilation of the appliance.
• Position the appliance in such a way that the plug
is accessible at all times.

5
EN
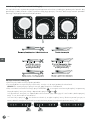
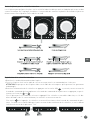
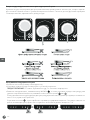
Suitable cooking equipment
• Only use the Grill plate supplied with this appli-
ance, or to use pans that have the following prop-
erties:
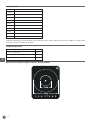
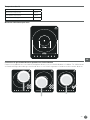
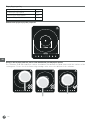
• The pan must be suitable for induction. The fol-
lowing logo is usually displayed on the bottom of
the pan:
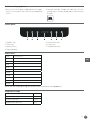
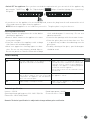
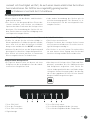
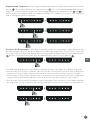
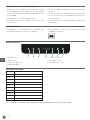
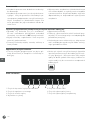
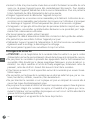
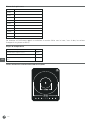
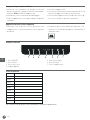
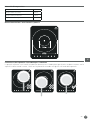
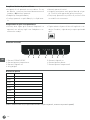
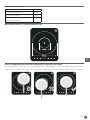
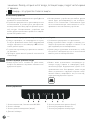
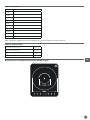
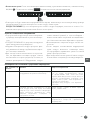
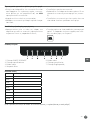
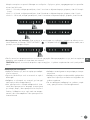
Control panel
1. ON/OFF key
2. Timer key
3. Up arrow key
4. Digital display
5. Down arrow key
6. Power key
7. Temperature key
Power levels
100W Default power
200W
300W
400W
500W
800W
1000W
1300W
1500W
1800W
2000W
[when the user keeps pressing the increase icon, it increases in a rapid pace]
Temperature range
Lowest temperature 35ºC
Highest temperature 240ºC
Default temperature 100ºC
Temperature division
5ºC

6
EN
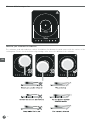
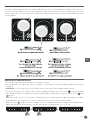
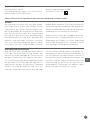
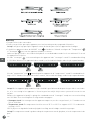
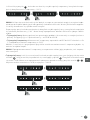
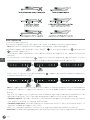
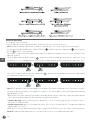
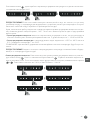
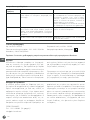
Minimum & Maximum pan size
Check for your cookwares for Induction
The cookware used with Induction cookers should have flat bottom for good contact with the surface of the
cooking zone. Please check the flatness by rotating a ruler across the bottom of the cookware.

7
EN
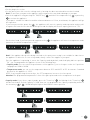
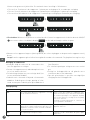
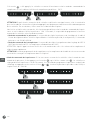
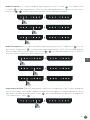
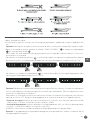
Operating the appliance
• Put the plug in the socket
• Set the pan of your choice on the cooking surface, bearing the above mentioned instructions in mind.
Note! Do not leave your pan on the appliance while empty as this may lead to damage to your pan.
• Switch the appliance on by pressing the “ON/OFF key”
and either the temperature key
or power key
to activate the appliance.
If your pan is suitable for induction and has a bottom diameter of 12cm, at minimum, the appliance will go
into operation.
If you have pressed the power key
, the appliance will enter in capacity mode operation and you will
recognize this from the fact that the fan will go on and the display will show a capacity position of “100”.
On the other hand, if you have pressed temperature key , the appliance will enter in temperature mode
operation, the default temperature is 100ºC.
Note! If the appliance beeps after being switched on, the pan you are using is not suitable for induction or
the appliance is defective. In case of any doubt, always contact the supplier of your pan!
Once the appliance is operating, it enters the Capacity mode by default, and the display indicates position
“100”, you can programme the appliance in one of the following ways.
• Capacity mode: You can control the performance of the appliance, just as for a gas cooker via 11 positions
ranging from 100W to 2000W.
• Temperature mode: you can set the temperature between 35ºC and 240ºC in 5ºC increments. Standard
position for the appliance is 100ºC.
NOTE: if we keep pressing the arrow keys, the SET temperature increases in a fast speed.
Attention! The programmed temperature is that of the glass plate and not the temperature in the pan!
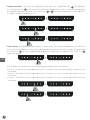
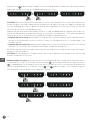
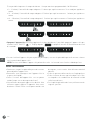
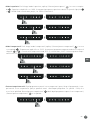
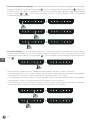
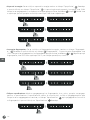
• Capacity mode: If you choose capacity mode, press the “Power key”
, the lighting of the “Power key”
will be switched on. Default Capacity is 100W. Now you can programme the capacity required by means of
the arrow keys
&
, 2000W being the highest and 100W the lowest position.

8
EN
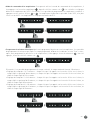
• Temperature Mode: If you select the temperature mode, press the “Temperature Key”
, the lighting of
the “Temperature key”
will be switched on. Default Set Temperature is 100°C. Now you can programme
the required temperature by means of the arrow keys
&
, the lowest temperature is 35ºC and 240ºC
the highest, temperature division is 5ºC.
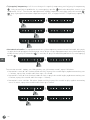
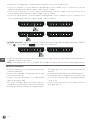
• Timer setting: After programming the power or temperature, you can opt to programme the timer, this
timer switches the appliance off after the programmed time has been reached. You can do this by pressing
the “Timer key” once after programming the power or temperature, the lighting of the “Timer key”
will be switched on.
You can now set the desired time. The maximum programmable time is 180 minutes.
• From 0 - 10 minutes, the time adjusted interval is 1 minute for each increment and 30 seconds for each
decrement.
• From 10 - 60 minutes, the time adjusted interval is 5 minutes for each increment and 1 minute for each
decrement.
• From 60 - 180 minutes, the time adjusted interval is 10 minutes for each increment and 5 minutes for each
decrement.

9
EN
• Switch OFF the appliance: Once you have reached the required result, you can switch off the appliance by
pressing the “ON/OFF key”
.
The “Digital display”
will go off and the lighting of the control keys
will go off.
• If you do not use the appliance for an extended period, remove the plug from the wall-mounted electrical
socket and remove the pans from the appliance.
NOTE! Allow the appliance to cool off before you touch it. The glass plate is very hot after use.
Cleaning and maintenance
•
Always remove the plug from the socket before
cleaning the appliance.
•
Beware: Never immerse the appliance in water
or any other liquid!
•
Clean the outside of the appliance with a damp
cloth (water with mild detergent).
•
Never use aggressive cleaning agents or abra-
sives. Do not use any sharp or pointed objects.
Do not use petrol or solvents! Clean with a damp
cloth and detergent if necessary. Do not use
abrasive materials.
•
Clean the fan openings with the vacuum cleaner.
•
Clean the glass plate each time after use. This
is to prevent any residues from burning onto the
glass plate.
•
For daily cleaning of the glass, special detergent
should be used
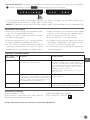
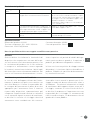
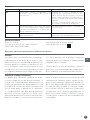
Trouble shooting
Error message Cause Solution
E01 Internal temperature of the appliance is too
high or the fan inside is not working.
Make sure there is a minimum distance of
10cm between the ventilation slot and any ob-
struction such as a wall or other appliances.
Unplug, let the appliance cool down, plug back
in and switch ON the appliance.
Check and clean the air inlet and outlet if they
are blocked.
E02 The temperature of the pan is too high. If the
pan is dry or empty it can reach a very high
temperature. The appliance will shut down to
protect the internal parts.
Remove the cookware from the appliance. Let
the appliance cool off.
E03 Input voltage is too high or too low. Make sure the appliance is connected to the
correct input voltage.
Technical specification
Item no.: 239230
Operating voltage and frequency: 220 - 240V~ 50/60 Hz
Dimension: 296x370x(H)46mm
Rated input power: 2000W
Protection class: Class II
Remark: Technical specification is subjected to change without prior notification

10
EN
Warranty
Any defect affecting the functionality of the ap-
pliance which becomes apparent within one year
after purchase will be repaired by free repair or re-
placement provided the appliance has been used
and maintained in accordance with the instructions
and has not been abused or misused in any way.
Your statutory rights are not affected. If the appli-
ance is claimed under warranty, state where and
when it was purchased and include proof of pur-
chase (e.g. receipt).
In line with our policy of continuous product devel-
opment we reserve the right to change the product,
packaging and documentation specifications with-
out notice.
Discarding & Environment
When decommissioning the appliance, the prod-
uct must not be disposed of with other household
waste. Instead, it is your responsibility to dispose to
your waste equipment by handing it over to a des-
ignated collection point. Failure to follow this rule
may be penalized in accordance with applicable
regulations on waste disposal. The separate col-
lection and recycling of your waste equipment at
the time of disposal will help conserve natural re-
sources and ensure that it is recycled in a manner
that protects human health and the environment.
For more information about where you can drop off
your waste for recycling, please contact your local
waste collection company. The manufacturers and
importers do not take responsibility for recycling,
treatment and ecological disposal, either directly
or through a public system.
Page is loading ...
Page is loading ...
Page is loading ...
Page is loading ...
Page is loading ...
Page is loading ...
Page is loading ...
Page is loading ...
Page is loading ...
Page is loading ...
Page is loading ...
Page is loading ...
Page is loading ...
Page is loading ...
Page is loading ...
Page is loading ...
Page is loading ...
Page is loading ...
Page is loading ...
Page is loading ...
Page is loading ...
Page is loading ...
Page is loading ...
Page is loading ...
Page is loading ...
Page is loading ...
Page is loading ...
Page is loading ...
Page is loading ...
Page is loading ...
Page is loading ...
Page is loading ...
Page is loading ...
Page is loading ...
Page is loading ...
Page is loading ...
Page is loading ...
Page is loading ...
Page is loading ...
Page is loading ...
Page is loading ...
Page is loading ...
Page is loading ...
Page is loading ...
Page is loading ...
Page is loading ...
Page is loading ...
Page is loading ...
Page is loading ...
Page is loading ...
Page is loading ...
Page is loading ...
Page is loading ...
Page is loading ...
Page is loading ...
Page is loading ...
Page is loading ...
Page is loading ...
Page is loading ...
Page is loading ...
Page is loading ...
Page is loading ...
Page is loading ...

74
GR
Εύρος θερμοκρασίας
Η χαμηλότερη θερμοκρασία 35ºC
Η υψηλότερη θερμοκρασία 240ºC
Προεπιλεγμένη θερμοκρασία 100ºC
Διαίρεση θερμοκρασίας
5ºC
Ελάχιστο και μέγιστο μέγεθος τηγανιού
Ελέγξτε εάν τα μαγειρικά σας σκεύη είναι κατάλληλα για επαγωγική χρήση
The cookware used with Induction cookers should have flat bottom for good contact with the surface of the
cooking zone. Please check the flatness by rotating a ruler across the bottom of the cookware.
Page is loading ...
Page is loading ...
Page is loading ...
Page is loading ...
Page is loading ...

Hendi B.V.
Steenoven 21
3911 TX Rhenen, The Netherlands
Tel: +31 (0)317 681 040
Email: [email protected]
Hendi Polska Sp. z o.o.
ul. Magazynowa 5
62-023 Gądki, Poland
Tel: +48 61 6587000
Email: [email protected]
Hendi Food Service Equipment GmbH
Gewerbegebiet Ehring 15
5112 Lamprechtshausen, Austria
Tel: +43 (0) 6274 200 10 0
Email: offi[email protected]
Hendi UK Ltd.
Central Barn, Hornby Road
Lancaster, LA2 9JX, United Kingdom
Tel: +44 (0)333 0143200
Email: [email protected]o.uk
Hendi Food Service Equipment Romania Srl
Str. 13 decembrie 94A, Hala 14
Brașov, 500164, Romania
Tel: +40 268 320330
Email: offi[email protected]o
PKS Hendi South East Europe SA
5 Metsovou Str.
18346 Moschato, Athens, Greece
Tel: +30 210 4839700
Email: office.gr[email protected]
Hendi HK Ltd.
1208, 12/F Exchange Tower
33 Wang Chiu Road, Kowloon Bay, Hong Kong
Tel: +852 2154 2618
Email: [email protected]
Find Hendi on internet:
www.hendi.eu
www.facebook.com/HendiFoodServiceEquipment
www.linkedin.com/company/hendi-food-service-equipment-b.v.
www.youtube.com/HendiEquipment
- Changes, printing and typesetting errors reserved.
- Änderungen und Druckfehler vorbehalten.
- Wijzigingen en drukfouten voorbehouden.
- Producent zastrzega sobie prawo do zmian oraz
błędów drukarskich w instrukcji.
- Variations et fautes d’impression réservés.
- Errori di cambiamenti, di stampa e di impaginazione riservati.
- Drepturi rezervate cu privire la modificări şi greşeli de imprimare.
- Изменения, печати и верстки ошибки защищены.
- Με επιφύλαξη αλλαγών, λαθών εκτύπωσης και στοιχειοθεσίας.
© 2019 Hendi BV Rhenen - The Netherlands Ver: 19-12-2019
-
 1
1
-
 2
2
-
 3
3
-
 4
4
-
 5
5
-
 6
6
-
 7
7
-
 8
8
-
 9
9
-
 10
10
-
 11
11
-
 12
12
-
 13
13
-
 14
14
-
 15
15
-
 16
16
-
 17
17
-
 18
18
-
 19
19
-
 20
20
-
 21
21
-
 22
22
-
 23
23
-
 24
24
-
 25
25
-
 26
26
-
 27
27
-
 28
28
-
 29
29
-
 30
30
-
 31
31
-
 32
32
-
 33
33
-
 34
34
-
 35
35
-
 36
36
-
 37
37
-
 38
38
-
 39
39
-
 40
40
-
 41
41
-
 42
42
-
 43
43
-
 44
44
-
 45
45
-
 46
46
-
 47
47
-
 48
48
-
 49
49
-
 50
50
-
 51
51
-
 52
52
-
 53
53
-
 54
54
-
 55
55
-
 56
56
-
 57
57
-
 58
58
-
 59
59
-
 60
60
-
 61
61
-
 62
62
-
 63
63
-
 64
64
-
 65
65
-
 66
66
-
 67
67
-
 68
68
-
 69
69
-
 70
70
-
 71
71
-
 72
72
-
 73
73
-
 74
74
-
 75
75
-
 76
76
-
 77
77
-
 78
78
-
 79
79
-
 80
80


Hendi 239230 User manual
- Type
- User manual
- This manual is also suitable for
Ask a question and I''ll find the answer in the document
Finding information in a document is now easier with AI
in other languages
- italiano: Hendi 239230 Manuale utente
- français: Hendi 239230 Manuel utilisateur
- Deutsch: Hendi 239230 Benutzerhandbuch
- русский: Hendi 239230 Руководство пользователя
- Nederlands: Hendi 239230 Handleiding
- polski: Hendi 239230 Instrukcja obsługi
- română: Hendi 239230 Manual de utilizare
Related papers
Other documents
-
Aigostar 300005CFO User manual
-
OK. OSP 502 User manual
-
Tribest sousvant User manual
-
Bodum 11659-913UK User manual
-
Aquaglide MCKENZIE Series Owner's manual
-
GoodHome GHAGRO90 Operating instructions
-
Villaware BVVLKTSL01 User manual
-
eta Isabela 1587 90000 Owner's manual
-
Concept RK0010 User manual
-