
Instruction Manual
Vortex Mixer, Mini Fix Speed, VXMNFS
Vortex Mixer, Mini Analog, VXMNAL
Vortex Mixer, Mini Digital, VXMNDG
Vortex Mixer, Mini Pulsing, VXMNPS
Revision 4
20/06/17
EN - English ......... 1

1
Service information
If the troubleshooting section does not resolve or describe your problem, contact your
authorized OHAUS service agent. For service assistance or technical support in the
United States call toll-free 1-800-672-7722 ext. 7852 between 8:00 AM and 5:00 PM EST.
An OHAUS product service specialist will be available to provide assistance. Outside the
USA, please visit our web site, www.ohaus.com to locate the Ohaus office nearest you.
Serial Number: _______________________________________________________
Date of Purchase: ____________________________________________________
Supplier: ___________________________________________________________
Package contentS
Fixed Speed, Analog, Digital or Pulsing Mini Vortex Mixer
Power Cord
* (1) cup head
* (1) 3” (7.6cm) head
* (1) 3” (7.6cm) rubber head cover
Instruction manual
Warranty card
* These accessories come with all units except the Pulsing Mini Vortex Mixer which is
also supplied with a 1.5 to 2mL Micro-Tube Holder with built-in cup head.
table of contentS
Package Contents . . . . . . . . . . . . . . . 1
Service Information . . . . . . . . . . . . . . . 1
Installation . . . . . . . . . . . . . . . 2
Maintenance & Servicing . . . . . . . . . . . . . . . 2
Environmental Conditions . . . . . . . . . . . . . . . 2
Safety Instructions . . . . . . . . . . . . . . . 3
Standards & Regulations . . . . . . . . . . . . . . . 3
Specifications . . . . . . . . . . . . . . . 4
Digital & Pulsing Mini Vortex Mixer Control Panel . . . . . . . . . . . . . . . 5
Operating Instructions . . . . . . . . . . . . . . . 6-7
Head/Accessory Installation Instructions . . . . . . . . . . . . . . . 8-9
Troubleshooting . . . . . . . . . . . . . . . 10
1
EN

2
Operating Conditions: Indoor use only.
Temperature: 4 to 40°C (39.2 to 104°F)
Humidity: 20% to 85% relative humidity, non-condensing
Altitude: 0 to 6,562 ft. (2000 M) above sea level
Non-Operating Storage:
Temperature: -20 to 65°C (-4 to 149°F)
Humidity: 20% to 85% relative humidity, non-condensing
Installation Category II and Pollution Degree 2 in accordance with IEC 664.
equiPment DiSPoSal
This equipment must not be disposed of with unsorted waste. It is your responsibility
to correctly dispose of the equipment at life-cycle-end by handing it
over to an authorized facility for separate collection and recycling. It is also
your responsibility to decontaminate the equipment in case of biological,
chemical and/or radiological contamination, so as to protect the persons
involved in the disposal and recycling of the equipment from health
hazards.
For more information about where you can drop off your waste of equipment, please
contact your local dealer from whom you originally purchased this equipment. By doing
so, you will help to conserve natural and environmental resources and you will ensure
that your equipment is recycled in a manner that protects human health.
Upon receiving the Ohaus Mini Vortex Mixer, check to ensure that no damage has
occurred during shipment. It is important that any damage that occurred in transport
is detected at the time of unpacking. If you do find such damage the carrier must be
notified immediately.
After unpacking, place the Mini Vortex Mixer on a level bench or table, away from
explosive vapors. Ensure that the surface on which the unit is placed will withstand
typical heat produced by the unit. Always place the unit on a sturdy work surface.
The Mini Vortex Mixer is supplied with a power cord that should be plugged into a
properly grounded outlet. If the supplied power cord does not meet your needs, please
use an approved power cord that suits local codes and electric supply. Replacement
of the plug must be made by a qualified electrician.
maintenance & Servicing
The Mini Vortex Mixer is built for long, trouble-free, dependable service. No lubrication
or other technical user maintenance is required.
The unit should be given the care normally required for any electrical appliance. Avoid
wetting or unnecessary exposure to fumes. Spills should be removed promptly. DO
NOT use a cleaning agent or solvent on the front panel which is abrasive or harmful to
plastics, nor one which is flammable. Always ensure the power is disconnected from
the unit prior to any cleaning. If the unit ever requires service, contact your Ohaus
representative.
intenDeD uSe
The Ohaus Mini Vortex Mixers are intended for general laboratory use. Safety can not
be guaranteed if used outside of the intended use.
inStallation environmental conDitionS
2
EN

3
Please read the entire instruction manual before operating the Mini Vortex Mixer.
WARNING! DO NOT use the Mini Vortex Mixer in a hazardous atmosphere
or with hazardous materials for which the unit was not designed. Also, the
user should be aware that the protection provided by the equipment may
be impaired if used with accessories not provided or recommended by the
manufacturer, or used in a manner not specified by the manufacturer.
Always operate unit on a level surface for best performance and maximum
safety.
DO NOT lift the Mini Vortex Mixer by the head. All heads, including cup head,
are removable. They can pop off if lifted by them.
CAUTION! To avoid electrical shock, completely cut off power to the unit by
disconnecting the power cord from the wall outlet. Disconnect unit from the
power supply prior to maintenance and servicing.
Spills should be removed promptly. DO NOT immerse the unit for cleaning.
DO NOT operate the unit if it shows signs of electrical or mechanical damage.
Earth Ground - Protective Conductor Terminal
Alternating Current
Compliance to the following standards and regulations is indicated by the corresponding mark
on the product.
Mark Standards and Regulations
OHAUS Corporation declares that the VXMN series mixers comply with directives
2011/63/EU, 2014/30/EU, 2014/35/EU and standards EN 50581, EN 61010-1, EN
61010-2-051, EN 61326-1.
The full text of the EU declaration of conformity is available at the following internet
address: www.ohaus.com/ce.
This product complies with directive 2012/19/EU. Please dispose of this product in
accordance with local regulations at the collecting point specified for electrical and
electronic equipment.
For disposal instructions in Europe, refer to www.ohaus.com/weee.
EN 61326-1
CAN/CSA C22.2 61010-1, CAN/CSA C22.2 61010-2-051
UL 61010-1, UL 61010-2-051
Global Notice
Warning: This is a Class A product. In a domestic environment this product may cause radio interfer-
ence in which case the user may be required to take adequate measures.
Canada Notice
This Class A digital apparatus complies with Canadian ICES-003.
FCC Notice
NOTE: This equipment has been tested and found to comply with the limits for a Class A digital
device, pursuant to Part 15 of the FCC Rules. These limits are designed to provide reasonable
protection against harmful interference when the equipment is operated in a commercial envi-
ronment. This equipment generates, uses, and can radiate radio frequency energy and, if not
installed and used in accordance with the instruction manual, may cause harmful interference to
radio communications. Operation of this equipment in a residential area is likely to cause harmful
interference in which case the user will be required to correct the interference at his own expense.
Changes or modifications not expressly approved by Ohaus Corporation could void the user’s authority
to operate the equipment.
Safety inStructionS StanDarDS & regulationS
3
EN

44
* Maximum speed will vary depending on accessory being used.
Overall dimensions (L x W x H): 8.3 x 4.8 x 6.5” (21.0 x 12.3 x 16.5 cm)
Electrical (50/60 Hz): 120V: 1.2 amps, 135 watts
230V: 0.6 amps, 135 watts
Speed range*: 120V: 500 to 3000rpm
230V: 500 to 2500rpm
Timer: 1 second to 9999 minutes
Orbit: 4.9mm (0.194”)
Duty rating: intermittent duty
Controls: see page 5
Ship weight: 10lbs (4.5kg)
analog vortexer mixer SPecificationS
Overall dimensions (L x W x H): 8.3 x 4.8 x 6.5” (21.0 x 12.3 x 16.5 cm)
Electrical (50/60 Hz): 120V: 1.2 amps, 135 watts
230V: 0.6 amps, 135 watts
Speed range*: 120V: 300 to 3200rpm
230V: 300 to 2500rpm
Orbit: 4.9mm (0.194”)
Duty rating: intermittent duty
Controls: auto/off/on rocker switch,
speed knob: variable 1 to 10 dial marks
Ship weight: 10lbs (4.5kg)
Overall dimensions (L x W x H): 8.3 x 4.8 x 6.5” (21.0 x 12.3 x 16.5 cm)
Electrical (50/60 Hz): 120V: 1.2 amps, 135 watts
230V: 0.6 amps, 135 watts
Speed range: 120V: 3200rpm
230V: 2500rpm
Orbit: 4.9mm (0.194”)
Duty rating: intermittent duty
Controls: none
Ship weight: 10lbs (4.5kg)
fixeD SPeeD vortexer mixer SPecificationS Digital vortexer mixer SPecificationS
Overall dimensions (L x W x H): 8.3 x 4.8 x 6.5” (21.0 x 12.3 x 16.5 cm)
Electrical (50/60 Hz): 120V: 1.2 amps, 135 watts
230V: 0.6 amps, 135 watts
Speed range*: 120V: 500 to 3000rpm
230V: 500 to 2500rpm
Timer: 1 second to 9999 minutes
Orbit: 2.5mm (0.098”)
Duty rating: intermittent duty
Controls: see page 5
Ship weight: 10lbs (4.5kg)
PulSing vortexer mixer SPecificationS
EN

5
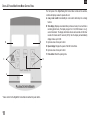
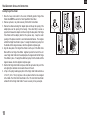
Digital & PulSing mini vortex mixer control Panel
The front panel of the Digital/Pulsing Mini Vortex Mixer contains all the switches,
controls and displays needed to operate the unit.
A. 3-way rocker switch: Auto/standby/on rocker switch starts/stops the vortexing
function.
B. Time display: Displays accumulated time (continuous mode) or how much time is
remaining (timed mode). The display range is from 0 to 9,999 minutes in one (1)
second increments. The display will indicate minutes and seconds until the timer
reaches 99 minutes and 59 seconds (99:59), then the display will automatically
display minutes up to 9,999.
C. Up/down arrows for set-point control.
D. Speed display: Displays the speed of the Mini Vortex Mixer.
E. Up/down arrows for set-point control.
F. Pulse button: Starts the pulsing mode.
D
B
E
C
A
F
5
* Same controls for the Digital Mini Vortex Mixer but without the ‘pulse’ button.
EN

6
Your Mini Vortex Mixer is ready for most one-handed applications. The Mini Vortex
Mixer operates by mixing tubes just prior to testing.
oPerating tiPS
These units are not intended for continuous use over extended periods of time. A
built-in temperature sensor will prevent the unit from overheating by shutting the motor
down. If this occurs, allow the motor to cool down and the unit will be able to resume
normal operation. Decrease the duration of the time unit is used between rest periods.
See page 8-9 for ‘Head/Accessory Installation Instructions’.
fixeD SPeeD mini vortex mixer oPerating inStructionS
The Fixed Speed Mini Vortex Mixer runs only at 3200rpm (2500rpm for 230V).
1. Plug the power cord into a properly grounded outlet. The unit is now on and in a
standby mode.
2. The vessel you are using must be pushed down on the head attachment to achieve
motion. To get the desired mix, vary the angle of contact and pressure against the
head.
3. The mixer will return to standby mode when the vessel is lifted off the head.
4. The unit can become warm to the touch with constant use. There is nothing wrong
with it. At high performance settings the motor (UL recognized component) simply
puts out more heat. IMPORTANT: DO NOT use large accessories on the Fixed
Speed Mini Vortex Mixer. This unit is designed for use with cup head or 3” (7.6cm)
head with 3” (7.6cm) rubber head cover only.
5. To completely cut off power to the unit, disconnect the power cord from the wall
outlet.
1. Make sure the 3-way rocker switch is in the center, off position. Plug the power
cord into a properly grounded outlet.
2. For continuous operation, push the rocker switch to the right, on position. For
intermittent/touch operation, push the rocker switch to the left, auto position.
3. In either case, turn the speed knob to 1. In the on position, you will see the head in
motion immediately. In the auto position, the vessel you are using must be pushed
down on the head attachment to achieve motion. To get the desired mix, vary
the speed, using the speed knob, and/or vary the angle of contact and pressure
against the head.
4. When finished with either continuous or intermittent operation, return rocker switch
to the center, off position.
5. The continuous, on mode is for the larger accessories. In continuous on mode,
DO NOT run the unit above 900rpm (analog speed setting of approximately 5).
6. The intermittent, auto mode is intended for short mixing times of one (1) minute
or less at full speed. A rest period of two (2) minutes is recommended to minimize
the possibility of overheating the motor. The unit can become warm to the touch
with constant use. There is nothing wrong with it. At high performance settings
the motor (UL recognized component) simply puts out more heat. IMPORTANT:
When using larger accessories (Insert Retainer with foam inserts or Ampule
Tube Holders), DO NOT run the unit above 900rpm, (analog speed setting of
approximately 5). UNIT DAMAGE WILL OCCUR.
7. To completely cut off power to the unit, disconnect the power cord from the wall
outlet.
mini vortex mixer introDuction analog mini vortex mixer oPerating inStructionS
6
EN

7
1. Make sure the 3-way rocker switch is in the center, standby position. Plug the
power cord into a properly grounded outlet. The unit is now on and in a standby
mode.
2. For continuous operation, push the rocker switch to the right, on position. For
intermittent/touch operation, push the rocker switch to the left, auto position.
3. In either case, set the speed. In the on position, you will see the head in motion
immediately. In the auto position, the vessel you are using must be pushed down
on the head attachment to achieve motion. To get the desired mix, vary the speed,
using the speed up/down arrows, and/or vary the angle of contact and pressure
against the head.
Setting speed:
To set the speed press the up/down arrows below the speed display until you reach
the desired speed.
• Speedwhilerunningintheonpositionis500to3000rpm(500to2500rpm
for 230V).
• Speed while running in the auto position is 1000 to 3000rpm (1000 to
2500rpm for 230V).
• Speedwhilerunninginthepulsemodeis3000rpm,runningfor30seconds,
resting 10 seconds (2500rpm for 230V).
Setting time:
Time operation works in both auto and on positions.
• Torunintimedmode(programmedtime),startbypressingtherockerswitch
to the left, auto position. Press the up/down arrows below the time display
until you reach the desired time. While running unit in timed mode, the time
display will show time remaining, counting down to zero (0:00).
• Torunincontinuousmode(accumulatedtime),resetthetimertozero(0:00)
before running. Time display will show the accumulated time and run until
you press the rocker switch to the center, standby position.
Pulse operation: (for Pulsing Mini Vortex Mixer only)
• Setthetimeifdesired.
• Movetherockerswitchtotheright,onposition.Pressthepulse button, in
the center of the front panel. The speed display will show “PULSE”. The unit
will run at 3000rpm, cycling a run time of 30 seconds, followed by a resting
time of 10 seconds. The unit will continue vortexing until the timer reaches
zero (0:00) or you stop the unit by moving the rocker switch to the center,
standby position.
4. When finished with either continuous, intermittent or pulse operation, return rocker
switch to the center, standby position.
5. The continuous, on mode is for the larger accessories. In continuous on mode, DO
NOT run the unit above 900rpm.
6. The intermittent, auto mode is intended for short mixing times of one (1) minute
or less at full speed. A rest period of two (2) minutes is recommended to minimize
the possibility of overheating the motor. The unit can become warm to the touch
with constant use. There is nothing wrong with it. At high performance settings
the motor (UL recognized component) simply puts out more heat. IMPORTANT:
When using larger accessories (Insert Retainer with foam inserts or Ampule Tube
Holders), DO NOT run the unit above 900rpm. UNIT DAMAGE WILL OCCUR.
7. To completely cut off power to the unit, disconnect the power cord from the wall
outlet.
NOTE: In the event of a power outage or hazard that will interrupt unit operation, the
unit will restart at set speed and/or temperature when a power outage or hazard is
restored.
Digital & PulSing mini vortex mixer oPerating inStructionS
7
EN

8
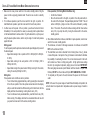
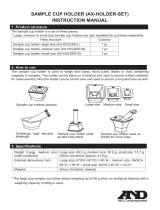
HeaD/acceSSory inStallation inStructionS
Installing the cup head, 3” head or other head attachments:
1. Move the 3-way rocker switch to the center, off/standby position. For the Fixed
Speed Mini Vortex Mixer disconnect the power cord from the wall outlet.
2. If using an Insert Retainer with tube holder, insert foam tube holder into Insert
Retainer by lining up the recessed notches of the foam with the fingers of the
retainer. Push foam to the bottom of the retainer.
3. Place head on post of the unit, aligning the flat “alignment mark” inside of the head
mounting hole with the flat “alignment mark” on the post.
4. Press center of head down firmly until it snaps into place. DO NOT use a 3” head
without the 3” rubber head cover. Add samples to attachments after the head is
secured onto the Mini Vortex Mixer. Be sure samples are secure before turning unit
on.
5. To remove an installed head, hold the Mini Vortex Mixer housing with one hand
and firmly pull the head straight up. Larger heads may require using both hands to
force head off post. Remove samples before removing attachments.
Installing Vessel Harness:
1. Install Insert Retainer without foam tube holder onto Mini Vortex Mixer.
2. Stretch vessel harness elastic bands over opposite fingers of the Insert Retainer.
Place bands on either upper or lower notches of the retainer.
3. Place sample in center of the harness bands. Be sure sample is secure before
turning unit on.
8
EN
4.
3.
2.
5.

9
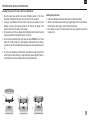
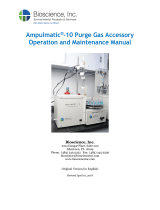
HeaD/acceSSory inStallation inStructionS
Installing Single Tube Holder:
1. Move the 3-way rocker switch to the center, off/standby position. Single Tube
Holder should NOT be used on the Fixed Speed Mini Vortex Mixer.
2. Remove cup head, or any other accessory from the Mini Vortex Mixer.
3. Remove the adhesive backing from adapter plate and line up the opening of the
adapter plate over the opening of the housing. Press down firmly to ensure a
proper bond between the adaptor and the unit. Align the base plate of the Single
Tube Holder with the adaptor plate from the previous step. Keep the center
openings of the plates concentric to avoid mechanical interference. The magnets
will hold the Single Tube Holder in place. To realign this attachment, pull up from
the handle until the magnets release, check the alignment and place again.
4. Align the base plate of the Single Tube Holder over the post of the Mini Vortex
Mixer with the two Single Tube Holder alignment posts at the back of the unit.
Lower Single Tube Holder onto the adapter plate, the magnets will hold the Single
Tube Holder in place. To realign this attachment, pull up from the handle until the
magnets release, check the alignment and place again.
5. Now that the Single Tube Holder is in place, attach the cup head on the post of the
unit, aligning the orientation arrow towards the rear of the unit.
6. Lift up on the spring loaded upper portion of the Single Tube Holder and slide a
2.5 to 4.5” (6.4 to 11.4cm) long tube on the cup head so that the tube is aligned
in the middle. The 0.5mL Micro-Tube Holder or the 1.5 to 2mL Micro-Tube Holder
will also fit into the Single Tube Holder. You are now ready to mix your sample.
EN
2.
5.5.
4.3.

10
Problem Cause Solution
Unit will not run
Mechanical obstruction
or Motor obstruction
Removeobstructionandpressdownoncupheadseveraltimestoconrmnoobstructionexists.If
problem persists, please contact your Ohaus representative for repair.
Unit is excessively noisy
Sensor fan misaligned
or Motor misaligned
Thiserrorcannotbexedbytheenduser.PleasecontactyourOhausrepresentativeforrepair.
troubleSHooting
EN

Ohaus Corporation
7 Campus Drive
Suite 310
Parsippany, NJ 07054 USA
Tel: +1 (973) 377-9000
Fax: +1 (973) 944-7177
Withofcesworldwide.
www.ohaus.com
*30391282*
SAP P/N: 30391282
P/N: 745301-00
© 2017 OHAUS Corporation, all rights reserved
-
 1
1
-
 2
2
-
 3
3
-
 4
4
-
 5
5
-
 6
6
-
 7
7
-
 8
8
-
 9
9
-
 10
10
-
 11
11
-
 12
12


Ask a question and I''ll find the answer in the document
Finding information in a document is now easier with AI
Related papers
Other documents
-
Vortex Pulse User manual
-
Gilson Vortex Mixer User manual
-
 AND AX-HOLDER-SET User manual
-
Benchmark Scientific BV1000-E Owner's manual
-
-
Benchmark Scientific BV101-G Owner's manual
-
Grant Instruments PV-1 Vortex Mixer User manual
-
 Bioscience Ampulmatic-10 Purge Gas Injector Operation and Maintenance Manual
-
-

