LG LD-1420I1 Owner's manual
- Category
- Dishwashers
- Type
- Owner's manual
This manual is also suitable for
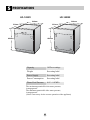
LG LD-1420I1 is a dishwasher with multiple programs to choose from, allowing you to select the one that best suits your needs, whether it's for heavily soiled pots and pans or delicate glassware. It features a spacious interior that can accommodate up to 14 place settings, so you can easily wash a full load of dishes in one go. The dishwasher also includes a variety of convenient features, such as a delay start option, so you can set it to run at a time that's convenient for you.
LG LD-1420I1 is a dishwasher with multiple programs to choose from, allowing you to select the one that best suits your needs, whether it's for heavily soiled pots and pans or delicate glassware. It features a spacious interior that can accommodate up to 14 place settings, so you can easily wash a full load of dishes in one go. The dishwasher also includes a variety of convenient features, such as a delay start option, so you can set it to run at a time that's convenient for you.


-
 1
1
-
 2
2
-
 3
3
-
 4
4
-
 5
5
-
 6
6
-
 7
7
-
 8
8
-
 9
9
-
 10
10
-
 11
11
-
 12
12
-
 13
13
-
 14
14
-
 15
15
-
 16
16
-
 17
17
-
 18
18
-
 19
19
-
 20
20
-
 21
21
-
 22
22
-
 23
23
-
 24
24
-
 25
25
-
 26
26
-
 27
27
-
 28
28


LG LD-1420I1 Owner's manual
- Category
- Dishwashers
- Type
- Owner's manual
- This manual is also suitable for
LG LD-1420I1 is a dishwasher with multiple programs to choose from, allowing you to select the one that best suits your needs, whether it's for heavily soiled pots and pans or delicate glassware. It features a spacious interior that can accommodate up to 14 place settings, so you can easily wash a full load of dishes in one go. The dishwasher also includes a variety of convenient features, such as a delay start option, so you can set it to run at a time that's convenient for you.
Ask a question and I''ll find the answer in the document
Finding information in a document is now easier with AI
Related papers
Other documents
-
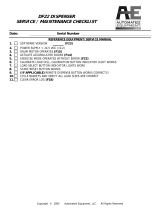 Automated Equipment LLC DF22 User manual
-
LG Electronics LDS5811WW User manual
-
-
-
-
Westinghouse WSF67381S User manual
-
Haier HLM-116B User manual
-
-
-
