Triumph-Adler 3262i Owner's manual

Category
Fax machines
Type
Owner's manual

This manual is also suitable for

Quick Guide 3262i/4062i
E-Mail operation
Sending
q
Place the originals on the
platen or in the optional
document processor.
q
Press
SEND on the Home
screen.
Enter the destination address.
From the address book:
Press
ADDRESS BOOK. Press the checkbox to select
the desired destination from the list. Press
SEARCH (NAME)WR¿QGWKHGHVWLQDWLRQ(QWHUWKH
QDPH\RXVHDUFKIRU&RQ¿UPZLWK
OK.
You may choose multiple destinations.
Enter an e-mail address:
Press
E-MAIL ADDR. ENTRY and E-MAIL ADDRESS. Enter
the E-Mail address on the touch screen. After
that press
OK.
,I\RXZDQWWRVHQGWKHHPDLOWRVHYHUDOGHVWL
-
nations, go back to step 1.
To send the e-mail press START.
Scan settings
q
Press
SEND on the Home
screen.
Press COLOR/IMAGE QUALITY.
Press COLOR SELECTION.
Choose the Color to be used.
&RQ¿UPZLWKOK.
Further settings
q
Press
SEND on the Home
screen.
Press QUICK SETUP.
Choose an item to be changed. After changing
FRQ¿UPZLWK
OK.
7RHQWHUD¿OHQDPHSUHVV
ADVANCED SETUP. Press
FILE NAME ENTRYDQGFKDQJHWKHQDPH&RQ¿UP
ZLWK
OK.
Press DESTINATION to return.
Status
Destination Detail
Address
Book
Folder Path
Entry
E-mail
Addr Entry
No.
1/100
AAA BBB CCC DDD
FFF GGG HHH III JJJ
00040003 00050001 0002
0006 0007 0008 0009 0010
1/1
i-FAX
Addr Entry
FAX No.
Entry
WSD Scan
'606FDQ
Destination
TUVW 192.168.188.120
Group1 Group1
EEE
Detail/Edit Delete RecallChainDirectOn Hook
Org./Sending
Data Format
Quick SetupDestination Color/
Image Quality
Advanced
Setup
Program
10/10/201 10:10
Status
Address Book
Cancel OK
Group
E-mail
Dest.
Search(Name)
Search(No.)
No. Type Name Detail
Folder
Detail
Address Book SortAddr Book
0001
0002
0005
0004
0003
Group1
Group2
Group3
Name
Register/Edit
Address Book
1/2
i-FAXFAX
ABC DEF JKL MNO PQRS TUV WXYZGHI 0-9
10/10/201 10:10
E-mail
Address
Add a new e-mail destination.
Press [E-mail Address], then enter
the address using the keyboard screen.
Status
E-mail Address Entry
Enter Destination.
Destination
Cancel OKNext Dest.Add to Addr Book
10/10/201 10:10
E
-m
ail
Address
Book
Status
Status
Status
FFF
GGG
Q
u
Status
Status
D
es
tin
a
ti
on
No.)
S
earch
(
Name
)
Search(
Search(
No )
No )
08/08/20 10:10
Destination
Status
Destination
Quick Setup
Original/Sending
Data Format
Color/
Image Quality
Advanced
Setup
Shortcut 1
Shortcut 2
Shortcut 3
Shortcut 4
Shortcut 5
Shortcut 6
Ready to send.
Sending Image
Place original.
Preview
Original
Zoom
Send
:
:
:
100%
---
---
File Format
PDF
2-sided/Book
Original
Density
FAX TX
Resolution
Zoom
600x600dpi
Scan
Resolution
100%
1-sidedAuto
600x600dpi 400x400dpi
Ultra Fine
200x400dpi
Super Fine
200x200dpi
Fine
200x100dpi
Normal
Status
Status
O
Status
Status
D
estin
a
ti
on
Quick Setu
p
//
//
08/08/20
//
10:10
0
0
0
0
0
0
A
d
v
a
nce
d
Setup
Status
Destination Detail
Address
Book
Folder Path
Entry
E-mail
Addr Entry
No.
1/100
AAA BBB CCC DDD
FFF GGG HHH III JJJ
00040003 00050001 0002
0006 0007 0008 0009 0010
1/1
i-FAX
Addr Entry
FAX No.
Entry
WSD Scan
'606FDQ
Destination
TUVW 192.168.188.120
Group1 Group1
EEE
Detail/Edit Delete RecallChainDirectOn Hook
Org./Sending
Data Format
Quick SetupDestination Color/
Image Quality
Advanced
Setup
Program
10/10/201 10:10
Black & WhiteGrayscale
Color Selection
Full Color
Select scanning color.
Use [Auto Color] to automatically produce color originals
in full color and black & white originals in black & white.
Cancel OKAdd Shortcut
Status
Destination
Auto Color
(Color/B & W)
Auto Color
(Color/Gray)
10/10/201 10:10
100%
A4
A4
Preview
Original
Zoom
Send
:
:
:
n
g
ma
A
g
g
a
at
Color/
Image Q
uality
Send
Send
Send
Fax operation
Depending on the model in use not all
functions are available.
For more details refer to the Operation
Guide on the co-packed DVD.
Cancelling fax job
Press STATUS/JOB CANCEL.
Press SENDING JOBS.
Choose the job to be cancelled and press
CANCEL.
&RQ¿UPZLWKYES.
Communication is cancelled.
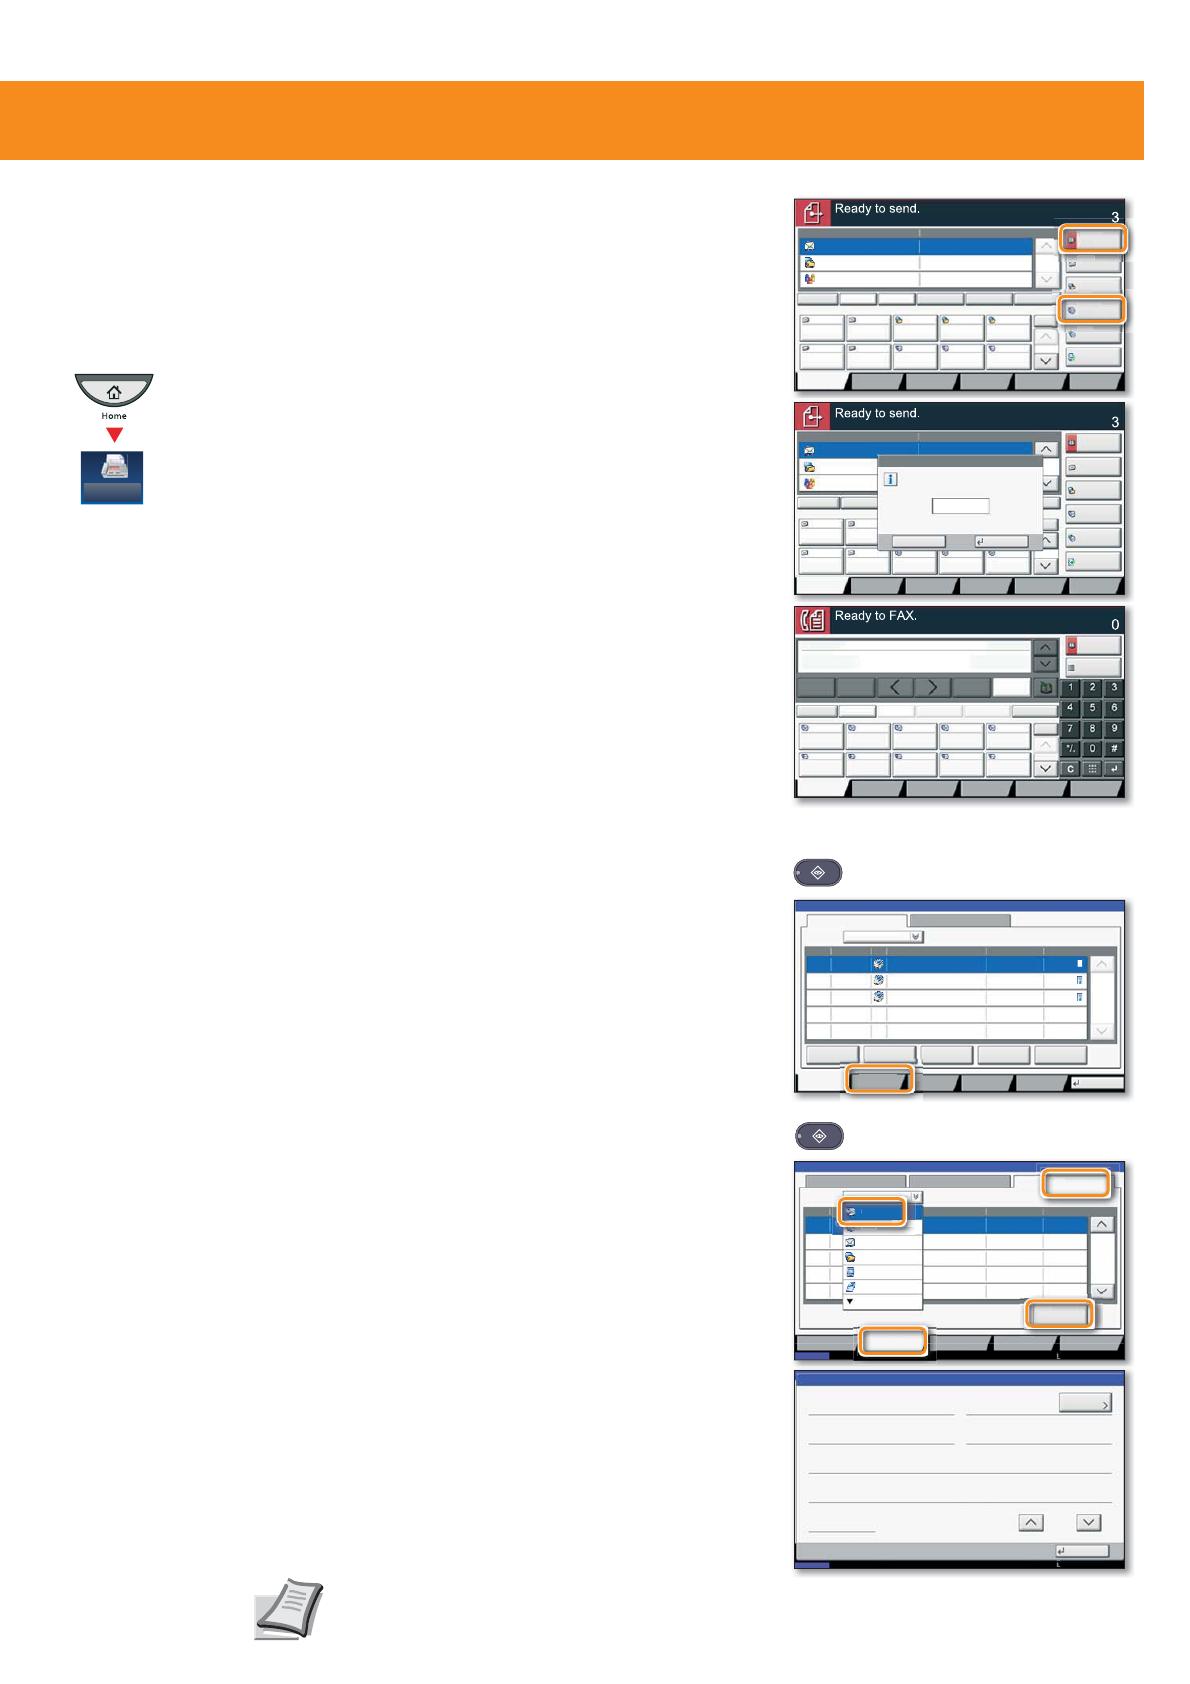
Sending a fax
q
Place the originals on the
platen or in the optional
document processor.
q
Press
FAX on the Home
screen.
Enter the destination address.
From the address book:
Press
ADDRESS BOOK. Press the checkbox to select
the desired destination from the list. Press
SEARCH (NAME)WR¿QGWKHGHVWLQDWLRQ(QWHUWKH
QDPH\RXVHDUFKIRU&RQ¿UPZLWK
OK.
You may choose multiple destinations.
Enter the destination:
Press
FAX. NO. ENTRY(QWHUWKHID[QXPEHUZLWK
the
TEN-KEY pad. After that press OK.
,I\RXZDQWWRVHQGWKHID[WRVHYHUDOGHVWLQDWL
-
ons, go back to step 1.
To send the fax press START.
Check
transmision
result
Press STATUS/JOB CANCEL.
Press SENDING JOBS.
Under Job Type, select FAX.
Press LOG.
Select a job to be checked.
Press DETAIL.
The details are displayed.
Destination Detail
Address
Book
Folder Path
Entry
E-mail
Addr Entry
No.
1/100
AAA BBB CCC DDD
FFF GGG HHH III JJJ
00040003 00050001 0002
0006 0007 0008 0009 0010
1/1
i-FAX
Addr Entry
FAX No.
Entry
WSD Scan
/DSM Scan
Destination
EEE
Detail/Edit Delete RecallChainDirectOn Hook
Org./Sending
Data Format
Quick SetupDestination Color/
Image Quality
Advanced
Setup
Program
Enter Destination.
A OFFICE
B OFFICE
C OFFICE
Member: 3
10.181.56.22:65535
Destination Detail
Address
Book
Folder Path
Entry
E-mail
Addr Entry
1/100
AAA BBB
FFF GGG HHH III JJJ
0001
0006 0007
0008
0009 0010
1/1
i-FAX
Addr Entry
FAX No.
Entry
WSD Scan
/DSM Scan
Enter Destination.
Destination
DirectOn Hook
A OFFICE
B OFFICE
C OFFICE
Org./Sending
Data Format
Quick SetupDestination Color/
Image Quality
Advanced
Setup
Program
Enter One Touch key number
using # keys.
Cancel OK
(0001 - 1000)
0011
$%&' DEFG#HIJFRP
$GGUHVV
%RRN
)$;
(QWU\
1R

$$$ %%% &&& '''
))) *** +++ ,,, ---
  
    
&KHFN
'HVWLQDWLRQV
'HVWLQDWLRQ
3DXVH
%DFNVSDFH
(((
6SDFH
'HWDLO 'HOHWH 5HFDOO&KDLQ'LUHFW2Q+RRN
2UJ6HQGLQJ
'DWD)RUPDW
4XLFN6HWXS'HVWLQDWLRQ ,PDJH4XDOLW\ $GYDQFHG
6HWXS
3URJUDP
(QWHU'HVWLQDWLRQ

I
'()$%&
012-./*+,
:;<=7893456
E
-m
ail
Add
r
ess
B
oo
k
Entry
i-FA
X
FAX N
o.
Entr
y
doc20151010091015
InProcess
000001
doc20151010091510 Waiting
000002
AAAAA
AAAAA
Pause All
Print Jobs
Cancel Priority
Override
Move Up
Status
Status Log
Job Type All
Job No. Accept Time Type Job Name User Name Status
1/1
Detail
Paper/
Supplies
Storing JobsSending JobsPrinting Jobs
10/10 09:10
10/10 09:15
000003 10/10 09:20 doc20151010092015 WaitingBBBBB
Close
Device/
Communicate
t0101
Log
438
14:47
1/1
Status
Printing Jobs Sending Jobs Storing Jobs
Device/
Communication
Paper/Supplies
Detail
InProcess
Result
User NameDestinationJob No.
Job Type
All
Status
Status
Scheduled Job
FAX
i-FAX
E-mail
Folder
Application
Multi Sending
10/10/201 10:10
Detail Job No.:
Close
Job No.:
Status/Destination:
Job Type:
Destination:
User Name:
Job Name:
Start Time
1/2
Sending Job - FAX
Processing000080
User1
ABCDE
doc2008101005151
10:10:10
000080
Add/Edit
Status
10/10/201
10:10
Sto
s
S
endin
g
Jobs
L
o
g
@
@
@
@d
@d
@d
@d
d
d
de
de
@d
@
11
1
1
1
e
All
i
-
FAX
abc@
bc@
abc@
abc@
abc@
c@
c@
@
c@
@
c@
@
c@
14:47
14:47
14:
4
4
4
4
4:4
4:47
14:47
14:47
All
All
All
FAX
iFAX
iFAX
iFAX
i/
D
e
t
a
i
l
S
endin
g
Jobs
FAX
Quick Guide 3262i/4062i
Print operation
Private printing
q
Press
JOB BOX on the Home
screen.
Note: To activate the private printing from the
PC, select the
JOB tab in the printer driver and
click
PRIVATE PRINT3URWHFW\RXUSULQWMREZLWK
a 4-digit access code if needed. The section
JOBNAMEDOORZV\RXWRW\SHLQ\RXUQDPHGLUHFWO\
q
In the application click on
FILE and then PRINT.
q
Open the
PROPERTIES of the selected printer.
q
Click on
JOB.
Select the creator of the private print job.
Select the document to be printed from the
OLVW,IWKHGRFXPHQWLVSDVVZRUGSURWHFWHGW\SH
LQWKH3,1ZLWKWKH
TEN-KEY pad.
Press PRINT to start printing.
Note: By pressing
DELETE jobs can be cancelled.
Media type
settings
When printing from an application
press
PROPERTIES button.
Choose BASIC tab.
To print on the special paper such as
thick paper or transparency, click the
MEDIA
TYPE
menu and select the media type.
&RQ¿UPZLWKOK.
Cancel
print job
Press STATUS/JOB CANCEL.
Press PRINTING JOBS.
Choose the job to be cancelled and
press
CANCEL.
&RQ¿UPZLWKYES.
Job is cancelled.
Close
1/2
Open
User Name Files
Quick Copy/Proof and Hold
Status
5
2
1
1
1
User
User
User
User
User
1
2
3
4
5
10/10/201 10:10
1/1
Detail
Close
User:
File
File
File
File
File
Print
Delete
2010/10/10 09:40
2010/10/10 09:45
2010/10/10 09:50
2010/10/10 09:55
2010/10/10 10:00
File Name
Date and Time
Size
MB
30
MB
21
MB21
MB
36
MB
30
Status
1
2
3
4
5
10/10/201 10:10
doc20151010091015
InProcess
000001
doc20151010091510 Waiting
000002
AAAAA
AAAAA
Pause All
Print Jobs
Cancel Priority
Override
Move Up
Status
Status Log
Job Type All
Job No. Accept Time Type Job Name User Name Status
1/1
Detail
Paper/
Supplies
Storing JobsSending JobsPrinting Jobs
10/10 09:10
10/10 09:15
000003 10/10 09:20 doc20151010092015 WaitingBBBBB
Close
Device/
Communicate
0101
e
nd
S
S
S
Se
e
Printing Jobs
Job Box
Prin
t
Cl
Delete
Open
UN
User Na
User Na
User Na
me
me
me
Fil
Files
Files
Files
1
/2
User Na
User Na
User Na
me
me
me
Files
Files
Files
5
2
1
1
1
Use
r
U
ser
U
ser
U
ser
U
ser
1
2
3
4
5
Copy operation
Depending on the model in use not all
functions are available.
For more details refer to the Operation
Guide on the co-packed DVD.
Preparation
q
Place the originals on the
platen or in the optional
document processor.
q
Press
COPY on the Home
screen.
(QWHUWKHQXPEHURIFRSLHVZLWKWKH
TEN-KEY pad.
Choose PAPER SELECTION, DUPLEX, ZOOM, COMBINE,
DENSITY or STAPLE/PUNCH (optional) in the sub
menu from the main screen.
&RQ¿UPDOOVHWWLQJVZLWKOK.
Press START.
Optional functions:
The image quality settings can be changed.
Press IMAGE QUALITY.
Choose DENSITY, BACKGROUND DENSITY ADJ.,
SHARPNESS, PREVENT BLEED-THRU in the sub menu
from the main screen.
&RQ¿UPDOOVHWWLQJVZLWKOK.
Help
A Help icon is provided on this machine's touch
screen. If you need further information about
KRZWRRSHUDWHWKHPDFKLQHDQGKRZWRXVH
LWVIXQFWLRQVRULIWKHPDFKLQHLVQRWZRUNLQJ
SURSHUO\SUHVVWKH+HOSNH\WRYLHZDGHWDLOHG
explanation on the touch panel.
Image QualityOrg./Paper/
Finishing
Quick Setup Layout/Edit Advanced
Setup
Shortcut 1
Shortcut 4
Shortcut 3
Shortcut 2
Shortcut 6
Shortcut 5
Program
:
:
:
100%
A4
A4
Preview
Original
Zoom
Paper
Preview
Proof Copy
Copies
Staple
/Punch
Normal 0
DensityPaper
Selection
Auto
Zoom
100%
Off1-sided
>>1-sided
Duplex
Off
Combine
Status
Copies
Add Shortcut Cancel OK
Darker
Density
Normal
Lighter
-3 -2 -1 0 +1 +3+2
-2.5 -1.5 -0.5 +0.5 +1.5 +2.5
10/10/201 10:10
100%
A4
A4
Preview
Original
Zoom
Paper
:
:
:
Background Density Adj.
Copies
Status
Cancel OKAdd Shortcut
Manual
Off
Background
Lighter Darker
123 45
Auto
10/10/201 10:10
100%
A4
A4
Preview
Original
Zoom
Paper
:
:
:
Sharpness
Copies
Status
Cancel OKAdd Shortcut
SharpenBlur
0 123
-1
-2-3
Text/Fine Line
All
10/10/201 10:10
100%
A4
A4
Preview
Original
Zoom
Paper
:
:
:
Prevent Bleed-thru
Copies
Status
Cancel OKAdd Shortcut
Off
On
Hide background colors and image bleed-through
when scanning thin original.
10/10/201 10:10
100%
A4
A4
Preview
Original
Zoom
Paper
:
:
:
/P
t/Edit
Ad
d
S
S
S
S
ta
p
l
e
/P nch
/Punch
/Punch
Normal
0
D
ensit
y
Pape
r
Selecti
on
Au
t
o
Z
oo
m
1
00
%
Off
1-
s
i
ded
>>1-sid
ed
D
uple
x
O
f
f
Combine
La
r/
L
/
I
ma
g
e
Q
ua
lity
I Q lit
Copy
  • Page 1 1
  • Page 2 2
  • Page 3 3
  • Page 4 4

Triumph-Adler 3262i Owner's manual

Category
Fax machines
Type
Owner's manual
This manual is also suitable for

Ask a question and I''ll find the answer in the document

Finding information in a document is now easier with AI