Page is loading ...

NOTICE
Dear Customers:
Thank you for choosing our barbeque grill and hope that you enjoy
our product.
5270 Edison Avenue., Chino, CA 91710
(Tel) 800-790-1299 (Fax) 909-718-1949
Our gas valves and components are preset at the factory to operate
on Liquid Propane (LP). If you wish to convert your grill from LP to
Natural Gas (NG), we strongly recommend that you hire a
professionally trained technician to convert the unit. Please
understand that we will not be responsible for any liability, personal
injury, or property damage resulting from an improperly converted
grill.
We will provide warranty parts for this product after it is converted,
however, we will not honor any warranty claims for parts damaged
during the conversion of the original LP valves and orifices to NG
configuration if the conversion is done improperly.

Natural Gas Conversion for Model# 720-0691A
NG Conversion Kit for Model # 720-0691A
WARNING! FALURE TO HEED THESE WARNINGS COULD RESULT IN A FIRE OR EXPLOSION THAT
COULD CAUSE SERIOUS BODILY INJURY, DEATH OR PROPERTY DAMAGE.
Installation of this Natural Gas Conversion kit must be performed by a QUALIFIED GAS TECHNICIAN ONLY. DO
NOT ATTEMPT TO INSTALL THIS KIT YOURSELF. Improper installation could result in a gas leak which could
cause a fire or explosion and cause serious bodily injury, death or property damage. Leaks due to improper
installation could occur immediately or slowly over time. If you hear any unusual noises or leaks, smell gas or
unusual odors, or notice anything unusual with the operation of your gas appliance after the installation,
immediately shut off the gas supply and discontinue use until the appliance is repaired by a QUALIFIED GAS
TECHNICIAN.
If there are damaged or missing parts when you unpack this kit, call 1-800-790-1299. DO NOT have your
QUALIFIED GAS TECHNICIAN attempt to install this kit until you receive replacement for any damaged or
missing parts.
Orifice Chart
The different burner valves in this grill have different BTU ratings. This means that the amount of gas coming
from each orifice varies in order to create the BTU's. The holes in the orifices themselves are drilled to different
sizes so as to allow the proper amount of gas to flow through them. Please note the chart below as an easy
reference for the various orifice opening sizes for the different valves in the grill.
720-0691A, 730-0691A orifice size( Do not included in NG conversion kit pack)
Liquid Propane (LP) Natural Gas (NG)
Components
Orifice Size
BTU
Orifice Size
BTU
Components
Orifice Size
BTU
Orifice Size
BTU
Main Burner 0.94mm 10,000 1.54mm 10,000
Searing Side Burner 1.15mm 15,000 1.90mm 15,000
Rear Burner 1.07mm 13,000 1.84mm 13,000
Below tools are included in package:
Allen Key
6mm Nut Driver
6mm Wrench
1

Natural Gas Conversion for Model# 720-0691A
Warning: Make sure all grill components are completely cool and gas supply is turned off and removed from grill
prior to performing the conversion.
NG Hose and Regulator Conversion
Tools required:
14mm wrench
Phillips Head Screwdriver (+)
1. Turn all knobs to OFF. Turn off LP gas supply and remove the LP cylinder from the grill cart. Remove the
brass adapter of the LP regulator from the manifold with a wrench.
2. Install the NG regulator hose(150mm) to the manifold and secure using a wrench. Tighten the NG regulator
on the side panel with two 5/32*10mm screws that pre
-
assemble on the NG regulator.
on the side panel with two 5/32*10mm screws that pre
-
assemble on the NG regulator.
2

Natural Gas Conversion for Model# 720-0691A
Main Tube Burner Conversion
Tools required:
Phillips Head Screwdriver (+)
6 mm Nut Driver
Steps:
1. Remove the warming rack, cooking grids, and flame tamers.
2. Remove the main tube burners by removing the screws securing the burners near the back wall of the
firebox and the screw near the front of the firebox that secures the igniter bracket to the burner. Gently lift
the tube burners up and out.
Note: Make sure the orifice will be lined with valve when loose out and replace orifice in Main
Tube Burner Conversion, Searing Side Burner conversion and Rear burner Conversion. And
then test gas leak accordingly.
3. Remove LP orifice with 6mm nut driver for each of the main burners, and replace with NG orifice by 6mm
nut driver. (4 main burner)
4. Replace the tube burners and screw back into original position.
3

Natural Gas Conversion for Model# 720-0691A
Searing Side Burner Conversion
Tools required:
Phillips Head Screwdriver (+)
6 mm Nut Driver
The step-by-step instruction for converting the searing side burner’s orifice are stated below.
1. Remove the screw under C bracket to take off the C bracket, then remove the searing side burner from
the firebox by loosening the screws securing the burners near the back wall of the firebox. Lift the burner
up and out.
2. Remove the searing side burner LP orifice with 6mm nut driver, replace the NG orifice, then install the
searing side burner and screw back in to original position.
4

Natural Gas Conversion for Model# 720-0691A
Rear Burner Conversion
Tools required:
Steps:
1. Remove the screws securing the rear baffle from inside the firebox. Remove the Rear Baffle from the back
of the grill.
2. Remove the LP orifice with 6mm wrench.
6mm Wrench
Phillips Head Screwdriver (+)
3. Replace the NG orifice with 6mm wrench. Then put rear baffle and screw back into original position.
5

Natural Gas Conversion for Model# 720-0691A
For Main Tube Burner Conversion Only
(The 3 steps below are not necessary for the Sear side burner and Rear burner )
You will need to adjust the High Flame setting screw when converting the barbecue from Propane to Natural Gas.
Please follow the steps as detailed below.
1. Remove each Control Knob of main tube burners by loosening the socket head grub screw with the Allen
key.
2. Use a screw driver to turn the High Flame Set Screw clockwise approximately 90 degree.
3. Check that burner operates at the new high fire setting - it may be necessary to adjust the screw setting
slightly to get the ideal burner flame height.
Warning!! Gas Valves are preset at the factory to operate on LP gas or NG gas. If you wish to convert, be sure to
consult your gas supplier or trained technician for the conversion.
A. After the Natural Gas regulator has been installed, attach the PVC Gas hose to the regulator (See drawing
below).
B. Connect the other end of the PVC Gas Hose to the house gas line using the quick-connect fitting. To use
the quick connect fitting, lift the head of the connector back. Insert the end of the PVC hose and release the
the quick connect fitting, lift the head of the connector back. Insert the end of the PVC hose and release the
head of the connector. Ensure connection is secure.
There is a brass adapter for natural gas lines that are pre-regulated. If the gas line is not pre-regulated, remove
the brass adapter and connect the regulator directly to the PVC gas hose.
Once conversion is complete, please attach the NG CSA certification sticker to the grill.
If you should have any questions regarding natural gas conversion, please contact customer service at
1-800-790-1299.
6

Natural Gas Conversion for Model# 720-0691A
WARNING: IMPORTANT!
BEFORE LIGHTING…
Inspect the gas supply hose prior to turning the gas
“ON”. If there is evidence of cuts, wear, or abrasion,
it must be replaced prior to use. Do not use the grill
if the odor of gas is present. Only the pressure
regulator and hose assembly supplied with the unit
should be used.
Never substitute regulators and hose assembly for
those supplied with the grill. If a replacement is
necessary, contact the manufacturer for proper
replacement. The replacement must be that
specified in the manual.
WARNING: Always keep your face and body as
far away from the burner as possible when
lighting.
TO LIGHT THE MAIN BURNER
Make sure all knobs are “OFF” then turn on the gas.
Always keep your face and body as far from the grill
as possible when lighting.
Your grill has an exclusive patented built-in ignition.
The igniter is built into the valve. To ignite each
burner simply push and turn the control knobs to the
HI setting, you will hear the valve click as it sends a
TO LIGHT THE SEARING SIDE BURNER
To light the searing side burner, remove any cooking
utensils from the burner grate. Push and turn the control
knob counterclockwise to the “IGNITE/ON” position. If the
burner does not light, turn the control knob to “OFF”. If the
smell of gas is detected and the igniter is not functioning,
immediately turn the control knob “OFF”. Allow 5 minutes
for any accumulated gas to dissipate. If the side burner
igniter is not functioning, see the following section for
match lighting.
TO MATCH LIGHT THE GRILL
If the burner will not light after several attempts then the
burner can be match lit.
Match light extension rod is located on the inside panel of
the door.
If you’ve just attempted to light the burner with the igniter,
allow 5 minutes for any accumulated gas to dissipate.
Keep your face and hands as far away from the grill as
possible.
Insert a lit match attached to the lighting rod through the
cooking grids to the burner.
Press the control knob and rotate left to the HI/ON setting
continue to press the knob until the burner ignites.
Burner should light immediately.
HI setting, you will hear the valve click as it sends a
spark to the pilot flame. If the burner does not light
wait 5 minutes for any excess gas to dissipate and
then retry.
Burner should light immediately.
If the burner does not light in 4 seconds turn the knob off,
wait 5 minutes and try again.
TO MATCH LIGHT THE SIDE BURNER
Hold a lit extended match near the side burner ports, turn
the control knob counterclockwise to “IGNITE/HI”. Move
your hand immediately once the burner is lit. Rotate the
control knob to the desired setting.
Do not attempt to light the grill if odor of gas is
present. Call for service 1-800-790-1299
FLAME CHARACTERISTICS
Check for proper burner flame characteristics.
Burner flames should be blue and stable with no yellow
tips, excessive noise, or lifting. If any of these conditions
exist call our customer service line. If the flame is yellow,
it indicates insufficient air. If the flame is noisy and tends
to lift away from the burner, it indicates too much air.
Each burner is adjusted prior to shipment; however,
variations in the local gas supply may make minor
adjustments necessary.
Visually check the burner flames prior to each
use,The flames should look like this picture,if
they do not ,refer to the burner maintenance part
of this manual.
7

Natural Gas Conversion for Model# 720-0691A
Note: Remove all packaging, including straps, before using the grill
M ain
Burners
Rear
Burner
IG NIT E / H I
LO
OF F
IG NITE / H I
LO
IG NITE / HI
LO
OFF
1
3
2
IG NITE / H I
LO
IG NIT E / O N
OF F OF F
OF F
OF F
IG NIT E / H I
LO
IG NIT E / H I
LO
OF F
Sear
Burner
Make sure the lid is open.
Push and turn Main Burner knob slowly to IGNITE/HI.
Keep knob pressed in until the burner is lit.
If burner does not light within 5 seconds, turn the knob
to OFF and repeat the lighting instruction.
If burner does not light up after step 3, turn the knob to
OFF, wait 5 minutes, and repeat the lighting procedure
or light by match.
1
2
3
4
or light by match.
IGNITE / ON
1
2
OFF
Make sure the lid is open.
Push and slowly turn the Rear Burner knob to IGNITE/ON
position. Keep knob pressed in until the burner is lit. Once it
is lit, continue to press and hold for another 15 seconds to
ensure the burner stays lit.
If burner does not light within 5 seconds, turn the knob to
OFF position and repeat the lighting procedure.
If burner fails to light after step 3, turn the knob to OFF
position, wait 5 minutes, then repeat the lighting procedure
or light by match.
1
2
3
4
8

Natural Gas Conversion for Model# 720-0691A
1. If the burner will not light after several attempts them the burner can be match lit, before using the match
Match light
allow 5 minutes for any accumulated gas to dissipate.
2. Clip a paper match on one end of the lighting rod.
Light match.
3. Hold lighting rod and insert lighted match right next to the burner ports or ceramic file.
4. Push and turn the designated control knob to IGNITE/HI.
5. Burner should ignite immediately.
01
02
03
04
05
06
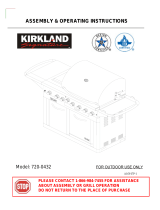
Exploded View
Part List
No. Part (Description) QTY No. Part (Description) QTY
01 NG hose 1 04 6mm Wrench 1
02
NG regulator
1 05 Allen key 1
03
NG regulator hose
1 06 6 mm Nut Driver 1
9
/