Page is loading ...

All disclosures, notices and warranty conditions are being written on the back of the box. Revision 1.1. Released on 17th of March, 2015.
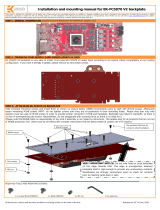
Installation and mounting manual for EK-FC Titan X Backplate
This product is intended for installation only by expert users. Please consult with a qualified technician for installation. Improper installation may result in damage to your equipment. EK Water Blocks assumes no liability
whatsoever, expressed or implied, for the use of these products, nor their installation. The following instructions are subject to change without notice. Please visit our web site at www.ekwb.com for updates. Before
installation of this product please read important notice, disclosure and warranty conditions printed on the back of the box.
STEP 1: GENERAL INFORMATION. Sample picture of GeForce GTX Titan X series graphics card.
STEP 2: PREPARING YOUR GRAPHICS CARD
EK-FC Titan X Backplate is very easy to install. First install EK-FC Titan X series water block according to its installation manual. If you have it already
installed, please check the picture below to see which mounting screws are to be left in their position and which are to be removed. Please remove
the six (6) M3x4 DIN7985 screws and their washers as well (marked with arrow).
STEP 3: APPLYING THE THERMAL PADS
EK-FC Titan X Backplate features passive cooling of the printed circuit board and it’s components therefore it is mandatory to install the enclosed
thermal pad. Please install enclosed 1mm thick thermal pad (Thermal Pad A – 1mm (100x16)) and 1mm thick thermal pad (Thermal Pad D – 0,5mm
(100x16)) as shown on the picture below. You may need to trim the excess thermal pad.
Thermal PAD A 1mm
EK-FC Titan X Backplate
Thermal PAD A 0,5mm

All disclosures, notices and warranty conditions are being written on the back of the box. Revision 1.1. Released on 17th of March, 2015.
Figure1: Detail A
M3x8 DIN 7991
M3X10 DIN7991
screw
PVC washer
M3 NUT
These screw, washer and
nut is applied only at Plexi
top version, which don't
covers the entire lenght of
the PCB
Plexi version:
STEP 4: ATTACHING EK-FC Titan X BACKPLATE TO THE GRAPHICS CARD
Take enclosed mounting screws and install them as shown on picture below. Use six (5) M3x8 DIN7991 or four (4) M3x8 DIN7991 and two (2)
M3x10 DIN7991 screws and mount them on the back side of backplate. Mount the M3 nut and PVC washer from the front side on the M3x10
DIN7991 screw, as shown on the detailed picture.
HINT: Do not tighten screws until they are all positioned in their mounting holes. The backplate has milled in standoffs, so there is no fear of over
tightening of the screws. Nevertheless do not exaggerate with screwing force as there is no need for it.
vBy all means users must also consider that this product is intended to be used only with EK-FC Titan X series water blocks. No other 3rd party heat
sinks or coolers are supported!
IMPORTANT DISCLOSURES
VERY IMPORTANT NOTICE: Once the installation is completed, it is a recommended practice to test the cooling circuit for leaks prior to powering up the
computer. We recommend a 24 hour leak test prior to powering up the computer. Do not test the water block using city water pressure. This will rupture the top
of the housing and render the block unusable (and will void your warranty).While all efforts have been made to provide the most comprehensive tutorial possible,
EK Water Blocks assumes no liability expressed or implied for any consequential damage(s) occurring to your equipment as a result of using EK Water Blocks
cooling products, either due to errors or omissions on our part in the above instructions, or due to failure or defect in the EK Water Blocks cooling products.
WARRANTY:
Our products are warranted against defects in materials or workmanship for a period of 24 months beginning from the date of delivery to the final user. During
this period, products will be repaired or have parts replaced at our discretion provided that: (I) the product is returned to the agent from whom it was
purchased; (II) the product has been purchased by an end user and has not used for commercial purposes; (III) the product has not been misused, handled
carelessly, or used in a manner other than in accordance with the instructions provided describing its installation and proper use. This warranty does not confer
rights other than those expressly set out above and does not cover any claims for consequential loss or damage. This warranty is offered as an extra benefit and
does not affect your statutory rights as a consumer. This warranty is voided if the product comes in contact with aggressive chemical, chemical agents or other
improper liquids or solids.
EK blocks are sealed with warranty void circular label, which proves that the block has withstood a pressure leak test. Removing it will void leak-free guarantee
and not the guarantee on the product itself. Any other RMA issues can be reported to EK Support at http://www.ekwb.com/support for further analysis.
REQUIRED TOOLS:
Philips head screwdriver Scissors Allen key
M3 nut
/