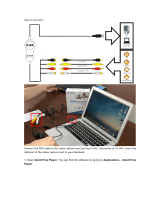
Samsung SAMSUNG NV100HD User manual

Category
Bridge cameras
Type
User manual
This user manual includes detailed usage
instructions for your camera. Please read
this manual thoroughly. Click a button
below for more information.
NV100HD
Quick search
Contents
1 Basic functions
2 Extended functions
3 Shooting options
4 Playback/Editing
5 Appendix
Index
1
Health and Safety Information
Always comply with the following precautions and usage tips to
avoid dangerous situations and ensure peak performance of your
camera:
Warning—situations that could cause injury to yourself or
others
Caution—situations that could cause damage to your
camera or other equipment
Note—notes, usage tips, or additional information
Safety Warnings
Do not use your camera near flammable or explosive
gases and liquids
Do not use your camera near fuels, combustibles, or flammable
chemicals. Do not store or carry flammable liquids, gases, or
explosive materials in the same compartment as the camera or its
accessories.
Keep your camera away from small children and pets
Keep your camera and all accessories out of the reach of small
children and animals. Small parts may cause choking or serious
injury if swallowed. Moving parts and accessories may present
physical dangers as well.
Prevent damage to subjects’ eyesight
Do not use the flash in close proximity (closer than 1 m/3 ft) to
people or animals. Using the flash too close to your subject’s
eyes can cause temporary or permanent damage.
2
Health and Safety Information
Handle and dispose of batteries and chargers with care
Use only Samsung-approved batteries and chargers.
Incompatible batteries and chargers can cause serious injuries
or damage to your camera.
Never dispose of batteries in a fire. Follow all local regulations
when disposing of used batteries.
Never place batteries or cameras on or in heating devices,
such as microwave ovens, stoves, or radiators. Batteries may
explode when overheated.
Safety Precautions
Handle and store your camera carefully and sensibly
Do not allow your camera to get wet—liquids can cause serious
damage. Do not handle your camera with wet hands. Water
damage to your camera can void your manufacturer’s warranty.
Do not expose the camera to direct sunlight or high
temperatures for an extended period of time. Prolonged
exposure to sunlight or extreme temperatures can cause
permanent damage to your camera’s internal components.
Avoid using or storing your camera in dusty, dirty, humid, or
poorly-ventilated areas to prevent damage to moving parts and
internal components.
Remove the batteries from your camera when storing it for an
extended period of time. Installed batteries may leak or corrode
over time and cause serious damage to your camera.
Protect your camera from sand and dirt when using it on
beaches or in other similar areas.
Protect your camera and monitor from impact, rough handling,
and excessive vibration to avoid serious damage.
Exercise caution when connecting cables or adapters and
installing batteries and memory cards. Forcing the connectors,
improperly connecting cables, or improperly installing batteries
and memory cards can damage ports, connectors, and
accessories. Do not insert foreign objects into any of your
camera’s compartments, slots, or access points. Damage due
to improper use may not be covered by your warranty.
Protect batteries, chargers, and memory cards from
damage
Avoid exposing batteries or memory cards to very cold or very
hot temperatures (below 0º C/32º F or above 40º C/104º F).
Extreme temperatures can reduce the charging capacity of your
batteries and can cause memory cards to malfunction.
Prevent batteries from making contact with metal objects, as
this can create a connection between the + and – terminals
of your battery and lead to temporary or permanent battery
damage.
Prevent memory cards from making contact with liquids, dirt, or
foreign substances. If dirty, wipe the memory card clean with a
soft cloth before inserting in your camera.
3
Turn off the camera when inserting or removing the memory
card.
Do not bend drop, or subject memory cards to heavy impact
or pressure.
Do not use memory cards that have been formatted by other
cameras or by a computer. Reformat the memory card with
your camera.
Never use a damaged charger, battery, or memory card.
Use only Samsung-approved accessories
Using incompatible accessories may damage your camera,
cause injury, or void your warranty.
Protect your camera’s lens
Do not expose the lens to direct sunlight, as this may discolour
the image sensor or cause it to malfunction.
Protect your lens from fingerprints and scratches. Clean your
lens with a soft, clean, debris-free lens cloth.
Important Usage Information
Allow only qualified personnel to service your camera
Do not allow unqualified personnel to service the camera or
attempt to service the camera yourself. Any damage that results
from unqualified service is not covered by your warranty.
Ensure maximum battery and charger life
Overcharging batteries may shorten battery life. After charging is
finished, disconnect the cable from your camera.
Over time, unused batteries will discharge and must be
recharged before use.
Disconnect chargers from power sources when not in use.
Use batteries only for their intended purpose.
Exercise caution when using the camera in humid
environments
When transferring the camera from a cold environment to a warm
and humid one, condensation can form on the delicate electronic
circuitry and memory card. In this situation, wait for at least 1 hour
until all moisture has evaporated before using the camera.
Check that the camera is operating properly before use
The manufacturer takes no responsibility for any loss of files or
damage that may result from camera malfunction or improper
use.
Health and Safety Information
4
©2008 SAMSUNG DIGITAL IMAGING CO., LTD.
The specifications of the camera or contents of this
manual may be changed without prior notice due to
upgrade of camera functions.
Copyright information
Microsoft Windows and the Windows logo are
registered trademarks of the Microsoft Corporation.
HDMI, the HDMI logo and the term "High Definition
Multimedia Interface" are trademarks or registered
trademarks of HDMI Licensing LLC.
QuickTime
®
and QuickTime
®
logo are trademarks or
registered trademarks of Apple Computer, Inc., used
under license.
Organisation of the user manual
1
Basic functions ................................................. 10
Learn about your camera’s layout, icons, and basic
functions for shooting.
2
Extended functions ......................................... 19
Learn how to take a photo by selecting a mode and
how to record a video or voice memo.
3
Shooting options .............................................. 29
Learn about the options you can set in shooting mode.
4
Playback/Editing .............................................. 47
Learn how to play back photos, videos, or voice memos
and edit photos or videos. You will also learn how to
connect your camera to your computer, photo printer,
TV, or HDTV.
5
Appendix ............................................................ 67
Refer to settings, error messages, specifications, and
maintenance tips.
5
Indications used in this manual
Shooting mode Indication
AUTO
2
PROGRAM
1
MANUAL
8
DUAL IS
7
NIGHT
6
BEAUTY SHOT
5
SCENE
4
MOVIE
3
Shooting mode icons next to a title
These icons indicate that a function is available in the
corresponding modes. The 4 mode may not support
functions for all scenes.
e.g.)
Available in the AUTO,
PROGRAM, NIGHT,
BEAUTY SHOT, and
some SCENE modes
Available in the AUTO,
PROGRAM, NIGHT,
BEAUTY SHOT, and
some SCENE modes
Icons used in this manual
Icon Function
Additional information
Situations where you need to be careful
[ ]
Camera buttons; for example: [Shutter] (represents the
Shutter button)
( ) Page number for reference
¡
The order of options or menus you must select to
perform a step; for example: Touch
¡
(represents
, followed by ).
* Annotation
Abbreviations used in this manual
Abbreviation Definition
ACB
Auto Contrast Balance
AEB
Auto Exposure Bracket
AF
Auto Focus
DIS
Digital Image Stabilisation
DPOF
Digital Print Order Format
EV
Exposure Value
OIS
Optical Image Stabilisation
WB
White Balance
6
Expressions used in this manual
Pressing the shutter
Half-press [Shutter]: press and hold the shutter halfway down
Press [Shutter]: press the shutter all the way down
Half-press [Shutter]Half-press [Shutter]
Press [Shutter]Press [Shutter]
Subject, background, and composition
Subject: the main object of a scene, such as a person, animal,
or still life
Background: the objects around the subject
Composition: the combination of a subject and background
SubjectSubject
CompositionComposition
BackgroundBackground
Exposure (Brightness)
The amount of light that enters your camera is called exposure.
You can alter the exposure with shutter speed, aperture value,
and ISO speed. By altering the exposure, your photos will be
darker or lighter.
Overexposure (too bright)Overexposure (too bright)
Normal exposureNormal exposure
7
Quick search
Taking photos of people
4 mode > PORTRAIT,
CHILDREN, SELF SHOT
f
20
5 mode
f
21
Red Eye, Red Eye Fix
(to prevent or correct red-eye)
f
33
Face Detection, Self Portrait, Smile Shot,
Blink Detection
f
38
Taking photos at night or in the dark
6 mode
f
20
4 mode > DAWN, FIREWORK
f
20
Flash options
f
33
ISO speed (to adjust the sensitivity to light)
f
35
Taking photos of an action
Adjust shutter speed in the 8 mode
f
22
Continuous, High Speed, M. Capture
f
44
Taking photos of food, insects, or
flowers
4 mode > CLOSE UP, FOOD
f
20
Macro, Auto Macro
(to take close-up photos)
f
36
White balance (to change the colour tone)
f
42
Adjusting the exposure (brightness)
Adjust exposure in the 8 mode
f
22
ISO speed (to adjust the sensitivity to light)
f
35
EV (to adjust exposure)
f
40
ACB (to compensate for subjects against
bright backgrounds)
f
41
Metering
f
42
AEB (to take three photos of the same
scene with different exposures)
f
44
Applying a different effect
Photo Style (to apply a different tone)
f
45
Effect (to apply a different colour filter)
f
45
Adjust saturation, sharpness, or contrast
f
46
Reducing camera shake
Optical Image Stabilisation (OIS)
f
18
7 mode
f
21
Deleting all files in the
memory card
f
50
Viewing files in a slide show
f
52
Viewing files on a TV or
HDTV
f
59
Connecting your camera to
a computer
f
61
Adjusting sound and
volume
f
69
Adjusting the brightness of
the display
f
69
Changing the language
displayed on the screen
f
69
Setting the date and time
f
69
Formatting the memory
card
f
70
Troubleshooting
f
76
8
1. Basic functions ................................................................. 10
Camera layout ............................................................. 11
Icons ............................................................................ 13
Turning your camera on or off ...................................... 14
Using the touch screen ................................................ 15
Setting the display .......................................................... 16
Taking photos .............................................................. 17
Zooming ........................................................................ 17
Reducing camera shake (OIS) .......................... 18
2. Extended functions .......................................................... 19
Shooting modes .......................................................... 20
2 Using the Auto mode ........................................... 20
6 Using the Night mode ............................................... 20
4 Using the Scene mode ..................................... 20
7Using the Dual IS mode ...................................... 21
5 Using the Beauty Shot mode ..................................... 21
1 Using the Program mode ............................................ 22
8 Using the Manual mode ............................................. 22
3 Recording a video .................................................... 24
Tips for getting a clearer photo ........................................ 26
Recording voice memos .............................................. 28
Recording a voice memo ................................................ 28
Adding a voice memo to a photo ..................................... 28
3. Shooting options .............................................................. 29
Selecting a resolution and quality ................................. 30
Selecting a resolution ..................................................... 30
Selecting a quality .......................................................... 31
Using the timer and remote control .............................. 32
Shooting in the dark ..................................................... 33
Preventing red-eye .......................................... 33
Using the flash ............................................................... 33
Adjusting the ISO speed .................................. 35
Changing the camera’s focus ...................................... 36
Using macro ................................................... 36
Using auto focus ............................................. 36
Using touch focus ........................................... 37
Adjusting the focus area ................................... 37
Using face detection .................................................... 38
Adjusting brightness and colour ................................... 40
Adjusting the exposure manually ....................... 40
Compensating for backlighting ......................... 41
Changing the metering option .......................... 42
Selecting a light source (White balance) ............ 42
Using burst modes ...................................................... 44
Improving your photos ................................................. 45
Applying photo styles ...................................... 45
Applying colour ............................................... 45
Adjusting your photos ..................................................... 46
Red-eye
EV
ACB
Metering
Photo style
Color effect
ISO speed
Macro
AF area
AF
OIS
WB
Contents
Touch AF
9
4. Playback/Editing ............................................................... 47
Playing back ................................................................ 48
Starting Playback mode .................................................. 48
Viewing photos .............................................................. 51
Playing a video ............................................................... 53
Playing voice memos ...................................................... 54
Editing a photo ............................................................ 55
Rotating a photo ............................................................ 55
Resizing photos ............................................................. 55
Editing colour ................................................................. 56
Applying a special effect ................................................. 56
Correcting exposure problems ........................................ 57
Creating a print order ....................................... 58
Viewing files on a TV or HDTV ...................................... 59
Transferring files to your computer ............................... 61
For Windows users ........................................................ 61
For Mac users ............................................................... 64
Printing photos with a photo printer .............. 65
5. Appendix ............................................................................ 67
Camera settings menu ................................................. 68
Accessing the settings menu .......................................... 68
Sound setting ......................................................... 69
Display setting ......................................................... 69
Camera setting ........................................................ 70
Connection setting .................................................... 71
Error messages ............................................................ 72
Camera maintenance ................................................... 73
Cleaning your camera ..................................................... 73
About memory cards ...................................................... 74
About the battery ........................................................... 75
Before contacting a service centre ............................... 76
Camera specifications .................................................. 79
Index ............................................................................ 83
Contents
DPOF
PictBridge
1. Basic functions
Learn about your camera’s layout, icons, and
basic functions for shooting.
1. Basic functions
Camera layout ............................................... 11
Icons ............................................................... 13
Turning your camera on or off .................... 14
Using the touch screen ............................... 15
Setting the display ......................................... 16
Taking photos ............................................... 17
Zooming ........................................................ 17
Reducing camera shake (OIS) ....................... 18
Basic functions
11
Camera layout
Icon Mode Description
2
AUTO
Take a photo quickly and easily with minimal
settings
1
PROGRAM
Take a photo by setting options (except for
shutter speed and aperture value)
8
MANUAL
Take a photo by setting options manually
7
DUAL IS
Take a photo with options suitable for
reducing camera shake
Icon Mode Description
6
NIGHT
Take a photo with options for shooting at
night
5
BEAUTY
SHOT
Take a photo of a person with options to hide
facial imperfections
4
SCENE
Take a photo with options for a preset scene
3
MOVIE
Record a video
Flash unit
When the flash is needed,
the flash unit opens
automatically when you
press [Shutter]
(Press down gently to close).
While not in use, keep the flash unit closed to
prevent damage.
Forcing open the flash unit may cause damage
to your camera.
Remote control
sensor
Mode dial
See below
Shutter button
POWER button
Lens
AF-assist light/Timer lamp
Microphone
Basic functions
12
Camera layout
Status lamp
Blinking: When saving a photo or video, recording a voice
memo, being read by a computer or printer, or out of focus
Steady: When connecting to a computer or in focus
Zoom T/Expand button
Zoom W/Thumbnail button
Touch screen
MENU button
Access the camera
settings menu
Playback button
Speaker
Battery chamber cover
Insert a memory card and battery
USB and A
/
V port
Tripod mount
Basic functions
13
Icons
The icons displayed will change according to the selected mode or options you set.
B. Touch icons
Icon Description
Selected photo style
Select a white balance
Adjust the exposure with ACB
Select a display type
Return to the previous screen
Select a scene
Select an ISO speed
Adjust the brightness of the face
Adjust the exposure manually
Adjust the shutter speed
Adjust imperfections of the face
Select an aperture value
Select an auto focus option
Select a flash option
Select a video resolution
Select a photo resolution
A. Main display
Icon Description
Selected shooting mode
: Fully charged
: Partially charged
: Charging needed
Internal memory
Memory card inserted
Available number of photos
Available recording time
Optical Image Stabilisation (OIS)
Current date and time
Zoom ratio
Voice memo
Auto focus frame
Camera shake
Option set 1 (of 3)
A
B
Icon Description
Select a frame rate
Select a face detection option
Select a focus area option
Select a burst type
Select a metering option
Select photo quality
Select a timer option
Add a voice memo to a photo or
record a voice memo
Set the Optical Image
Stabilisation option
Apply a colour effect
Adjust sharpness
Adjust contrast
Adjust saturation
Display another row of options
Basic functions
14
Turning your camera on or off
Press [POWER] to turn your camera on or off.
In Playback mode
Press [Playback] to view stored files.
Press and hold [Playback] to mute camera sounds.
Basic functions
15
Using the touch screen
Learn basic actions to use the touch screen. The touch screen works best when touched with the soft part of your finger.
Do not use any sharp objects to touch the screen. Doing so may damage the screen.
Touching
Touch an icon to open a menu or set an option.
The screen may not recognise your touches correctly when:
you touch multiple items at the same time
you use the camera in high humidity environments or
with a wet finger
you use the camera with an LCD protection film or
another LCD accessory
-
-
-
Dragging
Drag your finger left or right to scroll horizontally.
Drag your finger up or down to scroll vertically.
Volume
Beep Sound
Shutter Sound
Start Sound
AF Sound
Volume
Beep Sound
Shutter Sound
Start Sound
AF Sound
Medium
Sound 1
Sound 1
Off
On
Medium
Sound 1
Sound 1
Off
On
Basic functions
16
Setting the display
Selecting a display type
Select a style of display for Shooting or Playback mode.
c
Touch
c
Touch
d
Touch
d
Touch
Option Available mode Description
Full
Shooting,
Playback
Display the name of an option
when you touch an icon.
Hide
Shooting,
Playback
Hide icons on the screen if you
perform no operations for 3
seconds (touch the screen to
display icons again).
Basic Playback
Display icons without the name of
an option.
Function
Description
Shooting
Display the name of an option
and a brief description when you
touch an icon.
Using the touch screen
Setting a start image
Set a start image to be displayed when the camera is turned on.
1
In Playback mode, press [MENU].
2
Touch ¡Start Image ¡ User Image.
3
Touch .
4
Select a photo and touch .
If there are no images, you must first take a photo.
5
Set a start image.
c
Touch
c
Touch
d
Touch
d
Touch
Only one start image will be saved in the internal memory.
If you select a new photo as a start image or reset your camera, the
current image will be deleted.
A wide image or image in 3:2 ratio cannot be set as a start image.
Basic functions
17
Taking photos
1
Rotate the mode dial to 2.
2
Align your subject in the frame.
3
Half-press [Shutter] to focus.
Green: In focus
Red: Out of focus
Green: In focus
Red: Out of focus
4
Press [Shutter] to take a photo.
Zooming
You can shoot close-up photos by adjusting the zoom. Your
camera has a 3.6X optical zoom and 5X digital zoom. By using
both, you can zoom in up to 18 times.
Press or press and hold [T] to zoom in on your subject. Press or
press and hold [W] to zoom out.
Zoom ratioZoom ratio
Zoom inZoom in
Zoom outZoom out
Basic functions
18
Digital zoom
If the zoom indicator is in the digital range, your camera is using
the digital zoom. The picture quality may deteriorate when you
use the digital zoom.
Optical rangeOptical range
Zoom indicatorZoom indicator
Digital rangeDigital range
The digital zoom is not available when using 7, 6, 5,
4(in some scenes), and 3 modes and when used with
High Speed, M. Capture, or Face Detection.
It may take longer to save a photo when using the digital zoom.
The focus area will be set to Center AF when using the digital zoom.
Reducing camera shake (OIS)
Reduce camera shake optically in Shooting mode.
1
In Shooting mode, touch ¡ .
(In some modes, touch
twice.)
2
Set an option.
If you set the option to on, will appear on top of the
screen.
c
Touch
c
Touch
d
Touch
d
Touch
Optical Image Stabilisation (OIS) may not function properly when:
you move your camera to follow a moving subject
you use digital zoom
there is too much camera shake
the shutter speed is slow
(e.g., when shooting in the 6 mode)
the battery is low
you take a close-up shot
If you use the OIS function with a tripod, your images may be blurred
by the vibration of the OIS sensor. Deactivate the OIS function when
you use a tripod.
-
-
-
-
-
-
Taking photos
2. Extended functions
Learn how to take a photo by selecting a mode
and how to record a video or voice memo.
2. Extended functions
Shooting modes ........................................... 20
2 Using the Auto mode ......................... 20
6 Using the Night mode .............................. 20
4 Using the Scene mode .................... 20
7Using the Dual IS mode .................... 21
5 Using the Beauty Shot mode ................... 21
1 Using the Program mode .......................... 22
8 Using the Manual mode ........................... 22
3 Recording a video ................................... 24
Tips for getting a clearer photo ...................... 26
Recording voice memos ............................. 28
Recording a voice memo .............................. 28
Adding a voice memo to a photo .................. 28
  • Page 1 1
  • Page 2 2
  • Page 3 3
  • Page 4 4
  • Page 5 5
  • Page 6 6
  • Page 7 7
  • Page 8 8
  • Page 9 9
  • Page 10 10
  • Page 11 11
  • Page 12 12
  • Page 13 13
  • Page 14 14
  • Page 15 15
  • Page 16 16
  • Page 17 17
  • Page 18 18
  • Page 19 19
  • Page 20 20
  • Page 21 21
  • Page 22 22
  • Page 23 23
  • Page 24 24
  • Page 25 25
  • Page 26 26
  • Page 27 27
  • Page 28 28
  • Page 29 29
  • Page 30 30
  • Page 31 31
  • Page 32 32
  • Page 33 33
  • Page 34 34
  • Page 35 35
  • Page 36 36
  • Page 37 37
  • Page 38 38
  • Page 39 39
  • Page 40 40
  • Page 41 41
  • Page 42 42
  • Page 43 43
  • Page 44 44
  • Page 45 45
  • Page 46 46
  • Page 47 47
  • Page 48 48
  • Page 49 49
  • Page 50 50
  • Page 51 51
  • Page 52 52
  • Page 53 53
  • Page 54 54
  • Page 55 55
  • Page 56 56
  • Page 57 57
  • Page 58 58
  • Page 59 59
  • Page 60 60
  • Page 61 61
  • Page 62 62
  • Page 63 63
  • Page 64 64
  • Page 65 65
  • Page 66 66
  • Page 67 67
  • Page 68 68
  • Page 69 69
  • Page 70 70
  • Page 71 71
  • Page 72 72
  • Page 73 73
  • Page 74 74
  • Page 75 75
  • Page 76 76
  • Page 77 77
  • Page 78 78
  • Page 79 79
  • Page 80 80
  • Page 81 81
  • Page 82 82
  • Page 83 83
  • Page 84 84
  • Page 85 85
  • Page 86 86
  • Page 87 87

Samsung SAMSUNG NV100HD User manual

Category
Bridge cameras
Type
User manual

Ask a question and I''ll find the answer in the document

Finding information in a document is now easier with AI